What is Microsoft Cloud for Health Care…?

Hi Folks,

Have you heard about this before?

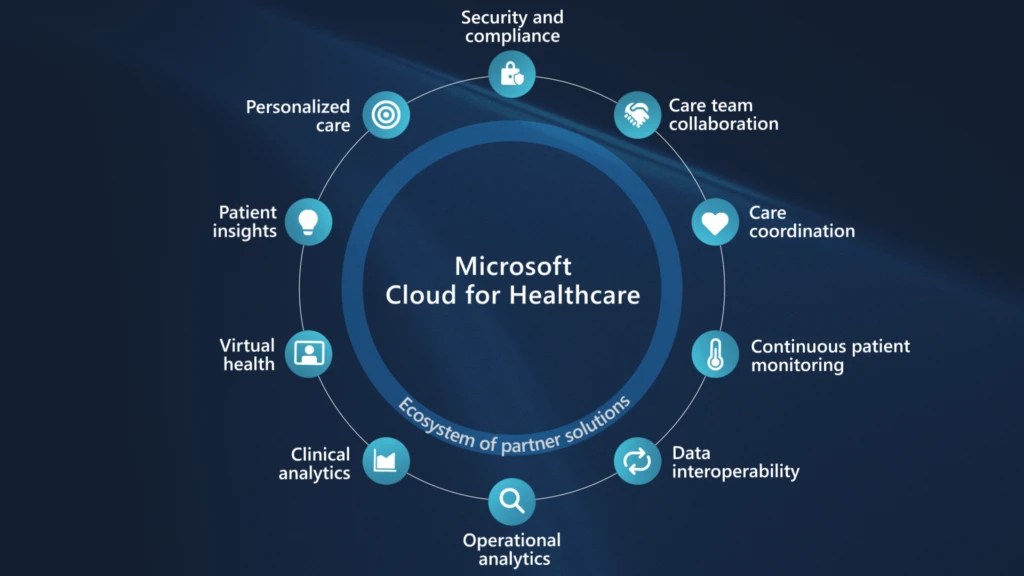
Microsoft Cloud for Healthcare provides capabilities to manage health data at scale and make it easier for healthcare organizations to improve the patient experience, coordinate care, and drive operational efficiency, while helping support security, compliance, and interoperability of health data.

Microsoft Cloud for Healthcare includes solutions that are built on capabilities within Microsoft Dynamics 365, Microsoft 365, Microsoft Azure, and Microsoft Power Platform.

This is an introduction blog post. Firstly, Microsoft Cloud for Healthcare solution should be installed from Microsoft Cloud Solution Center. To say about Microsoft Cloud Solution Center, it actually checks for requirements such as licenses, dependencies, and enables you to easily discover and deploy capabilities and solutions in Microsoft Cloud for Healthcare, there by simplifying the deployment process from a single location.

We will see what are the prerequisites.

Prerequisites

  • You must be a tenant admin, Dynamics 365 admin, or Power Platform admin to deploy Microsoft Cloud for Healthcare solutions.
  • You must have licenses for the Microsoft Cloud for Healthcare solutions and apps that you’re deploying. If your organization doesn’t have the necessary licenses, you’ll be notified during the deployment process in Solution Center.

Here are the solutions that are part of Microsoft Cloud for Healthcare, for each solution. We need to keep in mind that:

  • Some solutions have predeployment setup requirements.
  • Some solutions require configuration or have additional capabilities that you can set up after deployment.
SolutionDependencies
Patient accessPower Pages, Dynamics 365 Customer Service
Patient service centerDynamics 365 Customer Service, Digital Messaging add-on for Dynamics 365 Customer Service
Patient outreachDynamics 365 Marketing
Patient insight cardsDynamics 365 Sales Premium
Care managementDynamics 365 Customer Service*
Home healthDynamics 365 Field Service
Data integration toolkitPower Apps
Unified patient viewPower Apps
Patient trends (preview)Power Apps, Dynamics 365 Customer Insights
Patient population dashboard (preview)Power BI
Provider data modelPower Apps
Payor data model (preview)Power Apps
Life sciences data model (preview)Power Apps
Virtual VisitsMicrosoft Teams
Text analytics for healthAzure subscription
Azure IoT for healthcareAzure subscription
Azure Health BotAzure subscription
Azure Health Data ServicesAzure subscription
Healthcare database templatesAzure subscription
Health document intelligenceAzure subscription

There were a ton of Microsoft Azure capabilities to explore which I will do in my upcoming blog posts. So here, I am using a personal Azure subscription and rest everything I will try to keep using Trial accounts as long as possible. So, you don’t need to worry if you will charge just to try it out.

Also, with the advent of AI, health care industry is getting revolutionized.

Interested…? Then keep looking this space as I will explore more with all of you. Stay tuned…

Cheers,

PMDY

Show last refreshed time for your Power BI Reports in Import Mode – Quick Tip

Hi Folks,

If you are working on Power BI, this is a good to know tip.

In case you were using Import mode which is by default suggested by Microsoft for medium or small-scale datasets as it uses Vertipaq engine for improved performance and compression, this post is definitely for you.

Did your user ever asked why they were not able to see latest data in the report. Possibly you could have said it is because of refresh frequency.

Then you could have thought if there was a nice way to show when the dataset was last refreshed. This definitely help your users to have a clear idea of what’s going on.

FYI, the refresh frequency could be set in Power BI service as below for import mode.

In your Power BI report, click on Transform data.

Click on New Source –> Blank Query as below.

In the Query Fx expression…. enter the below expression to get the last refresh time and click on Tick symbol.

Next, click on To Table to create a table from this data as below.

Rename it to something meaningful like below.

Rename the Query1 variable as below..you should see the applied steps getting added for each operation you performed.

DateTime.LocalNow() gets the last refresh frequency of your dataset in your local time.

Click on Close & Apply

Now in your report, just add a card visual at the bottom right corner and drag the Last Refreshed On query.

That’s it, next time onwards, you should see the date and time when the refresh had occurred.

Cheers,

PMDY

Update your Model Driven App User personal settings in an easier way – Quick Tip

Hi Folks,

Did u ever been asked in your project to update the User Personal Settings….possibly you could have resorted to User Settings Utility in XrmToolBox…may be you could have updated the settings manually for each user in list provided to you…

Do you know you could update them in bulk at one shot in a much easier way, so you don’t need to update it manually one by one. I could see many blog posts talking about updating through this tool, but this was missed in those.

Scenario:

You have newly added users to your Azure Active Directory, now you need to set up the user personal settings for them so see proper time zone in Dynamics.

There were two ways:

  1. Use a view
  2. Choose users from FXB(Fetch XML Builder)

The first approach is easiest of course…

For this, lets create a view Users with Security in user entity as below…you know that you could only update settings for those who were having security role.

Mainly the user need prvReadUserSettings privilege to update the personal settings, the tool doesn’t allow if not.

Once you have connected to the environment, click on Load Users and settings. Now just select the view which have created before…upon selecting the tool will list down all the active users satisfying the view criteria.

All you need is to click on Check all and there by selecting all the users satisfying your filter criteria, change the settings as per your needs on the right-hand side of the tool and click on Update User(s) Settings in one go.

Here I have 3 users in the view, all were updated in one shot…

Isn’t it easy, this trick will save you a lot of time if your user list grows…

Cheers,

PMDY

Deploying Solutions using Power Platform CLI

In my previous blog post, I have already explained how you can utilize Power Pipelines which is the OOB Dynamics 365 Product capability.

Power Platform have many ways where we can deploy our solutions to higher environments…in this blog post, we will see how we can utilize Power Platform CLI to deploy our solutions.

Prerequisites: Power Platform CLI

If you don’t have installed yet in your machine, you can download Power Platform CLI from this link in either of the ways below

1.Install using Power Platform Tools for Visual Studio Code

2. Install Power Platform CLI for Windows using PowerShell

Once you got this installed, make sure you set your environment variable in your machine as below

Then you can use your favorite IDE or Command line. I personally recommend using Visual Studio Code because of the flexibility it offers and ease of installation, use.

Export and Import can be done very easily with CLI with a few commands once you were authenticated with your instance.

For authentication with your instance. Open a new terminal in visual studio code.

pac auth create –name powermvps1 –url <give your org URL here> –username <give your username here> –password <give your password here>

As below..

Once you have set up correctly, it will show that it is connected.

Now in order to export your solution..use the below commands from Vs Code

pac solution export –path <Path of the Solution Zip file> –name <Solution Name> –managed false –include general

As below..

You should see a Solution zip file got created with the same name as mentioned above…

Similarly, u can import solutions using CLI..

Here I have a solution named ecellorstest in the same folder in my machine..

Let’s try to import using CLI..inorder to import your solution,use the below commands from Vs Code…

pac solution import –path <Solution Zip file path> –activate-plugins true –publish-changes true –async true

As below..

If we check in our instance, we see the solution is imported…

That’s it, how easy it was…however I have detailed about only a part of full capabilities of Power Platform CLI, its uses are unimaginable.

Reference: Power Platform CLI for Solutions

Cheers,

PMDY