Exploring Power Platform and Beyond: Features, Experiences, Challenges, Solutions all in one place
Author: Pavan Mani Deep Y
Passionate for Power Platform. A technology geek who loves sharing the leanings, quick tips and new features on Dynamics 365 & related tools, technologies. An Azure IOT and Quantum Computing enthusiast...
This blog post is all about the latest features released in Power BI Desktop for DAX(Data Analysis Expressions) using DAX Query View.
Do you have the requirement any time to document your DAX functions used in your Power BI Report, then use the DAX query view which introduced new DAX functions to get metadata about your semantic model with the INFO DAX functions.
Firstly, if you were not aware, DAX Query view is the recent addition where we can query the model similar to how the analysts and developers used Power BI Desktop or other 3rd party tools to get the same information earlier. You can access DAX Query view as below in green.
When you navigate to the DAX Query view, key points to note are as below
DAX Queries will be directly saved to your Model when saved from DAX Query View
DAX Query View will not be visible when the Power BI Report is published to the Power BI Service
The results of the DAX will be visible at the bottom of the page as shown below
IntelliSense is provided by default
There were 4 DAX INFO.VIEW Functions introduced as below
List all your Measures using INFO.VIEW.MEASURES() This lists down all the measures in your Semantic Model, it also provides the Expression used for the Measure along with which table it was created.
I have selected the whole results of the measures and Copy the results you see see in the table below
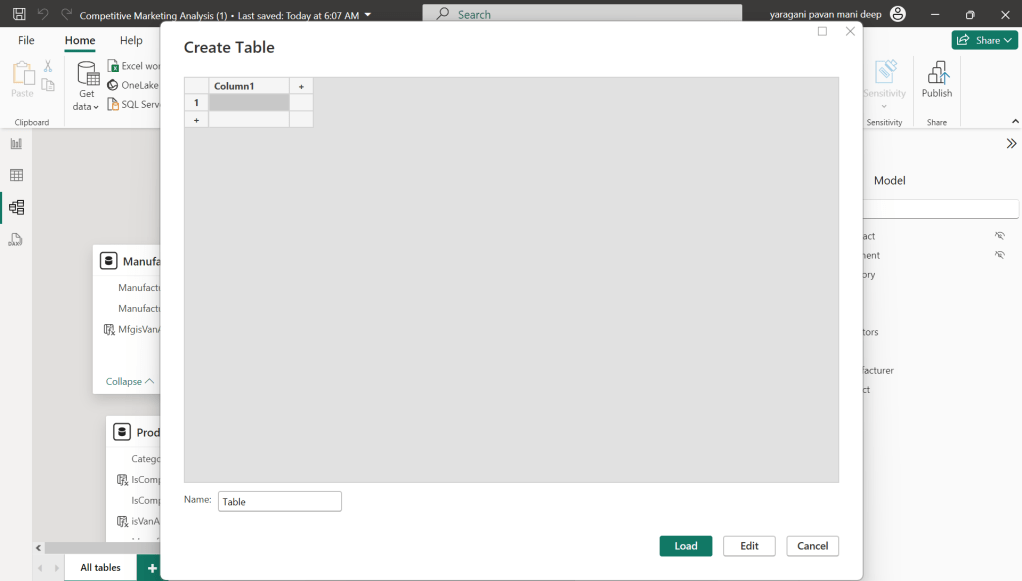
Just go to Model View and click Enter Data
You will be shown a screen like this
Just do a Cntrl + V as you have previously copied the table information
That’s it, how easy it was to document all the Measures, similarly you can document all the Meta Data available for the Power BI Report.
That’s it for today, hope you learned a new feature in Power BI Desktop…
Last week Microsoft Power CAT Team had released a white paper on Power Automate Best Practices which is mainly for Power Automate Developers who want to scale up their Power Automate Flows in enterprise implementations.
It has been extremely useful and insightful, so I thought of sharing with everyone again.
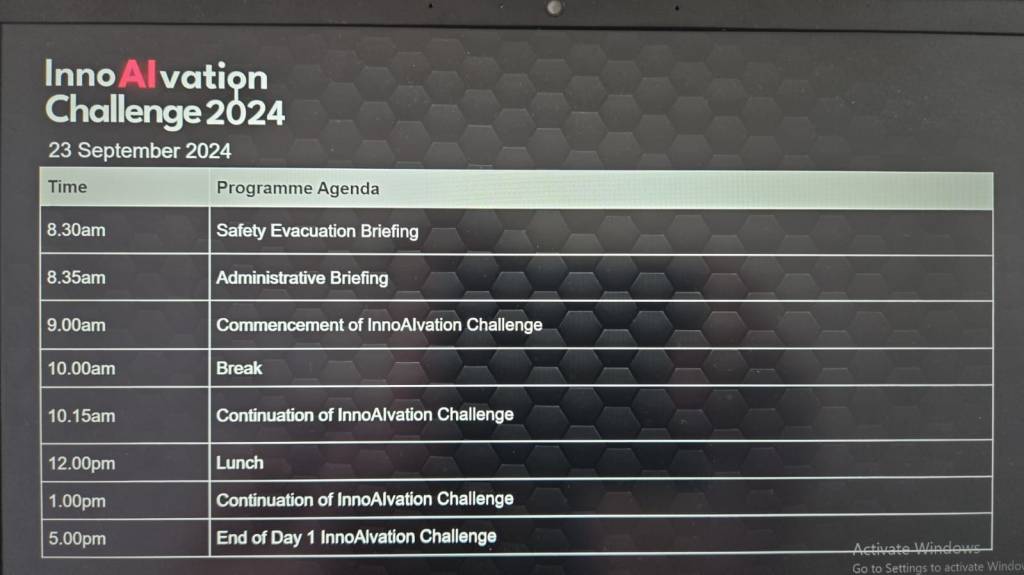
Excited to share about the recently held AI Innovation Day Bootcamp and Hackathon 2 day event organized by Microsoft, Singapore on September at Seatrium, 80 Tuas S Blvd, Singapore, SG, 6265 1766.
🗣️ Business User Feedback & Reflections
Solutions buit by Seatrium employees based on the engagement and the type, thanks to David Choo, Seatrium Microsoft Technical Account Manager for spearheading this Initiative.
Seatrium management officially sent a thank you note to MVPs Pavan Mani Deep Yaragani, Goloknath Mishra, Senthami Selvan for spending 3 valuable days for this event making it a grand success.
The event took place like below
Day Microsoft Singapore with Seatrium Hackathon Particpants for prepartion on 16 September
AI Innovation Day – 1 – 23 September, 2024.
AI Innovation Day – 2 – 24 September, 2024.
AI Innovation Day – Evaluation and Awards
Below were some the feedback from different business user teams.
🛠️ Operations & Production Team:
“We’ve been struggling with manual job task cards for years—seeing OCR and Copilot Studio digitize it in just two days was mind-blowing!”
“Tracking welder certifications used to take hours each week. Now, with this Power App, we can do it in seconds.”
📦 Supply Chain:
“This predictive maintenance idea using AI was something we thought only big tech could do. I didn’t expect we could prototype it so fast with Azure AI and Power Platform!”
“The Power BI dashboards finally give us a single view of procurement metrics without needing to export Excel sheets all day.”
🏗️ Engineering:
“We’ve been manually cross-checking MTOs and standards forever—having AI do that gives us back our time to actually focus on engineering work.”
“It’s amazing to see a tool extract information from drawings and relate it to VCDs without manual effort.”
💻 Group IT & HR:
“That SharePoint Copilot FAQ bot is going to save us a ton of IT support emails—super impressive.”
“Invoice checking and validation was one of our most time-consuming tasks—now it’s automated and way more reliable.”
📊 Commercial & Planning:
“We finally saw what Microsoft Fabric can do for project-level KPIs and dashboards. We’re excited to explore more.”
“This was one of the most hands-on, practical hackathons we’ve had. It wasn’t just ideas, we actually saw working solutions.”
One of my colleagues asked about Dataverse search, hence I am writing this article on Dataverse Search in Dynamics 365 and in the end, will compare different search options available in Dynamics 365.
Dataverse Search:
In layman terms, Dataverse Search is a powerful search tool that helps you find information quickly across your organization’s data in Microsoft Dataverse, which is the underlying data platform for apps like Power Apps, Dynamics 365, and more, shows you all the related information from across different tables or records in one place.
In short, Dataverse Search is the evolved version of Relevance Search, offering a more robust, faster, and user-friendly search experience including search results for text in documents that are stored in Dataverse such as PDF, Microsoft Office documents, HTML, XML, ZIP, EML, plain text, and JSON file formats. It also searches text in notes and attachments. Before enabling it, just note that once Dataverse search is enabled, it will be affected in all your Model Driven Apps, as of now, just take note.
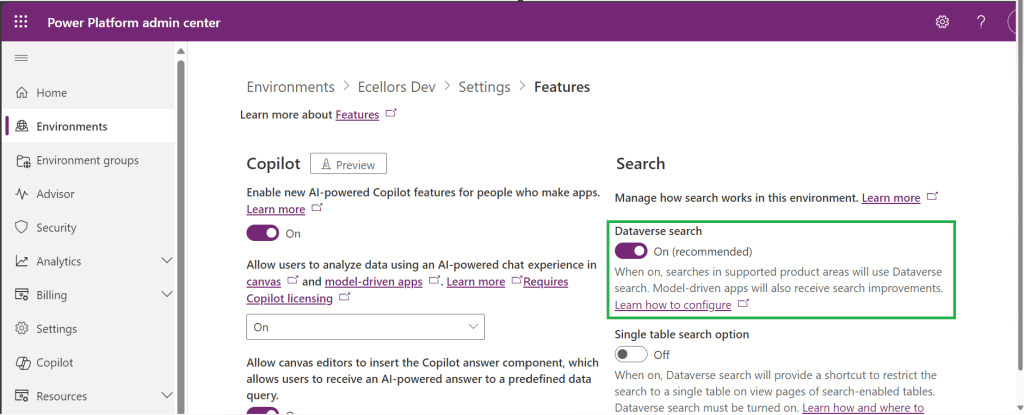
It is on by default, here is where you can now turn off the Dataverse Search:
Click on Environments –> Choose your required environment –> Settings –>Features
3. Disable/Enable the Dataverse search feature.
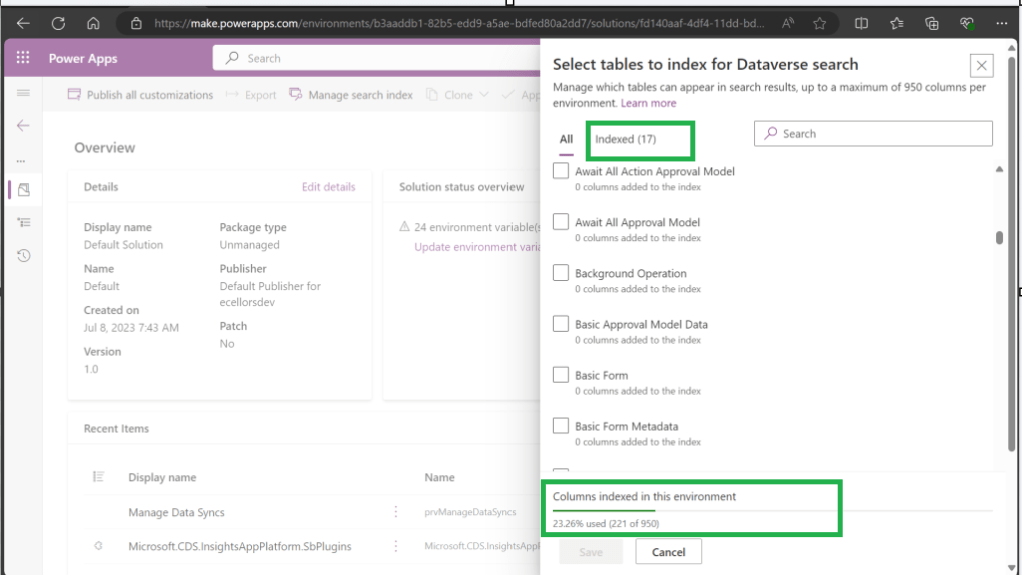
Once enabled, we need to configure the tables for Dataverse Search so that indexing is performed at the backend, in order to do this…
Navigate to https://make.powerapps.com, select your desired solution –> Click on Overview as shown below
Now you need to choose Manage Search Index and you can choose your desired table and fields, there isn’t a limit on the number of tables you can configure, but there is a limit on the number of fields you can configure for an environment, a maximum of 1000 fields are permitted both including system and custom fields, 50 fields are used by system, so you can configure 950 fields.
Just note that some field types are treated as multiple fields in the Dataverse search index as indicated in this table.
Field type
Number of fields used in the Dataverse search index
Lookup (customer, owner, or Lookup type attribute)
3
Option Set (state, or status type attribute)
2
All other types of fields
1
At the bottom of the snap above, you could see the percentage of columns indexed in this environment.
When Dataverse search is enabled, the search box is always available at the top of every page in your app. You can start a new search and quickly find the information that you’re looking for.
When Dataverse search is turned on, it becomes your default and only global search experience for all of your model-driven apps. You won’t be able to switch to quick find search also known as categorized search.
You can also enable Quick actions as shown in the below table
Table
Quick actions
Account
Assign, Share, Email a link
Contact
Assign, Share, Email a link
Appointment
Mark complete, Cancel, Set Regarding, Assign, Email a link
Task
Mark complete, Cancel, Set Regarding, Assign, Email a link
Phone Call
Mark complete, Cancel, Set Regarding, Assign, Email a link
Email
Cancel, Set Regarding, Email a link
Here is the short table comparing all types of searches in Dynamics 365…
Yes. Note: For non-production environments an administrator must manually enable it.
Yes, for the table grid. No, for multiple-table quick find (categorized search). An administrator must first disable Dataverse search before multiple-table grid find can be enabled.
Yes
Single-table search scope
Not available in a table grid. You can filter the search results by a table on the results page.
Available in a table grid.
Available in a table grid.
Multi-table search scope
There is no maximum limit on the number of tables you can search.
Searches up to 10 tables, grouped by a table.
Multi-table search not available.
Search behavior
Finds matches to any word in the search term in any column in the table.
Finds matches to all words in the search term in one column in a table; however, the words can be matched in any order in the column.
Query builder where you can define search criteria for the selected row type. Can also be used to prepare data for export to Office Excel so that you analyze, summarize,or aggregate data, or create PivotTables to view your data from different perspectives.
Searchable columns
Text columns like Single Line of Text, Multiple Lines of Text, Lookups, and Option Sets. Doesn’t support searching in columns of Numeric or Date data type.
All searchable columns.
All searchable columns.
Search results
Returns the search results in order of their relevance, in a single list.
For single-table, returns the search results in a table grid. For multi-table, returns the search results grouped by categories, such as accounts, contacts, or leads.
Returns search results of the selected row type with the columns you have specified, in the sort order you have configured.
Hope you learned something today…if you have any questions, do let me know in the comments…
This is the second blog post series on Canvas Apps where you can learn and grow from Zero – Hero in Canvas Power Apps. In this blog post, we will talk about different ways you can get started with creating canvas apps.
Introduction
Power Apps Canvas Apps allow users to build powerful applications with a drag-and-drop interface, requiring little to no coding. Whether you’re a beginner or an experienced user, setting up your first Canvas App is a straightforward process. This guide walks you through each step.
Basic knowledge of what you want to build (e.g., a simple data entry form).
Step 1: Accessing Power Apps Studio
There were different ways you can create a Canvas Apps
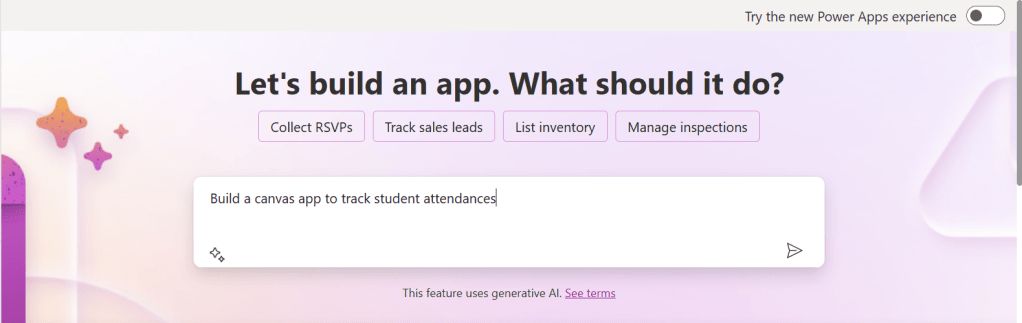
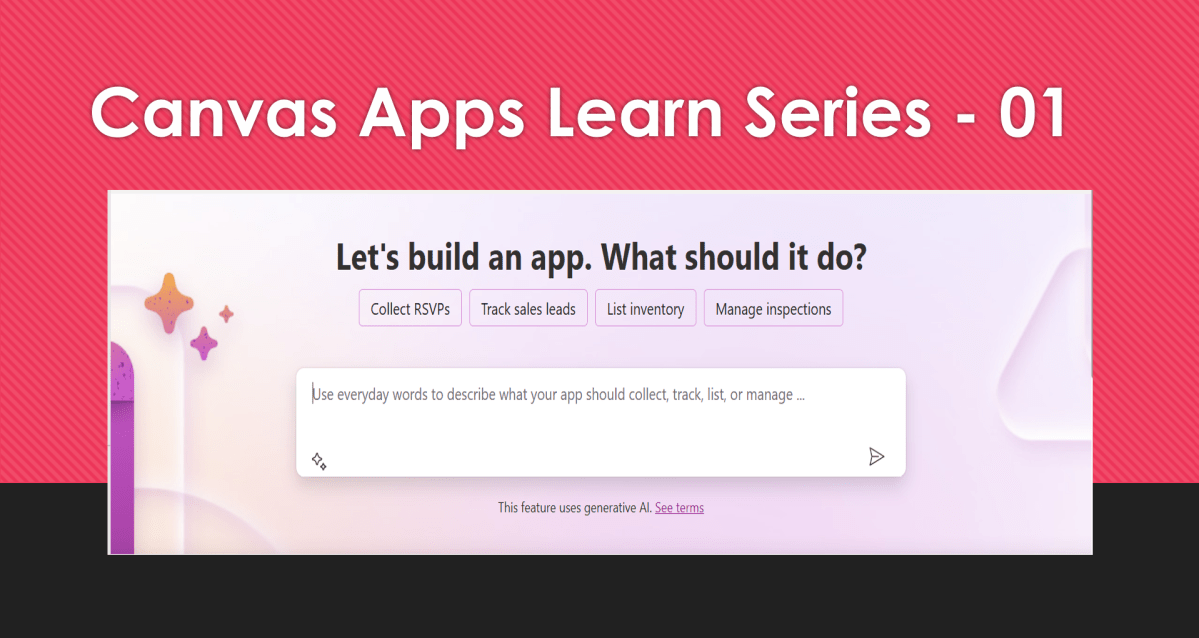
You can create a canvas app by giving your requirement in Copilot which will in turn build your Canvas Apps.
2. You can design them using any of the existing templates available
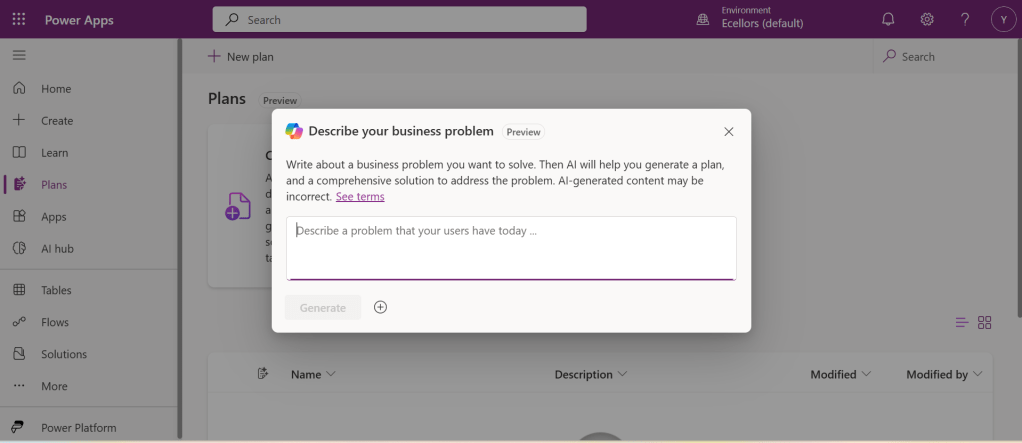
3. You can also design your App using Plan designer which is the latest feature released and still in preview, for this you need to enable
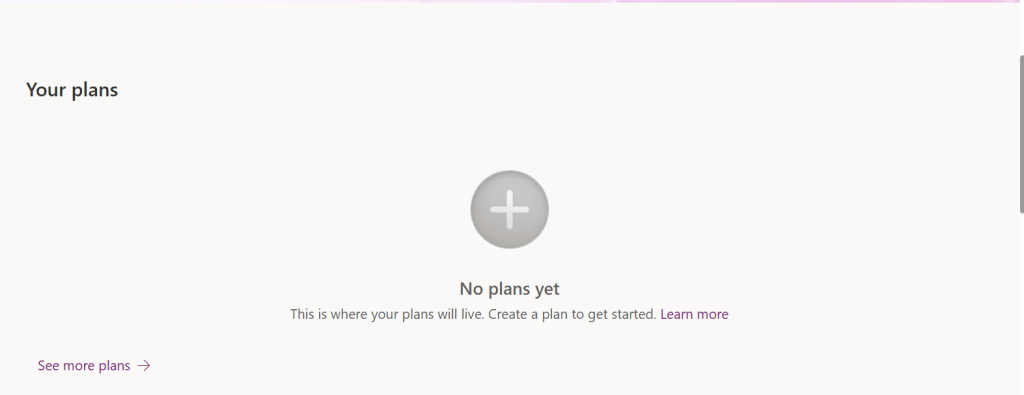
For this you need to have an plan available
You can click on See more plans option available, create new plans if necessary
You have to state your business problem, this is pretty much same as using the Copilot in the old experience but here you just tell what problem you have been solving by creating the App, that’s it.
I entered Tracking Student Attendances as my problem and within a matter of 1 min, it designed whole data model where you can accept or propose for a new change.
Once you accept, next it will go ahead and start preparing the data necessary.
After you accept this, it will start designing for the user experiences
Once everything is done, you
It will ask you to save in a solution, this way you will be able to save all your changes to a solution which can be safely moved across environments.
And that’s it, your fully functional app is ready in few mins.
Step 2: Designing Your App
Once inside the Power Apps Studio:
Drag and drop controls from the left-side panel to the canvas.
Add labels, text inputs, buttons, and galleries as needed.
Resize and align elements for a clean layout.
Below is the sample Power App screen in Studio containing the components.
Step 3: Connecting to a Data Source
Click on Data in the left panel.
Select Add data and choose a source like SharePoint, Dataverse, or Excel.
Connect your app to the data source.
Step 4: Adding Functionality with Formulas
Power Apps uses Excel-like formulas to add functionality. Example:
To navigate to another screen: Navigate(Screen2, ScreenTransition.Fade)
To filter data: Filter(Orders, Status="Pending")
Step 5: Previewing and Testing Your App
Click on the Play button in the top-right corner.
Test the app’s functionality.
Fix any layout or data issues as needed.
Image Suggestion: Screenshot showing the app running in preview mode.
Step 6: Saving and Publishing
Click File > Save As.
Choose Cloud as the storage option.
Click Publish to make your app available.
Image Suggestion: Screenshot of the Save & Publish screen.
Conclusion
Congratulations! You’ve built your first Canvas App. You can continue refining it by adding more features, integrating AI, or automating workflows.
Are you ready to explore more? Share your first Canvas App experience in the comments!
Do you want step by step guided walk through, then check this App in a Day Workshop from Microsoft where you can start from scratch and build a fully functional Canvas App.
This is a post related to Power Automate, I will try to keep it short giving a background of this first.
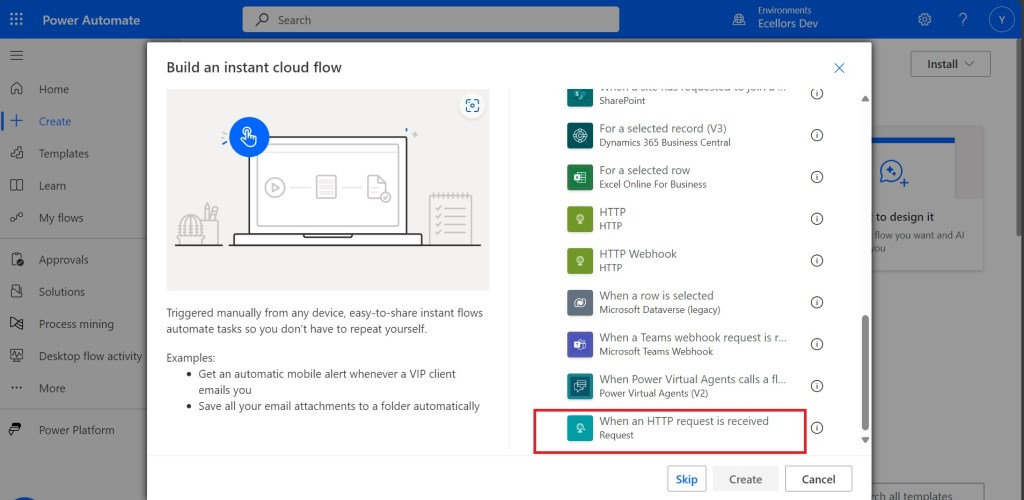
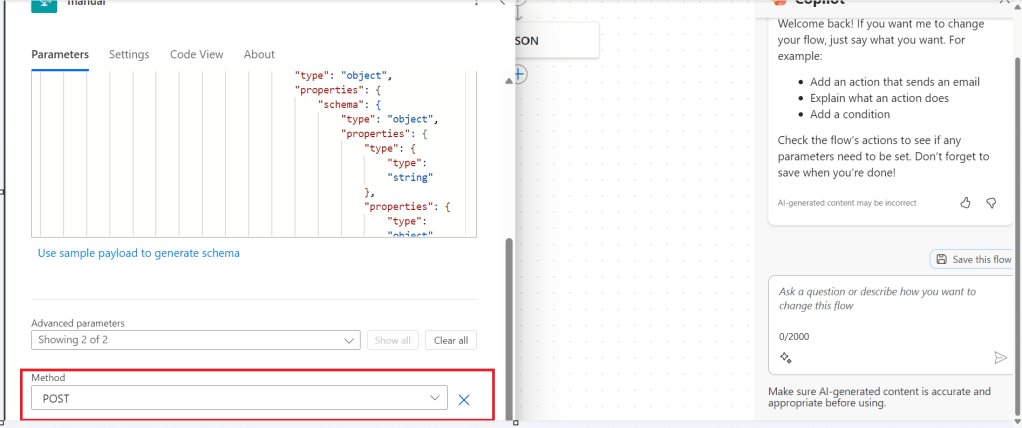
Recently we faced one issue with Power Automate where we had actually created a Power Automate Flow which uses the trigger ‘When a HTTP Request is received’ where for the request the method name is not specified in the trigger.
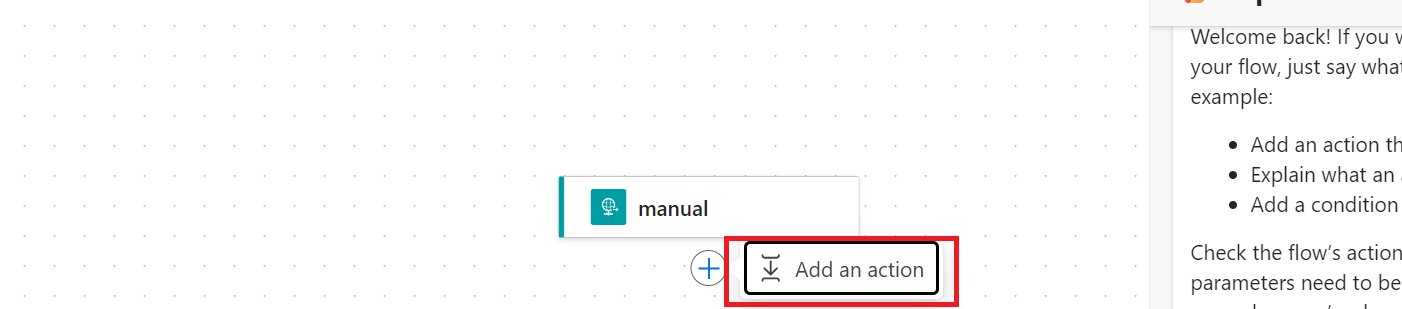
So, we need to update the existing flow without generating a new one as saving your Power Automate without giving Method name gave error which couldn’t be modified later. There was one way from the code but not the Power Automate editor, so here we would try to update the flow from code. I will show you two approaches after showing the existing flow steps.
Once installed, identify the Power Automate flow which you want to edit, once you were on this page, click on the extension –> Power Automate Tools
You can just modify the code and add the piece of step needed wherever required,
here I would add method name to my HTTP Trigger
I will add Post Method here
"method": "POST",
It will look like
You get a chance to validate and then click on save, even you will the same IntelliSense you would have on https://make.powerautomate.com
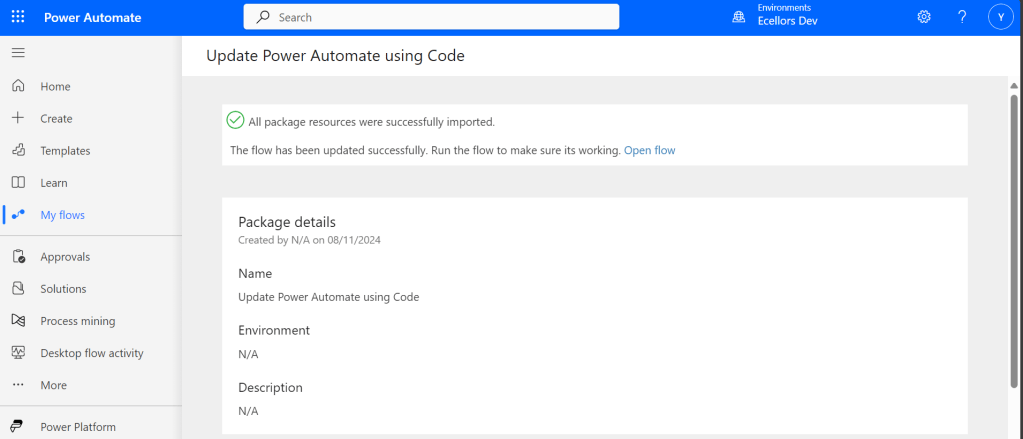
Upon saving, your Power Automate flow, an alert will be shown to you, and the flow will be updated.
Just refresh your Power Automate flow and check
That’s it, your flow is now updated.
Well, if your tenant have policies where you can’t use the Power Automate Tools extension, you can then follow this approach is easier as well.
For showing this one, I will remove the Method name Post again from the flow, save it and then update using below method.
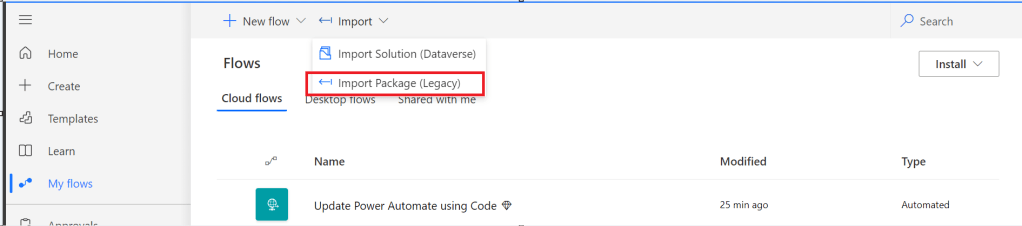
Export & Import method
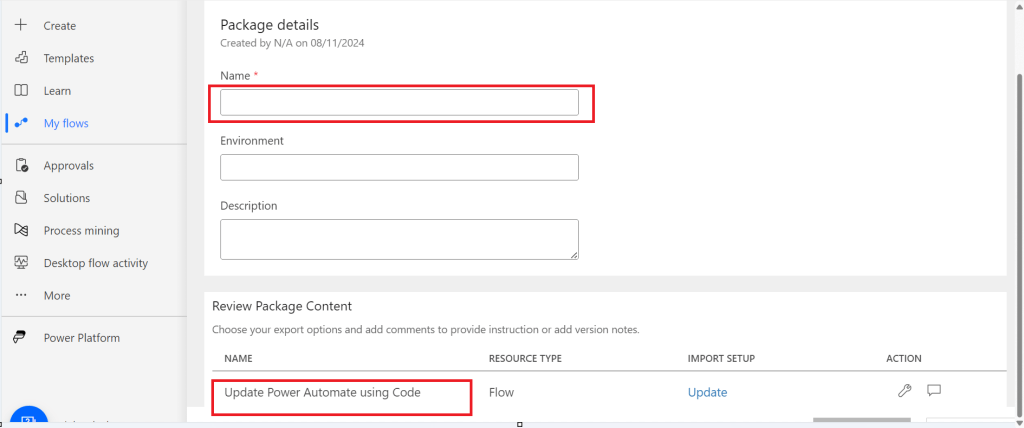
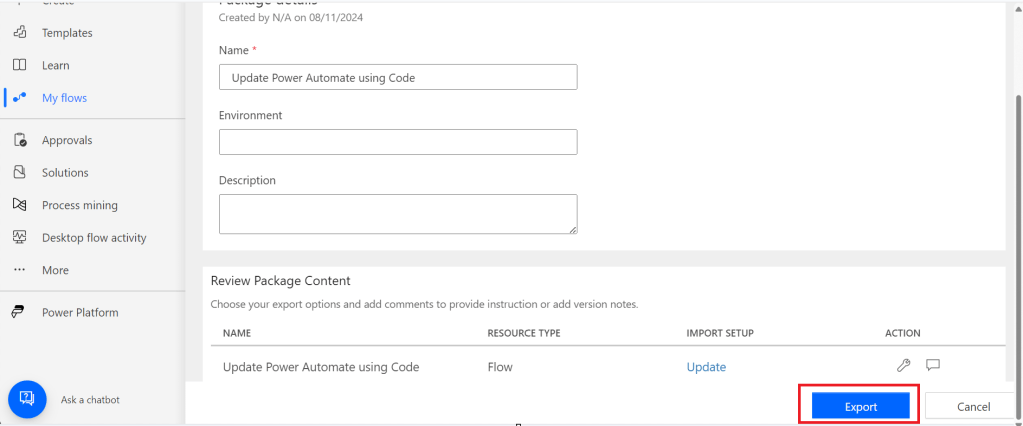
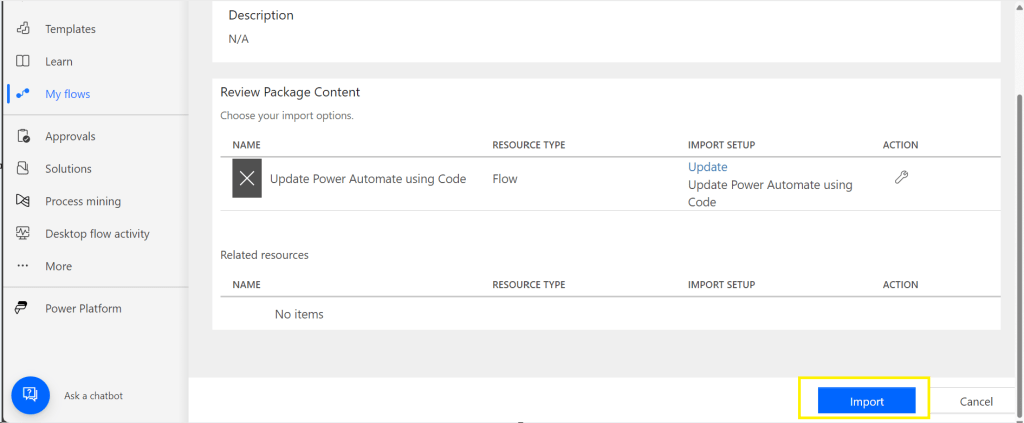
Here you would need to export the flow, here we would use the export via Package (.zip) method.
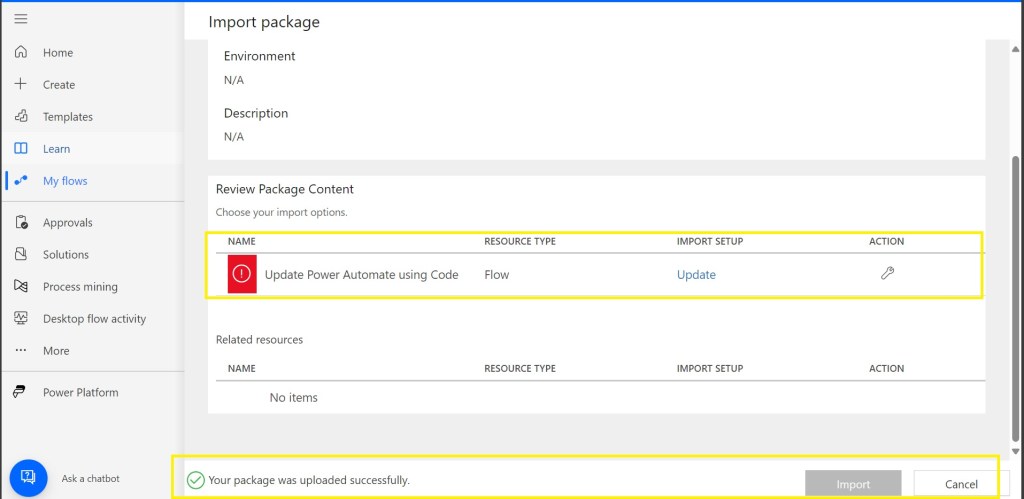
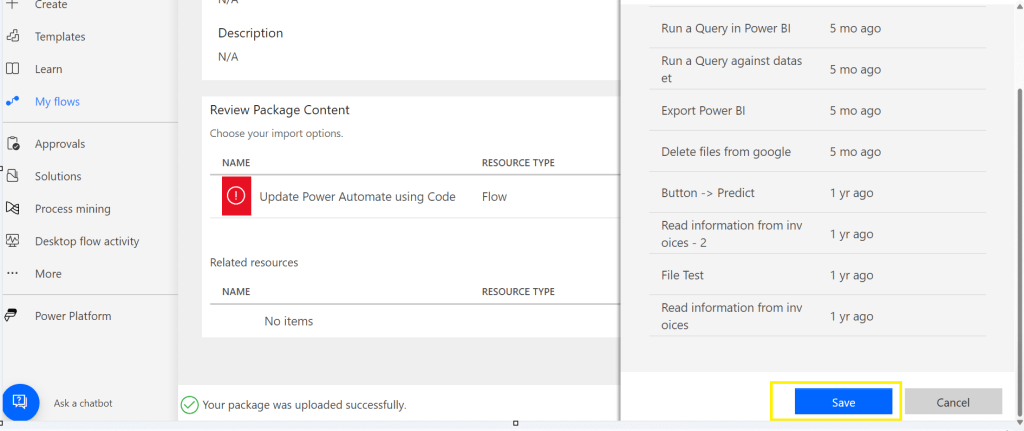
In the next step of export, you will be prompted to key in details as below, just copy the flow name from Review Package Content and paste it in the Name field. Just enter the flow name, it would be enough.
Then click on export
The package will be exported to your local machine
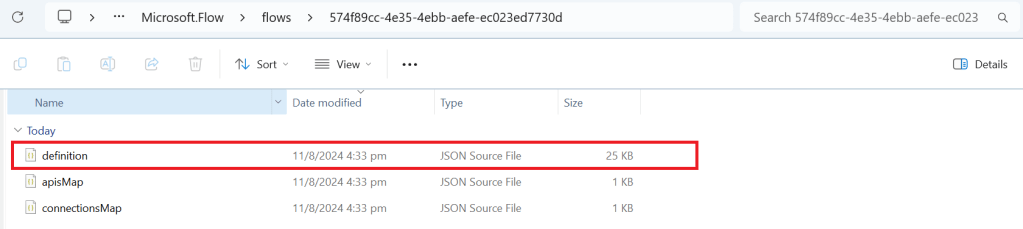
We need to look for definition file, there would be few JSON files in the exported file
You can navigate the last subfolder available
Open the JSON file using your favorite IDE, I prefer using Visual Studio Code, once opened, you will see something like this
Click on Cntrl + A, once all the text is selected, right click and choose Format document, then your text will be properly aligned.
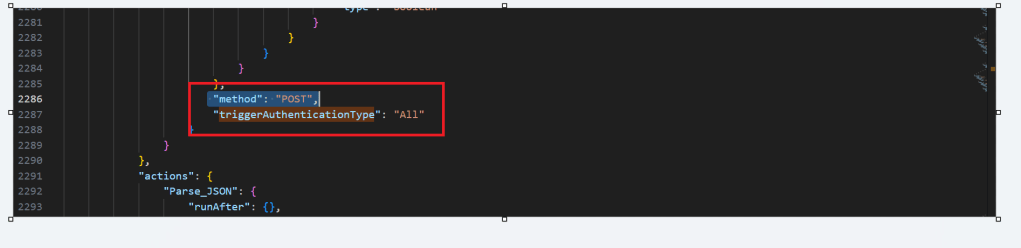
Look for the
triggerAuthenticationType
Now copy paste the code for the method
"method": "POST",
Now your code should look like, hit save as and save the file to a different folder, since we cant override the existing zip folder.
Now once again navigate the last subfolder and delete the definition file present. Once deleted, copy the saved file in your folder to the last subfolder, so your subfolder should look exactly same as below
Last few weeks was very busy for me, I missed interacting with the community.
Here I would like to share one tip which can greatly help your debugging…
Just to give a little background, I was working with the Plugins for Dynamics 365 recently where I was working with API, the Plugin seem to work fine when debugged using Profiler, I tested the piece of the Plugin Code in Console, it worked either, but Plugin is not working when the respective action which triggers the Plugin is being fired. I scratched my head, what is the problem…
Just then, I tried using the below block of code, replaced the catch block of Plugin Code with below code.
This file contains hidden or bidirectional Unicode text that may be interpreted or compiled differently than what appears below. To review, open the file in an editor that reveals hidden Unicode characters.
Learn more about bidirectional Unicode characters
Soon, I observed from the detailed error message above function posted, it is failing because of version problem of the referenced DLL and current DLL version was not supported with my assembly.
Soon I was able to reference my Plugin with correct DLL version which fixed the issue. No further debugging was needed.
Are you a Power Platform or Dynamics 365 CE Developer, you would definitely need to work on Plugin Registration tool at any given point of time and having a local application for Plugin Registration tool greatly helps…in this post, I will show a little different way to install Plugin registration tool and that too very easily.
Well, this approach is especially useful to me when I got a new laptop and need to work on Plugin Registration Tool where the Plugins already build for the implementation.
First 3 ways might have known to everyone through which you can download Plugin registration tool…do you know there is fourth approach as well…
Because there were limitations to use these approaches at least in my experience, I found the fourth one very useful.
XrmToolBox – Not quite convenient to profile and debug your plugins
https://xrm.tools/SDK – Dlls in the downloaded folder will be blocked and would need to manually unblock the DLL’s for the Tool to work properly
CLI – People rarely use this.
Just do note that the approach is very easy and works only if you have a Plugin Project already. Please follow the steps below
Just open the Plugin project.
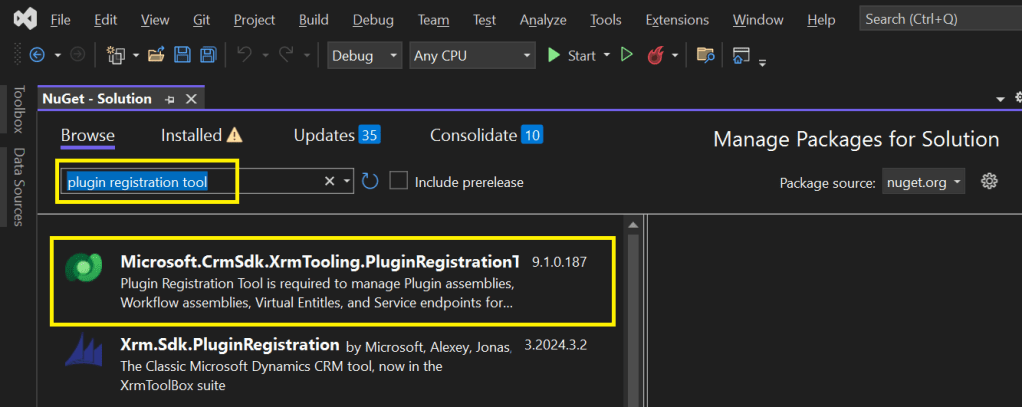
Right click on the solution and choose manage Nuget Packages for the solution
Search for Plugin Registration tool as below
4. Choose the Plugin project and click install, confirm the prompt and agree the license agreement shown
5. Once installed, next go to the Project folder in the local machine.
6. Navigate to Packages folder, you should see a folder for Plugin Registration tool below
7. There you go, you can open the Plugin Registration Application under tools folder. You can undo the changes for the Assembly it is linked to Source control.
That’s it, how easy it was? Hope this would help someone.
In Dynamics 365, a Polymorphic Lookup is a powerful feature that allows you to associate a single lookup field with multiple different entities. This feature is particularly useful when you want a field to reference multiple related entities, providing greater flexibility and efficiency in your CRM applications.
What is a Polymorphic Lookup?
A Polymorphic Lookup is a special type of lookup field that can refer to multiple entities rather than just one. For example, a single “Related Entity” field can refer to either a Contact, Account, or Opportunity, making it versatile for various business scenarios. This capability is referred to as “polymorphism” because the lookup field can resolve to different types of entities at runtime.
Example Scenario:
Consider a sales scenario where a “Related Entity” can be a Customer, but the customer could be either an Account or a Contact. Rather than having two separate lookup fields (one for Account and another for Contact), you can create a polymorphic lookup field, which makes your user interface simpler and more streamlined.
How Does Polymorphic Lookup Work in Dynamics 365?
In Dynamics 365, polymorphic lookup fields are implemented as part of the Relationship between entities. The key concept here is the EntityReference, which dynamically resolves to the appropriate entity type (e.g., Account, Contact, etc.) based on the actual value selected by the user.
Field Definition:
When defining a lookup field, you define a Relationship where the field can refer to multiple target entities.
The system uses the Type and Id to determine the related entity.
Lookup Resolution:
At runtime, when a user selects a value in the polymorphic lookup field, the system dynamically resolves which type of entity to link to.
The field displays the appropriate name (e.g., Account or Contact) based on the entity that the user selects.
Creating Polymorphic Lookups in Dynamics 365
Polymorphic lookup fields are typically used in the following types of scenarios:
Custom Relationships: When you need to create a lookup that can reference multiple different entities.
Shared Relationship: For cases where one relationship applies to more than one entity, such as a lookup that could refer to either a Contact or an Account.
Steps to Create a Polymorphic Lookup Field:
Navigate to the Customization Area:
Go to the Settings area in Dynamics 365 and select Customizations.
Select Customize the System to open the solution where you want to add the polymorphic lookup field.
Create a New Field:
In the relevant entity, click on Fields, and then select New.
Choose the Lookup data type for the field.
Define the Polymorphic Lookup:
Under the Related Entity section, select Custom to define the multiple entities this lookup should support.
Select the Entity Relationships where this lookup should point to multiple entities.
Save and Publish:
Save the field and publish your customizations to apply the changes.
Example: Setting Up Polymorphic Lookup for Customer
Suppose you’re designing a custom Case entity and you want to add a lookup for the Customer. Instead of creating separate lookups for Contact and Account, you can create a polymorphic lookup that links to either an Account or Contact as the Customer.
Steps:
Create a Customer Lookup field in the Case entity.
Define the Customer Lookup field to support both Account and Contact entities.
After publishing the field, the user will see the lookup field and will be able to choose either an Account or Contact as the Customer.
Use Cases for Polymorphic Lookup
Consolidating Related Data:
Polymorphic lookups help streamline user experience by consolidating multiple lookups into a single field, especially when dealing with common relationships across different entities.
Reducing Redundancy:
Rather than having separate lookup fields for Account and Contact in every related form, you can reduce redundancy by using polymorphic lookups, which allows referencing both entities in one field.
Improved Reporting and Analytics:
When data is related across multiple entities, using a polymorphic lookup can make it easier to pull reports and perform analysis without requiring multiple joins or complex queries.
Considerations and Limitations
While polymorphic lookups are powerful, they come with certain limitations:
Limited to Certain Fields: Polymorphic lookups are supported only in certain system fields (like Regarding in activities), but may not be available for every custom scenario.
API Handling: When working with the Dynamics 365 Web API, the polymorphic lookup is handled through special attributes that require careful parsing to identify the correct entity type.
UI Considerations: Although polymorphic lookups streamline the user interface, they can also confuse users who are unfamiliar with the concept. It’s important to have clear documentation and training for users on how to use these fields.
Conclusion
Polymorphic lookups in Dynamics 365 provide an elegant solution for scenarios where a lookup field needs to refer to multiple entity types. By understanding and using polymorphic lookups effectively, you can streamline your CRM solutions, reduce redundancy, and improve your application’s flexibility. It’s important to consider the limitations and ensure that users are properly guided in utilizing these fields within your system.
You can easily create this Polymorphic Lookup from XrmToolBox as well…
Understanding Screens and Navigation – How to structure an app with multiple screens.
Working with Data Sources – Connecting to SharePoint, Dataverse, Excel, and other sources.
Forms and Galleries – Displaying and capturing data effectively.
Mastering Power Fx – Key formulas and best practices.
User Experience and UI Design – Creating a responsive and user-friendly interface.
Using Components for Reusability – Making apps scalable and maintainable.
Working with Media and Attachments – Adding images, videos, and file uploads.
Performance Optimization Tips – Best practices to make apps faster.
Offline Capabilities in Canvas Apps – How to work with apps when offline.
Integrating Power Automate with Canvas Apps – Automating processes.
AI and Copilot Features in Canvas Apps – Adding intelligence to apps.
Advanced Security and Role-Based Access – Controlling user access and permissions.
Publishing and Managing Your Canvas Apps – Deployment, versioning, and governance.
Firstly, let’s start with some simple introduction for this post…
What Are Canvas Apps?
Canvas Apps are a powerful low-code development tool within Microsoft Power Platform that allows users to build custom business applications with a drag-and-drop interface. Unlike model-driven apps, which rely on structured data models, Canvas Apps provide full control over the user interface, enabling developers and business users to design highly customized applications tailored to specific business needs.
Canvas Apps can be used to create simple applications for internal business processes or sophisticated applications with multiple screens, data interactions, and integrations with other Microsoft and third-party services. Users can design these apps using Power Apps Studio, a web-based development environment that provides a range of components, such as buttons, galleries, forms, and media controls, to create intuitive and responsive applications.
Why Are Canvas Apps Important?
Canvas Apps bring significant value to businesses and developers by providing:
Low-Code Development – Build applications with minimal coding, making app development accessible to both developers and non-developers. Power Fx, a formula-based language, enables business logic implementation with ease.
Customization & Flexibility – Unlike model-driven apps that follow a predefined data structure, Canvas Apps allow users to freely design screens, layouts, and controls, ensuring the app meets unique business requirements.
Seamless Data Integration – Connect to over 800+ data sources, including SharePoint, Dataverse, Excel, SQL Server, and third-party APIs, ensuring seamless access to enterprise data.
Cross-Platform Compatibility – Run apps on web browsers, mobile devices (iOS & Android), and embedded within Microsoft Teams, SharePoint, and Dynamics 365.
Integration with Power Platform – Enhance apps with Power Automate for automation workflows, Power BI for data visualization, and AI Builder for AI-driven insights and intelligent automation.
Rapid Prototyping & Deployment – With the drag-and-drop interface and prebuilt templates, businesses can quickly prototype and deploy applications without long development cycles.
Security & Compliance – Apps built using Canvas Apps inherit Microsoft’s security infrastructure, allowing role-based access control (RBAC) and compliance with enterprise security standards.
Real-World Use Cases
Canvas Apps can be leveraged across industries to improve efficiency and streamline operations. Some common real-world use cases include:
Expense Management App – Employees can submit expenses with receipts, managers can approve them, and finance teams can generate reports.
Inventory Management System – Track stock levels, reorder inventory, and generate reports in real-time.
Incident Reporting App – Employees can report workplace incidents with photos, location, and real-time status updates.
Customer Feedback App – Collect customer feedback through mobile-friendly forms and analyze responses with Power BI.
Field Service Management – Field workers can access work orders, update job statuses, and capture customer signatures through mobile devices.
HR Onboarding App – Manage the onboarding process for new employees with guided forms, policy documents, and task checklists.
Getting Started with Canvas Apps
To start building a Canvas App, follow these steps:
Click on ‘Create’ and select ‘Canvas App from Blank’
Choose a layout (Tablet or Mobile) based on your app’s intended use
Design your app using Power Apps Studio:
Add Screens: Home screen, forms, galleries, etc.
Insert Controls: Buttons, text inputs, dropdowns, and images
Connect Data Sources: Link to Dataverse, SharePoint, SQL, etc.
Apply Business Logic: Use Power Fx formulas to create dynamic interactions
Test the App: Use Preview mode to validate functionality
Publish and Share Your App: Deploy the app and control access using Microsoft Entra ID (Azure AD)
Best Practices for Building Canvas Apps
Plan Your App Structure – Define screens, navigation, and key functionalities before starting.
Optimize Performance – Reduce unnecessary data calls and use delegation-friendly queries.
Use Components for Reusability – Create custom components for commonly used UI elements.
Ensure Responsive Design – Design layouts that work across multiple device sizes.
Leverage Power Automate for Automation – Automate approvals, notifications, and data processing.
What’s Next?
In the next post, we’ll walk through setting up your first Canvas App from scratch, covering app layout, adding controls, and connecting to a data source.