Update your Model Driven App User personal settings in an easier way – Quick Tip

Hi Folks,

Did u ever been asked in your project to update the User Personal Settings….possibly you could have resorted to User Settings Utility in XrmToolBox…may be you could have updated the settings manually for each user in list provided to you…

Do you know you could update them in bulk at one shot in a much easier way, so you don’t need to update it manually one by one. I could see many blog posts talking about updating through this tool, but this was missed in those.

Scenario:

You have newly added users to your Azure Active Directory, now you need to set up the user personal settings for them so see proper time zone in Dynamics.

There were two ways:

  1. Use a view
  2. Choose users from FXB(Fetch XML Builder)

The first approach is easiest of course…

For this, lets create a view Users with Security in user entity as below…you know that you could only update settings for those who were having security role.

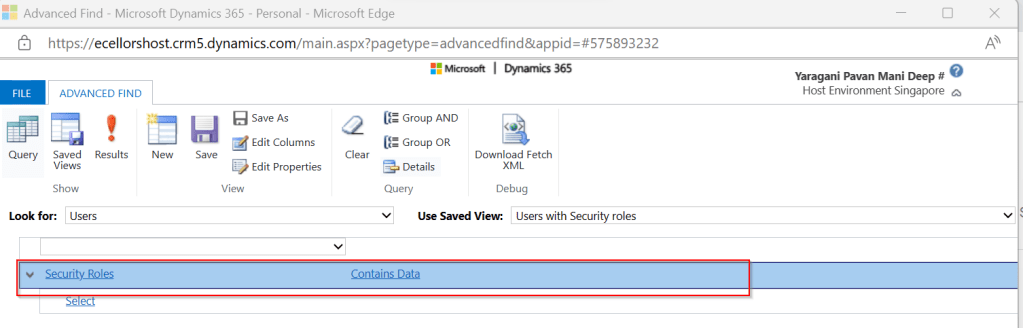
Mainly the user need prvReadUserSettings privilege to update the personal settings, the tool doesn’t allow if not.

Once you have connected to the environment, click on Load Users and settings. Now just select the view which have created before…upon selecting the tool will list down all the active users satisfying the view criteria.

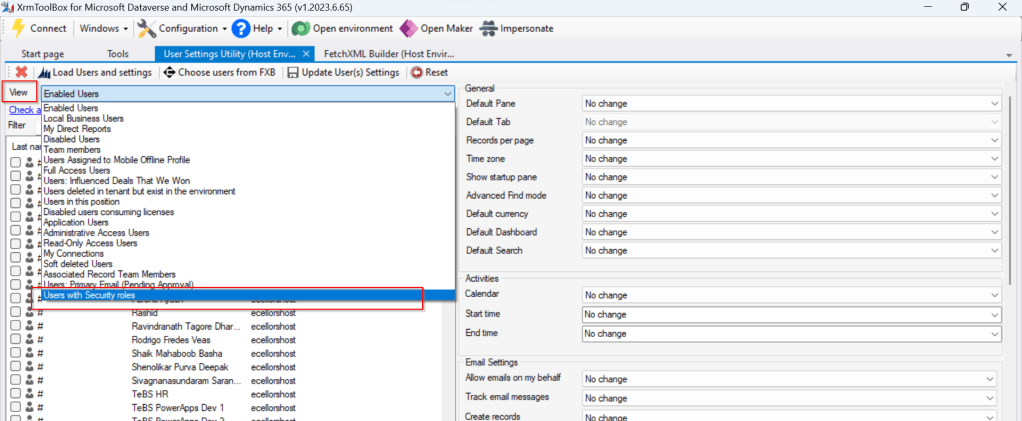
All you need is to click on Check all and there by selecting all the users satisfying your filter criteria, change the settings as per your needs on the right-hand side of the tool and click on Update User(s) Settings in one go.

Here I have 3 users in the view, all were updated in one shot…

Isn’t it easy, this trick will save you a lot of time if your user list grows…

Cheers,

PMDY

Create a Custom Connector for your Web API from within Visual Studio

Hi Folks,

In this blog post, let’s see how we can create a custom connector without leaving our own Visual Studio for building a custom connector. Ideally for building any custom connector, we need to create them in https://make.powerapps.com or https://make.powerautomate.com. Last month Microsoft Announced that Power Platform is now a connected service in Visual Studio 2022. In this blog, we will utilize its capability…

Before diving deeper, let’s see what are the prerequisites..

  1. Visual Studio
  2. ASP .NET Web API knowledge
  3. Canvas Apps knowledge

Let’s get started..

Step 1:

Create ASP.NET Web API Project in Visual Studio

Step 2:Choose your option as below and click on Next..

Step 3:

Choose your next steps as below and click on Next to proceed, make sure to choose authentication type as None

Step 4:

Create a ASP.NET Core Web API Project

Step 5:

By adding Power Platform as a service dependency, you can update an existing custom connector, or create a new one from your API.

If you want to expose your local running API to a public endpoint, I prefer using Dev Tunnels feature of Visual Studio…

That’s it, you have started running your API.

Step 6:

Now let’s create a Mobile App with Power Apps…with the same login you have used for the Visual Studio to create a custom connector..

Step 7:

First check if Custom Connector has been created in your tenant and authenticate the connection….navigate to https://make.powerapps.com and click on Discover at the left of the page….and then click on Custom Connectors, you should see a connector which we created from Visual Studio….nice isn’t it…

Step 8:

All you need to create a connection by clicking on the + sign available..

Once connected, now try creating a mobile Canvas App..

In the Canvas App, try adding data…and search for Weather Sample which you created, you should see something like below…

Step 9:

Once the web API is running in your development environment, you can debug in real time and even Hot Reload your code.

References:

https://learn.microsoft.com/en-us/aspnet/core/test/dev-tunnels?view=aspnetcore-7.0#create-a-tunnel

Thank you for reading…

Cheers,

PMDY