Showing multiselect option set from Model Driven Apps in Power BI

Hi Folks,

Well, this post will show you how you can work with multi option sets from Dynamics 365 in Power BI. First of all, you need some basic understanding of Power BI Desktop to follow. However, I made it clear for people with little background to follow and relate to. I scanned through the internet, but I couldn’t find a similar post, hence I am blogging this if it might help someone. I have faced this issue and here is the solution, you don’t need to use XrmToolBox nor Postman nor complex Power Query as many out in internet would suggest.

So, follow with me along, if you were trying show the values in Multi OptionSet from Model Driven Apps in Power BI as below, then this post is absolutely for you.

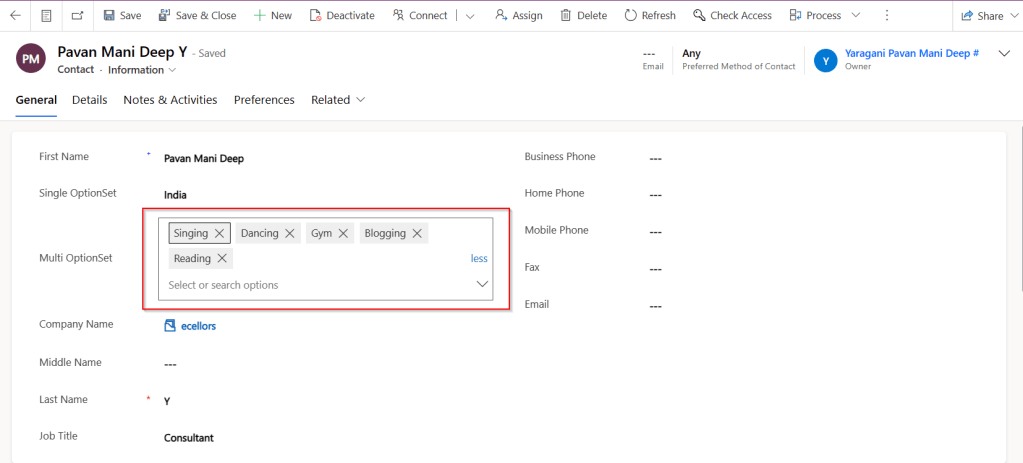
Practically if we retrieve the value of Multi OptionSet field as shown in the above image. You get something like below in comma separated values.

Now based on use case and the requirement, we need to transform our data, i.e. Split the values into rows or columns using a delimiter, in this case, we use comma as delimiter. Here I am splitting into multiple rows as I need to show the contacts for different option values selected in the record.

Select on the respective field and choose Split Column option available in the ribbon.

Next, you will be presented with Split Column Delimiter Dialog box, you may select the options as below and click on Ok.

Next in the Split Column by Delimiter, choose as below.

Once clicked on Ok, now the Multi OptionSet was changed to Single OptionSet and showing the values in different rows.

We can use Dataverse REST API to get the OptionSet values as below in Power BI, click on Get Data –> Web, enter the below in the URL to get the MultiSelect OptionSet Values –> Load. You can refer here some reference.

https://ecellorshost.crm5.dynamics.com/api/data/v9.2/stringmaps?$filter=attributename%20eq%20%27powerbi_multioptionset%27

Once data is loaded, it should look as below..

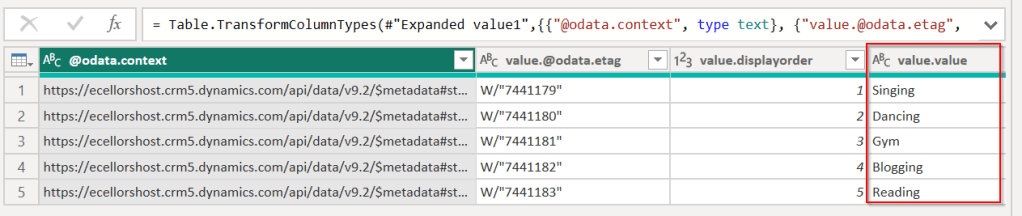
So, now click on Close and Apply the transformation to be saved in the model, later create the data model relationships by going to the model view as below between the multiselect OptionSet field in the contact table and string map table.

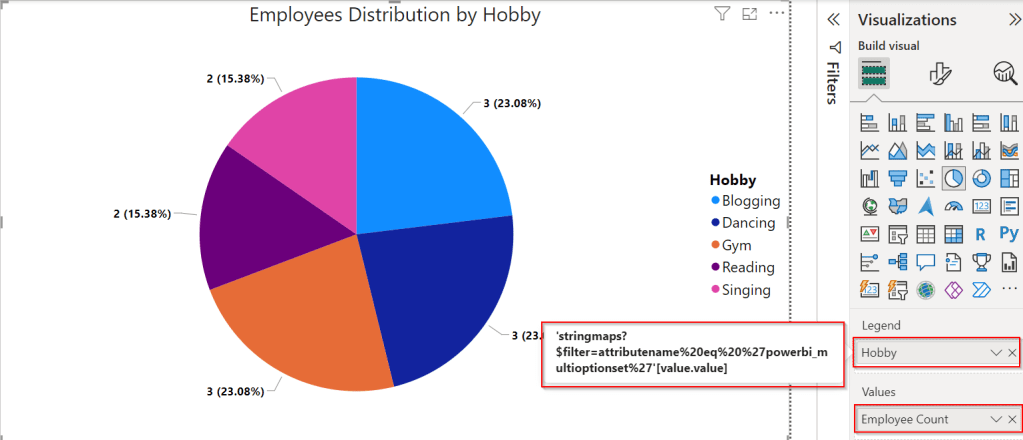
Once the relationship is established, we can proceed with plotting the visuals in visuals of your choice. For simplicity, used.

Hope this helps someone looking out for such requirement which at least could save couple of seconds.

Cheers,

PMDY

Simplify Power BI Management with Environment Variables

Introduction

Power Platform solutions often rely on dynamic configuration data, like Power BI workspace IDs, report URLs, or API endpoints. Environment variables make it easier to manage such configurations, especially in managed solutions, without hard coding values. This blog will walk you through the steps to update a Power BI environment variable in managed solutions, focusing on the task of switching the workspace to the correct one directly within Power BI integration when working on different environments.

What are Environment Variables in Power Platform?

Before we dive into the steps, let’s quickly cover what environment variables are and their role in solutions:

  • Environment Variables are settings defined at the environment level and can be used across apps, flows, and other resources in Power Platform.
  • They store values like URLs, credentials, or workspace IDs that can be dynamically referenced.
  • In managed solutions, these variables allow for configuration across multiple environments (e.g., development, testing, production).

Why Update Power BI Environment Variables in Managed Solutions?

Updating environment variables for Power BI in managed solutions ensures:

  • Simplified Management: You don’t need to hardcode workspace or report IDs; you can simply update the values as needed.
  • Better Configuration: The values can be adjusted depending on which environment the solution is deployed in, making it easier to scale and maintain.
  • Dynamic Reporting: Ensures that Power BI reports or dashboards are correctly linked to the right workspace and data sources.
  • Best and Recommended: Changing the environment variables and pointing to right workspace is the correct and is best way to point your Power BI Report to respective workspace and recommended by Microsoft.

Prerequisites

Before proceeding with the update, ensure you meet these prerequisites:

  1. You have the necessary permissions to edit environment variables and manage solutions.
  2. The Power BI integration is already set up within your Power Platform environment.
  3. You have a managed solution where the Power BI environment variable is defined.

Steps to Update a Power BI Environment Variable in Managed Solutions

Step 1: Navigate to the Power Platform Admin Center
Step 2: Open the Solution in Which the Environment Variable is Defined
  • Go to Solutions in the left navigation menu.
  • Select the Managed Solution that contains the Power BI environment variable you need to update.
Step 3: Find the Environment Variable
  • In the solution, locate Environment Variables under the Components section.
  • Identify the Power BI environment variable (such as API URL or workspace ID) that you need to modify.
Step 4: Click on Dashboards to Update the Workspace
  • To update the Power BI environment variable related to the workspace, click on Dashboards.
  • Find the existing environment variable tied to the workspace and click to edit it.
  • Here, you’ll see the current workspace configuration for the Power BI resource.
Step 5: Update the Workspace ID
  • In the environment variable settings, you will now change the workspace to the new one.
  • Select the appropriate workspace from the list or manually enter the new workspace ID, ensuring it aligns with the target environment (development, production, etc.).
  • If necessary, update other properties like report or dataset IDs based on your environment needs.
Step 6: Save and Apply Changes
  • After updating the workspace and any other relevant properties, click Save.
  • The environment variable will now reflect the new workspace or configuration.
Step 7: Publish the Solution
  • If you’re using a managed solution, ensure that the updated environment variable is properly published to apply the changes across environments.
  • You may need to export the solution to other environments (like test or production) if applicable.
Step 8: Test the Changes
  • After saving and publishing, test the Power BI integration to ensure that the updated workspace is correctly applied.
  • Check the relevant Power BI reports, dashboards, or flows to confirm that the new workspace is being used.

Best Practices

  • Document Changes: Always document the updates to environment variables, including what changes were made and why.
  • Use Descriptive Names: When defining environment variables, use clear and descriptive names to make it easy to understand their purpose.
  • Cross-Environment Testing: After updating environment variables, test them in different environments (dev, test, prod) to ensure consistency and reliability.
  • Security Considerations: If the environment variable includes sensitive information (like API keys), make sure it’s properly secured.

Conclusion

Updating Power BI environment variables in managed solutions allows you to maintain flexibility while keeping your configurations centralized and dynamic. By following the steps outlined in this blog post, you can efficiently manage workspace IDs and other key configuration data across multiple environments. This approach reduces the need for hardcoded values and simplifies solution deployment in Power Platform.

Cheers,

PMDY