Opening a Custom page to capture entity details for Case Rejection in Model Driven Apps

Hi Folks,

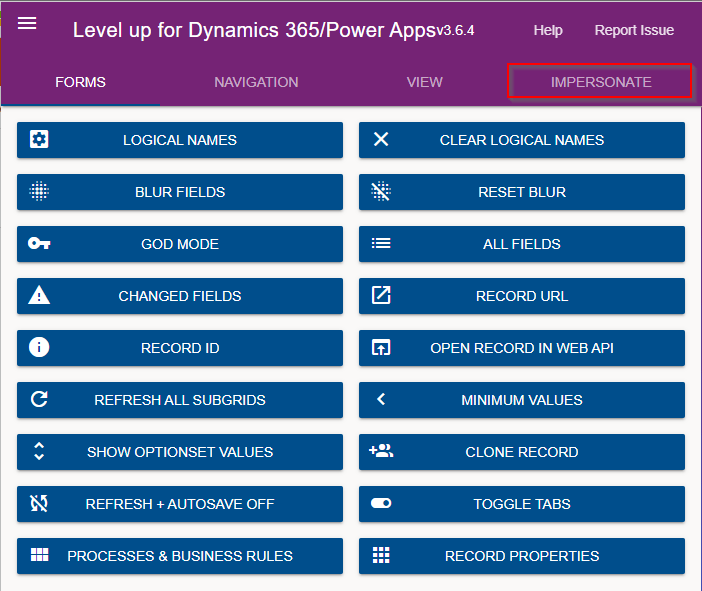
In this blog post, I will talk about implementing a custom page for your implementations.

Here in our use case, customer want to see a pop up dialog box where they can reject the cases from a button and when reject is clicked, there should be a dialog box to capture the reject reason and comments and update them back to the record. So for this we had to implement a custom page and called from a Ribbon button. If you just want to show an alert, you can very easily implement using JavaScript with the help of OOB Alert Dialog…

Xrm.Navigation.openAlertDialog(alertStrings,alertOptions).then(closeCallback,errorCallback);

But in case as user want to update entity details like optionset field, directly from the pop up, you should consider using the approach as we did using a custom page.

.

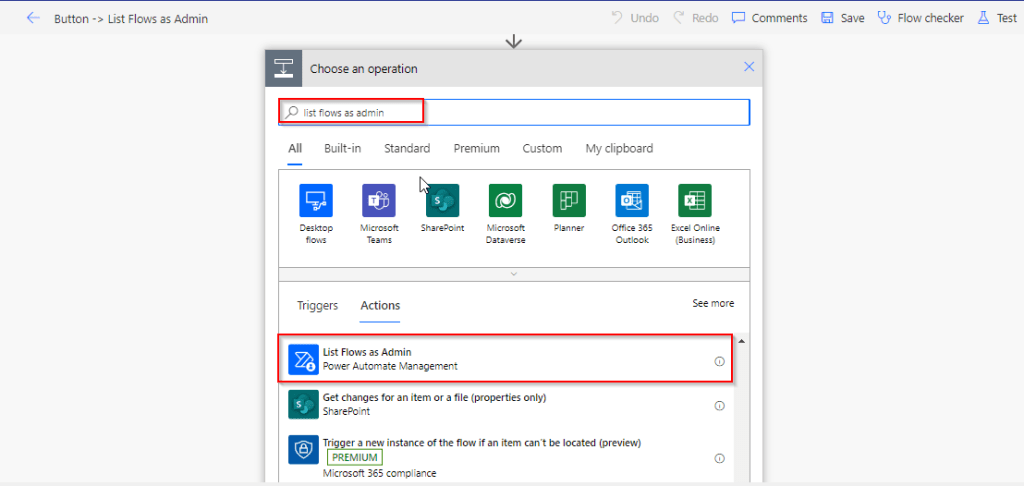
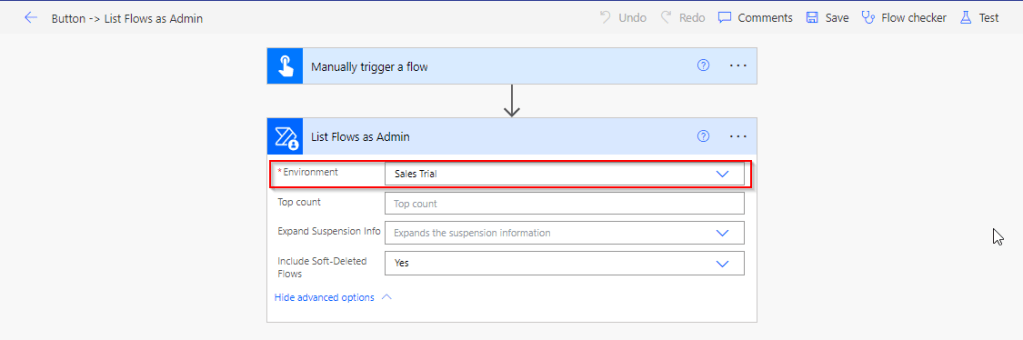
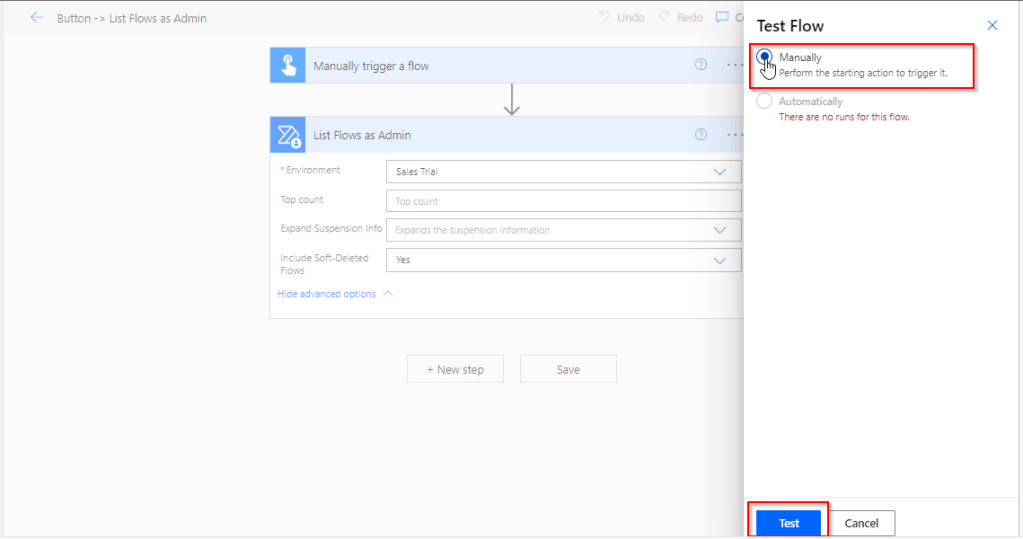
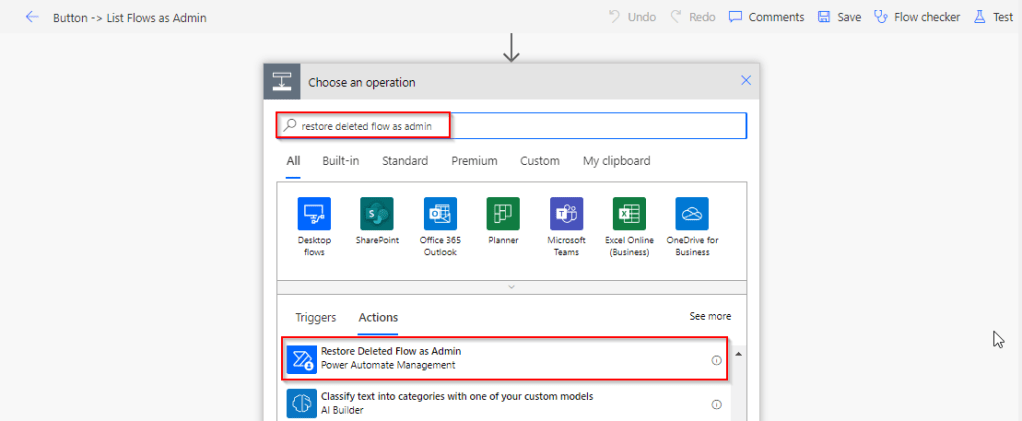
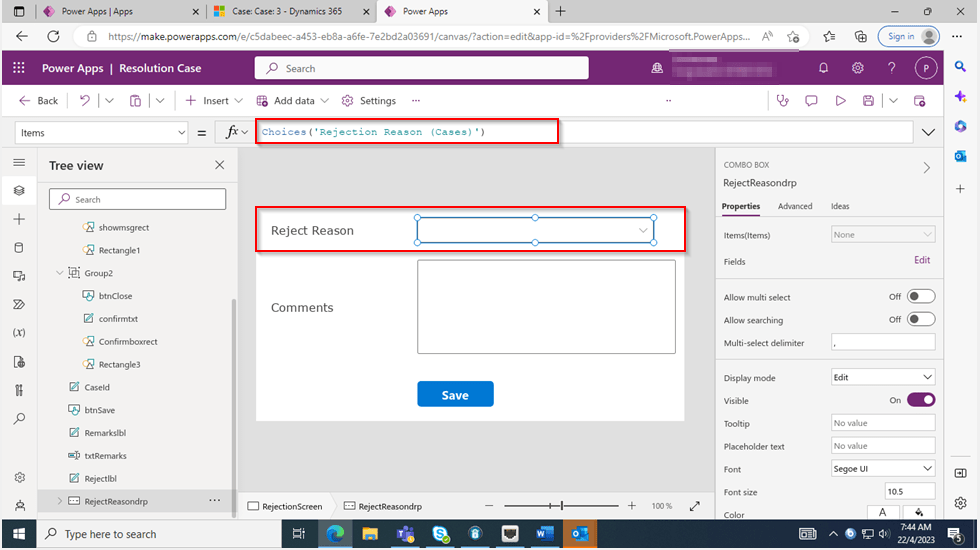
All we have used is JavaScript, Ribbon Workbench and Custom Page…First is to design the custom page in https://make.powerapps.com/

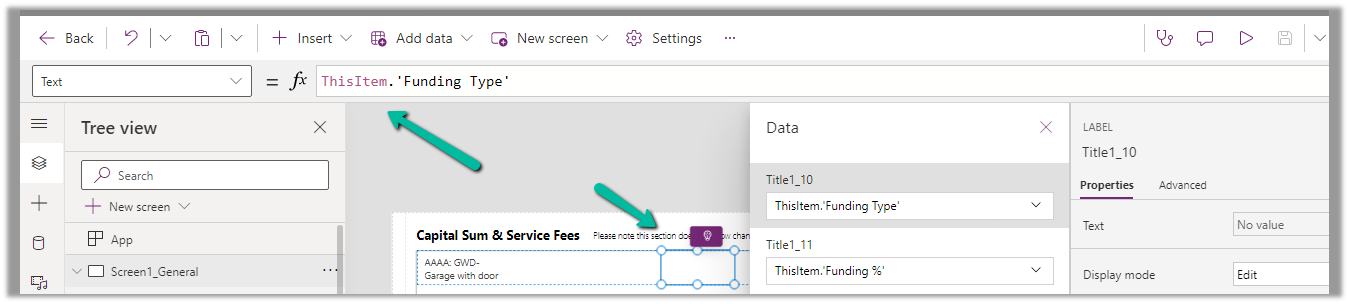
The optionset for Reject Reason is bound to the Reject Reason combo box using the below property.

On the App start, we will set the parameter with what we have supplied from the ribbon on-click function.

On the OnSelect property of the Save button, we can use the below function

Function:

If(IsBlank(RejectReasondrp.Selected) Or IsBlank(txtRemarks.Value),Set(varmsg,"Fill both the values")&&Set(varmsgpopup, true),
Patch(Cases,LookUp(Cases,Case=GUID(CaseId.Text)),{Comments:txtRemarks.Value,'Rejection Reason':RejectReasondrp.Selected.Value}));
If(!IsBlank(RejectReasondrp.Selected) && !IsBlank(txtRemarks.Value),Set(varShowpopup,true),"");
view raw OnSavePowerFx hosted with ❤ by GitHub

Here’s the js code for the button OnClick Event…

//On Click of Reject button
onClickOfRejectRibbonButton: function (executionContext) {
"use strict";
var formContext = executionContext;
var recordId = formContext.data.entity.getId();
recordId = recordId.replace("{", "");
recordId = recordId.replace("}", "");
var contactId = formContext.getAttribute("customerid").getValue()[0].id;
contactId = contactId.replace("{", "");
contactId = contactId.replace("}", "");
var pageInput = {
pageType: "custom",
name: "new_custompage_7e429",
entityName: "incident",
recordId: recordId
};
var navigationOptions = {
target: 2,
position: 1,
height: 400,
width: 700,
title: "Case Resolution Confirmation" // Enter Title Of Your Choice
};
//Using navigateTo Client API.
Xrm.Navigation.navigateTo(pageInput, navigationOptions).then(
function success() {
// Run code on success
//formContext.data.refresh();
},
function error() {
// Handle errors
formContext.data.refresh();
}
);
}

Here the ribbon workbench customization added…

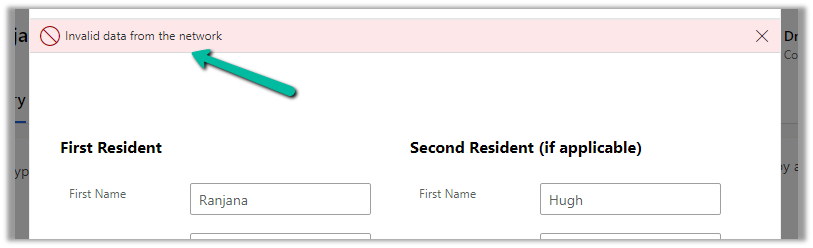
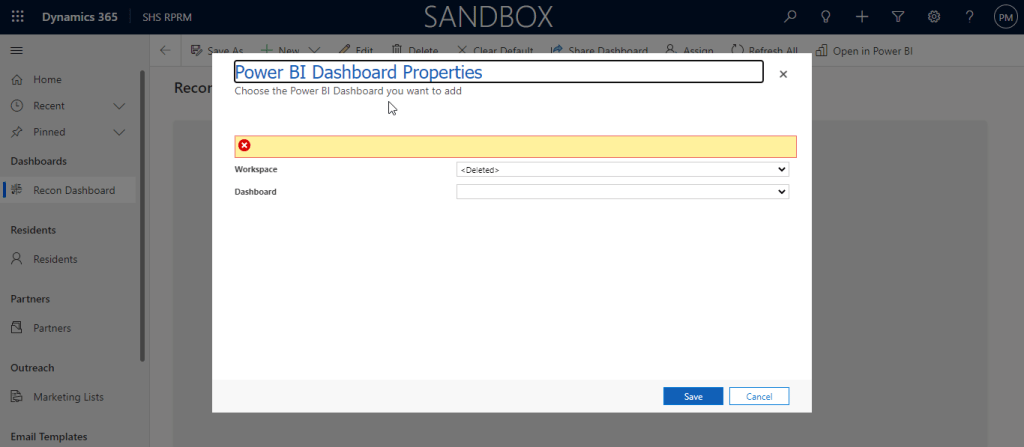
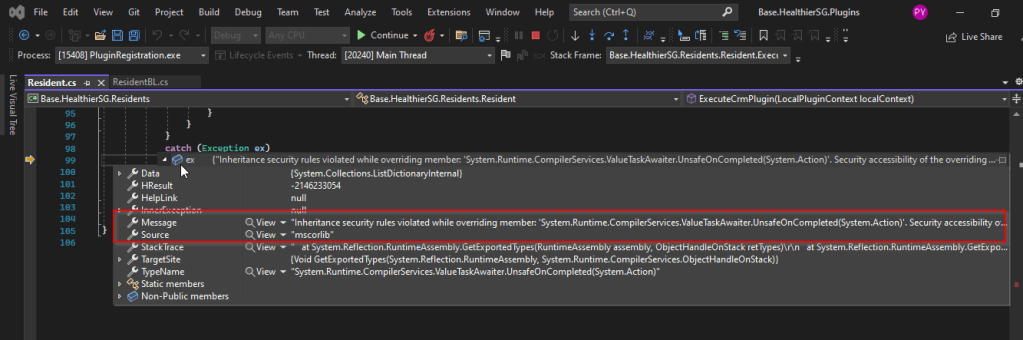
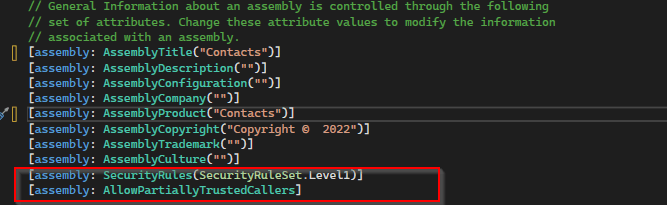
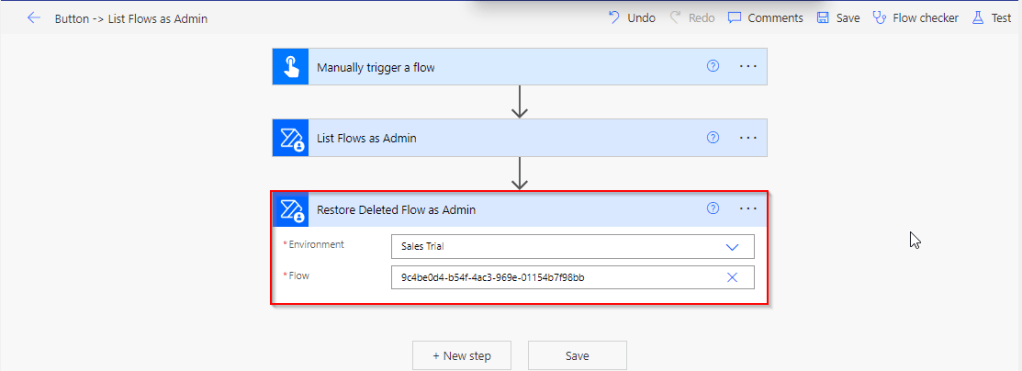
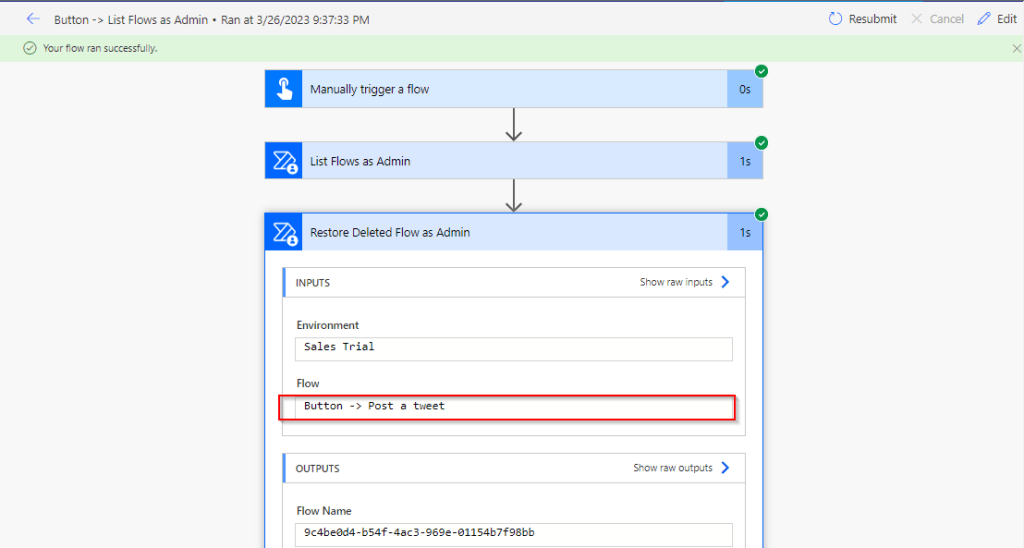
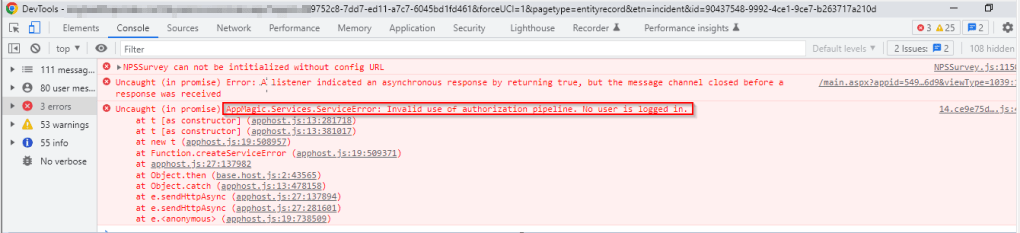
Finally publish the customizations and add the custom page to the model driven app…don’t forget to add this to your app as this mandatory to get the authorization to your page as below, else you see below error in developer tools of your browser as below…and no custom page opens up…

That’s it…when a Reject is clicked, you should a see a page as below..

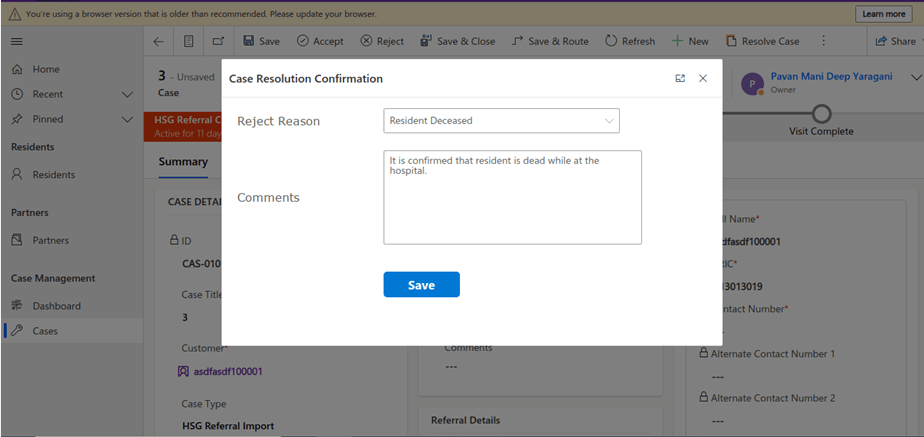
Upon entering the details as above, you will be shown a confirmation screen as below..

Once you click on Close, the selected details will be updated back in the record.

Hope this helps someone implementing custom page for a similar requirement….

Cheers,

PMDY

Stop using OData V2.0 endpoint going further for your implementations….!

Hi Folks,

This blog is just to let you know why you should stop implementing OData calls using V2.0 version. I am pretty sure almost every Dynamics CE project out there have used this OData calls definitely in their implementations from quite some time. While some of new implementations have replaced the logic using Web API, still some people go with using OData V2.0 calls to build their functionality using JavaScript.

Microsoft had actually planned to remove this endpoint from April 30, 2023. But they deferred this because many projects are’nt yet prepared for removal of this end point and help the customers prepare for this transition to Web API end point.

Identify if you still using OData V2.0 end point, actually Organization Data Service is an OData V2.0 endpoint which was introduced with Dynamics CRM 2011..it’s deprecated way back with Dynamics 365 CE version 8.0.

So now, how to identify where and all you were using OData End Points in your code…you shouldn’t expect that existing code will work with only minor changes and this work can be taken at a later stage. This was a high priority warning message from Microsoft stating the removal, so I urge all of you to be prepared for this removal very soon and you shouldn’t be surprised.

So where to change…..?

Below are the places where you should change your way of implementation and align with Microsoft…

  1. The Organization Data Service using this end point /XRMServices/2011/OrganizationData.svc in Javascript, you can find it out with the help of the checker service rule web-avoid-crm2011-service-odata for identification. This can be code which was making OData calls to perform CRUD Operations on the current table or related table.
  2. Check any other code, including PowerShell scripts, that send requests to this endpoint: /xrmservices/2011/organizationdata.svc.
  3. Cross Check your Power BI reports or Excel Data sources that may be using this endpoint.

Note:

This announcement does not involve the deprecated Organization Service SOAP endpoint, meaning using Organization service in plugins. At this time, no date has been announced for the removal of that endpoint. At the time of writing this blog post, Microsoft didn’t announce whether this removal is only for Online or On Premise Versions.

References:

How to use Application Insights to identify usage of the OrganizationData.svc endpoint?

OData v2.0 Service removal date announcement

The Clock is Ticking on Your Endpoint

Do not use the OData v2.0 endpoint

Hope this saves time and effort implementing your Dynamics CE Solutions…

Cheers,

PMDY

Design your Data Model efficiently with Star Schema for Power BI – [Must Know]

Hi Folks,

This blog post isn’t about any use case, rather it just highlights the importance and benefits of designing your data model for your reporting requirements. Every Power BI Developer should consider this at first place.

When designing your Power BI Reports, Data Modelling is the first step whenever you want to work with the Power BI dashboards or reports which plays a very key role. Coming to Schemas, I can say there are two schemas namely Star Schema and Snow Flake Schema. This blog post mainly talks about Star Schema for your Power BI Report/Dashboard design.

With Star Schema, Power BI data models are optimized for performance and usability. While every consultant try to create stunning visuals, they also need to focus on their data model before spending time on their report design.

Star Schema revolves around 2 types of tables in general, they were Fact tables and Dimension tables(talks about the business entities).

Fact table is central table in star schema. Dimension table are the tables which were connected to Fact table using a one-to-many or many-to-one relationship. Generally, dimension tables contain a relatively small number of rows. Fact tables, on the other hand, can contain a very large number of rows and continue to grow over time. So now let’s see how a star schema looks like and taken from Adventure works sample.

Image shows an illustration of a star schema.

Main point to note here is Normalization and Denormalization capabilities which are two great concepts to understand how star schema can help increase the performance of your dataset.

Star schema requires normalized tables and SnowFlake Schema needs denormalized tables. The design fits well with star schema principles:

  • Dimension tables support filtering and grouping
  • Fact tables support summarization

You can visualize the relationship as per the below diagram…

These concepts include, I will brief about the below topics which were not widely popular yet must know for designing an efficient Power BI Dataset.

Last but not the least, I should say that following and designing your data model using Star Schema is a best practice suggested by Microsoft.

You can lookout for references if you want to see video which can be of great help for you to understand the star schema mainly for beginners…

References:

Star Schema Data Model in Power BI

What is star schema?

Hope this helps…

Cheers,

PMDY

Fixed – Invalid data from the network error in the custom page – Power Apps / Dataverse

Reblogged on ecellorscrm.com

Nishant Rana's avatarNishant Rana's Weblog

Recently in one of our custom pages, we were getting the below error

“Invalid data from the network”

We had this setting “Formula-level error management” as On, switching it off was hiding this error on the page.

To fix it we tried removing the fields one by one to figure out the issue. Eventually, we saw the error was going away if we remove one of the option set fields from the gallery or comment it’s formula. Later when we removed and added the field back in the gallery and the error got fixed for us.

The page loading properly without the error –

Hope it helps..


View original post

5 Power BI Errors..you often encounter – Fixed

Hi Folks,

Here I would like to give some tips regarding Power BI Errors which will be encountered in everyday job of anyone who’s going to or work with Power BI Dashboards or understand any existing dashboards and integrate them with Model Driven Apps. You aren’t alone…so let’s gets started…

Error 1: Unable to open document

Fix:

You were not on the latest version of Power BI desktop with which it was authored. You can quickly check the version by navigating to Help –> About

You should see a update icon as below

Clicking on it will take you to the respective page having the latest update from where you can update it.

Error 2: Class not registered error

Fix:

This can happen when you were trying to open an existing dashboard which was created by you or shared by someone to you, might be because you have two versions of Power BI Desktop installed..in your machine..like shown below.i.e.

  1. Installed Power BI from Microsoft Store
  2. Installed Power BI from Microsoft Downloads

Make sure you choose the right one which you have used earlier to develop the Dashboard so that you won’t run into any issue.

Error 3: Workspace deleted

Fix:

This error can happen when you were trying to access any workspace while you were creating a Power BI Dashboard in Dynamics CE using an existing workspace, make sure you have a workspace and the logged in user have access to the Workspace.

Granting access to the workspace will fix the issue.

Error 4: One or more Cloud Datasources have been deleted

Fix:

Whenever you deploy any new Power BI report or dashboard to Power BI Service, you encounter this problem most of the times. Sometimes after making a change to a dataset or taking over ownership of a dataset, you might receive the following error:

1. Click the “Recreate cloud data sources” button.

2. Reenter credentials in the “Data Source Credentials” section for your data sources

Make sure dataset is connected to Gateway incase you have configured.

Error 5: There is no gateway to access the datasource

Fix:

The first thing to look at when you have a missing gateway is to make sure you created a data source for that gateway. Installing the On-Premises Data Gateway is not enough. That simply registers the gateway with the Power BI service and lists you as an admin for that gateway.

You then need to go into the Power BI service and create a data source for that gateway.

You can create a data source by doing the following.

  1. Select the gear icon within Power BI
  2. Select Manage Gateways.
  3. Select your gateway and then select Add Data Source.
  4. When you are done entering the information, select Add.

References:

Power BI Start up issues – MS Learn

One or more cloud datasources have been deleted

Restore and Recover Deleted Workspace

Hope my post helps someone who’s facing similar issues with their Power BI Dashboards…

Thank you for reading….

Cheers,

PMDY

Xrm.WebAPI with Promise for synchronous calls in Javascript

Hi Folks,

Here is how I have quickly achieved the synchronous Retrieve multiple call using Web API and Promises with the help of JavaScript. I don’t want to make my post too detail, but I would like to share the approach.

All I want to do is to just Restrict saving the Contact creation if the Postal Code entered is not present in the system. But this call should be synchronous as the message should be shown immediately incase postal code is not found in the system and prevent saving the contact record. All you need to do is simple, just call the below function on change of Postal Code in Contacts.

Here in place of XMLHTTPRequest, I have used Xrm.WebAPI so that it won’t show a critial warning in Solution Checker.

ValidatePostalCode: function (executionContext) {
"use strict";
var formContext = executionContext.getFormContext();
var postalcode = formContext.getAttribute(Resident.Fields.address1_postalcode).getValue();
var message = "Please enter a valid Postal code; Refer to Postal Code Mappings"
var uniqueId = "cnt_postalcodenotpresent";
return new Promise(function (resolve, reject) {
Xrm.WebApi.retrieveMultipleRecords("new_postalcodes", "?$select=new_postalcode&$filter=hsg_postalcode eq '" + postalcode + "' ").then(
function success(result) {
var isNotFound = false;
if(result !== undefined)
isNotFound = result.entities.length === 0 ? true : false;
if (isNotFound) {
var errorMessage = "Postal Code Mapping is not present for the given postal code"
formContext.ui.setFormNotification(errorMessage, "ERROR", uniqueId);
}
else {
Resident.isValidationNeeded = false;
formContext.ui.clearFormNotification(uniqueId);
formContext.data.entity.save();
}
// return true or false
resolve(isNotFound);
},
function (error) {
reject(error.message);
//console.log(error.message);
}
);
});
}

References:

What is Promise?

Web API Retrieve Multiple

Action based on Async Operation

Cheers,

PMDY

Impersonation – Level Up Hidden Feature that every Power Platform CE Developer ought to know

Hi Folks,

By this time, almost every Dynamics 365 Developer had some day or the other used Level up in their Custom Engagement consultant career.

While every one out in the Dynamics CRM Space know about the widely popular God mode available in Level Up which helps in the day to day administration and maintenance activity of CE applications.

Today in this blog post, lets see how we can achieve impersonation using Level up. We all know about impersonation in Dynamics CRM possibly using Plugins via Plugin Registration tool or directly through code.

But do you know, using Level Up, do you know that you even don’t need to write any piece of code but can impersonate to any user in the system with thin a few clicks right from your browser. If this interests you, just follow along…

Just open the level up chrome extension. This is how your home screen look like once opened..to use this feature, just click on Impersonate as highlighted in the below image. For all this activity, I am logged in as Admin user to the system.

Next you can search with the username with whom you want to impersonate with i.e. here I would like to impersonate with my user account. You can search and impersonate with any user in the system.

Once you click on SEARCH USER

Upnext, click on impersonate button available as below

It opens a new window impersonated with the user account as the user choosen for the impersonation.

The screen shows as the user pavan is the logged in user…

Now you can perform all the operations same as what user pavan has…how cool is it…this feature perfects suits when you want to test out the application security roles where you would like to make a change to a user role and assign to other team member, test it without needing his/her presence. Cool to know, isn’t it….

References:

You can install the extension on Edge, Firefox and Chrome.

BrowserStore Link
Chromehttps://chrome.google.com/webstore/detail/level-up-for-dynamics-crm/bjnkkhimoaclnddigpphpgkfgeggokam
Firefoxhttps://addons.mozilla.org/en-US/firefox/addon/level-up-for-d365-power-apps/
Edgehttps://microsoftedge.microsoft.com/addons/detail/level-up-for-dynamics-365/mdjlgdkgmhlmcikdmeehcecolehipicf

GitHub for source code and project documentation

Cheers to Nataraj Yegnaraman who developed this cool tool…

Thanks for reading…

PMDY

Plugin Error – Security accessibility of the overriding method must match the security accessibility of the method being overridden – Quick Fix

Hi Folks,

I recently came across the above error for one of my Dynamics 365 Plugins…this blog talks about applying a quick fix.

While debugging our Plugin logic line by line to understand why it’s not working, observed this error for messages like RetrieveMultiple, Retrieve when I use any Organization Service call.

This was a .Net version downgrade issue caused by ILMerge as I downgraded one of the DLL to 4.6.2 version from 4.7.1. If you see this issue even without downgrading your DLL, you can use this fix.

After some research I came across this article and applied the same to my assembly which fixed the issue. Added these lines to my AssemblyInfo.cs class file..

[assembly: AllowPartiallyTrustedCallers]
[assembly: SecurityRules(SecurityRuleSet.Level1)]

Hope this helps someone who is facing the same issue down the line in their Plugin Development, Debugging…

Thank you for reading…

Cheers,

PMDY

Restore your deleted Power Automate Flows – Quick Tip

Hi Folks,

Have you or some one in your team accidentally deleted some your flows and want them to be back..? Then this post is for you…

There are the two ways you can restore deleted flows up to 20 days in either way…once after 20 days, even Microsoft Support couldn’t recover your flows.

In this blog post, we will see how you can recover your flows using first approach using Power Automate Management connector which is much simpler.

All you need is a button flow with two Power Automate management connector actions—List Flows as Admin and Restore Deleted Flows as Admin.

So let’s see…

I have a very simple flow as below…

But is has been failing due to some authentication issue, so I have deleted it…

Later I understood the root cause for the authentication issue, I want the flow created to be back. But no problem, you can recover your flow as below…So follow these steps to quickly get your deleted flow back…using an another flow…

Choose a manual trigger…

Next add an action, and choose an operation by searching list flows as admin.

Select your environment in the connector

Save your flow and test it…

Once your flow is successful, verify the outputs..scroll to find out the flow, check for the display name and note down the name associated.

This connector will list down all the flows created in your tenant…when you expand the raw OUTPUTS/value. Note the name which is nothing but the Guid of your flow.

Add Restore Deleted Flows as Admin action and run the flow by searching for the same as below.

Add the Restore Deleted Flows as Admin action from the Power Automate Management Connector.

In the Flow field, enter the name value ie. Guid noted from previous step ie.

9c4be0d4-b54f-4ac3-969e-01154b7f98bb

Save the flow, and test/run it.

You can note your flow is back, you can find out under My Flows but it’s disabled state.

Note:

  • The steps in this article apply to both non-solution and solution flows.
  • Flows that were deleted more than 20 days ago can’t be recovered. Both restore methods (PowerShell script and Power Automate Management connector), as well as Microsoft Support can’t help to restore them.
  • After you restore a flow, it defaults to the disabled state. You must manually enable the flow, per your requirements.

Incase if you were good at Power Shell, you can utilize this approach.

Cheers,

PMDY