In the earlier blog post, we have seen how to connect to your Azure IOT Hub using Raspberry PI Online Simulator and send telemetry data…
In this post, we will be using Azure IOT Device Client SDK’s for sending the Telemetry data to IOT Hub…
This approach uses .NET Core SDK libraries using a Console application….
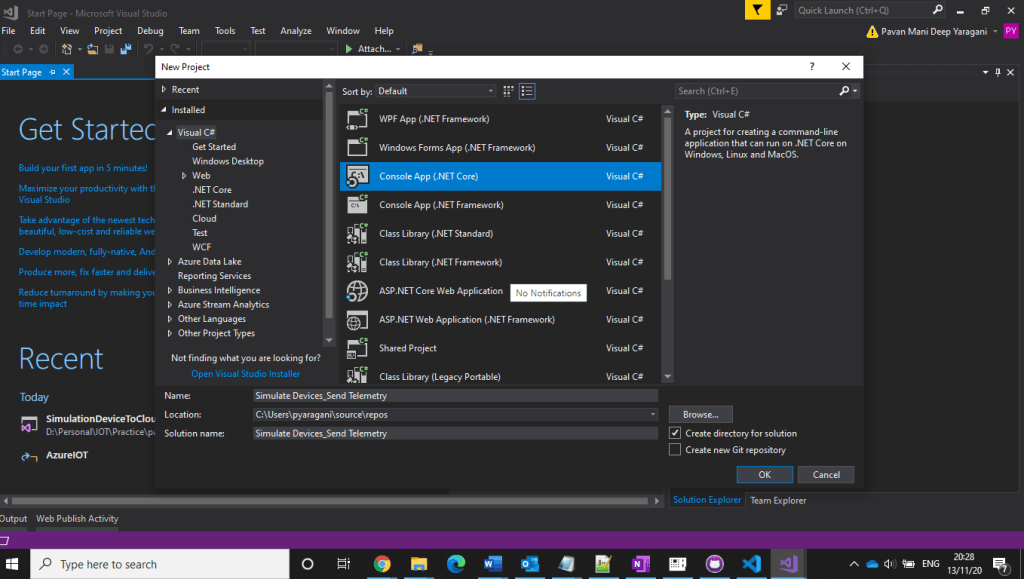
Creating a C# Console Application
Open Visual Studio, go to File -> New -> and select Project.
In Templates, select Visual C#, select Console App (.NET Framework) and give an appropriate name in the ‘Name’ textbox and then click the OK button.
3. Installing Microsoft Azure IOT Device Client SDK…Go to Project -> Manage NuGet Packages.
4. Click Browse tab and search for Microsoft.Azure.Devices.Client. You will see the Microsoft.Azure.Devices.Client device SDK will have listed in the search result and click Install button
5. Now, click the I Accept button to accept the license agreement.
6. It will take a few minutes to install the SDK in our project
7. Get IoT device connect string from Azure IoT Hub…navigate to Azure Portal –> IOT Hub –> IOT Devices –> Select respective device to be connected.
Using Microsoft.Azure.Devices.Client library we can create device client. The device client has CreateFromConnectionString method which requires device connection string as parameter. Create a read only static string s_connectionString01 and assign the connection string that we copy from Azure Portal.
Here you can create a random temperature and humidity values using Random() method.
This post is to understand the Node.js code used to connect to Azure IOT Hub…the complete code can be found This post is just to explain in detail for beginners to understand this quickly.
Now we will understand the code in the integrated console window as highlighted below…
So let’s understand each piece of it…
Firstly we need to understand about controlling the GPIO pins of the Raspberry PI…for high performance C language should be preferred language used but most developers are more comfortable with JS/Node…node.js is used.
So in order to read the pins, we should be using package require(‘wiring-pi’);
Next we will be requiring Azure IOT Device Client SDK’s to create a client for interaction with the Raspberry PI and to send messages
require(‘azure-iot-device’)
Based on the protocol being used, we need to import the respective package..
The following table provides the high-level recommendations for your choice of protocol:
Protocol
When you should choose this protocol
MQTT MQTT over WebSocket
Use on all devices that do not require to connect multiple devices (each with its own per-device credentials) over the same TLS connection.
AMQP AMQP over WebSocket
Use on field and cloud gateways to take advantage of connection multiplexing across devices.
HTTPS
Use for devices that cannot support other protocols.
MQTT and AMQP are binary protocols, which result in more compact payloads than HTTPS, this sample uses MQTT Protocol for communication, hence below package is used
require(‘azure-iot-device-mqtt’).Mqtt;
For bme280-sensor, a Node.js I2C module for the Bosch BME280 Humidity, Barometric Pressure, Temperature Sensor, used below
require(‘bme280-sensor’);
Regarding the connection string, you can follow my previous post on getting this from Azure Portal, however there is also an alternative to use SDK’s
There is a function in azure-iot-device npm (IoT Hub Device SDK for Node.js) to generate device connection string:
import { ConnectionString as DeviceConnectionString } from "azure-iot-device";
const deviceConnectionString = DeviceConnectionString.createWithSharedAccessKey(hostName, device.deviceId, device.authentication.SymmetricKey.primaryKey);
You could also refer to full code here to see how Azure IoT Toolkit generates the device connection string.
The next part is the custom logic on sending messages based on the temperature sensor to Azure IOT Hub and switching on the LED based conditions which is completely based on the needs…
This is my first post in the Azure IOT series….and really excited to share this content.
Have you ever tried a lot to get some hands-on experience connecting devices to Azure IOT Hub. Don’t worry…Microsoft IOT Team had made it so easy so that we can connect to a real device like Raspberry Pi without actually having any physical hardware with you.
This is all possible with Open Sourced Raspberry Pi Online Simulator…with the below link..
Once you open this…you should see the below screen….all you need to enter your IOT Device connection string…
If you check in the above image, you could see that connectionString is highlighted which you need to get from Azure Portal. So lets see how you can get this from Azure portal…
Step 1: Create a free Azure account or if you already have one proceed to next step
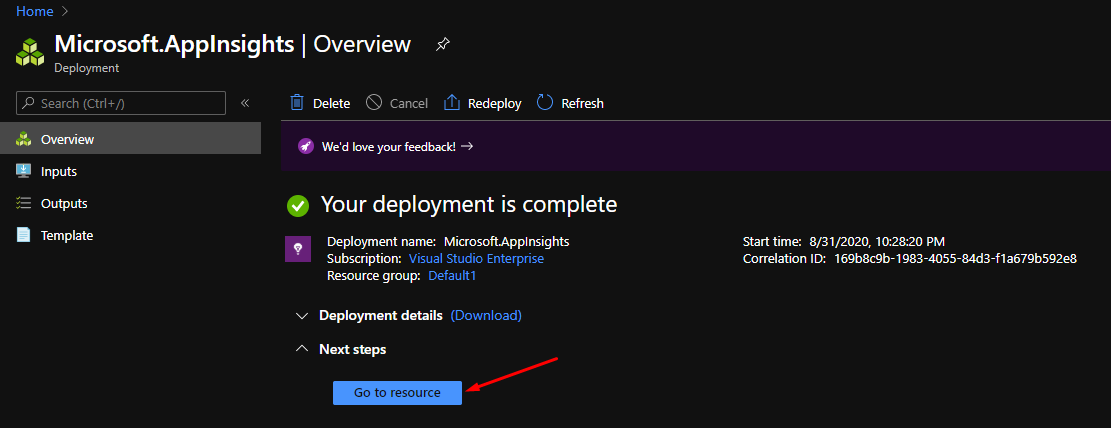
Step 2: Create Azure IOT Hub from Azure portal
From the Azure homepage, select the + Create a resource button, and then enter IoT Hub in the Search the Marketplace field
In the results, click Create.
Step 3: Once the deployment is succeeded and your Azure IOT Hub got created, you need to create a device to which you will be connected by navigating as below. Select IOT Devices under Explorers available in the Side pane as highlighted below
Step 4:
Click on New Device as highlighted below
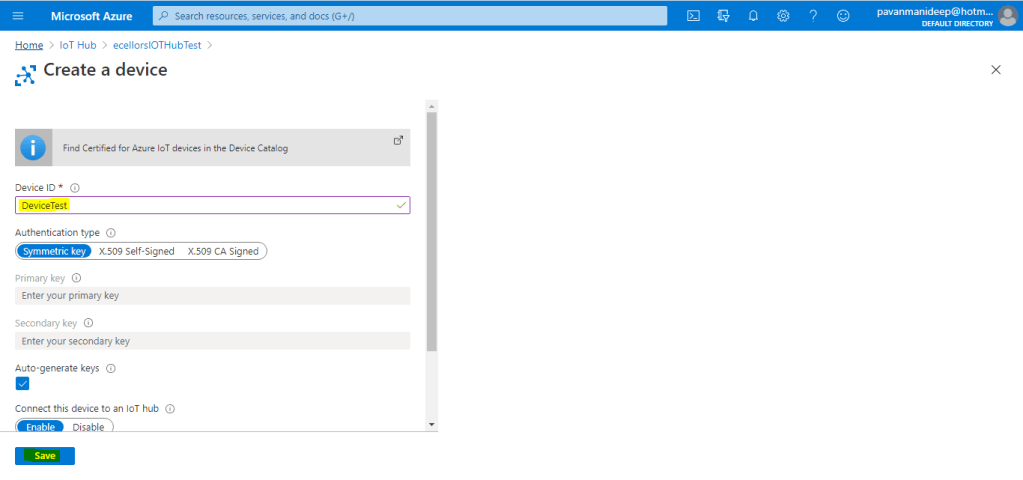
Step 5: Enter Device ID and click on save as higlighted below
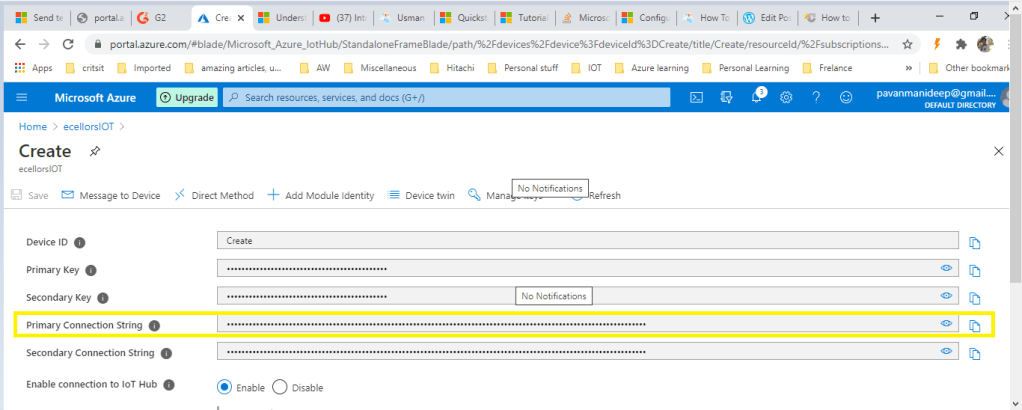
Step 6: Now Open your device by click on IOT Devices…and grab the primary connection string..make sure Enable connection to IOT Hub is enabled as below.
Step 7: Now go back to Raspberry PI Simulator and enter this connection string at the place shown in the first image.
Step 8: And finally boom…you will see that the message sent to Azure…and the bulb was switched on.
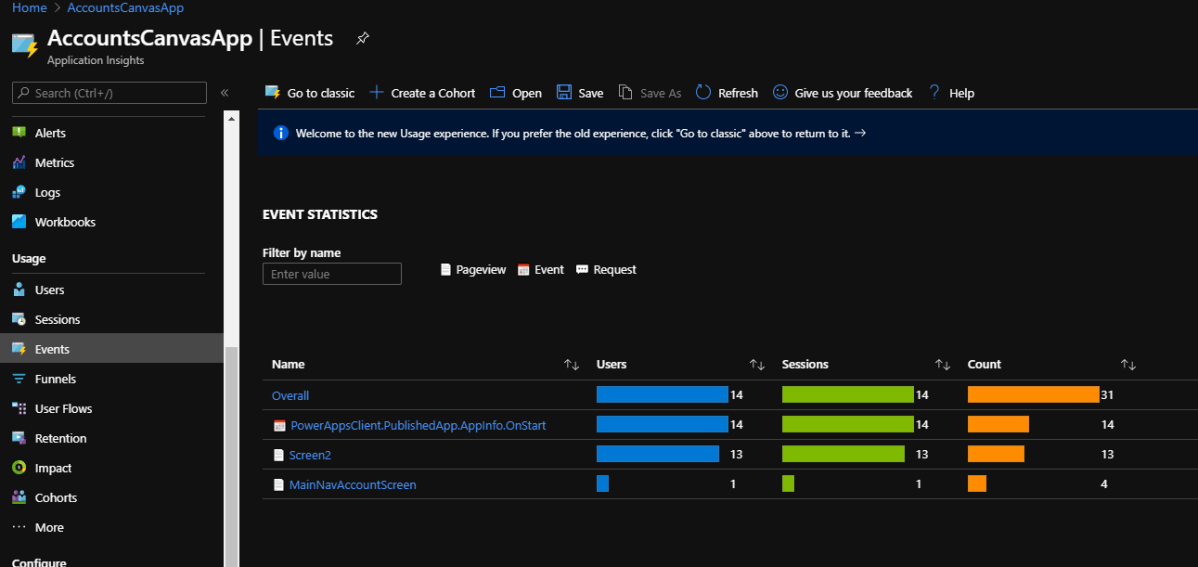
In the next post, will briefly describe on the Node.js code used and also on the Device SDK’s for Azure IOT so that we can gain more insight.
If you have any further questions on this….please post it here or you can reach out to Community Support on this tool at the below link…
Recently during an integration scenario with D365 Field services in order to identify if the person making a change to the Customer asset is an employee or not we spinned up an Azure Face API service and on trying to connect it from an Azure function we were getting Invalid key exception.
We were using the Face API client library which defaults to west US endpoint of the service but our service was in EastUS.
The solution is to override the endpoint tohttps://eastus.api.cognitive.microsoft.com/face/v1.0/ which can be done by using another constructor of the FaceServiceClient class
FaceServiceAPIClient = new FaceServiceClient("Face API subscription key", "https://eastus.api.cognitive.microsoft.com/face/v1.0");
Power Apps recently introduced sharing capabilities with Guest Users. Upon sharing users were not able to access app because of error “Unable to obtain access token for resource ‘https://gov.service.powerapps.us/’. A silent sign-in request was sent but no user is signed in. The cookies used to represent the user’s session were not sent in the request to Azure AD”.
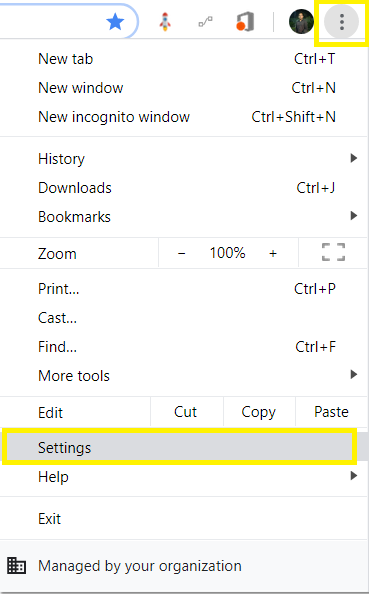
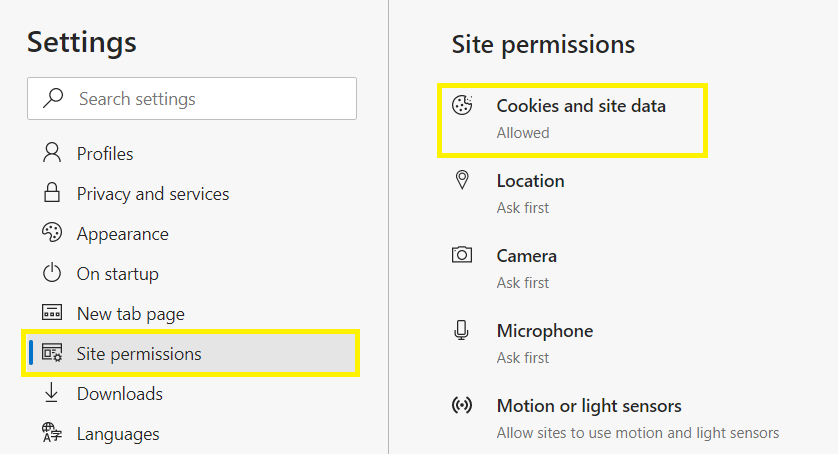
As we were investigating this issue and reaching out to Microsoft support team, we came to know this is not just for Guest users and because of browser cookie settings. Make sure third-party cookies are not blocked and enabled. You can refer below steps to enable third party cookies:
Microsoft Edge:
Go to Settings from right side navigation
Click on Site Permissions in Left side navigation and select Cookies and site data
Make sure options are enabled and disabled as shown below
Have u ever tried creating an App using Azure Cognitive Services.
Here is an excellent video tutorial on how to create an app to Scan Receipts using Azure Cognitive Services Form Recognizer API from MVP @Vivek Bhavishi..
Microsoft had recently announced on docs.microsoft.com that using WS-Trust authentication security protocol to connect to your Common Data Service had been deprecated.
So what does this mean??
Firstly you need to note that this only applies to client applications that connect to CDS.
It does not impact your custom plug-ins, workflow activities, or on-premises/IFD service connections.
Below are the places where you need to replace them…
If your code uses Username & Password for authenticating with Common Data Service or an application, you are likely using the WS-Trust security protocol.
If you are using the OrganizationServiceProxy class at all in your code, you are using WS-Trust.
If you are using CrmServiceClient.OrganizationServiceProxy in your code, you are using WS-Trust.
Replace all occurrences of the type OrganizationServiceProxy with the IOrganizationService interface
2. using CrmServiceClient with the “Office365” authentication type:
Action Required:
Switch over to using an OAuth based connection string, Note that LoginPrompt can be set to “never” to simulate the way that the Office 365 behavior worked. Please note that the App ID and Redirect URI should be created in AAD in your tenant.
Few points to note before we conclude:
An update to Microsoft.CrmSdk.XrmTooling.CoreAssembly is available for download through NuGet package that includes auto redirect support. This library will redirect an authentication type of Office365 to OAuth.
If you were not able to login even using OAuth, check if MultiFactor Authentication/conditional access is enabled, if so consider registering application user (Service Principal) in Azure Active Directory.


 Chrome: