Restoring environments in Power Platform has evolved significantly.
In the past, Dynamics CRM On-Premise users relied on SQL database backups and manual restores. Today, administrators can perform environment restores in online instances with just a few clicks via the Power Platform Admin Center.
This guide outlines the available restore options and key considerations to ensure a smooth and secure process.
🛠️ Restore Options in Power Platform
Option
Description
1. Manual Backup Restore
Restore from a backup you manually created. Ideal before major customizations or version updates.
2. System Backup Restore
Use automated system backups created by Microsoft. Convenient but less flexible than manual backups.
3. Full Copy
Clone the entire environment, including data, customizations, and configurations. Suitable for staging or testing.
4. Partial Copy (Customizations & Schema Only)
Copies only solutions and schema—no data. Best for promoting configurations from Production to SIT/UAT.
✅ Best Practices & Key Considerations
Use Partial Copy for Non-Production: When restoring from Production to SIT/UAT, prefer Partial Copy to avoid data and configuration mismatches. This brings all solutions without the underlying data.
Use Full Copy: In case it is restoring to a same type of environment
Avoid Restoring Production Backups to Non-Prod: Manual or system backups from Production should not be restored to non-production environments. This often leads to configuration conflicts and user access issues.
Update Security Groups: Always update the Security Group when restoring or copying to a different environment type. Otherwise, users may be unable to log in due to mismatched access controls.
Manual Backup Timing: After creating a manual backup, wait 10–15 minutes before initiating a restore. This ensures the backup is fully processed and available.
Regional Restore Limitation: You can only restore an environment to another environment within the same region.
Unlimited Manual Backups: There’s no cap on the number of manual backups you can create—use this flexibility to safeguard key milestones.
Exclude Audit Logs When Possible: Including Audit Logs in copies or restores can significantly increase processing time. Exclude them unless absolutely necessary.
🧠 Technical Note
All backup and restore operations in Power Platform are powered by SQL-based technology under the hood, ensuring consistency and reliability across environments.
This post is about Dataverse and Git Integration which is the most sought after feature in the todays automation Era. This is a preview feature, you would need to create a new environment with Early Access enabled to test this feature or you can use an existing US Preview environment for testing this out.
While every MDA(Model Driven Application) and it’s components can be safely and moved across the environments using Solutions with the help of Azure DevOps Pipelines. However when coming to integrating Power Platform Solutions to Azure DevOps, we had to manually export the solution and download them each and every time when we would like to commit the Solution Artifacts to Azure DevOps Repo.
With this new Preview feature we can directly integrate the Power Platform Solutions to Azure DevOps.
Let’s see this action…wait a moment, there were some prerequisites to be considered…
Environment should be a Managed Environment to start using this and you need to be an Admin for the environment
Azure DevOps subscription and license should be available to set this up, also permission to read source files and commits(should be a member of contributor group in Azure DevOps) from a Repo
Your email address used for Azure DevOps and Power Platform Solutions should be the same
Setup:
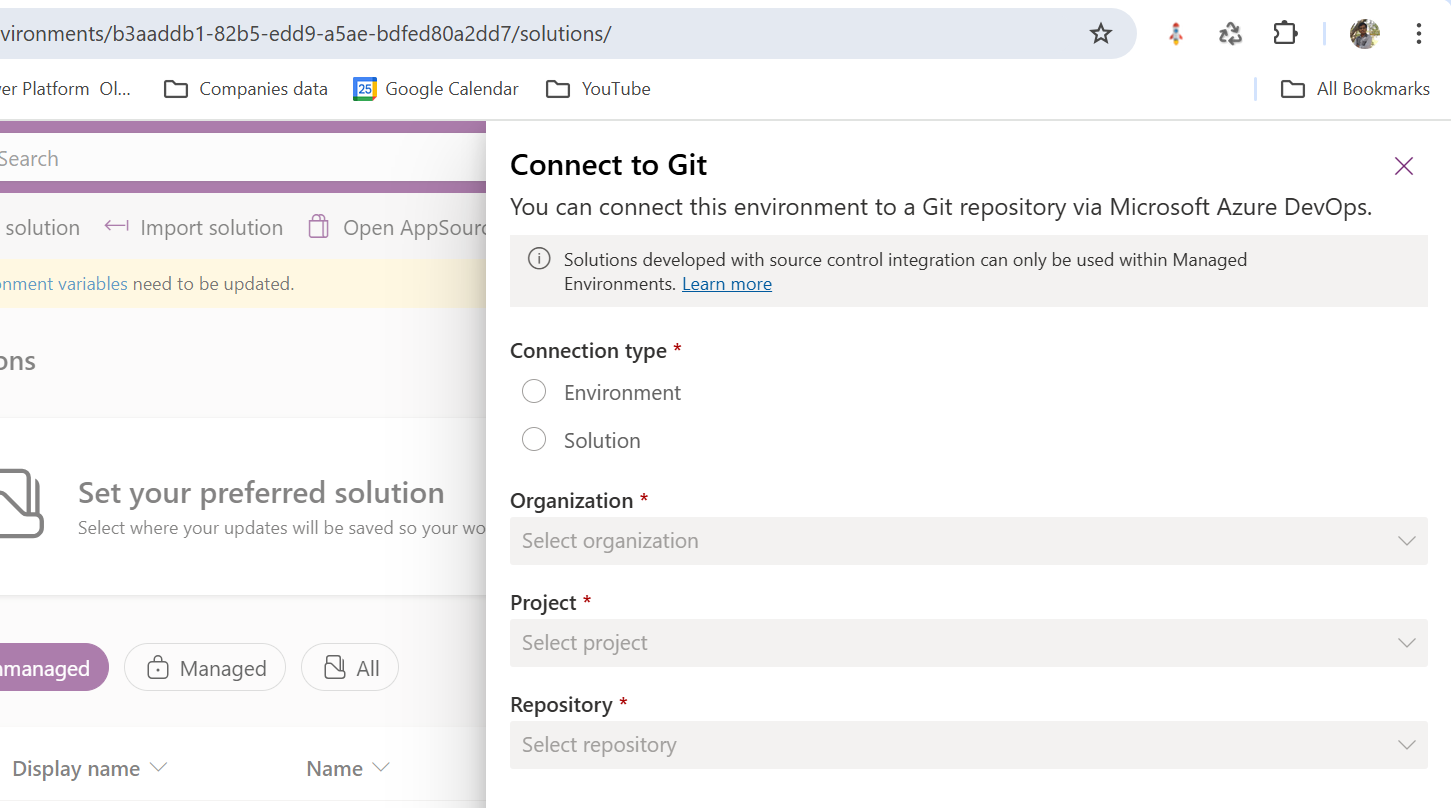
Connecting Dataverse with Azure DevOps is easy but requires a bit of understanding of the Binding options available.
Well, there were two types of Binding options
Environment Binding – Single root folder binds to all the unmanaged solutions in the environment
Solution Binding – Different solutions uses a different root folder in Azure DevOps for binding
Note: Once the binding is setup, there isn’t away to change, so set this up carefully, else you may need to delete the folder and create a new one in Azure DevOps.
Let’s see one by one…for demoing purpose, I have created two projects in Azure DevOps Instance
Solution Binding: When we use this, all the components will be available as pending changes
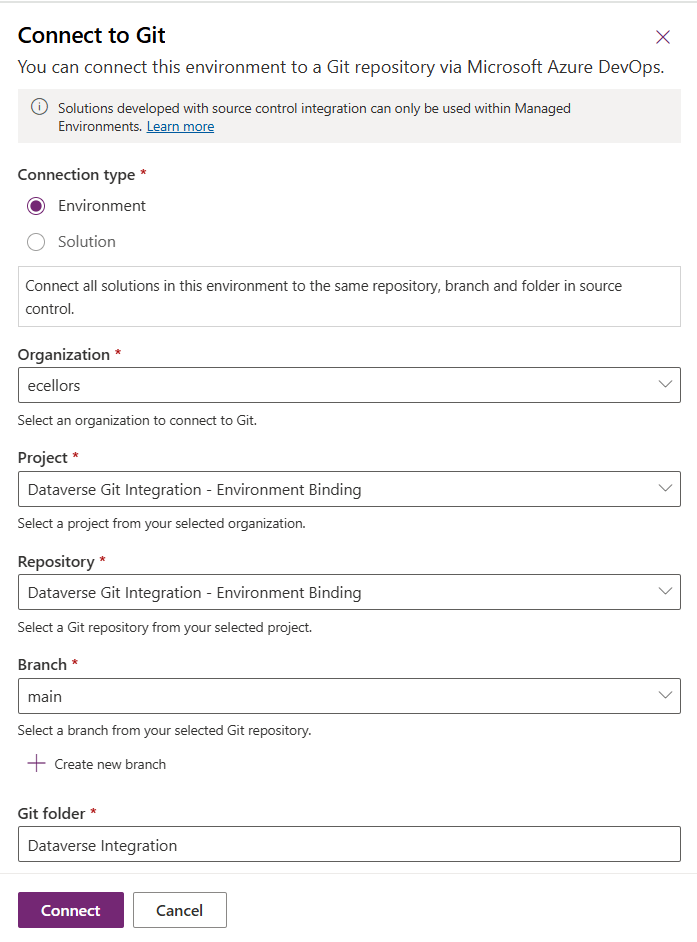
Environment Binding: When we use this, all the unmanaged solution components will be mapped to one Azure DevOps root folder. Let’s set this up.
We are currently able to use only Solution binding, as Environment Binding doesn’t show up any changes to be committed, but there is a catch here.
We can set up for Environment binding and verify if the Solution components are getting marked as pending changes or not. Do note that Setting up the Binding is a one time activity for environment, once setup, it can’t be changed from one type to another.
Since we were currently using Environment binding, let’s select the Connection Type as Environment
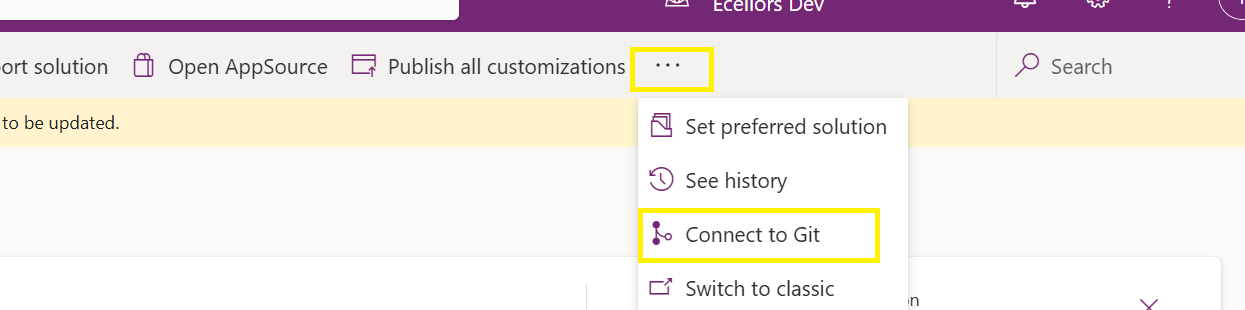
Then click on Connect, once connected, you should a alert message in power apps maker portal at the top.
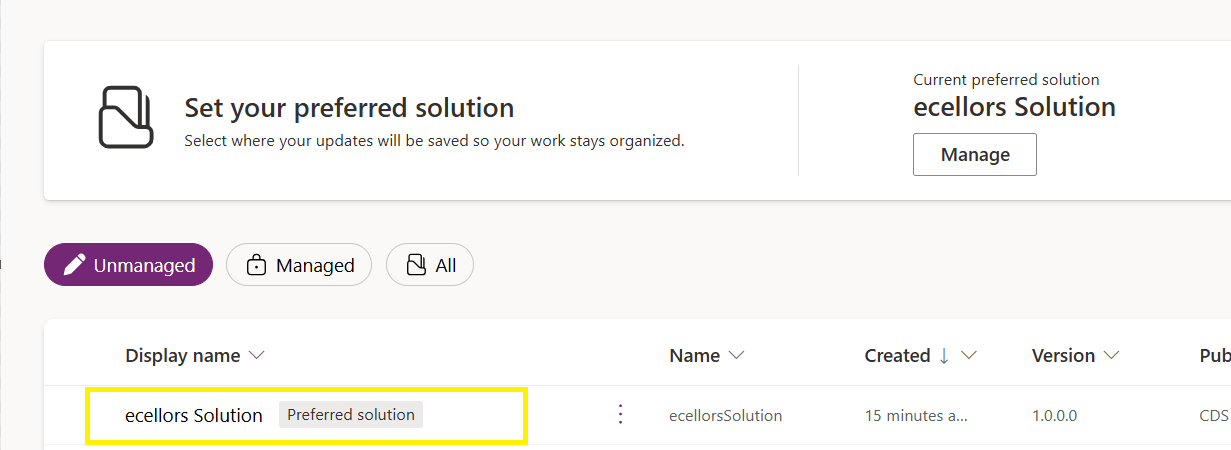
Now create a new solution as below named ecellors Solution
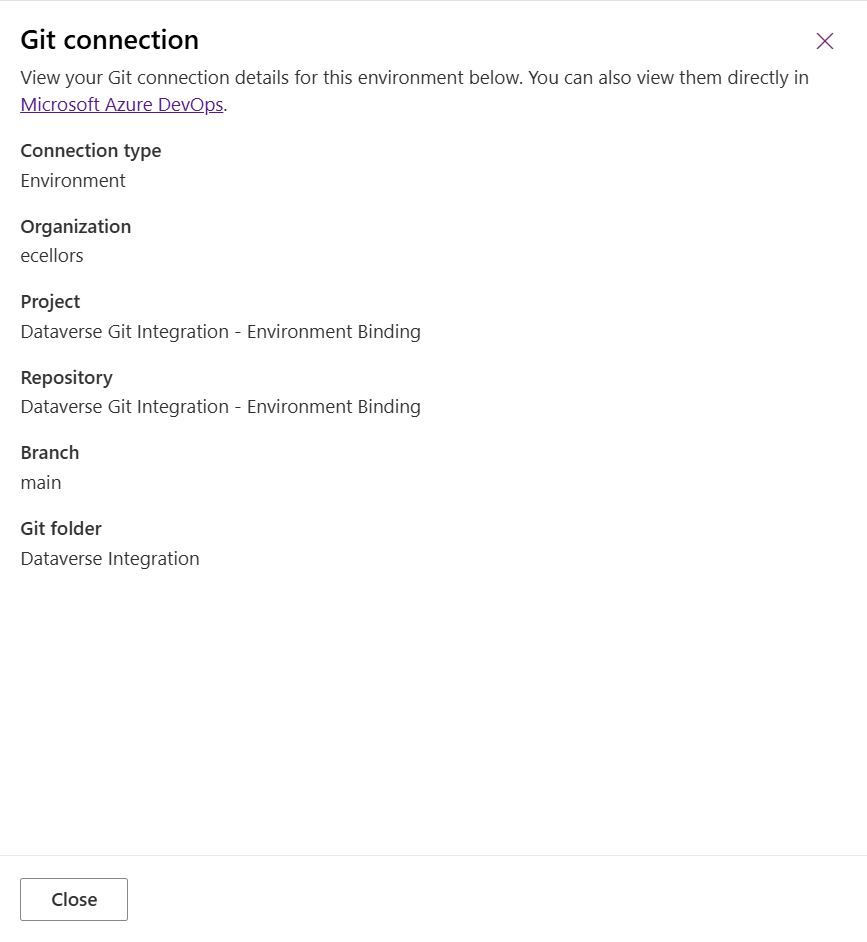
Verify the integration by clicking on Git Integration as below
It should show as below
Now let’s add few components to the solution we created
Once added, let’s publish the unmanaged solution and verify it..
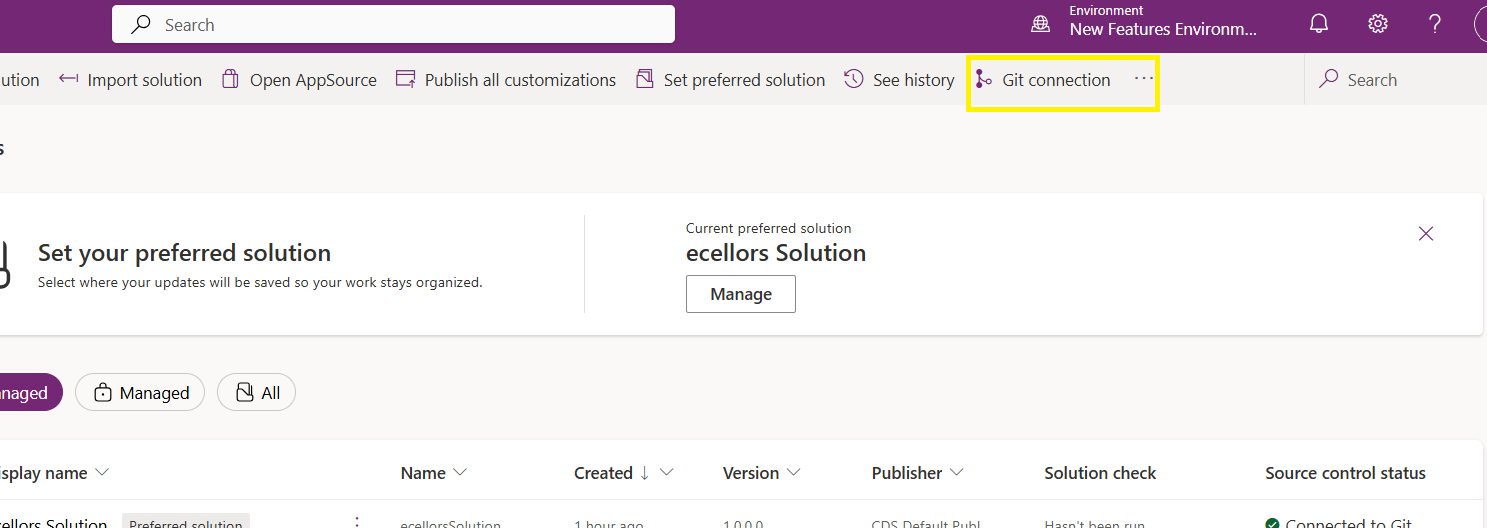
Do look closely, you should see a Source Control icon highlighted in yellow color for illustration.
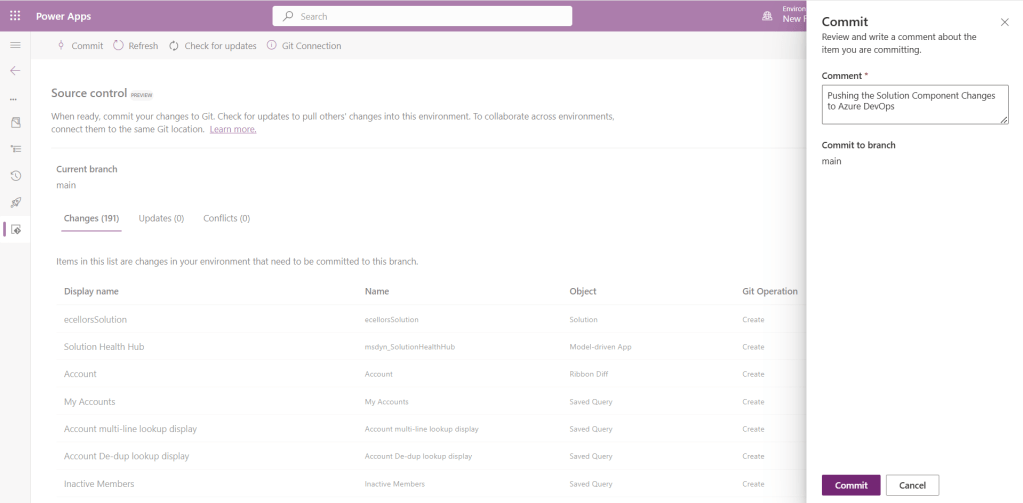
Also, you should see a commit option available at the top
You should now be able to commit the solution components as if you are committing the code changes.
It also specifies the branch to which we were commiting…
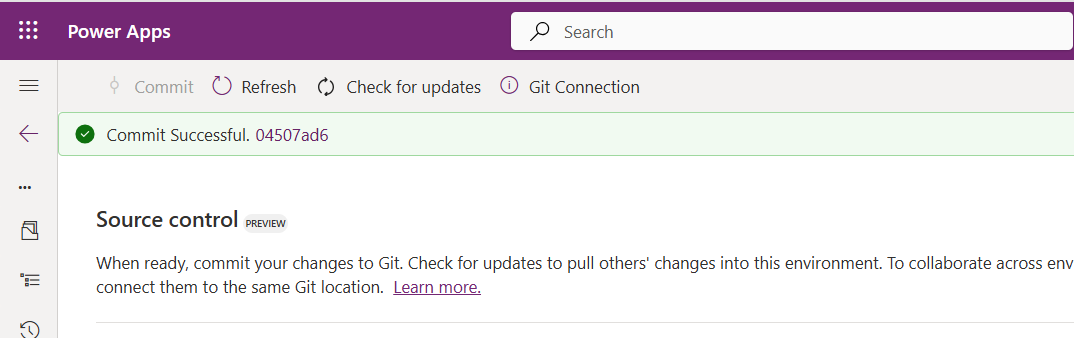
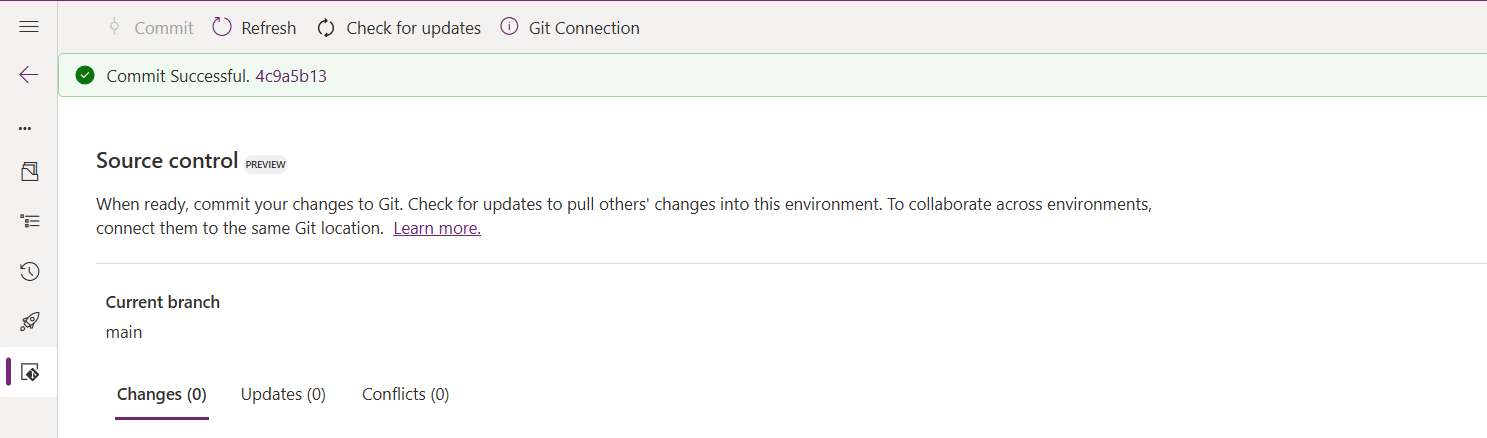
While it takes few minutes unlike pushing the code to Azure DevOps to push the changes, however this would depend based on the number of solution components you were pushing..once it is done, it will show a commit message like below…
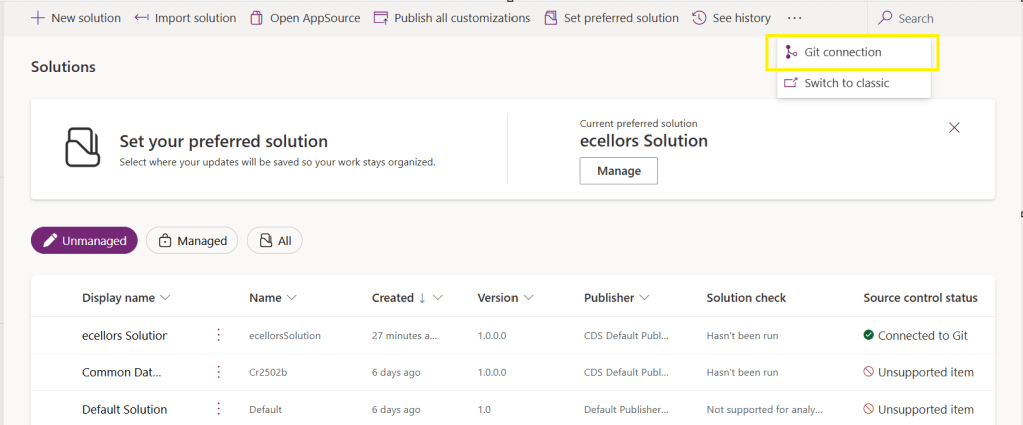
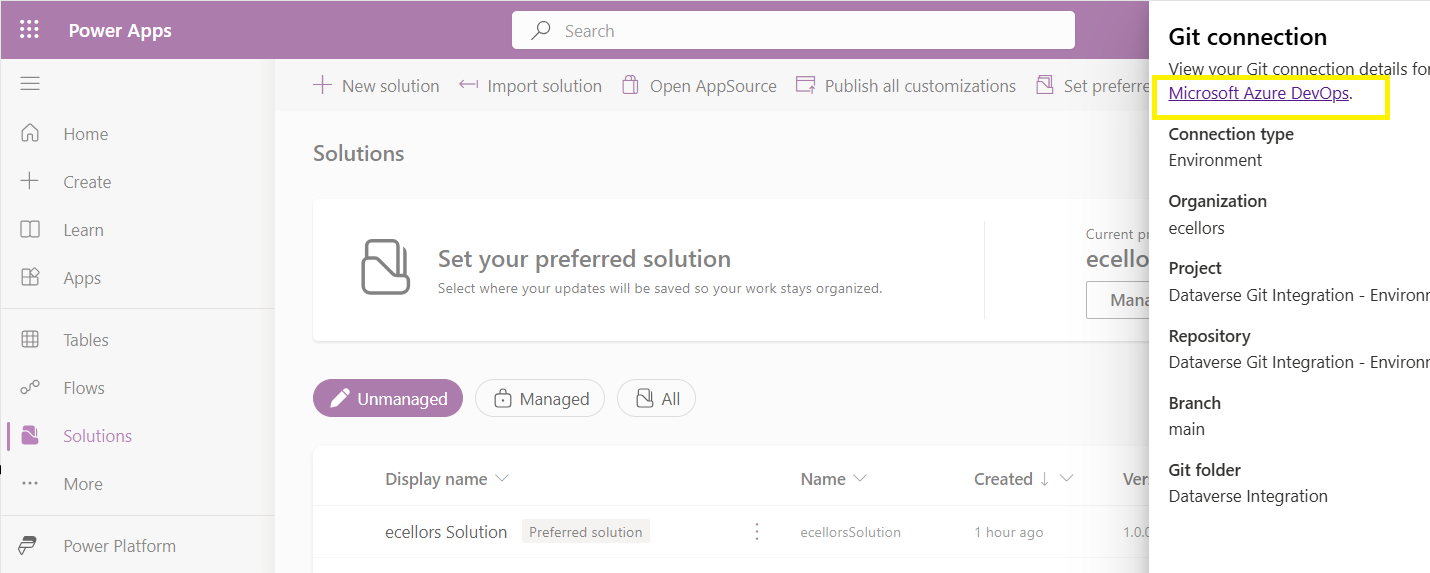
Now let’s verify our Azure DevOps Repo..for this you can go back to the main solutions page, click on Git Connection at the top..
After clicking on Git Connection, click on the link to Microsoft Azure DevOps as below
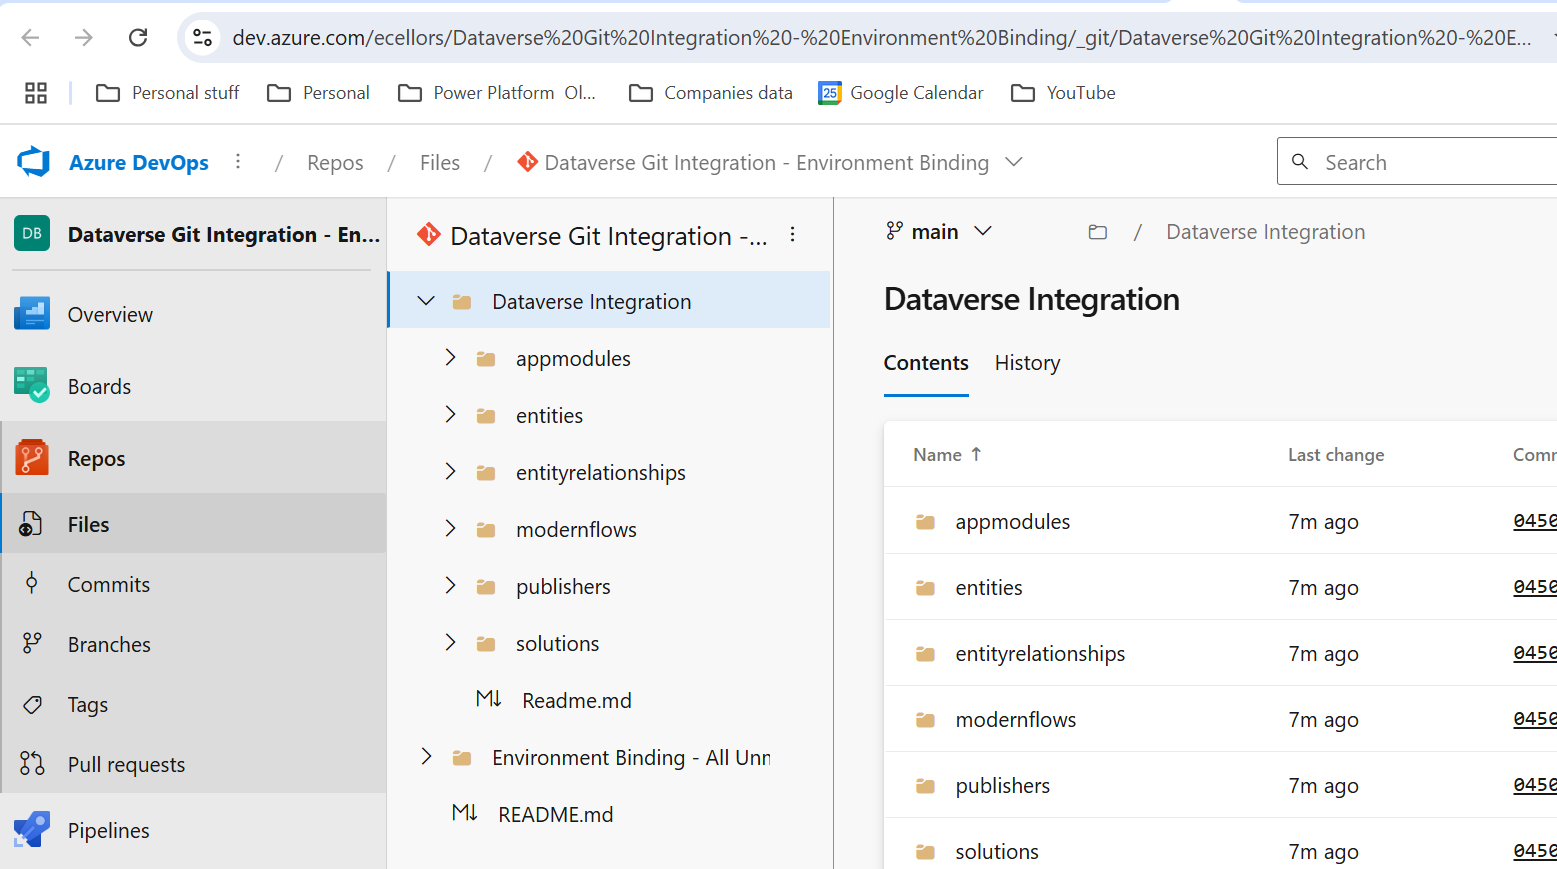
Then you should be navigated to Azure DevOps folder as below where all the solution files will be tracked component wise.
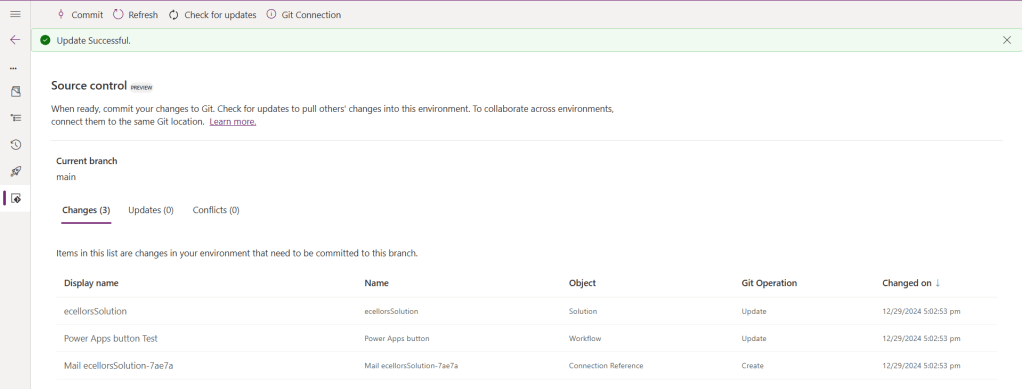
Now we will move back to Power Apps maker portal and make some changes to any of the components inside the solution…
Let’s say, I just edited the flow name and created a new connection reference, saved and published the customizations.
If you did some changes at the Azure DevOps repo level, you can come back and click on Check for updates, if there were any conflicts between changes done in Azure DevOps and component in solution, it will be shown as conflict.
We now have 3 component changes and all were listed here…you can click on Commit.
As soon as the changes are committed, you should see a message saying Commit Successful and 0 Changes, 0 Updates, 0 Conflicts.
Now you successfully integrated Dataverse Solution components with Azure DevOps without any manual intervention required while deploying solutions using Azure DevOps Pipelines.
Hope you learned something new today…while feature is still in Preview and only available for early release, while couple of issues still need to fixed by Microsoft.
I have tested this feature by creating an environment in US Preview region and this feature will be a good value to projects using Automation and this solution repository can be further deployed to other environments using Azure DevOps Pipelines.
This will be rolled out soon next year, hope you learned something new today…
Today, I will be pointing out the advantages of using Preferred Solution and it’s consequences of using or removing it…while the feature is out there from quite few months, yet many of the Power Platform Projects are not utilizing this feature, it can reduce your hassles when many people are working together in a team and you can make sure everyone’s changes go to this solution.
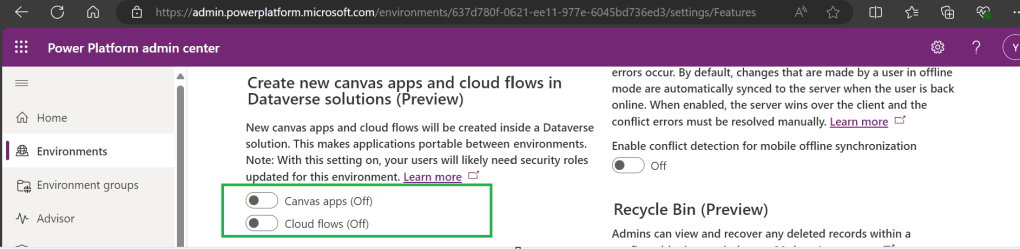
Here we understand what Preferred Solution means to the makers, firstly in order to use this affectively, let’s turn the feature to create Canvas Apps & Cloud Flows in Solutions by enabling this preview feature as suggested below from https://admin.powerplatform.com, this is not mandatory step but would be better as you can add Power Automate flows and Canvas Apps in the Solution and click Save.
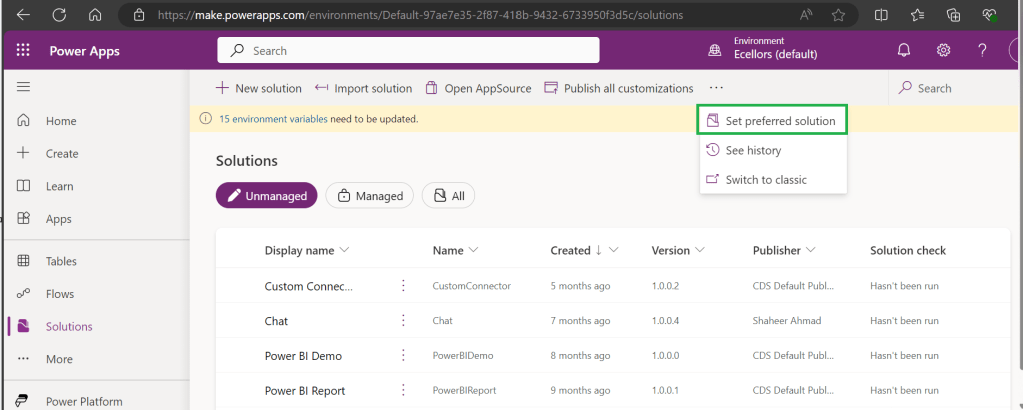
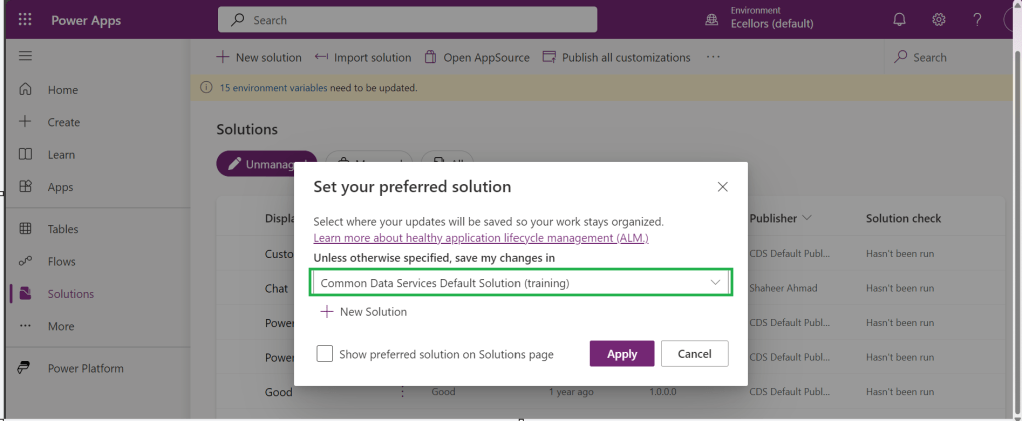
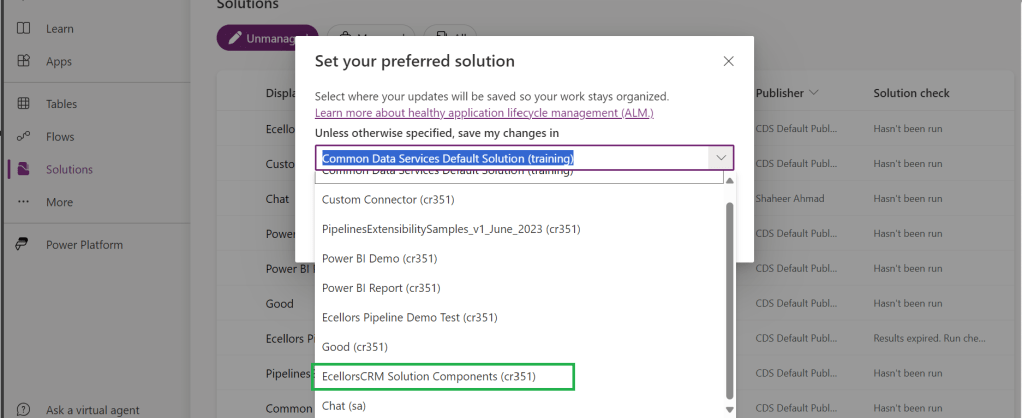
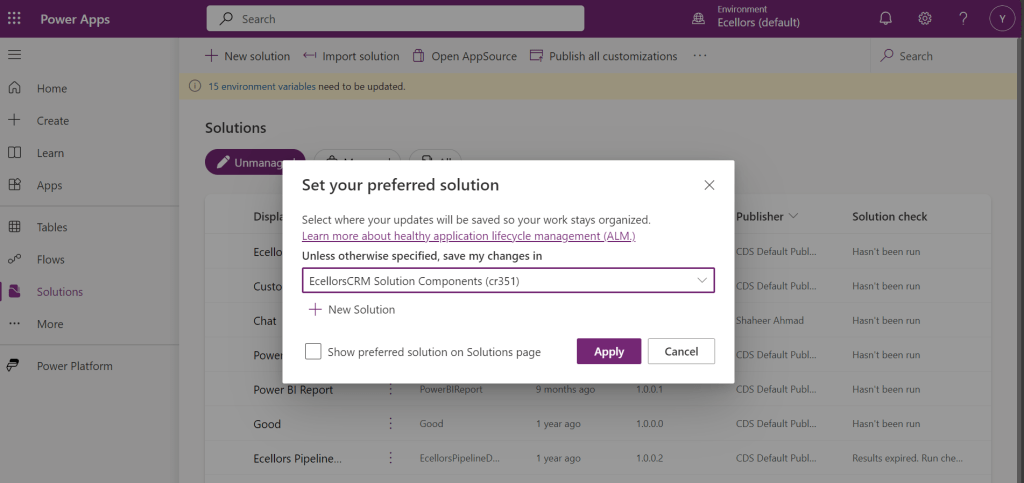
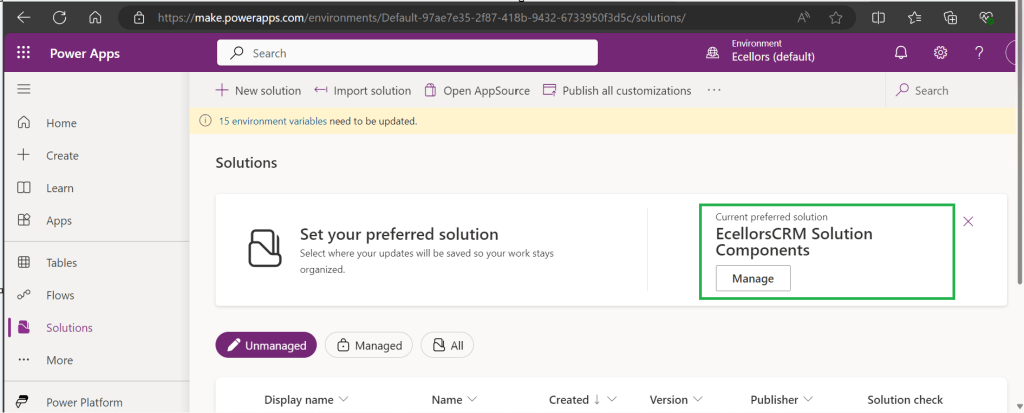
If no preferred solution is set, by default, it will show the Common Data Service Default Solution to set as Default Solution, if you wish to set another Solution, you can select the respective Solution from the drop down.
Enable/Disable the toggle to show Preferred Solution option in the Solutions Page.
Just click on Apply.
Advantages:
Once preferred Solution is set, any components added by the makers would by default go the Preferred Solution, so makers need not worry about choosing right Solution while creating Power Platform Components.
No need to worry if the solution components will be added in the default solution as the new components will be added to the preferred solution automatically.
Limitations:
Preferred Solutions can be only set in Modern Designer
Components created in Classic Designer won’t go to Preferred Solutions
Custom Connector, Connections, DataFlows, Canvas Apps created from Image or Figma Design, Copilots/Agents, Gateways
You can always delete your preferred solution so that other makers can set their preferred solution, but do this with caution so that none of your team members or your works gets impacted.
Hope this saves few seconds of your valuable time…
I have been encountering a strange error since past few weeks now. If you search for this error in Internet you find nothing…the detailed error message obtained from the Plugin Trace Log is as below
System.ServiceModel.FaultException`1[Microsoft.Xrm.Sdk.OrganizationServiceFault]: Exception occured ... at Microsoft.Xrm.RemotePlugin.Grpc.SandboxFabricGrpcClient.ExecutePluginInternal(IRemotePluginRequest pluginRequest, ExecuteRequest executeRequest, Guid executionId, ISandboxFabricDuplexCommunicationHandler communicationHandler, Boolean returnTraceInfo, Guid organizationId, SandboxFabricCallTracker sandboxFabricCallTracker) +0x5d0
at Microsoft.Xrm.RemotePlugin.Grpc.SandboxFabricGrpcClient.ExecutePlugin(IRemotePluginRequest pluginRequest, IPluginExecutionContext executionContext, IPluginTracingService pluginTracingService, ISandboxFabricDuplexCommunicationHandler communicationHandler, ISet`1 earlySerializedPropertiesList, SandboxFabricCallTracker sandboxFabricCallTracker, ISandboxMemoryStreamProvider memoryStreamProvider) +0x2cd
at Microsoft.Xrm.RemotePlugin.Grpc.SandboxFabricCodeUnit.Execute(ILifetimeScope scope, IExecutionContext context, SandboxFabricCallTracker& sandboxFabricCallTracker, ISandboxMemoryStreamProvider memoryStreamProvider) +0x6e
at Castle.Proxies.Invocations.ISandboxFabricCodeUnit_Execute.InvokeMethodOnTarget() +0x13
at Castle.DynamicProxy.AbstractInvocation.Proceed() +0x2d
at Microsoft.Xrm.RemotePlugin.Client.Interceptors.SandboxFabricPluginTraceInterceptor.Intercept(IInvocation invocation, IExecutionContext context, SandboxFabricCallTracker sandboxFabricCallTracker) +0x1f
The error message looked so strange to me and I couldn’t get any idea on what is happening, I thought some problem with the Plugin Code and it was executing more than 2 mins and hence causing error related to Sandbox service of Dynamics 365. I was executing this logic placed inside an action from Power Automate…this took couple of hours to figure out what was happening…
With no clue, I had started to change Plugin Code in the following ways…
Change the Synchronous Plugin to Asynchronous Plugin
It doesn’t show any error in Power Automate now, but in the Plugin Trace Log, it still throws the error
Add Try – Catch Block
Add try catch block made me understood that Plugin was causing an exception due to type casting issue in my logic. This worked…
FYI, I have removed some sensitive information from the below error message.
Microsoft recommends us to use Try – Catch block for efficient error handling, in the first place, so always use proper error handling while developing Plugins, Actions or Custom Workflows in Dynamics 365 to avoid such errors.
If you face this kind of error, this is some issue within your code and nothing to do with Microsoft Services, no need to raise a Microsoft Support Ticket for resolving this.
One of my colleagues asked about Dataverse search, hence I am writing this article on Dataverse Search in Dynamics 365 and in the end, will compare different search options available in Dynamics 365.
Dataverse Search:
In layman terms, Dataverse Search is a powerful search tool that helps you find information quickly across your organization’s data in Microsoft Dataverse, which is the underlying data platform for apps like Power Apps, Dynamics 365, and more, shows you all the related information from across different tables or records in one place.
In short, Dataverse Search is the evolved version of Relevance Search, offering a more robust, faster, and user-friendly search experience including search results for text in documents that are stored in Dataverse such as PDF, Microsoft Office documents, HTML, XML, ZIP, EML, plain text, and JSON file formats. It also searches text in notes and attachments. Before enabling it, just note that once Dataverse search is enabled, it will be affected in all your Model Driven Apps, as of now, just take note.
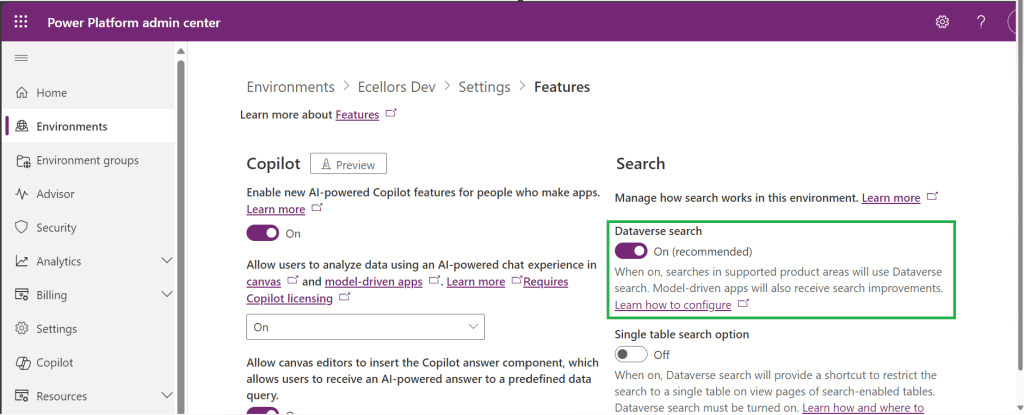
It is on by default, here is where you can now turn off the Dataverse Search:
Click on Environments –> Choose your required environment –> Settings –>Features
3. Disable/Enable the Dataverse search feature.
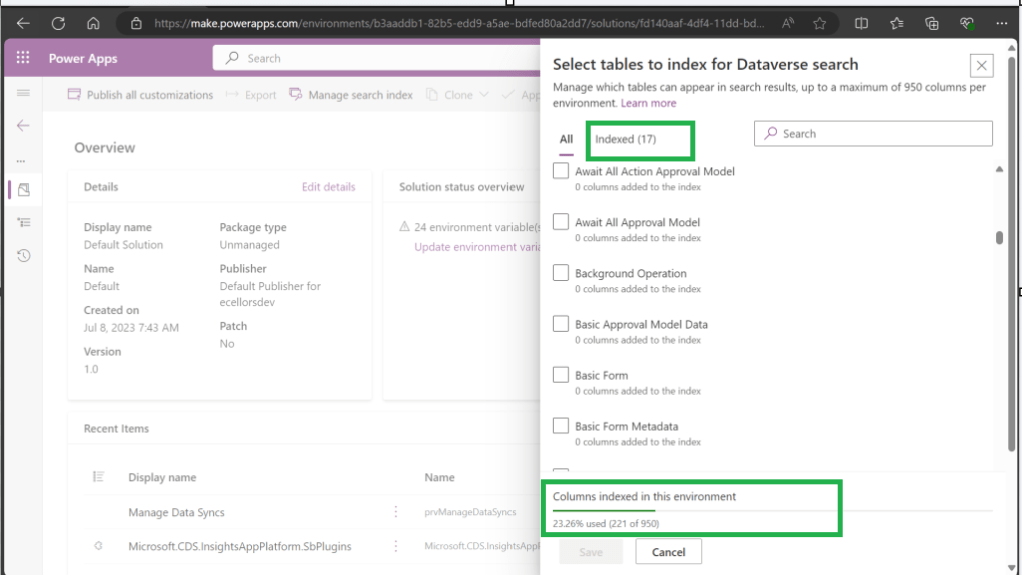
Once enabled, we need to configure the tables for Dataverse Search so that indexing is performed at the backend, in order to do this…
Navigate to https://make.powerapps.com, select your desired solution –> Click on Overview as shown below
Now you need to choose Manage Search Index and you can choose your desired table and fields, there isn’t a limit on the number of tables you can configure, but there is a limit on the number of fields you can configure for an environment, a maximum of 1000 fields are permitted both including system and custom fields, 50 fields are used by system, so you can configure 950 fields.
Just note that some field types are treated as multiple fields in the Dataverse search index as indicated in this table.
Field type
Number of fields used in the Dataverse search index
Lookup (customer, owner, or Lookup type attribute)
3
Option Set (state, or status type attribute)
2
All other types of fields
1
At the bottom of the snap above, you could see the percentage of columns indexed in this environment.
When Dataverse search is enabled, the search box is always available at the top of every page in your app. You can start a new search and quickly find the information that you’re looking for.
When Dataverse search is turned on, it becomes your default and only global search experience for all of your model-driven apps. You won’t be able to switch to quick find search also known as categorized search.
You can also enable Quick actions as shown in the below table
Table
Quick actions
Account
Assign, Share, Email a link
Contact
Assign, Share, Email a link
Appointment
Mark complete, Cancel, Set Regarding, Assign, Email a link
Task
Mark complete, Cancel, Set Regarding, Assign, Email a link
Phone Call
Mark complete, Cancel, Set Regarding, Assign, Email a link
Email
Cancel, Set Regarding, Email a link
Here is the short table comparing all types of searches in Dynamics 365…
Yes. Note: For non-production environments an administrator must manually enable it.
Yes, for the table grid. No, for multiple-table quick find (categorized search). An administrator must first disable Dataverse search before multiple-table grid find can be enabled.
Yes
Single-table search scope
Not available in a table grid. You can filter the search results by a table on the results page.
Available in a table grid.
Available in a table grid.
Multi-table search scope
There is no maximum limit on the number of tables you can search.
Searches up to 10 tables, grouped by a table.
Multi-table search not available.
Search behavior
Finds matches to any word in the search term in any column in the table.
Finds matches to all words in the search term in one column in a table; however, the words can be matched in any order in the column.
Query builder where you can define search criteria for the selected row type. Can also be used to prepare data for export to Office Excel so that you analyze, summarize,or aggregate data, or create PivotTables to view your data from different perspectives.
Searchable columns
Text columns like Single Line of Text, Multiple Lines of Text, Lookups, and Option Sets. Doesn’t support searching in columns of Numeric or Date data type.
All searchable columns.
All searchable columns.
Search results
Returns the search results in order of their relevance, in a single list.
For single-table, returns the search results in a table grid. For multi-table, returns the search results grouped by categories, such as accounts, contacts, or leads.
Returns search results of the selected row type with the columns you have specified, in the sort order you have configured.
Hope you learned something today…if you have any questions, do let me know in the comments…
Last few weeks was very busy for me, I missed interacting with the community.
Here I would like to share one tip which can greatly help your debugging…
Just to give a little background, I was working with the Plugins for Dynamics 365 recently where I was working with API, the Plugin seem to work fine when debugged using Profiler, I tested the piece of the Plugin Code in Console, it worked either, but Plugin is not working when the respective action which triggers the Plugin is being fired. I scratched my head, what is the problem…
Just then, I tried using the below block of code, replaced the catch block of Plugin Code with below code.
This file contains hidden or bidirectional Unicode text that may be interpreted or compiled differently than what appears below. To review, open the file in an editor that reveals hidden Unicode characters.
Learn more about bidirectional Unicode characters
Soon, I observed from the detailed error message above function posted, it is failing because of version problem of the referenced DLL and current DLL version was not supported with my assembly.
Soon I was able to reference my Plugin with correct DLL version which fixed the issue. No further debugging was needed.
In Dynamics 365, a Polymorphic Lookup is a powerful feature that allows you to associate a single lookup field with multiple different entities. This feature is particularly useful when you want a field to reference multiple related entities, providing greater flexibility and efficiency in your CRM applications.
What is a Polymorphic Lookup?
A Polymorphic Lookup is a special type of lookup field that can refer to multiple entities rather than just one. For example, a single “Related Entity” field can refer to either a Contact, Account, or Opportunity, making it versatile for various business scenarios. This capability is referred to as “polymorphism” because the lookup field can resolve to different types of entities at runtime.
Example Scenario:
Consider a sales scenario where a “Related Entity” can be a Customer, but the customer could be either an Account or a Contact. Rather than having two separate lookup fields (one for Account and another for Contact), you can create a polymorphic lookup field, which makes your user interface simpler and more streamlined.
How Does Polymorphic Lookup Work in Dynamics 365?
In Dynamics 365, polymorphic lookup fields are implemented as part of the Relationship between entities. The key concept here is the EntityReference, which dynamically resolves to the appropriate entity type (e.g., Account, Contact, etc.) based on the actual value selected by the user.
Field Definition:
When defining a lookup field, you define a Relationship where the field can refer to multiple target entities.
The system uses the Type and Id to determine the related entity.
Lookup Resolution:
At runtime, when a user selects a value in the polymorphic lookup field, the system dynamically resolves which type of entity to link to.
The field displays the appropriate name (e.g., Account or Contact) based on the entity that the user selects.
Creating Polymorphic Lookups in Dynamics 365
Polymorphic lookup fields are typically used in the following types of scenarios:
Custom Relationships: When you need to create a lookup that can reference multiple different entities.
Shared Relationship: For cases where one relationship applies to more than one entity, such as a lookup that could refer to either a Contact or an Account.
Steps to Create a Polymorphic Lookup Field:
Navigate to the Customization Area:
Go to the Settings area in Dynamics 365 and select Customizations.
Select Customize the System to open the solution where you want to add the polymorphic lookup field.
Create a New Field:
In the relevant entity, click on Fields, and then select New.
Choose the Lookup data type for the field.
Define the Polymorphic Lookup:
Under the Related Entity section, select Custom to define the multiple entities this lookup should support.
Select the Entity Relationships where this lookup should point to multiple entities.
Save and Publish:
Save the field and publish your customizations to apply the changes.
Example: Setting Up Polymorphic Lookup for Customer
Suppose you’re designing a custom Case entity and you want to add a lookup for the Customer. Instead of creating separate lookups for Contact and Account, you can create a polymorphic lookup that links to either an Account or Contact as the Customer.
Steps:
Create a Customer Lookup field in the Case entity.
Define the Customer Lookup field to support both Account and Contact entities.
After publishing the field, the user will see the lookup field and will be able to choose either an Account or Contact as the Customer.
Use Cases for Polymorphic Lookup
Consolidating Related Data:
Polymorphic lookups help streamline user experience by consolidating multiple lookups into a single field, especially when dealing with common relationships across different entities.
Reducing Redundancy:
Rather than having separate lookup fields for Account and Contact in every related form, you can reduce redundancy by using polymorphic lookups, which allows referencing both entities in one field.
Improved Reporting and Analytics:
When data is related across multiple entities, using a polymorphic lookup can make it easier to pull reports and perform analysis without requiring multiple joins or complex queries.
Considerations and Limitations
While polymorphic lookups are powerful, they come with certain limitations:
Limited to Certain Fields: Polymorphic lookups are supported only in certain system fields (like Regarding in activities), but may not be available for every custom scenario.
API Handling: When working with the Dynamics 365 Web API, the polymorphic lookup is handled through special attributes that require careful parsing to identify the correct entity type.
UI Considerations: Although polymorphic lookups streamline the user interface, they can also confuse users who are unfamiliar with the concept. It’s important to have clear documentation and training for users on how to use these fields.
Conclusion
Polymorphic lookups in Dynamics 365 provide an elegant solution for scenarios where a lookup field needs to refer to multiple entity types. By understanding and using polymorphic lookups effectively, you can streamline your CRM solutions, reduce redundancy, and improve your application’s flexibility. It’s important to consider the limitations and ensure that users are properly guided in utilizing these fields within your system.
You can easily create this Polymorphic Lookup from XrmToolBox as well…
Geo Migration is a great feature/flexibility offered by Microsoft for customers who wish to move to a region which is in closest proximity to their operations even though initially their Power Platform environment region based out of a different one when they signed up. I checked out online but couldn’t find a good reference blog article yet online, hence this post.
I will make this post detailed but a comprehensive one for anyone to understand the migration. Customers can also opt for Multi Geo for those who have a need to store data in multiple geographies to satisfy their data residency requirements. If you don’t know where your Power Platform environment resides, you can check from Power Platform Admin Center.
If you were not aware yet, Microsoft Azure is the only cloud provider which offers services in more regions when compared to AWS (Amazon Web Services) and GCP (Google Cloud Platform). The Geo Migration feature seamlessly allows customers to move their environments in a single tenant from one region to another. e.g. for Singapore, it is as below.
Important:
Geo Migration is not generally available, so please exercise with caution.
You may reach out to your TAM(Microsoft Technical Account Manager) quoting your request
There were several limitations, see below references for more details.
Mandatory Pre-Migration Check list:
Any Power Apps, Power Automate Flows should be manually exported prior to the migration. Custom Connectors aren’t supported as of now, they must manually reconfigure or created in the new environment. You can export them individually or export them in group.
Canvas Apps, Custom Pages, Code Components like PCF and libraries should be deleted from the environment before your migration activity starts. Else they might be in corrupted state after migration activity.
If any of your Apps are not solution aware because of any reason like App calls a Power Automate when a button is called etc., you may need to explicitly export it out and take the backup.
Post Migration Check list:
After the migration, import all the packages which you have taken backup during pre migration. For those which were not solution aware, import them manually.
If you have Power Portals or Power Virtual Agents, those should be exported explicitly.
Make sure you test all functionalities in order not to impact end users.
Notes:
You don’t need to build Apps and Flows from scratch. Dynamics 365 marketing App is not supported yet. There could be some configuration changes post migration.
While I try to put the information to the best available as per sources from Microsoft, this may change over time and variation could be different as each customer will have different workloads and dependencies with other services, so please read the references carefully before proceeding. Contact Microsoft Support or TAM as necessary.
Hope this helps to get a sneak peek into the migration process.
GnuPG is a complete and free implementation of the OpenPGP standard. GnuPG allows you to encrypt and sign your data and communications; it features a versatile key management system, along with access modules for all kinds of public key directories. GPG can use both symmetric and asymmetric encryption to encrypt and decrypt.
So, now let’s talk about the tool Gpg4Win. Gpg4win is an email and file encryption package for most versions of Microsoft Windows and Microsoft Outlook, which utilizes the GnuPG framework for symmetric and public-key cryptography, such as data encryption, digital signatures, hash calculations etc. It’s open source and a free tool, it has been widely used by many of the encryption implementations. So, let’s see how you can install a GnuPG Software.
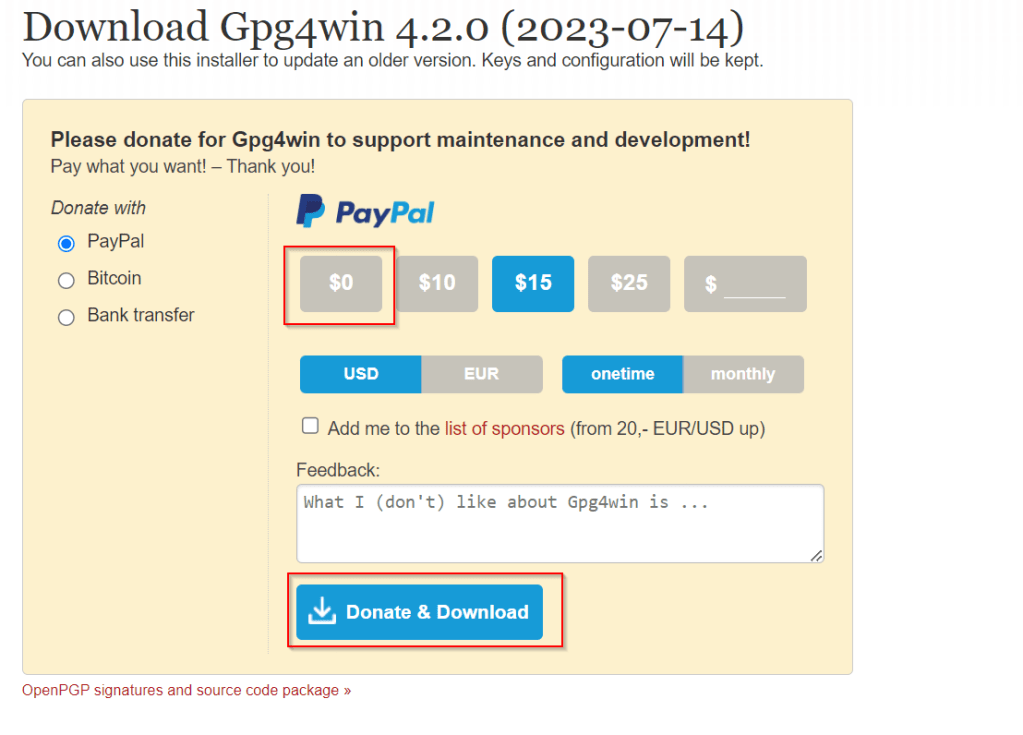
You can navigate to this GnuPG Download link of the official download page. You can download the latest version, as of writing this blog Gpg4Win 4.2.0 is the latest.
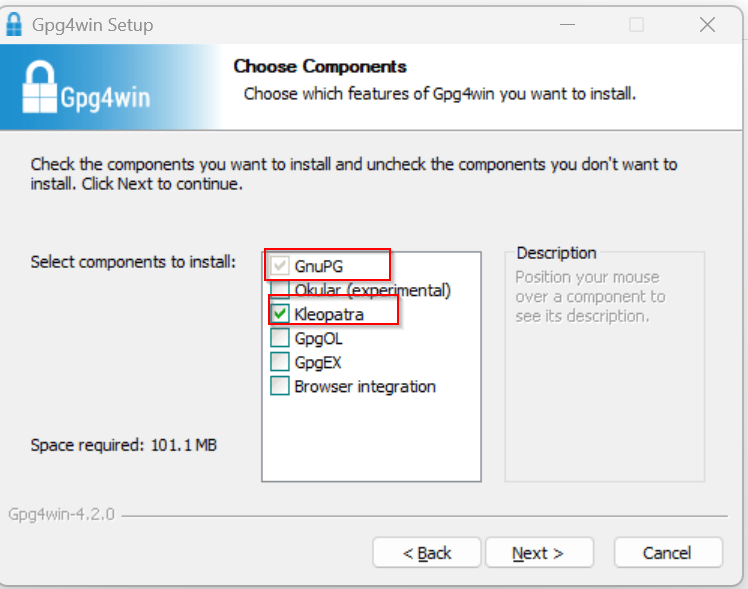
Gpg4win 4.2.0 contains mainly, rest of the components aren’t of interest for this blog:
1.GnuPG 2.4.3 : Actual software used to encrypt and decrypt.
2. Kleopatra 3.1.28: Kleopatra is a certificate manager and GUI for GnuPG, it stores all your certificates and keys.
Choose $0 and proceed to download which now
This now downloads the Gpg4Win software. So once click and start your installation, choose the necessary components required.
You can proceed to select only GnuPG, Kleopatra or both, which installs only GnuPG command line and/or Kleopatra which is a windows utility.
If you choose not to install Kleopatra, it’s ok, you still be able to encrypt and decrypt but only using command line, but if you have Kleopatra, you can use GUI for encryption or decryption.
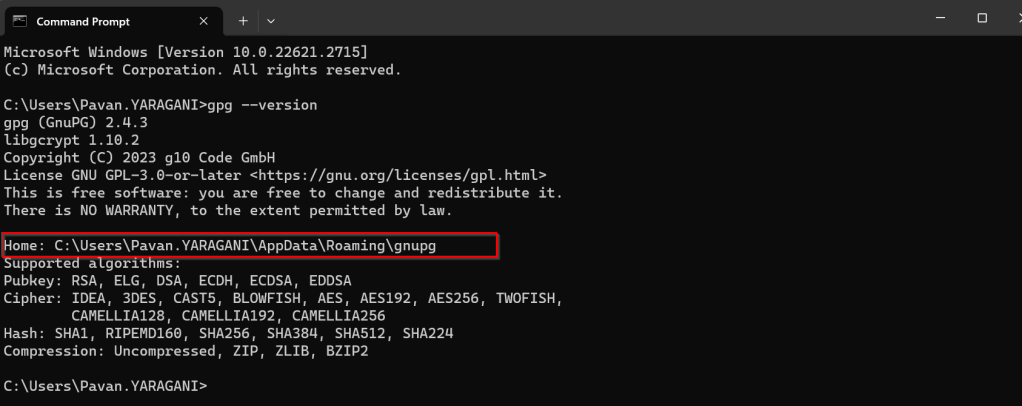
Once you have installed GnuPG, just open Command Prompt, start entering gpg..
You can also check the root folder where all your Key rings will be stored…
With gpg is now set up in your PC, you will be able to encrypt and decrypt using gpg command line scripts.
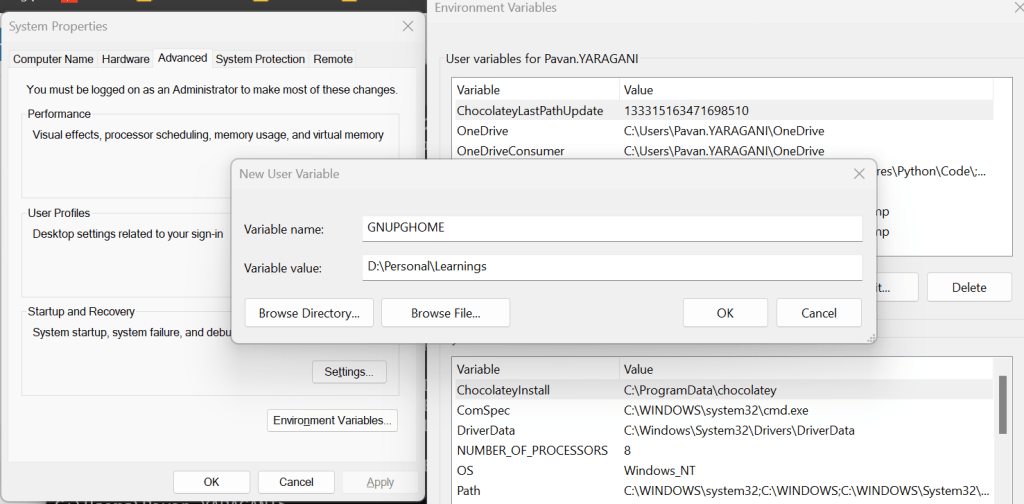
Ok, now everything is good, how about if other persons when logged into this PC, will they be able to use the gpg commands to encrypt or decrypt, of course not, for this you need to follow as below…
All you need to set an environment variable which is of scope user and set the home location for gpg to look for keys in that machine.
Once you have set this, the home location of gpg is now changed, so any user who have access to this path can be able to encrypt or decrypt without issues.
You check the modified location by using this command
I hope you have learned something…below this post, I have added the link to the blog post where the encryption and decryption just below this blog post, we will see how you can encrypt and decrypt files using gpg command line utility being called from C#. Any questions do let me know in comments….
Happy Integrating Power Platform with 3rd party Applications.
Thank you for visiting my blog today, this is another post talking about SSIS Data Flow Task which I encountered while performing data loading tasks using SSIS and would like to share with everyone.
Did your Visual Studio keeps not responding when you were opening the dataflow tasks for the SSIS Packages you or your team created as shown in image below. And you always try to close the same from task bar since you can’t work and keeps you frustrating, then this tip is absolutely for you.
The problem is actually with your Connection Manager, in your data flow task, you might have OLE DB Connections which the package is using in order to write information if there were any failures in the Data flow. In my case, I was actually writing to a SQL Table using a OLE DB Destination component.
If you cross check that SQL server availability, you should see the SQL Server (Your Instance) is stopped when you check in Start–> Services in the PC. In my case, I was using SQL Server (SQLEXPRESS01) in the SSIS Package as below.
And hence the SQL Server service is in stopped mode, the Visual Studio is not able to acquire the connection to open the package. You were almost there..
Just Start the service which you were using and voila…. your Visual Studio should open normally.