Dataverse – Git Integration – Preview – Quick Review

Hi Folks,

This post is about Dataverse and Git Integration which is the most sought after feature in the todays automation Era. This is a preview feature, you would need to create a new environment with Early Access enabled to test this feature or you can use an existing US Preview environment for testing this out.

While every MDA(Model Driven Application) and it’s components can be safely and moved across the environments using Solutions with the help of Azure DevOps Pipelines. However when coming to integrating Power Platform Solutions to Azure DevOps, we had to manually export the solution and download them each and every time when we would like to commit the Solution Artifacts to Azure DevOps Repo.

With this new Preview feature we can directly integrate the Power Platform Solutions to Azure DevOps.

Let’s see this action…wait a moment, there were some prerequisites to be considered…

  1. Environment should be a Managed Environment to start using this and you need to be an Admin for the environment
  2. Azure DevOps subscription and license should be available to set this up, also permission to read source files and commits(should be a member of contributor group in Azure DevOps) from a Repo
  3. Your email address used for Azure DevOps and Power Platform Solutions should be the same

Setup:

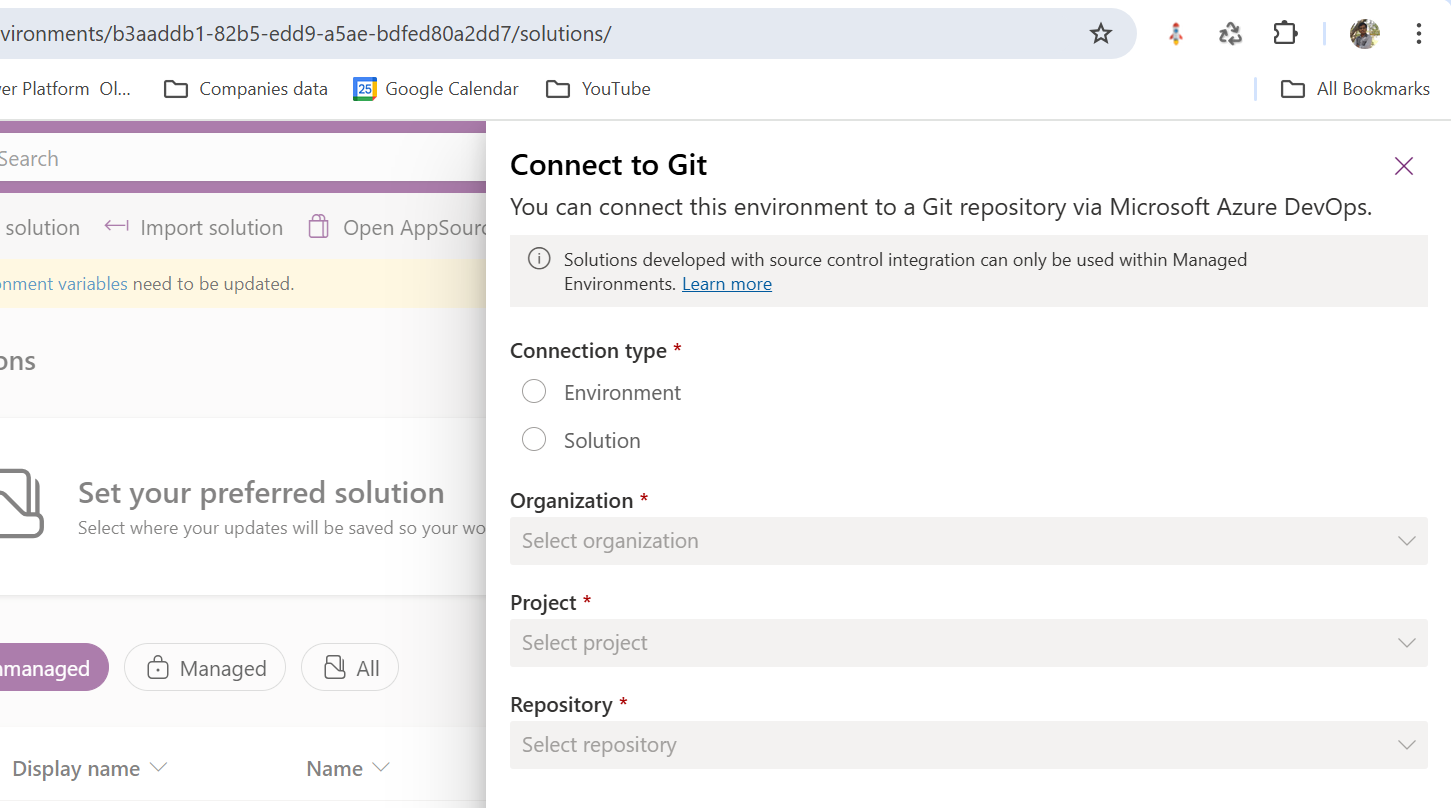
Connecting Dataverse with Azure DevOps is easy but requires a bit of understanding of the Binding options available.

Well, there were two types of Binding options

  1. Environment Binding – Single root folder binds to all the unmanaged solutions in the environment
  2. Solution Binding – Different solutions uses a different root folder in Azure DevOps for binding

Note: Once the binding is setup, there isn’t away to change, so set this up carefully, else you may need to delete the folder and create a new one in Azure DevOps.

Let’s see one by one…for demoing purpose, I have created two projects in Azure DevOps Instance

  1. Solution Binding: When we use this, all the components will be available as pending changes
  2. Environment Binding: When we use this, all the unmanaged solution components will be mapped to one Azure DevOps root folder. Let’s set this up.

We are currently able to use only Solution binding, as Environment Binding doesn’t show up any changes to be committed, but there is a catch here.

We can set up for Environment binding and verify if the Solution components are getting marked as pending changes or not. Do note that Setting up the Binding is a one time activity for environment, once setup, it can’t be changed from one type to another.

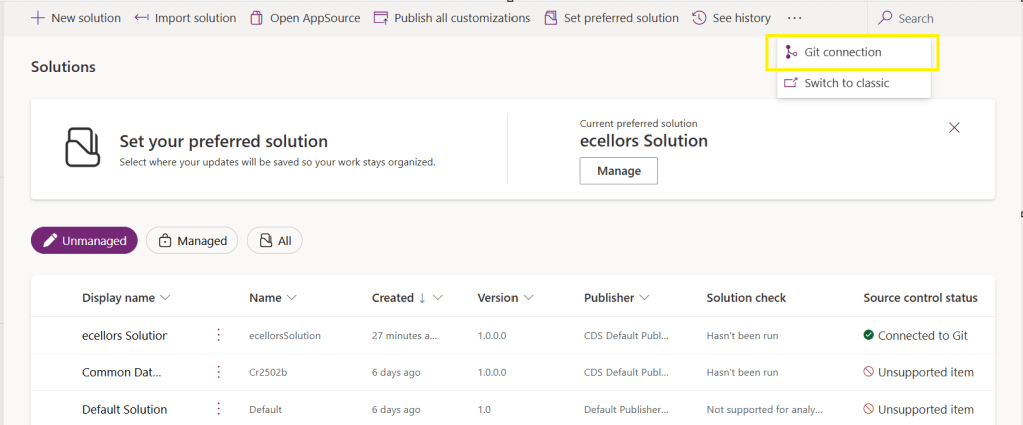
Open https://make.powerapps.com and navigate to solutions and click on ellipses as below

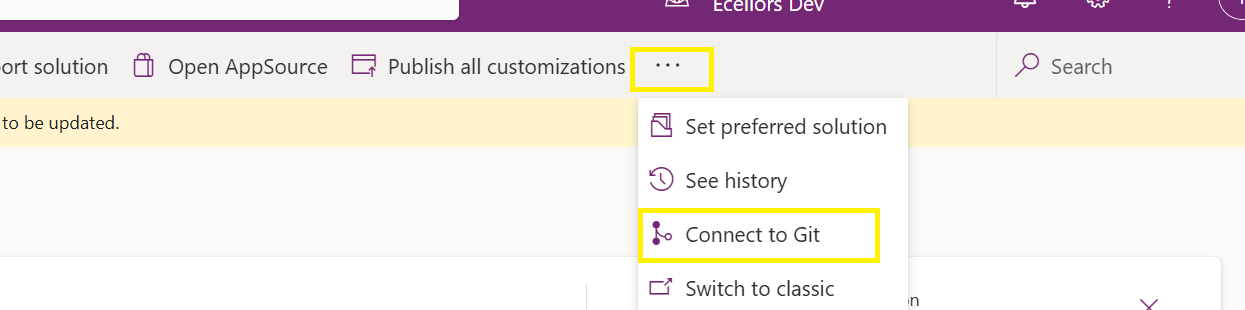
Once clicked on Connect to Git

Since we were currently using Environment binding, let’s select the Connection Type as Environment

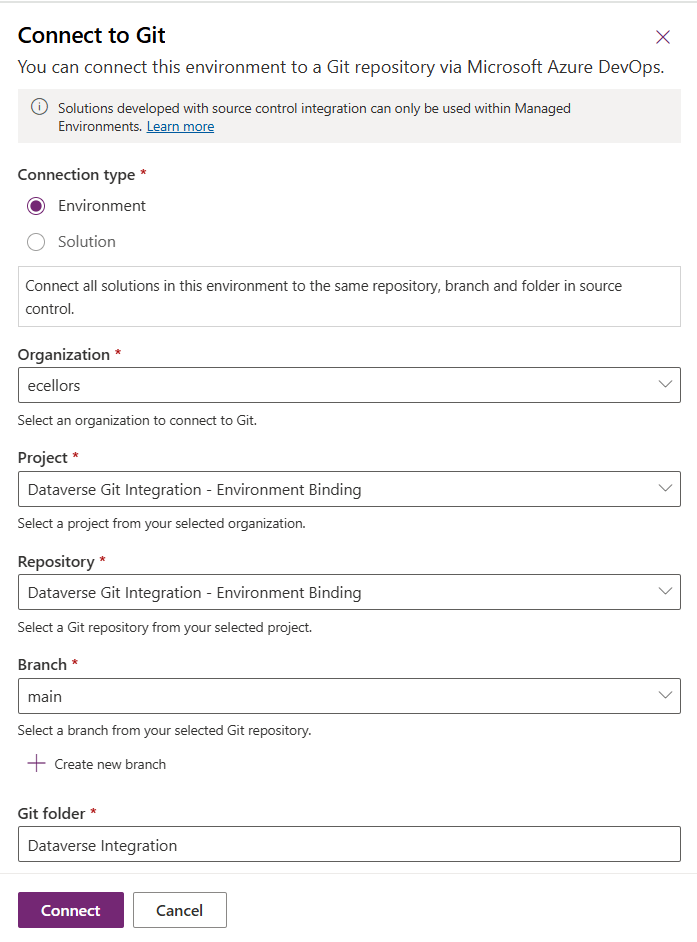
Then click on Connect, once connected, you should a alert message in power apps maker portal at the top.

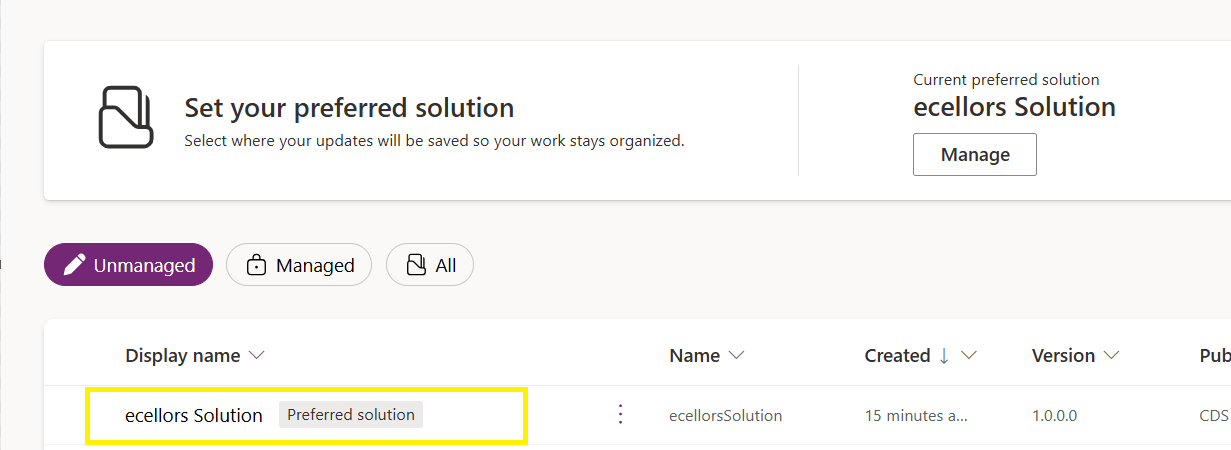
Now create a new solution as below named ecellors Solution

Verify the integration by clicking on Git Integration as below

It should show as below

Now let’s add few components to the solution we created

Once added, let’s publish the unmanaged solution and verify it..

Do look closely, you should see a Source Control icon highlighted in yellow color for illustration.

Also, you should see a commit option available at the top

You should now be able to commit the solution components as if you are committing the code changes.

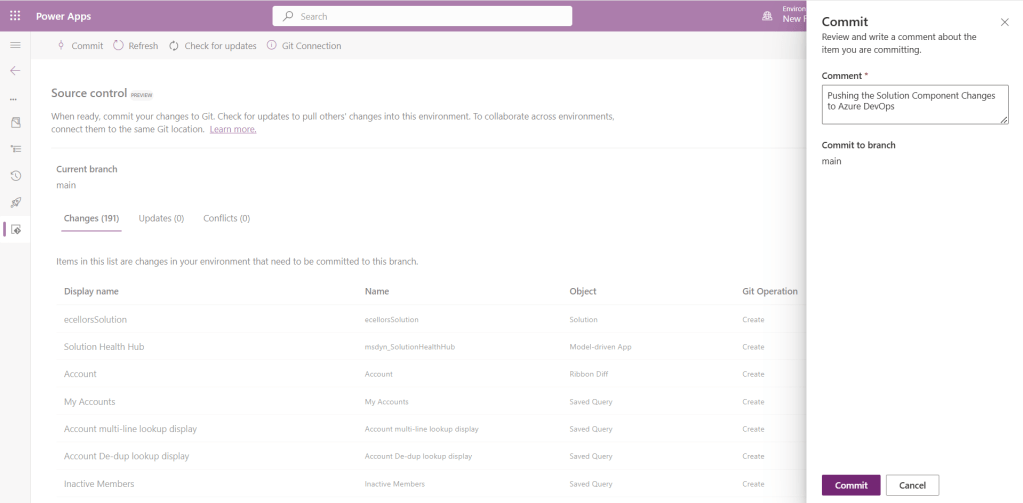
It also specifies the branch to which we were commiting…

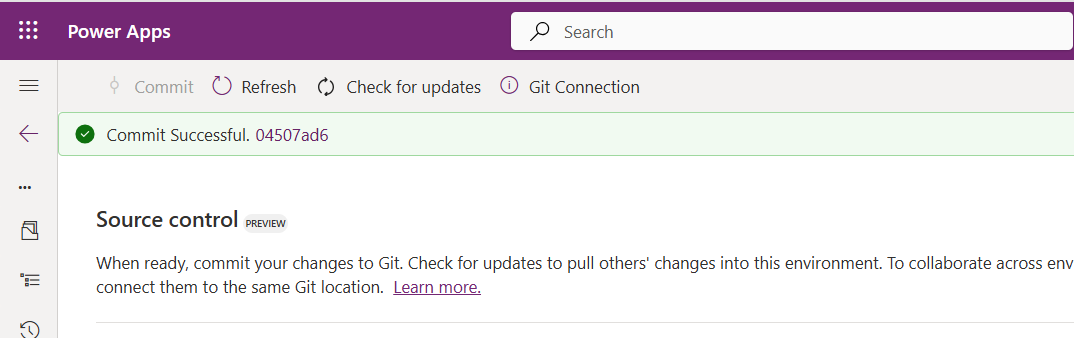
While it takes few minutes unlike pushing the code to Azure DevOps to push the changes, however this would depend based on the number of solution components you were pushing..once it is done, it will show a commit message like below…

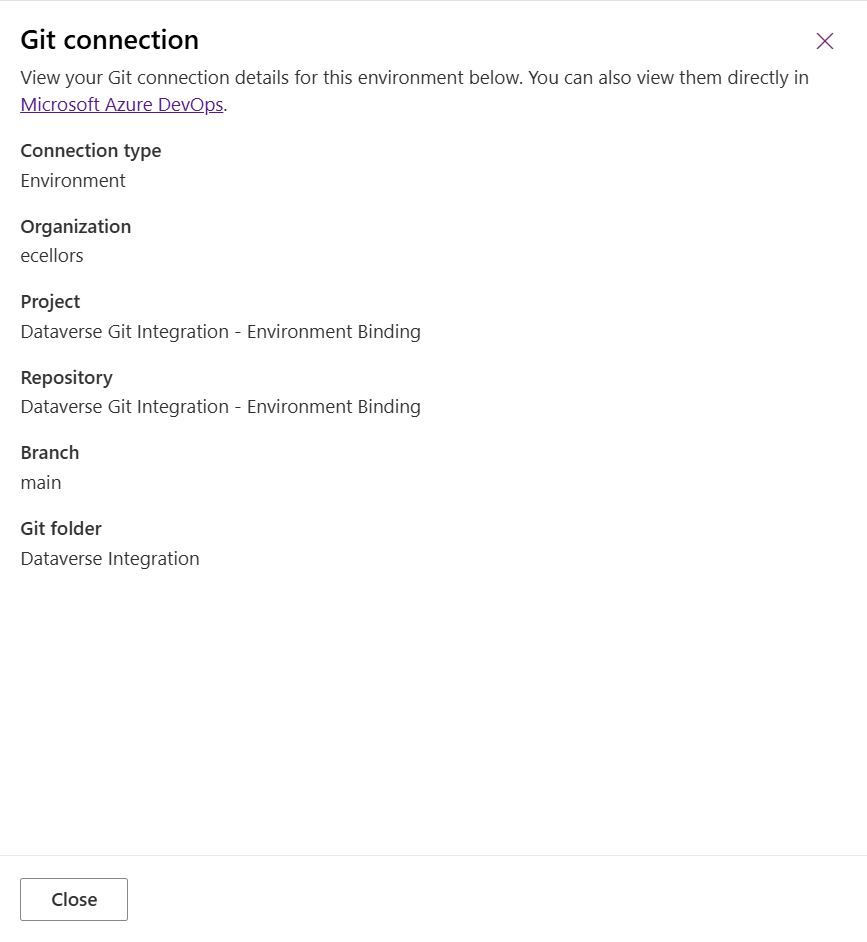
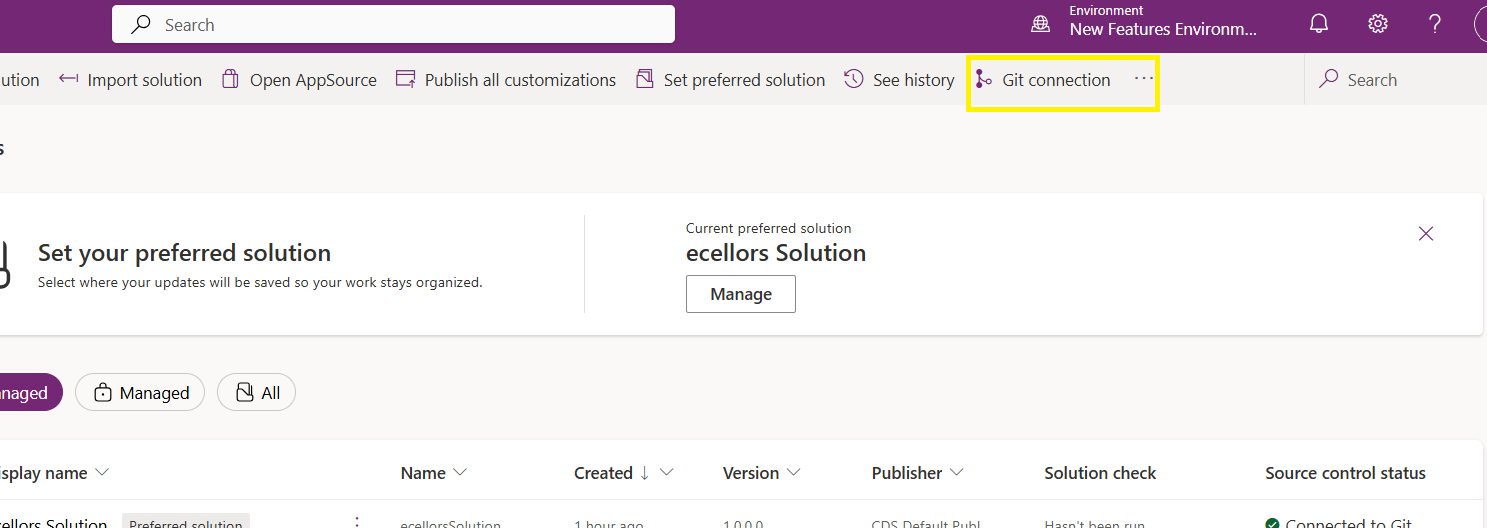
Now let’s verify our Azure DevOps Repo..for this you can go back to the main solutions page, click on Git Connection at the top..

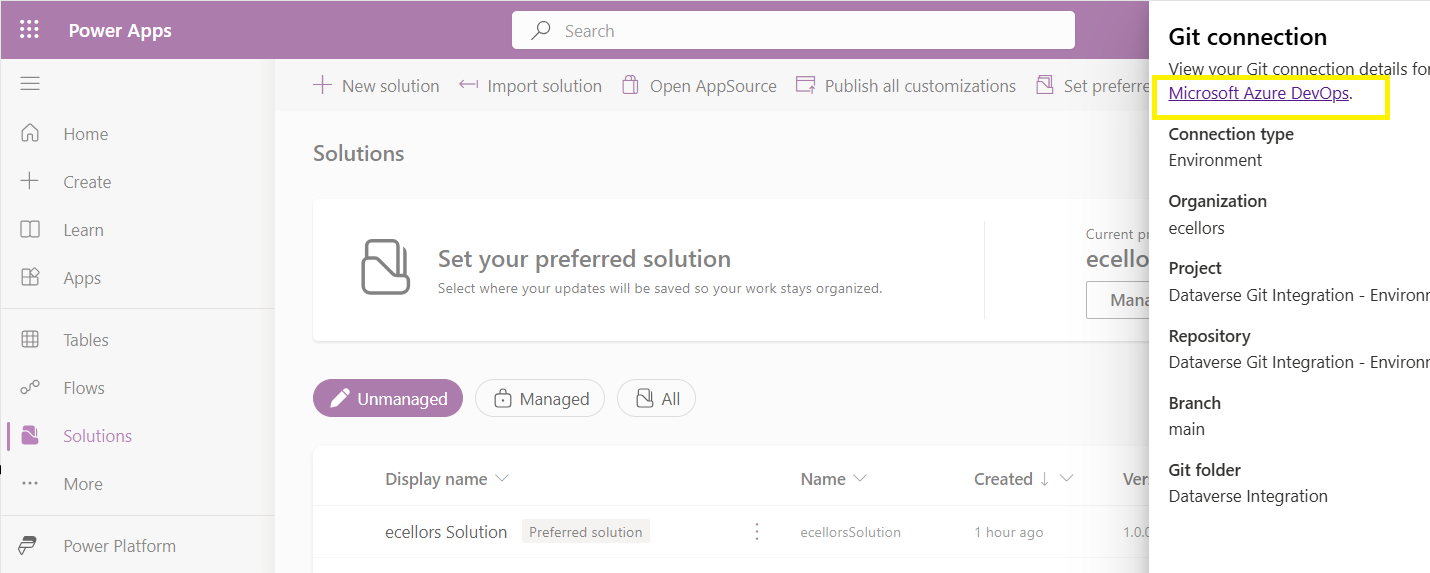
After clicking on Git Connection, click on the link to Microsoft Azure DevOps as below

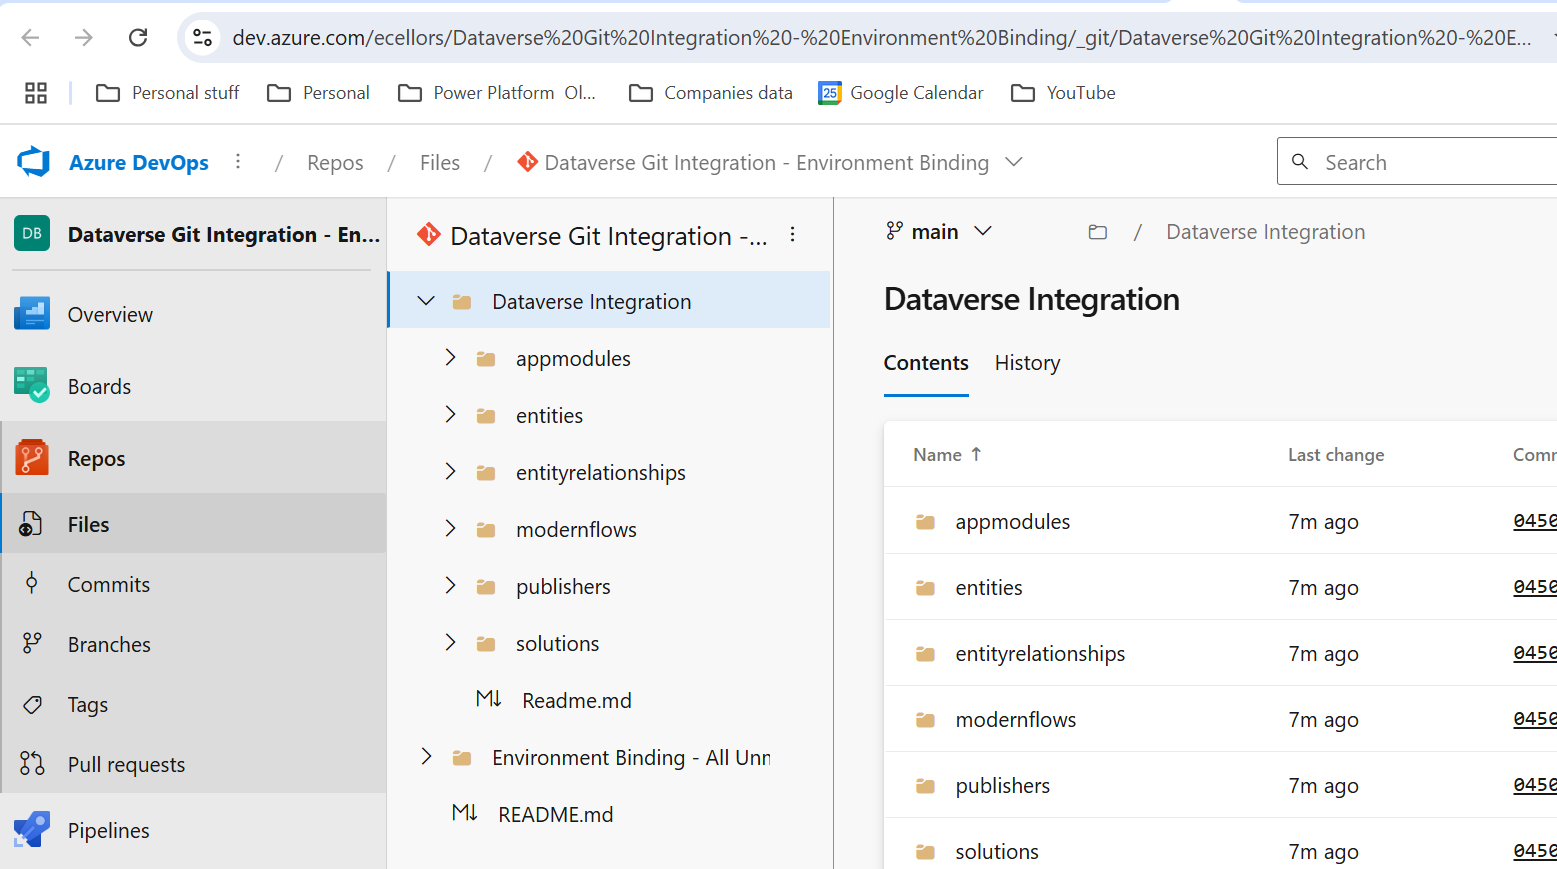
Then you should be navigated to Azure DevOps folder as below where all the solution files will be tracked component wise.

Now we will move back to Power Apps maker portal and make some changes to any of the components inside the solution…

Let’s say, I just edited the flow name and created a new connection reference, saved and published the customizations.

If you did some changes at the Azure DevOps repo level, you can come back and click on Check for updates, if there were any conflicts between changes done in Azure DevOps and component in solution, it will be shown as conflict.

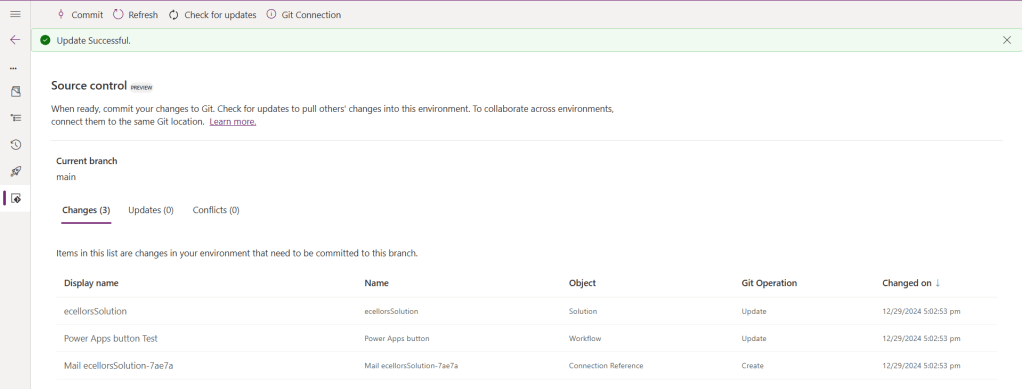
We now have 3 component changes and all were listed here…you can click on Commit.

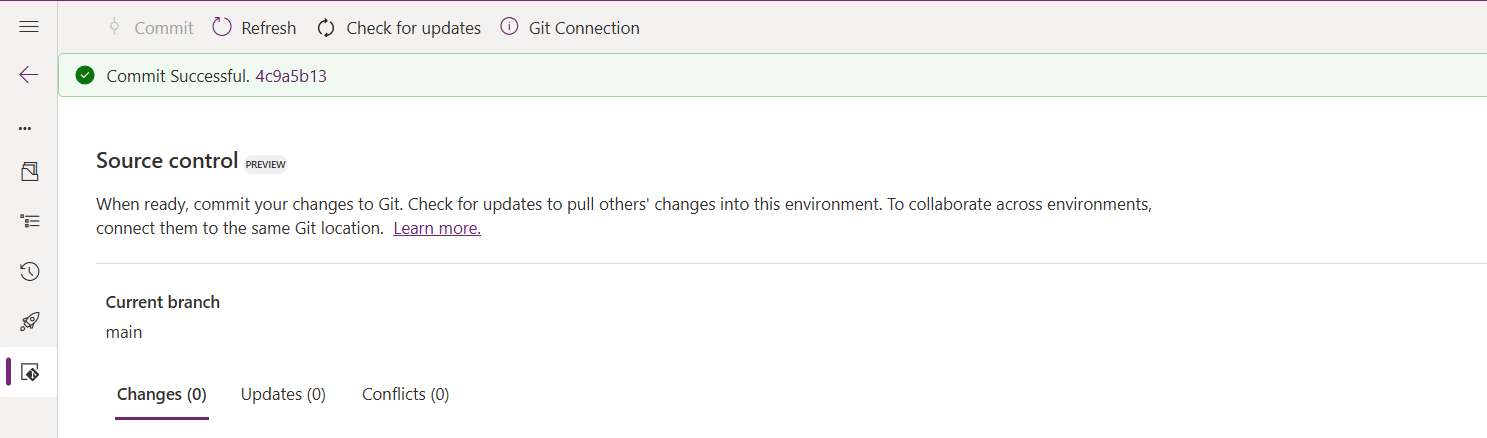
As soon as the changes are committed, you should see a message saying Commit Successful and 0 Changes, 0 Updates, 0 Conflicts.

Now you successfully integrated Dataverse Solution components with Azure DevOps without any manual intervention required while deploying solutions using Azure DevOps Pipelines.

Hope you learned something new today…while feature is still in Preview and only available for early release, while couple of issues still need to fixed by Microsoft.

I have tested this feature by creating an environment in US Preview region and this feature will be a good value to projects using Automation and this solution repository can be further deployed to other environments using Azure DevOps Pipelines.

This will be rolled out soon next year, hope you learned something new today…

Cheers,

PMDY

Whitepaper on Power Automate Best Practices released

Hi Folks,

Last week Microsoft Power CAT Team had released a white paper on Power Automate Best Practices which is mainly for Power Automate Developers who want to scale up their Power Automate Flows in enterprise implementations.

It has been extremely useful and insightful, so I thought of sharing with everyone again.

Please find it attached here down below

Hope you find it useful too..

Cheers,

PMDY

Understanding Dataverse search in Dynamics 365 – Quick Review

Hi Folks,

One of my colleagues asked about Dataverse search, hence I am writing this article on Dataverse Search in Dynamics 365 and in the end, will compare different search options available in Dynamics 365.

Dataverse Search:

In layman terms, Dataverse Search is a powerful search tool that helps you find information quickly across your organization’s data in Microsoft Dataverse, which is the underlying data platform for apps like Power Apps, Dynamics 365, and more, shows you all the related information from across different tables or records in one place.

In short, Dataverse Search is the evolved version of Relevance Search, offering a more robust, faster, and user-friendly search experience including search results for text in documents that are stored in Dataverse such as PDF, Microsoft Office documents, HTML, XML, ZIP, EML, plain text, and JSON file formats. It also searches text in notes and attachments. Before enabling it, just note that once Dataverse search is enabled, it will be affected in all your Model Driven Apps, as of now, just take note.

It is on by default, here is where you can now turn off the Dataverse Search:

  1. Navigate to https://admin.powerplatform.com
  2. Click on Environments –> Choose your required environment –> Settings –>Features

3. Disable/Enable the Dataverse search feature.

Once enabled, we need to configure the tables for Dataverse Search so that indexing is performed at the backend, in order to do this…

  1. Navigate to https://make.powerapps.com, select your desired solution –> Click on Overview as shown below

Now you need to choose Manage Search Index and you can choose your desired table and fields, there isn’t a limit on the number of tables you can configure, but there is a limit on the number of fields you can configure for an environment, a maximum of 1000 fields are permitted both including system and custom fields, 50 fields are used by system, so you can configure 950 fields.

Just note that some field types are treated as multiple fields in the Dataverse search index as indicated in this table.

Field typeNumber of fields used in
the Dataverse search index
Lookup (customer, owner, or Lookup type attribute)3
Option Set (state, or status type attribute)2
All other types of fields1

At the bottom of the snap above, you could see the percentage of columns indexed in this environment.

When Dataverse search is enabled, the search box is always available at the top of every page in your app. You can start a new search and quickly find the information that you’re looking for.

When Dataverse search is turned on, it becomes your default and only global search experience for all of your model-driven apps. You won’t be able to switch to quick find search also known as categorized search.

You can also enable Quick actions as shown in the below table

TableQuick actions
AccountAssign, Share, Email a link
ContactAssign, Share, Email a link
AppointmentMark complete, Cancel, Set Regarding, Assign, Email a link
TaskMark complete, Cancel, Set Regarding, Assign, Email a link
Phone CallMark complete, Cancel, Set Regarding, Assign, Email a link
EmailCancel, Set Regarding, Email a link

Here is the short table comparing all types of searches in Dynamics 365…

FunctionalityDataverse searchQuick FindAdvanced Find
Enabled by default?Yes.
Note: For non-production environments an administrator must manually enable it.
Yes, for the table grid.
No, for multiple-table quick find (categorized search). An administrator must first disable Dataverse search before multiple-table grid find can be enabled.
Yes
Single-table search scopeNot available in a table grid. You can filter the search results by a table on the results page.Available in a table grid.Available in a table grid.
Multi-table search scopeThere is no maximum limit on the number of tables you can search.Searches up to 10 tables, grouped by a table.Multi-table search not available.
Search behaviorFinds matches to any word in the search term in any column in the table.Finds matches to all words in the search term in one column in a table; however, the words can be matched in any order in the column.Query builder where you can define search criteria for the selected row type. Can also be used to prepare data for export to Office Excel so that you analyze, summarize,or aggregate data, or create PivotTables to view your data from different perspectives.
Searchable columnsText columns like Single Line of Text, Multiple Lines of Text, Lookups, and Option Sets. Doesn’t support searching in columns of Numeric or Date data type.All searchable columns.All searchable columns.
Search resultsReturns the search results in order of their relevance, in a single list.For single-table, returns the search results in a table grid. For multi-table, returns the search results grouped by categories, such as accounts, contacts, or leads.Returns search results of the selected row type with the columns you have specified, in the sort order you have configured.

Hope you learned something today…if you have any questions, do let me know in the comments…

Cheers,

PMDY

Getting started with creating a flow using Copilot in Power Automate

Subscribe to continue reading

Subscribe to get access to the rest of this post and other subscriber-only content.

Retrigger your Cloud Flow – Quick Tip

Hi Folks,

Today I am writing about a simple tip about Power Automate trigger which exists from quite a while but many people might not know it…stop the suspense. Let’s get into the use case…for Power Automate flows running on a trigger..

Are you tired of making the action which triggers your flow each and every time, then you can use this tip..

Just click on Test from top right bar as below..

Then in the pop up menu, select Automatically and check With a recently used trigger.

Later you can select any of the recently successful or failed executions to re-trigger your flow, no more hassles or manual actions to trigger your flow.

Hope this helps some one…trying to re-trigger their Automated cloud flows…without invoking their flow using an actual trigger.

Cheers,

PMDY