Understanding MIME Types in Power Platform – Quick Review

While many people doesn’t know the significance of MIME Type, this post is to give brief knowledge about the same before moving to understand security concepts in Power Platform in my upcoming articles.

In the Microsoft Power Platform, MIME types (Multipurpose Internet Mail Extensions) are standardized labels used to identify the format of data files. They are critical for ensuring that applications like Power Apps, Power Automate, and Power Pages can correctly process, display, or transmit files. 

Core Functions in Power Platform

  • Dataverse Storage: Tables such as ActivityMimeAttachment and Annotation (Notes) use a dedicated MimeType column to store the format of attached files alongside their Base64-encoded content.
  • Security & Governance: Administrators can use the Power Platform Admin Center to block specific “dangerous” MIME types (e.g., executables) from being uploaded as attachments to protect the environment.
  • Power Automate Approvals: You can configure approval flows to fail if they contain blocked file types, providing an extra layer of security for email notifications.
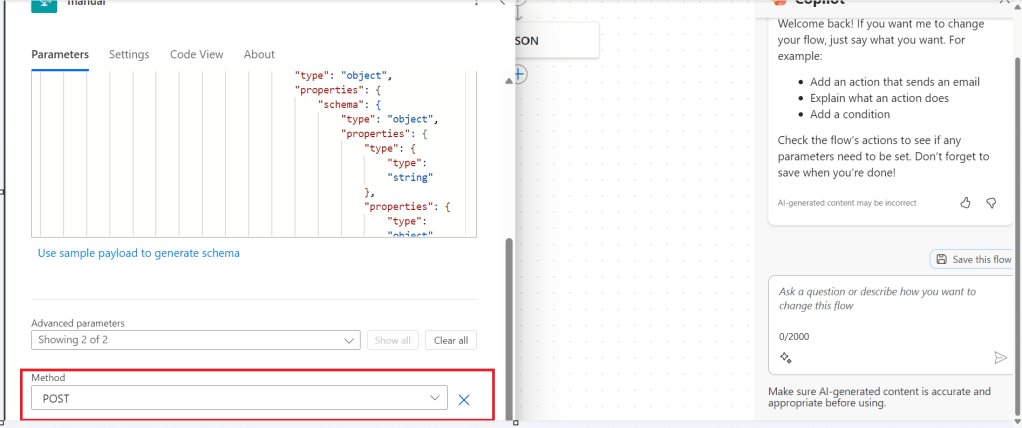
  • Power Pages (Web Templates): When creating custom web templates, the MIME type field controls how the server responds to a browser. For example, templates generating JSON must be set to application/json to be parsed correctly.
  • Email Operations: When using connectors like Office 365 Outlook, you must specify the MIME type for attachments (e.g., application/pdf for PDFs) so the recipient’s client can open them properly. 

Common MIME Types Used

File Extension MIME Type
.pdfapplication/pdf
.docxapplication/vnd.openxmlformats-officedocument.wordprocessingml.document
.xlsxapplication/vnd.openxmlformats-officedocument.spreadsheetml.sheet
.png / .jpgimage/png / image/jpeg
.jsonapplication/json
Unknownapplication/octet-stream (used for generic binary files)

Implementing MIME type handling and file restrictions ensures your Power Platform solutions are both functional and secure.

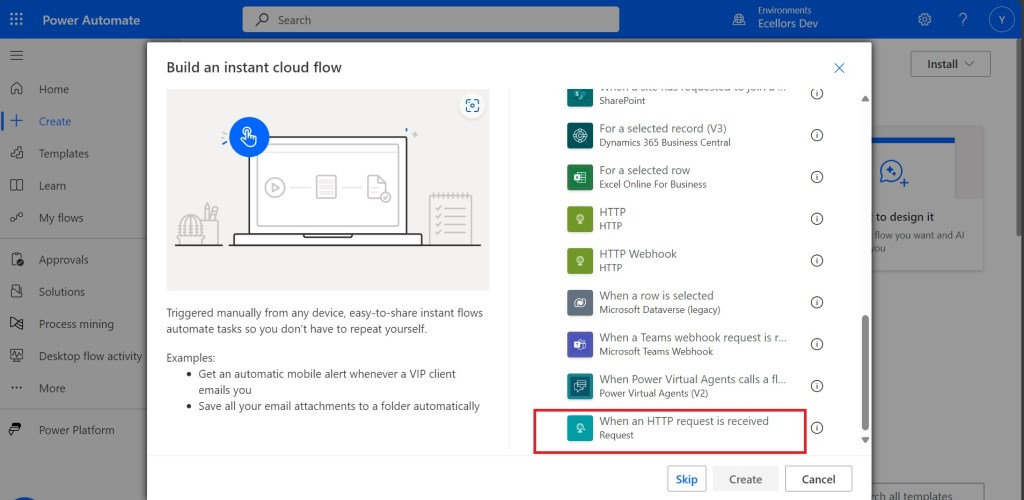
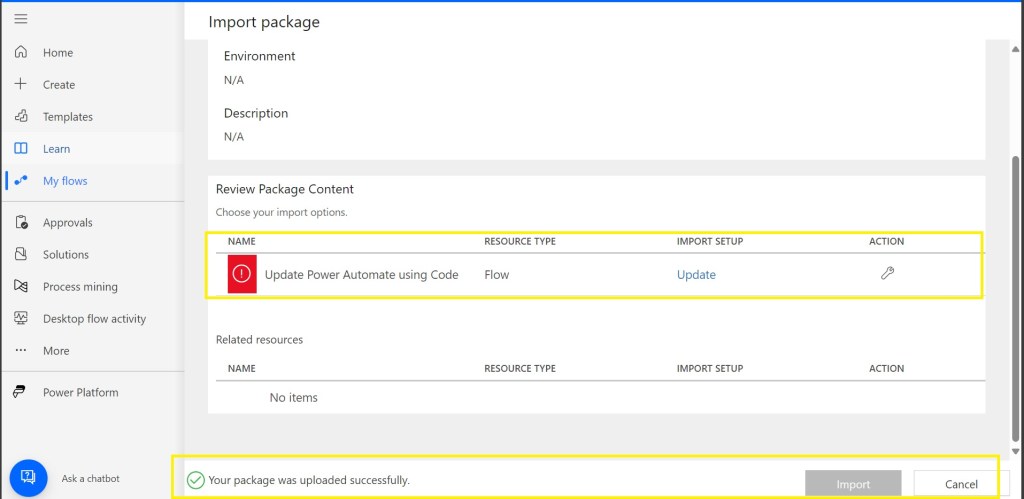
1. Programmatically Setting MIME Types in Power Automate 

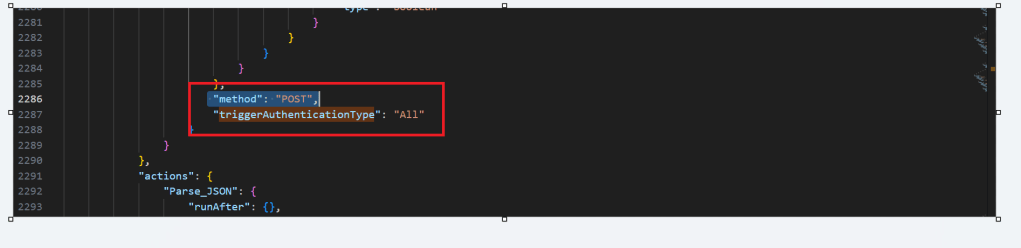
When working with file content in Power Automate, you often need to define the MIME type within a JSON object so connectors (like Outlook or HTTP) understand how to process the data. 

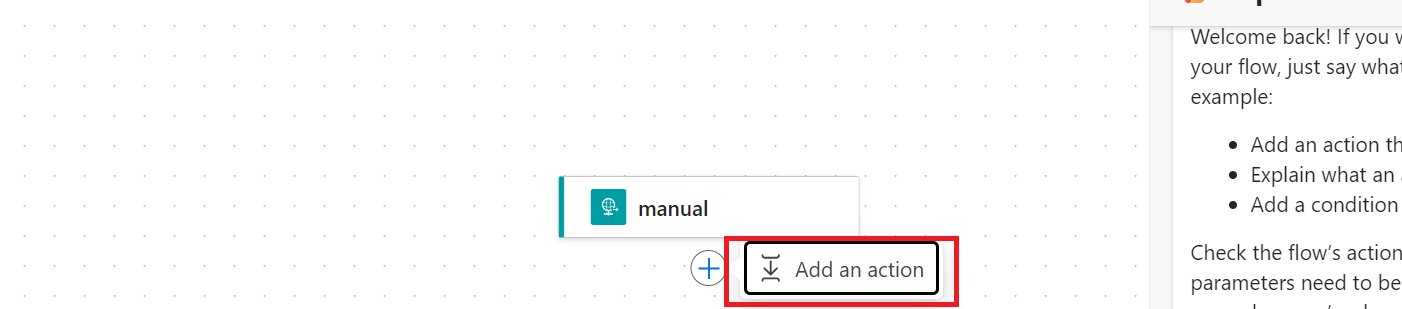
  • Structure: Use a Compose action to build a file object with the $content-type (MIME type) and $content (Base64 data).json
  • Dynamic Mapping: If you don’t know the file type in advance, you can use an expression to map extensions to MIME types or use connectors like Cloudmersive to automatically detect document type information. 

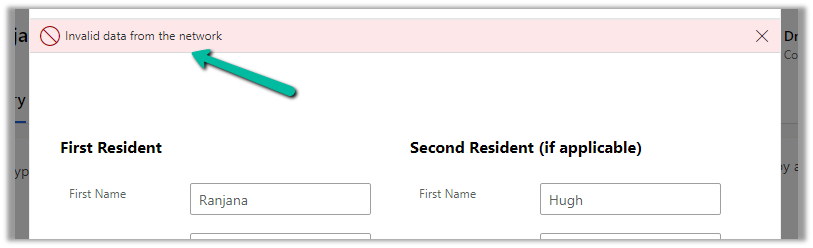
2. Restricting File Types in Power Apps

The Attachment control in Power Apps does not have a built-in “allowed types” property, so you must use Power Fx formulas to validate files after they are added. 

  • Validation on Add: Use the OnAddFile property of the attachment control to check the extension and notify the user if it’s invalid in PowerApps
  • Submit Button Logic: For added security, set the DisplayMode of your Submit button to Disabled if any attachment in the list doesn’t match your criteria. 

3. Global Restrictions (Admin Center)

To enforce security across the entire environment, administrators can navigate to the Power Platform Admin Center to manage blocked MIME types. Adding an extension to the blocked file extensions list prevents users from uploading those file types to Dataverse tables like Notes or email attachments. 

Hope this helps…in next post, I will be talking about Content Security Policy and how Power Platform can be secured using different sets of configuration.

Cheers,

PMDY

🔄Power Platform Environment Restore: Options & Best Practices

Hi Folks,

Restoring environments in Power Platform has evolved significantly.

In the past, Dynamics CRM On-Premise users relied on SQL database backups and manual restores. Today, administrators can perform environment restores in online instances with just a few clicks via the Power Platform Admin Center.

This guide outlines the available restore options and key considerations to ensure a smooth and secure process.

🛠️ Restore Options in Power Platform

OptionDescription
1. Manual Backup RestoreRestore from a backup you manually created. Ideal before major customizations or version updates.
2. System Backup RestoreUse automated system backups created by Microsoft. Convenient but less flexible than manual backups.
3. Full CopyClone the entire environment, including data, customizations, and configurations. Suitable for staging or testing.
4. Partial Copy (Customizations & Schema Only)Copies only solutions and schema—no data. Best for promoting configurations from Production to SIT/UAT.

✅ Best Practices & Key Considerations

  • Use Partial Copy for Non-Production: When restoring from Production to SIT/UAT, prefer Partial Copy to avoid data and configuration mismatches. This brings all solutions without the underlying data.
  • Use Full Copy: In case it is restoring to a same type of environment
  • Avoid Restoring Production Backups to Non-Prod: Manual or system backups from Production should not be restored to non-production environments. This often leads to configuration conflicts and user access issues.
  • Update Security Groups: Always update the Security Group when restoring or copying to a different environment type. Otherwise, users may be unable to log in due to mismatched access controls.
  • Manual Backup Timing: After creating a manual backup, wait 10–15 minutes before initiating a restore. This ensures the backup is fully processed and available.
  • Regional Restore Limitation: You can only restore an environment to another environment within the same region.
  • Unlimited Manual Backups: There’s no cap on the number of manual backups you can create—use this flexibility to safeguard key milestones.
  • Exclude Audit Logs When Possible: Including Audit Logs in copies or restores can significantly increase processing time. Exclude them unless absolutely necessary.

🧠 Technical Note

All backup and restore operations in Power Platform are powered by SQL-based technology under the hood, ensuring consistency and reliability across environments.

Reference:

https://learn.microsoft.com/en-us/power-platform/admin/backup-restore-environments?tabs=new

Cheers,

PMDY

Building a Cloud-Native Power Apps ALM Pipeline with GitLab, Google Cloud Build and PAC CLI: Streamlining Solution Lifecycle Automation

A unique combination to achieve deployment automation of Power Platform Solutions

Hi Folks,

This post is about ALM in Power Platform integrating with a different ecosystem than usual, i.e. using Google Cloud, sounds interesting..? This approach is mainly intended for folks using Google Cloud or GitLab as part of their implementation.

Integrating Google Cloud Build with Power Platform for ALM (Application Lifecycle Management) using GitLab is feasible and beneficial. This integration combines GitLab as a unified DevOps platform with Google Cloud Build for executing CI/CD pipelines, enabling automated build, test, export, and deployment of Power Platform solutions efficiently. This was the core idea for my session on Friday 28 November, at New Zealand Business Applications Summit 2025.

Detailed Steps for this implementation

Create an access token in GitLab for API Access and Read Access

Click on Add new token, you can select at the minimum the below scopes while you were working with CI-CD using GitLab

Create a host connection for the repository in GitLab

Specify the personal access token created in the previous step

Link your repository

The created host connections in the previous step will be shown under Connec ctions drop down

Create Trigger in Google Cloud Build

Click on Create trigger above, provide a name, select a nearest region

Event:

For now, I am choosing Manual invocation for illustration

Specify where the name of the Repository where your YAML in GitLab resides

You can optionally specify the substitution variables which are nothing but parameters you can pass to your pipeline from Google Cloud Build Configuration

You can optionally give this for any approval and choose the service account tagged to your google account in the drop down.

Click on Save.

Next proceed to GitLab YAML

You can find the full code below

steps:
– id: "export_managed"
name: "mcr.microsoft.com/dotnet/sdk:9.0"
entrypoint: "bash"
args:
– "-c"
– |
echo "=== 🏁 Starting Export Process ==="
# ✅ Define solution name from substitution variable
SOLUTION_NAME="${_SOLUTION_NAME}"
# ✅ Install PAC CLI
mkdir -p "${_HOME}/.dotnet/tools"
dotnet tool install –global Microsoft.PowerApps.CLI.Tool –version 1.48.2 || true
# Add dotnet global tools dir to the shell PATH for this step/session (preserve existing PATH)
export PATH="$_PATH:${_HOME}/.dotnet/tools"
echo "=== 🔐 Authenticating to Power Platform Environment ==="
pac auth create –name "manual" –url "https://ecellorsdev.crm8.dynamics.com" –tenant "XXXXX-XXXX-XXXXX-XXXXXX-XXXXX" –applicationId "XXXXXXXXXXXXXX" –clientSecret "XXXXXXXXXXXXXXXX"
pac auth list
echo "=== 📦 Exporting Solution: ${_SOLUTION_NAME} ==="
pac solution export \
–name "${_SOLUTION_NAME}" \
–path "/tmp/${_SOLUTION_NAME}.zip" \
–managed true \
–environment "${_SOURCE_ENV_URL}"
echo "=== ✅ Solution exported to /tmp/${_SOLUTION_NAME}.zip ==="
echo "=== 🔐 Authenticating to Target Environment ==="
pac auth create \
–name "target" \
–url "https://org94bd5a39.crm.dynamics.com" \
–tenant "XXXXXXXXXXXXXXXXXXXXXXXX" \
–applicationId "XXXX-XXXXX-XXXXX-XXXXXX" \
–clientSecret "xxxxxxxxxxxxxxxxxxxx"
echo "=== 📥 Importing Solution to Target Environment ==="
pac solution import \
–path "/tmp/${_SOLUTION_NAME}.zip" \
–environment "${_TARGET_ENV_URL}" \
–activate-plugins \
–publish-changes
echo "=== 🎉 Solution imported successfully! ==="
options:
logging: CLOUD_LOGGING_ONLY
substitutions:
_SOLUTION_NAME: "PluginsForALM_GitLab"
_SOURCE_ENV_URL: "https://org.crm.dynamics.com"
_TARGET_ENV_URL: "https://org.crm.dynamics.com"
_TENANT_ID: "xxxxxxxx-xxxx-xxxx-xxxx-xxxxxxxxxxxx"
_CLIENT_ID: "xxxxxxxx-xxxx-xxxx-xxxx-xxxxxxxxxxxx"
_CLIENT_SECRET: "xxxxxxxxxxxxxxxxxxxxxxxxxxxx"
_SOLUTIONS_DIR: "/workspace/Plugins/08112025"
view raw GitLabDemo.yaml hosted with ❤ by GitHub

Solution from Source Environment

Now lets run the trigger which will export the solution from the source environment and import to the target environment….we have manual trigger, automatic trigger whenever there is an commit to the repo in GitLab etc., you may pick whatever suits your needs best.

Solution imported to the target environment using Google Cloud Build

The below table illustrates key differences between Google Cloud Build and Azure Devops….

AspectGoogle Cloud BuildAzure DevOps Build Pipelines
Pricing ModelPay-as-you-go with per-second billingPer-minute billing with tiered pricing
Cost OptimizationSustained use discounts, preemptible VMsReserved capacity and enterprise agreements
Build EnvironmentServerless, container-native, managed by Google CloudRequires self-hosted or paid hosted agents
Free TierAvailable with build minutes and creditsAvailable but more limited
Operational OverheadLow, no need to manage build agentsHigher, managing agents or paying for hosted agents
Ideal ForVariable, short, or containerized workloadsLarge Microsoft-centric organizations
Integration Cost ImpactTightly integrated with Google Cloud serverless infrastructureIntegrated with Microsoft ecosystem but may incur additional licensing costs

Conclusion:

PAC CLI is a powerful command-line tool that automates authentication, environment, and solution management within Power Platform ALM, enabling consistent and repeatable deployment workflows. It integrates smoothly with DevOps tools like GitLab and Google Cloud Build, helping teams scale ALM practices efficiently while maintaining control and visibility over Power Platform environments. Just note, my intention was showcase the power of PAC CLI with wider ecosystem, not only with Microsoft.

Cheers,

PMDY

Establishing tenant hygiene with the CoE Starter Kit – Learn COE #04

Hi Folks,

In this blog post, I am going to talk about establishing tenant hygiene using COE Stater kit, in today’s world where there increasing Power Platform demand. Organizations have become mature, that every implementation is now looking for having some kind of governance being established.

If you were some one who want to get some knowledge of implementing governance, you were at right place.

In order to efficiently implement governance, we need to understand the environment strategy, your current implementation has used. Of course if you were looking for some guidance, there were examples of tooling available in the CoE Starter Kit and out-of-the-box capabilities to help CoE teams effectively manage and optimize their Power Platform solutions.

Few key steps to be considered for maintaing this in your environment, so let’s get started…

  1. Define Environment Strategy
  • Assign your admins the Power Platform service admin or Dynamics 365 service admin role.
  • Restrict the creation of net-new trial and production environments to admins
  • Rename the default environment to ‘Personal Productivity’
  • Provision a new Production environment for non-personal apps/flows
  • Define and implement your DLP policies for your environments
  • When establishing a DLP strategy, you may need multiple environments for the same department
  • When establishing your Power Platform environment strategy, based upon your licensing, you may find that you need to provision environments without a Dataverse (previously called Common Data Service) database and also use DLP policies to restrict the use of premium connectors.
  • Establish a process for requesting access or creation of environments
  • Dev/Test/Production environments for specific business groups or application
  • Individual-use environments for Proof of Concepts and training workshops
  • Use a service account to deploy production solutions
  • Reduce the number of shared development environments
  • Share resources with Microsoft Entra Security Groups.

2. Compliance and Adoption:

The Compliance page in the CoE Starter Kit’s Compliance and adoption dashboard can help you identify apps and flows with no owners, noncompliant apps, and suspended flows.

  • Rename and secure the default environment
  • Identify unused apps, pending suspension, suspended cloud flows and not without an owner or not in solutions
  • Quarantined noncompliant apps and clean up orphaned resources
  • Enable Managed Environments and establish a data loss prevention policy
  • Apply cross tenant isolation
  • Assign Administrator roles appropriately
  • Apps and flows with duplicate names not compliant with DLP policies or billing policies
  • Apps shared with everyone and apps shared with more than 100 users and Apps not launched in the last month and in the last quarter
  • Flows using plain text passwords and using HTTP actions
  • Cross-tenant connections
  • Environments with no apps or flows
  • Custom connectors using HTTP environments

3. Managing Dataverse for Teams environments

If you were not using Dataverse for Teams, you can safely skip this step, else please review

The Microsoft Teams environments page in the CoE Starter Kits dashboard provides you with an overview of your existing Teams environments, apps and flows in those environments, and the last launched date of apps.

Screenshot of a Microsoft Teams Environments overview.

By checking for new Dataverse for Teams environments daily, organizations can ensure they’re aware of all environments in use. 

State of Dataverse for TeamsPower Platform action
83 days after no user activitySend a warning that the environment will be disabled. Update the environment state on the Environments list page and the Environment page.
87 days after no user activitySend a warning that the environment will be disabled. Update the inactive environment state on the Environments list page and the Environment page.
90 days after no user activityDisable the environment. Send a notice that the environment has been disabled. Update the disabled environment state on the Environments list page and the Environment page.
113 days after no user activitySend a warning that the environment will be deleted. Update the disabled environment state on the Environments list page and the Environment page.
117 days after no user activitySend a warning that the environment will be deleted. Update the disabled environment state on the Environments list page and the Environment page.
120 days after no user activityDelete the environment. Send a notice that the environment has been deleted.

Please note a warning is displayed only if the Dataverse for Teams environment is <= 7 days until disablement.

4. Highly used apps

The Power BI Dashboard available out of the box with COE Starter Kit will provide you the necessary guidance over high performing apps and also your most active users.

5. Communicating governance to your makers

This is one of the important step while setting up COE and governance guidelines, follow the below approaches

  • Clearly communicate the purpose and benefits of governance policies:Explain how governance policies protect organizational data
  • Make governance policies and guidelines easily accessible:Place the policies and guidelines in a central location that is easily accessible to all makers
  • Provide training and support:Offer training sessions and resources to help makers understand and comply with governance policies.
  • Encourage open communication: Foster culture where makers can ask questions and raise concerns about governance policies.
  • Incorporate governance into the development process:For example, you can require a compliance review before deploying a solution.

6. Administration of the platform

Power Platform Administrator Planning Tool which comes with COE Strater Kit provides guidance and best practices for administration. Also the planning tool can optimize environments, security, data loss prevention, monitoring and reporting.

6. Securing the environments

It is critical to establish a Data Loss Prevention (DLP) strategy to control connector availability.

The DLP editor (impact analysis) tool is available for use before making changes to existing policies or creating new DLP policies. It reveals the impact of changes on existing apps and cloud flows and helps you make informed decisions.

Reference: COE Starter Kit Documentation

If you face issues using the COE Starter Kit, you can always report them at https://aka.ms/coe-starter-kit-issues

Hope this helps…. someone maintaining tenant governance with COE starter kit…. if you have any feedback or questions, do let me know in comments….

Cheers,

PMDY

Whitepaper on Power Automate Best Practices released

Hi Folks,

Last week Microsoft Power CAT Team had released a white paper on Power Automate Best Practices which is mainly for Power Automate Developers who want to scale up their Power Automate Flows in enterprise implementations.

It has been extremely useful and insightful, so I thought of sharing with everyone again.

Please find it attached here down below

Hope you find it useful too..

Cheers,

PMDY

Update Power Automate Flow from Code – Quick Review

Hi Folks,

This is a post related to Power Automate, I will try to keep it short giving a background of this first.

Recently we faced one issue with Power Automate where we had actually created a Power Automate Flow which uses the trigger ‘When a HTTP Request is received’ where for the request the method name is not specified in the trigger.

So, we need to update the existing flow without generating a new one as saving your Power Automate without giving Method name gave error which couldn’t be modified later. There was one way from the code but not the Power Automate editor, so here we would try to update the flow from code. I will show you two approaches after showing the existing flow steps.

Step 1:

Navigate to https://make.powerautomate.com and create an instant Cloud Flow

Next choose the trigger

Click create and up next, choose an action

Just to inform you that I haven’t selected any method for this request

I have used a simple JSON as below for the trigger

{
  "name": "John Doe",
  "age": 30,
  "isStudent": false,
  "courses": ["Mathematics", "Physics", "Computer Science"]
}

I have added Parse JSON Step next using the same JSON Schema, so now I can save the flow

Upon saving, I got the flow URL generated as below

https://prod2-27.centralindia.logic.azure.com:443/workflows/a1e51105b13d40e991c4084a91daffa5/triggers/manual/paths/invoke?api-version=2016-06-01

You can take a look for the code generated for each step in the Code View as below

It is readonly and you can’t modify it from the https://make.powerautomate.com

Only way is to update the flow from the backend, so here are two approaches

  1. Using Chrome extension : Power Automate Tools
  2. Export & Import method

Using Chrome Extension:

Install the tool from https://chromewebstore.google.com/detail/power-automate-tools/jccblbmcghkddifenlocnjfmeemjeacc

Once installed, identify the Power Automate flow which you want to edit, once you were on this page, click on the extension –> Power Automate Tools

You can just modify the code and add the piece of step needed wherever required,

here I would add method name to my HTTP Trigger

I will add Post Method here

 "method": "POST",

It will look like

You get a chance to validate and then click on save, even you will the same IntelliSense you would have on https://make.powerautomate.com

Upon saving, your Power Automate flow, an alert will be shown to you, and the flow will be updated.

Just refresh your Power Automate flow and check

That’s it, your flow is now updated.

Well, if your tenant have policies where you can’t use the Power Automate Tools extension, you can then follow this approach is easier as well.

For showing this one, I will remove the Method name Post again from the flow, save it and then update using below method.

Export & Import method

Here you would need to export the flow, here we would use the export via Package (.zip) method.

In the next step of export, you will be prompted to key in details as below, just copy the flow name from Review Package Content and paste it in the Name field. Just enter the flow name, it would be enough.

Then click on export

The package will be exported to your local machine

We need to look for definition file, there would be few JSON files in the exported file

You can navigate the last subfolder available

Open the JSON file using your favorite IDE, I prefer using Visual Studio Code, once opened, you will see something like this

Click on Cntrl + A, once all the text is selected, right click and choose Format document, then your text will be properly aligned.

Look for the

triggerAuthenticationType

Now copy paste the code for the method

 "method": "POST",

Now your code should look like, hit save as and save the file to a different folder, since we cant override the existing zip folder.

Now once again navigate the last subfolder and delete the definition file present. Once deleted, copy the saved file in your folder to the last subfolder, so your subfolder should look exactly same as below

Now navigate to the https://make.powerautomate.com, click on import option available and choose Import Package (Legacy)

Choose your import package

The package import will be successful

Now click on the package where Red symbol is shown and choose the resource type shown at the right of the page

Scroll down to the bottom and click on save option

Then click on import option

You will be shown a message that import is successful

Refresh your Power Automate and check

That’s it, your flow is now updated from backend.

Hope that’s it, you were now able to update the flow using code.

That’s it, it’s easier than you think..can save your time when needed.

Cheers,

PMDY

Filter data with single date slicer when multiple dates in fact table fall in range without creating relationship in Power BI

Hi Folks,

After a while, I am back with another interesting way to solve this type of problem in Power BI. It took increasingly more amount of time to figure out best approach, this post is to help suggest a way of solving differently. This post is a bit lengthy but I will try to explain it in the best way I can.

Here is the problem, I have date fields from 2 fact tables, I have to filter them using a single date slicer which is connected to a calendar table and show the data when any of dates in a particular row falls in the date slicer range. I initially thought this was an easy one and could be solved by creating a relationship between the two fact tables with calendar table, then slice and dice the data as I was able to filter the data with one fact table when connected to calendar table.

I was unable to do that because there were multiple date fields in one fact table and need to consider dates from two tables. I tried to get the value from the slicer using Calculated field since I have do row by row checking. Later understood that, date slicer values can be obtained using a calculated field but those will not be changing when the dates in date slicer is getting changed, this is because the Calculated fields using row context and will only be updated when data is loaded or user explicitly does the refresh. Instead we have to use measure which is calculated by filter context.

The interesting point here is that, if a measure is added to the visual, it returns same value for each row, so a measure shouldn’t be added to a visual as it calculates values on a table level and not at row level, it is ideal if you want to perform any aggregations.

I tried this approach using the great blog post from legends of Power BI(Marco Russo,Alberto Ferrari), but this looked increasingly complex to my scenario and don’t really need to use this, if you still wish to check this out, below is the link to that.

https://www.sqlbi.com/articles/filtering-and-comparing-different-time-periods-with-power-bi/

So, then I tried to calculate the Maximum and Minimum for each row in my fact table using MAXX; MINX functions

MaxxDate = 

VAR Date1 = FactTable[Custom Date1]
VAR Date2 = FactTable[Custom Date2]

RETURN 
MAXX(
    {
        Date1,
        Date2
        
    },
    [Value]
)
MinXDate = 

VAR Date1 = FactTable[Custom Date1]
VAR Date2 = FactTable[Custom Date2]

RETURN 
MAXX(
    {
        Date1,
        Date2
        
    },
    [Value]
)

After merging the two tables into a single one, then create two slicers connected to Maximum Date and Minimum Date for each row. I thought my problem is solved, but it isn’t, since I was only able to filter the dates which have a maximum or minimum value selected in the date slicer, any date value within the date range is being missed.

So I am back to the same situation again

This blog post really helped me get this idea

https://community.fabric.microsoft.com/t5/Desktop/How-to-return-values-based-on-if-dates-are-within-Slicer-date/m-p/385603

Below is the approach I have used,

  1. Create a date table, using the DAX below
Date =
VAR MinDate = DATE(2023,03,01)
VAR MaxDate = TODAY()
VAR Days = CALENDAR(MinDate, MaxDate)
RETURN
ADDCOLUMNS(
Days,
"UTC Date", [Date],
"Singapore Date", [Date] + TIME(8, 0, 0),
"Year", YEAR([Date]),
"Month Number", MONTH([Date]),
"Month", FORMAT([Date], "mmmm"),
"Year Month Number", YEAR([Date]) * 12 + MONTH([Date]) – 1,
"Year Month", FORMAT([Date], "mmmm yyyy"),
"Week Number", WEEKNUM([Date]),
"Week Number and Year", "W" & WEEKNUM([Date]) & " " & YEAR([Date]),
"WeekYearNumber", YEAR([Date]) & 100 + WEEKNUM([Date]),
"Is Working Day", TRUE()
)

2. Here I didn’t create any relationship between the fact and dimension tables, you can leave them as disconnected as below

    3. All you need is a simple measure which calculates if any of the dates in the fact table fall under the slicer date range, here is the piece of code

    MEASURE =
    IF (
    (
    SELECTEDVALUE ( 'Text file to test'[Date] ) > MIN ( 'Date'[Date] )
    && SELECTEDVALUE ( 'Text file to test'[Date] ) < MAX ( 'Date'[Date] )
    )
    || (
    SELECTEDVALUE ( 'Text file to test'[Custom Date1] ) > MIN ( 'Date'[Date] )
    && SELECTEDVALUE ( 'Text file to test'[Custom Date1] ) < MAX ( 'Date'[Date] )
    ) || (
    SELECTEDVALUE ( 'Text file to test'[Custom Date2] ) > MIN ( 'Date'[Date] )
    && SELECTEDVALUE ( 'Text file to test'[Custom Date2] ) < MAX ( 'Date'[Date] )
    )
    ,
    1,
    0
    )

    4. Then filtered the table with this measure value

    That’s it, you should be able to see the table values changing based on date slicer.

    Hope this helps save at least few minutes of your valuable time.

    Cheers,

    PMDY

    Deploying Solutions using Power Platform CLI

    In my previous blog post, I have already explained how you can utilize Power Pipelines which is the OOB Dynamics 365 Product capability.

    Power Platform have many ways where we can deploy our solutions to higher environments…in this blog post, we will see how we can utilize Power Platform CLI to deploy our solutions.

    Prerequisites: Power Platform CLI

    If you don’t have installed yet in your machine, you can download Power Platform CLI from this link in either of the ways below

    1.Install using Power Platform Tools for Visual Studio Code

    2. Install Power Platform CLI for Windows using PowerShell

    Once you got this installed, make sure you set your environment variable in your machine as below

    Then you can use your favorite IDE or Command line. I personally recommend using Visual Studio Code because of the flexibility it offers and ease of installation, use.

    Export and Import can be done very easily with CLI with a few commands once you were authenticated with your instance.

    For authentication with your instance. Open a new terminal in visual studio code.

    pac auth create –name powermvps1 –url <give your org URL here> –username <give your username here> –password <give your password here>

    As below..

    Once you have set up correctly, it will show that it is connected.

    Now in order to export your solution..use the below commands from Vs Code

    pac solution export –path <Path of the Solution Zip file> –name <Solution Name> –managed false –include general

    As below..

    You should see a Solution zip file got created with the same name as mentioned above…

    Similarly, u can import solutions using CLI..

    Here I have a solution named ecellorstest in the same folder in my machine..

    Let’s try to import using CLI..inorder to import your solution,use the below commands from Vs Code…

    pac solution import –path <Solution Zip file path> –activate-plugins true –publish-changes true –async true

    As below..

    If we check in our instance, we see the solution is imported…

    That’s it, how easy it was…however I have detailed about only a part of full capabilities of Power Platform CLI, its uses are unimaginable.

    Reference: Power Platform CLI for Solutions

    Cheers,

    PMDY

    Fixed – Invalid data from the network error in the custom page – Power Apps / Dataverse

    Reblogged on ecellorscrm.com

    Nishant Rana's avatarNishant Rana's Weblog

    Recently in one of our custom pages, we were getting the below error

    “Invalid data from the network”

    We had this setting “Formula-level error management” as On, switching it off was hiding this error on the page.

    To fix it we tried removing the fields one by one to figure out the issue. Eventually, we saw the error was going away if we remove one of the option set fields from the gallery or comment it’s formula. Later when we removed and added the field back in the gallery and the error got fixed for us.

    The page loading properly without the error –

    Hope it helps..


    View original post

    5 Power BI Errors..you often encounter – Fixed

    Hi Folks,

    Here I would like to give some tips regarding Power BI Errors which will be encountered in everyday job of anyone who’s going to or work with Power BI Dashboards or understand any existing dashboards and integrate them with Model Driven Apps. You aren’t alone…so let’s gets started…

    Error 1: Unable to open document

    Fix:

    You were not on the latest version of Power BI desktop with which it was authored. You can quickly check the version by navigating to Help –> About

    You should see a update icon as below

    Clicking on it will take you to the respective page having the latest update from where you can update it.

    Error 2: Class not registered error

    Fix:

    This can happen when you were trying to open an existing dashboard which was created by you or shared by someone to you, might be because you have two versions of Power BI Desktop installed..in your machine..like shown below.i.e.

    1. Installed Power BI from Microsoft Store
    2. Installed Power BI from Microsoft Downloads

    Make sure you choose the right one which you have used earlier to develop the Dashboard so that you won’t run into any issue.

    Error 3: Workspace deleted

    Fix:

    This error can happen when you were trying to access any workspace while you were creating a Power BI Dashboard in Dynamics CE using an existing workspace, make sure you have a workspace and the logged in user have access to the Workspace.

    Granting access to the workspace will fix the issue.

    Error 4: One or more Cloud Datasources have been deleted

    Fix:

    Whenever you deploy any new Power BI report or dashboard to Power BI Service, you encounter this problem most of the times. Sometimes after making a change to a dataset or taking over ownership of a dataset, you might receive the following error:

    1. Click the “Recreate cloud data sources” button.

    2. Reenter credentials in the “Data Source Credentials” section for your data sources

    Make sure dataset is connected to Gateway incase you have configured.

    Error 5: There is no gateway to access the datasource

    Fix:

    The first thing to look at when you have a missing gateway is to make sure you created a data source for that gateway. Installing the On-Premises Data Gateway is not enough. That simply registers the gateway with the Power BI service and lists you as an admin for that gateway.

    You then need to go into the Power BI service and create a data source for that gateway.

    You can create a data source by doing the following.

    1. Select the gear icon within Power BI
    2. Select Manage Gateways.
    3. Select your gateway and then select Add Data Source.
    4. When you are done entering the information, select Add.

    References:

    Power BI Start up issues – MS Learn

    One or more cloud datasources have been deleted

    Restore and Recover Deleted Workspace

    Hope my post helps someone who’s facing similar issues with their Power BI Dashboards…

    Thank you for reading….

    Cheers,

    PMDY