Update Power Automate Flow from Code – Quick Review

Hi Folks,

This is a post related to Power Automate, I will try to keep it short giving a background of this first.

Recently we faced one issue with Power Automate where we had actually created a Power Automate Flow which uses the trigger ‘When a HTTP Request is received’ where for the request the method name is not specified in the trigger.

So, we need to update the existing flow without generating a new one as saving your Power Automate without giving Method name gave error which couldn’t be modified later. There was one way from the code but not the Power Automate editor, so here we would try to update the flow from code. I will show you two approaches after showing the existing flow steps.

Step 1:

Navigate to https://make.powerautomate.com and create an instant Cloud Flow

Next choose the trigger

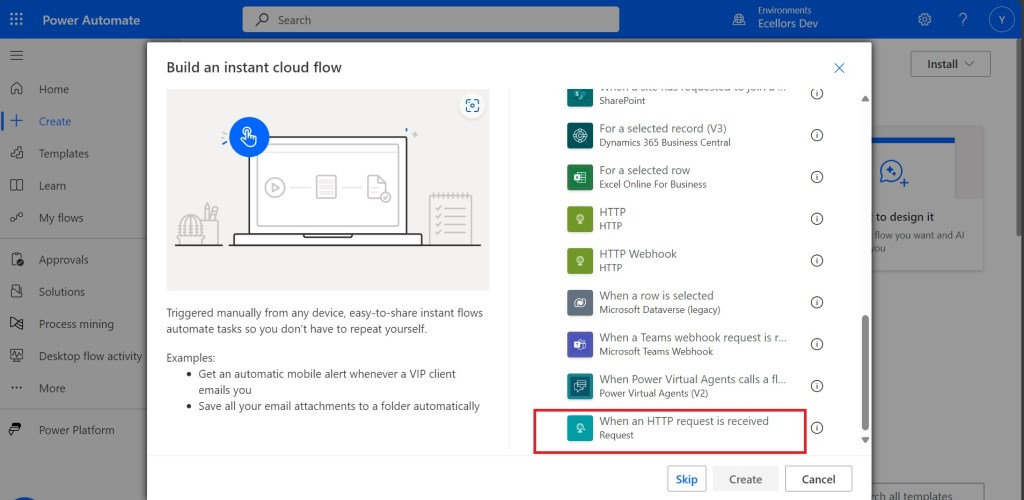
Click create and up next, choose an action

Just to inform you that I haven’t selected any method for this request

I have used a simple JSON as below for the trigger

{
  "name": "John Doe",
  "age": 30,
  "isStudent": false,
  "courses": ["Mathematics", "Physics", "Computer Science"]
}

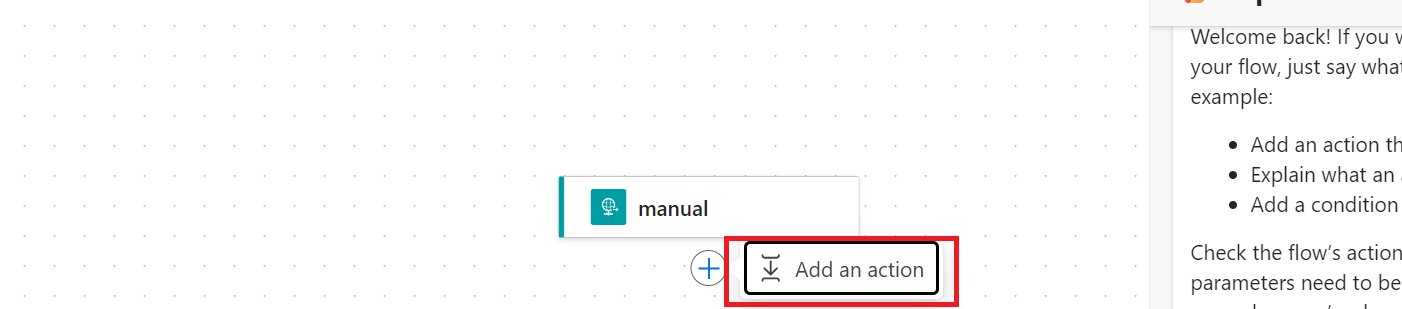
I have added Parse JSON Step next using the same JSON Schema, so now I can save the flow

Upon saving, I got the flow URL generated as below

https://prod2-27.centralindia.logic.azure.com:443/workflows/a1e51105b13d40e991c4084a91daffa5/triggers/manual/paths/invoke?api-version=2016-06-01

You can take a look for the code generated for each step in the Code View as below

It is readonly and you can’t modify it from the https://make.powerautomate.com

Only way is to update the flow from the backend, so here are two approaches

  1. Using Chrome extension : Power Automate Tools
  2. Export & Import method

Using Chrome Extension:

Install the tool from https://chromewebstore.google.com/detail/power-automate-tools/jccblbmcghkddifenlocnjfmeemjeacc

Once installed, identify the Power Automate flow which you want to edit, once you were on this page, click on the extension –> Power Automate Tools

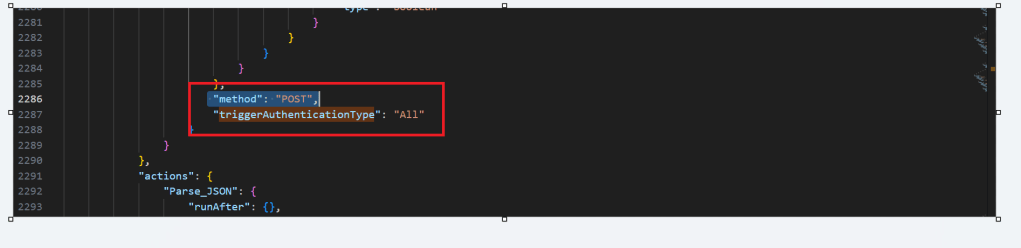
You can just modify the code and add the piece of step needed wherever required,

here I would add method name to my HTTP Trigger

I will add Post Method here

 "method": "POST",

It will look like

You get a chance to validate and then click on save, even you will the same IntelliSense you would have on https://make.powerautomate.com

Upon saving, your Power Automate flow, an alert will be shown to you, and the flow will be updated.

Just refresh your Power Automate flow and check

That’s it, your flow is now updated.

Well, if your tenant have policies where you can’t use the Power Automate Tools extension, you can then follow this approach is easier as well.

For showing this one, I will remove the Method name Post again from the flow, save it and then update using below method.

Export & Import method

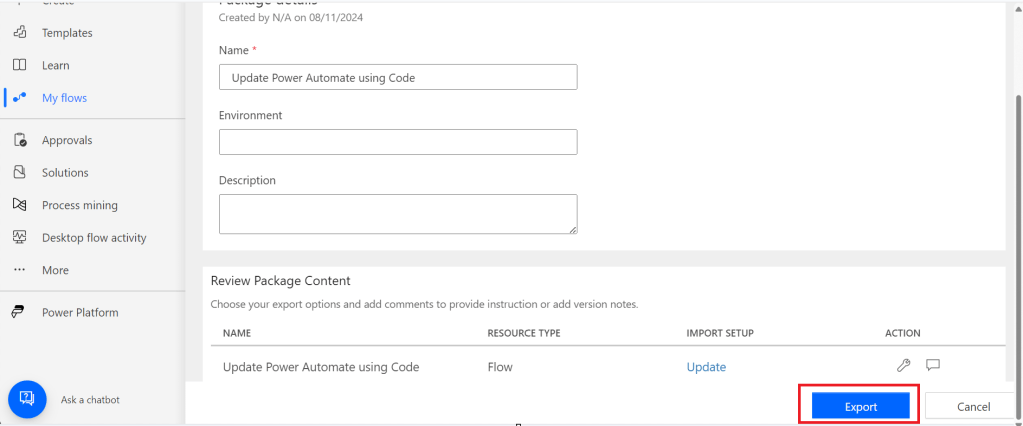
Here you would need to export the flow, here we would use the export via Package (.zip) method.

In the next step of export, you will be prompted to key in details as below, just copy the flow name from Review Package Content and paste it in the Name field. Just enter the flow name, it would be enough.

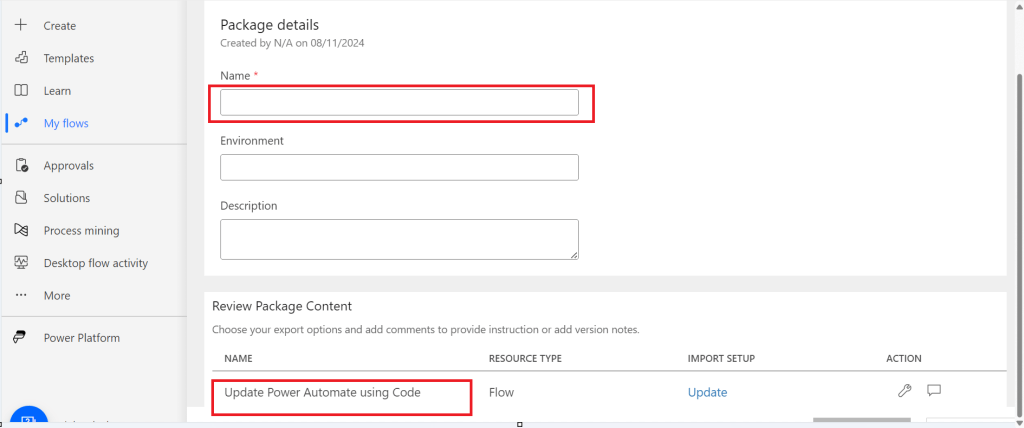
Then click on export

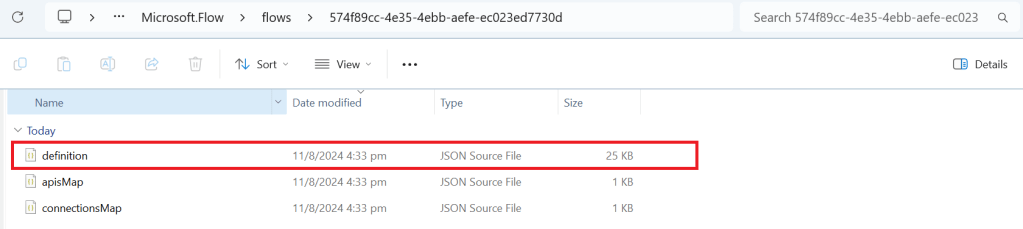
The package will be exported to your local machine

We need to look for definition file, there would be few JSON files in the exported file

You can navigate the last subfolder available

Open the JSON file using your favorite IDE, I prefer using Visual Studio Code, once opened, you will see something like this

Click on Cntrl + A, once all the text is selected, right click and choose Format document, then your text will be properly aligned.

Look for the

triggerAuthenticationType

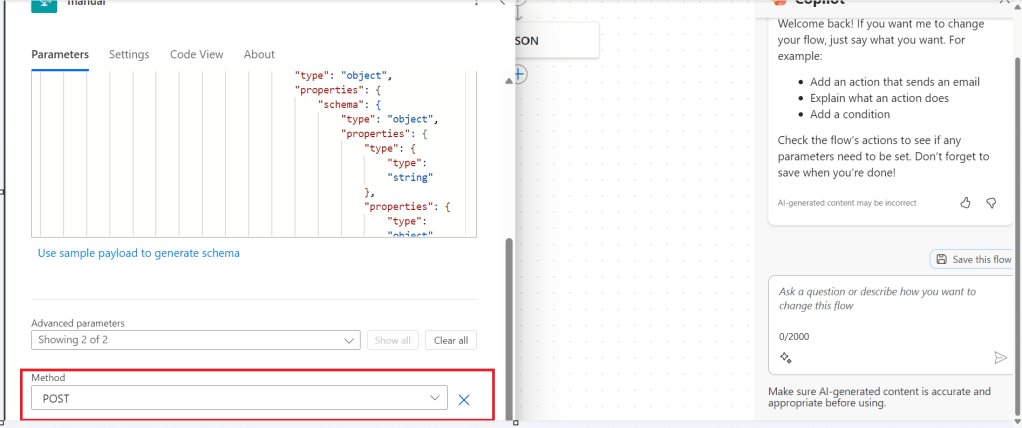
Now copy paste the code for the method

 "method": "POST",

Now your code should look like, hit save as and save the file to a different folder, since we cant override the existing zip folder.

Now once again navigate the last subfolder and delete the definition file present. Once deleted, copy the saved file in your folder to the last subfolder, so your subfolder should look exactly same as below

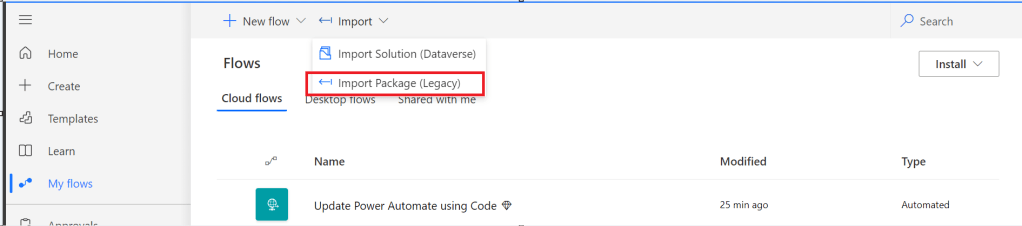
Now navigate to the https://make.powerautomate.com, click on import option available and choose Import Package (Legacy)

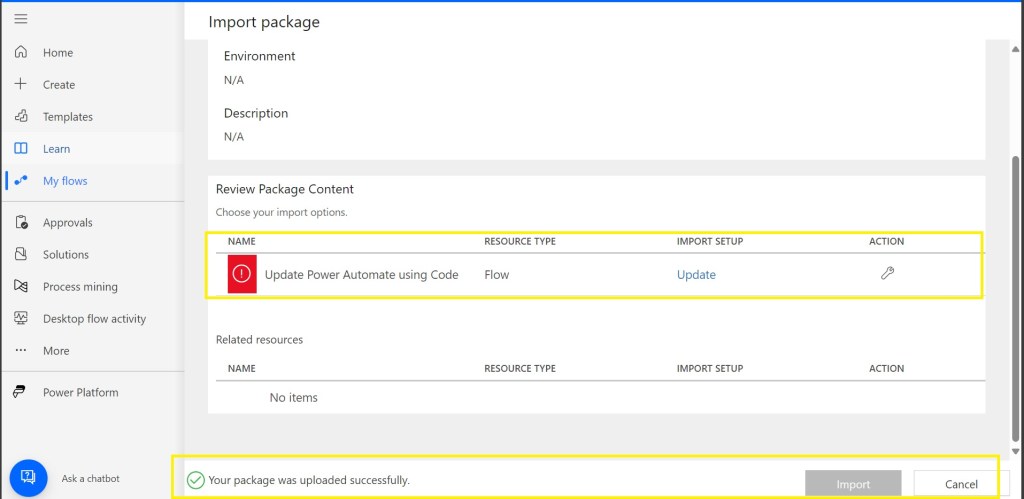
Choose your import package

The package import will be successful

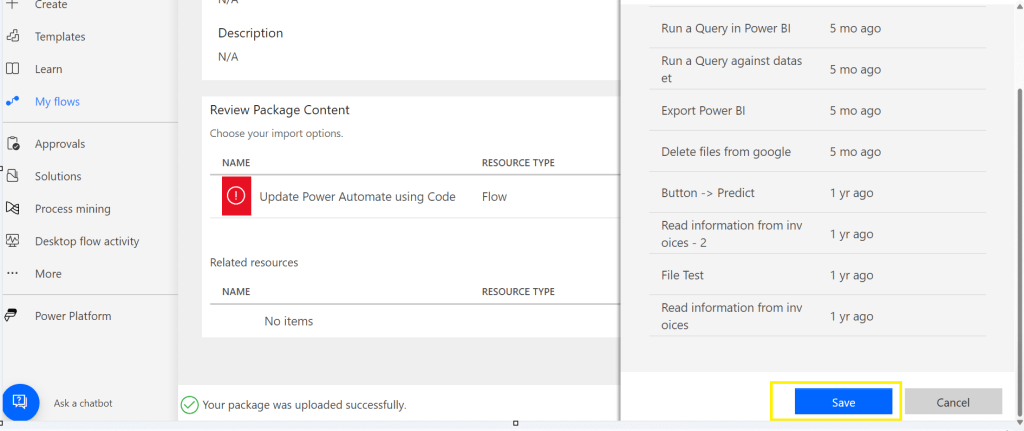
Now click on the package where Red symbol is shown and choose the resource type shown at the right of the page

Scroll down to the bottom and click on save option

Then click on import option

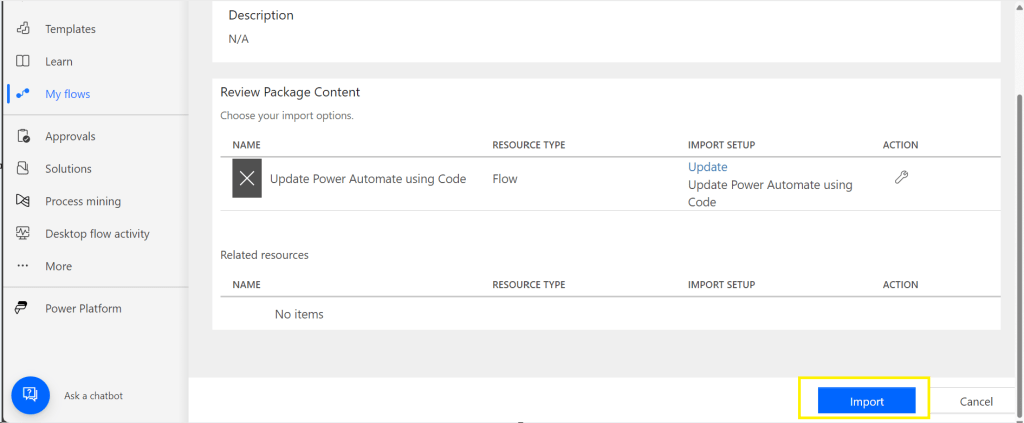
You will be shown a message that import is successful

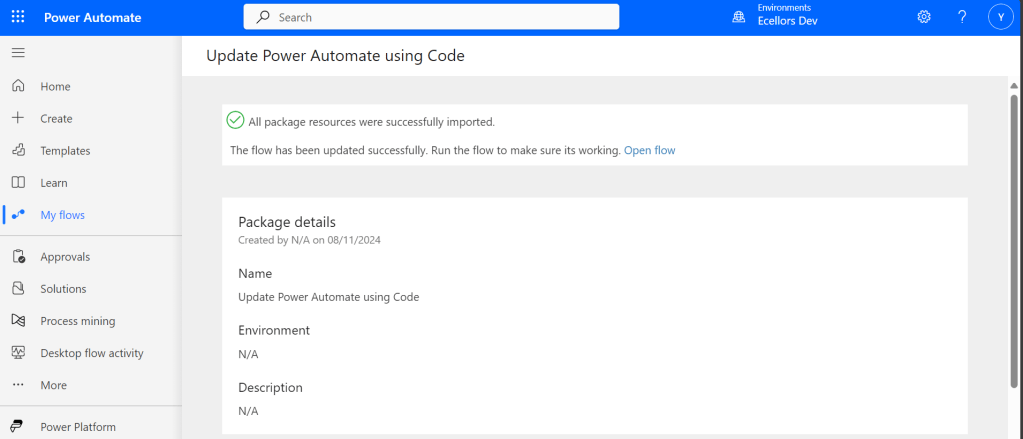
Refresh your Power Automate and check

That’s it, your flow is now updated from backend.

Hope that’s it, you were now able to update the flow using code.

That’s it, it’s easier than you think..can save your time when needed.

Cheers,

PMDY

Filter data with single date slicer when multiple dates in fact table fall in range without creating relationship in Power BI

Hi Folks,

After a while, I am back with another interesting way to solve this type of problem in Power BI. It took increasingly more amount of time to figure out best approach, this post is to help suggest a way of solving differently. This post is a bit lengthy but I will try to explain it in the best way I can.

Here is the problem, I have date fields from 2 fact tables, I have to filter them using a single date slicer which is connected to a calendar table and show the data when any of dates in a particular row falls in the date slicer range. I initially thought this was an easy one and could be solved by creating a relationship between the two fact tables with calendar table, then slice and dice the data as I was able to filter the data with one fact table when connected to calendar table.

I was unable to do that because there were multiple date fields in one fact table and need to consider dates from two tables. I tried to get the value from the slicer using Calculated field since I have do row by row checking. Later understood that, date slicer values can be obtained using a calculated field but those will not be changing when the dates in date slicer is getting changed, this is because the Calculated fields using row context and will only be updated when data is loaded or user explicitly does the refresh. Instead we have to use measure which is calculated by filter context.

The interesting point here is that, if a measure is added to the visual, it returns same value for each row, so a measure shouldn’t be added to a visual as it calculates values on a table level and not at row level, it is ideal if you want to perform any aggregations.

I tried this approach using the great blog post from legends of Power BI(Marco Russo,Alberto Ferrari), but this looked increasingly complex to my scenario and don’t really need to use this, if you still wish to check this out, below is the link to that.

https://www.sqlbi.com/articles/filtering-and-comparing-different-time-periods-with-power-bi/

So, then I tried to calculate the Maximum and Minimum for each row in my fact table using MAXX; MINX functions

MaxxDate = 

VAR Date1 = FactTable[Custom Date1]
VAR Date2 = FactTable[Custom Date2]

RETURN 
MAXX(
    {
        Date1,
        Date2
        
    },
    [Value]
)
MinXDate = 

VAR Date1 = FactTable[Custom Date1]
VAR Date2 = FactTable[Custom Date2]

RETURN 
MAXX(
    {
        Date1,
        Date2
        
    },
    [Value]
)

After merging the two tables into a single one, then create two slicers connected to Maximum Date and Minimum Date for each row. I thought my problem is solved, but it isn’t, since I was only able to filter the dates which have a maximum or minimum value selected in the date slicer, any date value within the date range is being missed.

So I am back to the same situation again

This blog post really helped me get this idea

https://community.fabric.microsoft.com/t5/Desktop/How-to-return-values-based-on-if-dates-are-within-Slicer-date/m-p/385603

Below is the approach I have used,

  1. Create a date table, using the DAX below
Date =
VAR MinDate = DATE(2023,03,01)
VAR MaxDate = TODAY()
VAR Days = CALENDAR(MinDate, MaxDate)
RETURN
ADDCOLUMNS(
Days,
"UTC Date", [Date],
"Singapore Date", [Date] + TIME(8, 0, 0),
"Year", YEAR([Date]),
"Month Number", MONTH([Date]),
"Month", FORMAT([Date], "mmmm"),
"Year Month Number", YEAR([Date]) * 12 + MONTH([Date]) – 1,
"Year Month", FORMAT([Date], "mmmm yyyy"),
"Week Number", WEEKNUM([Date]),
"Week Number and Year", "W" & WEEKNUM([Date]) & " " & YEAR([Date]),
"WeekYearNumber", YEAR([Date]) & 100 + WEEKNUM([Date]),
"Is Working Day", TRUE()
)

2. Here I didn’t create any relationship between the fact and dimension tables, you can leave them as disconnected as below

    3. All you need is a simple measure which calculates if any of the dates in the fact table fall under the slicer date range, here is the piece of code

    MEASURE =
    IF (
    (
    SELECTEDVALUE ( 'Text file to test'[Date] ) > MIN ( 'Date'[Date] )
    && SELECTEDVALUE ( 'Text file to test'[Date] ) < MAX ( 'Date'[Date] )
    )
    || (
    SELECTEDVALUE ( 'Text file to test'[Custom Date1] ) > MIN ( 'Date'[Date] )
    && SELECTEDVALUE ( 'Text file to test'[Custom Date1] ) < MAX ( 'Date'[Date] )
    ) || (
    SELECTEDVALUE ( 'Text file to test'[Custom Date2] ) > MIN ( 'Date'[Date] )
    && SELECTEDVALUE ( 'Text file to test'[Custom Date2] ) < MAX ( 'Date'[Date] )
    )
    ,
    1,
    0
    )

    4. Then filtered the table with this measure value

    That’s it, you should be able to see the table values changing based on date slicer.

    Hope this helps save at least few minutes of your valuable time.

    Cheers,

    PMDY