Today, I will be pointing out the advantages of using Preferred Solution and it’s consequences of using or removing it…while the feature is out there from quite few months, yet many of the Power Platform Projects are not utilizing this feature, it can reduce your hassles when many people are working together in a team and you can make sure everyone’s changes go to this solution.
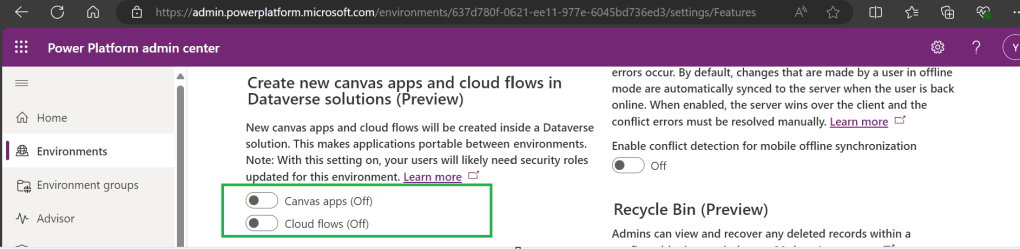
Here we understand what Preferred Solution means to the makers, firstly in order to use this affectively, let’s turn the feature to create Canvas Apps & Cloud Flows in Solutions by enabling this preview feature as suggested below from https://admin.powerplatform.com, this is not mandatory step but would be better as you can add Power Automate flows and Canvas Apps in the Solution and click Save.
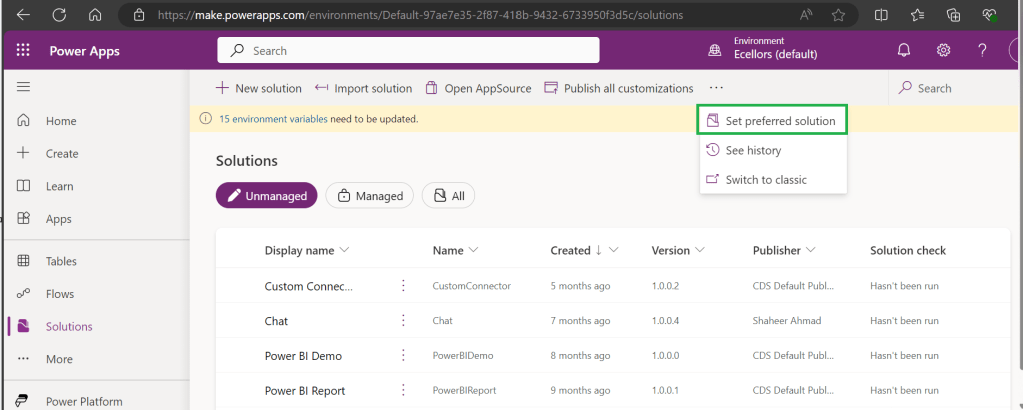
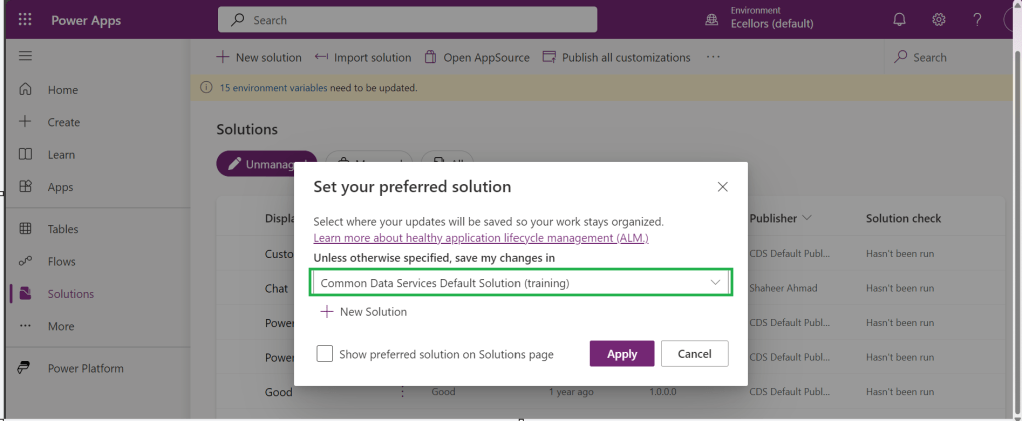
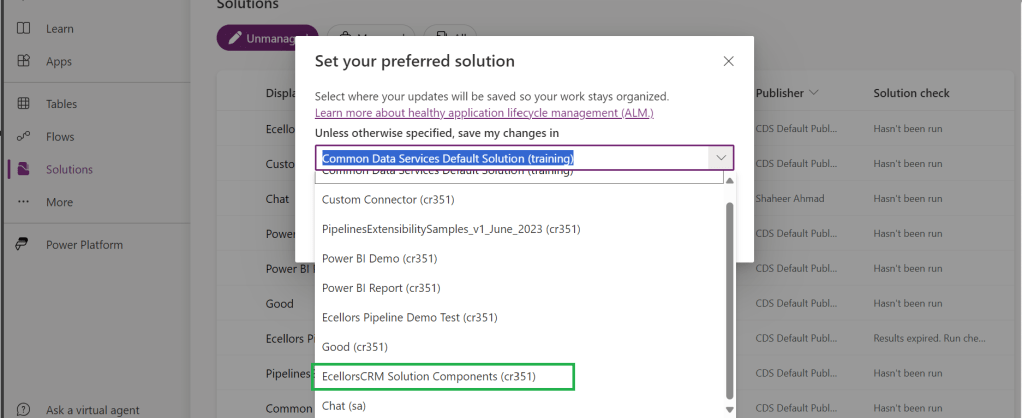
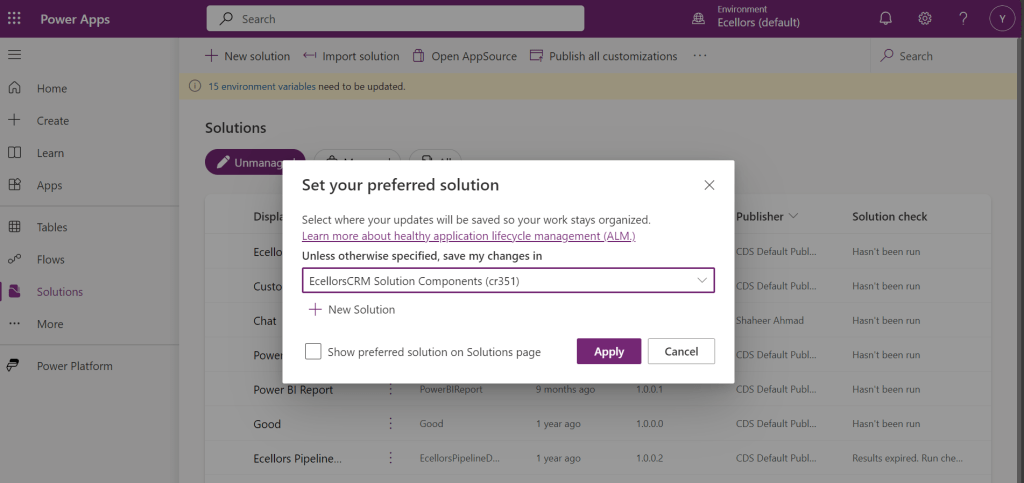
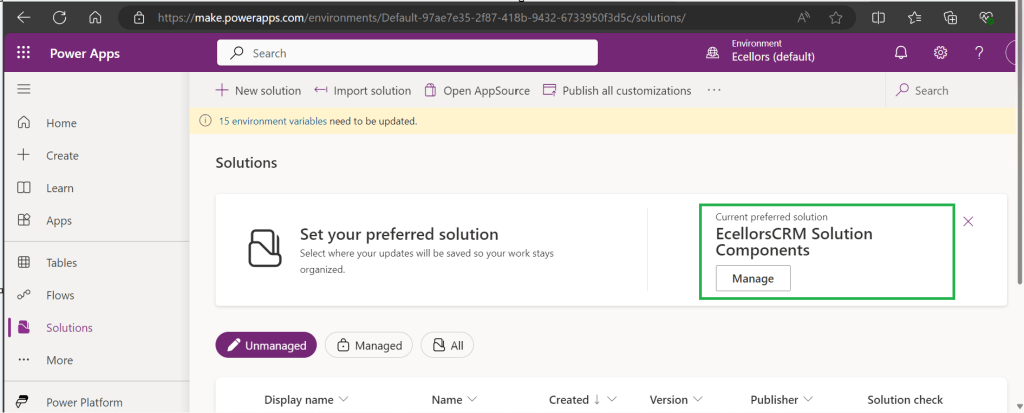
If no preferred solution is set, by default, it will show the Common Data Service Default Solution to set as Default Solution, if you wish to set another Solution, you can select the respective Solution from the drop down.
Enable/Disable the toggle to show Preferred Solution option in the Solutions Page.
Just click on Apply.
Advantages:
Once preferred Solution is set, any components added by the makers would by default go the Preferred Solution, so makers need not worry about choosing right Solution while creating Power Platform Components.
No need to worry if the solution components will be added in the default solution as the new components will be added to the preferred solution automatically.
Limitations:
Preferred Solutions can be only set in Modern Designer
Components created in Classic Designer won’t go to Preferred Solutions
Custom Connector, Connections, DataFlows, Canvas Apps created from Image or Figma Design, Copilots/Agents, Gateways
You can always delete your preferred solution so that other makers can set their preferred solution, but do this with caution so that none of your team members or your works gets impacted.
Hope this saves few seconds of your valuable time…
Well this post is not related to Power Platform, but I want to bring it on here to specify the significance of using NOLOCK in Power Platform Implementations using SQL Server.
Recently during our Deployment activity, we had a SSIS job which is writing a lot of data into SQL Server, at the same time, we were trying to read the data from the same table. I received never ending Executing query … message. It is when I had arguments on this, hence I would like to share the significance of NOLOCK.
The default behaviour in SQL Server is for every query to acquire its own shared lock prior to reading data from a given table. This behaviour ensures that you are only reading committed data. However, the NOLOCK table hint allows you to instruct the query optimizer to read a given table without obtaining an exclusive or shared lock. The benefits of querying data using the NOLOCK table hint is that it requires less memory and prevents deadlocks from occurring with any other queries that may be reading similar data.
In SQL Server, the NOLOCK hint, also known as the READUNCOMMITTED isolation level, allows a SELECT statement to read data from a table without acquiring shared locks on the data. This means it can potentially read uncommitted changes made by other transactions, which can lead to what’s called dirty reads.
Here’s an example:
Let’s say you have a table named Employee with columns EmployeeID and EmployeeName.
Now, if two transactions are happening concurrently:
Transaction 1:
BEGIN TRANSACTION
UPDATE Employee
SET EmployeeName = 'David'
WHERE EmployeeID = 1;
Transaction 2:
SELECT EmployeeName
FROM Employee WITH (NOLOCK)
WHERE EmployeeID = 1;
If Transaction 2 uses WITH (NOLOCK) when reading the Employee table, it might read the uncommitted change made by Transaction 1 and retrieve 'David' as the EmployeeName for EmployeeID 1. However, if Transaction 1 rolled back the update, Transaction 2 would have obtained inaccurate or non-existent data, resulting in a dirty read.
Key takeaways about NOLOCK:
✅ Pros: Reduces memory use, avoids blocking, speeds up reads.
❌ Cons: May read uncommitted or inconsistent data.
Using NOLOCK can be helpful in scenarios where you prioritize reading data speed over strict consistency. So, in my case as I want to just view the data, using NOLOCK is good without locking the query. However, it’s essential to be cautious since it can lead to inconsistent or inaccurate results, especially in critical transactional systems.
Other considerations like potential data inconsistencies, increased chance of reading uncommitted data, and potential performance implications should be weighed before using NOLOCK.
Conclusion:
There are benefits and drawbacks to specifying NOLOCK table hint as a result they should not just be included in every T-SQL script without a clear understanding of what they do. Nevertheless, should a decision be made to use NOLOCK table hint, it is recommended that you include the WITHkeyword. Using NOLOCK without WITH Statement is deprecated. Always use a COMMIT keyword at the end of the transaction.
I have been encountering a strange error since past few weeks now. If you search for this error in Internet you find nothing…the detailed error message obtained from the Plugin Trace Log is as below
System.ServiceModel.FaultException`1[Microsoft.Xrm.Sdk.OrganizationServiceFault]: Exception occured ... at Microsoft.Xrm.RemotePlugin.Grpc.SandboxFabricGrpcClient.ExecutePluginInternal(IRemotePluginRequest pluginRequest, ExecuteRequest executeRequest, Guid executionId, ISandboxFabricDuplexCommunicationHandler communicationHandler, Boolean returnTraceInfo, Guid organizationId, SandboxFabricCallTracker sandboxFabricCallTracker) +0x5d0
at Microsoft.Xrm.RemotePlugin.Grpc.SandboxFabricGrpcClient.ExecutePlugin(IRemotePluginRequest pluginRequest, IPluginExecutionContext executionContext, IPluginTracingService pluginTracingService, ISandboxFabricDuplexCommunicationHandler communicationHandler, ISet`1 earlySerializedPropertiesList, SandboxFabricCallTracker sandboxFabricCallTracker, ISandboxMemoryStreamProvider memoryStreamProvider) +0x2cd
at Microsoft.Xrm.RemotePlugin.Grpc.SandboxFabricCodeUnit.Execute(ILifetimeScope scope, IExecutionContext context, SandboxFabricCallTracker& sandboxFabricCallTracker, ISandboxMemoryStreamProvider memoryStreamProvider) +0x6e
at Castle.Proxies.Invocations.ISandboxFabricCodeUnit_Execute.InvokeMethodOnTarget() +0x13
at Castle.DynamicProxy.AbstractInvocation.Proceed() +0x2d
at Microsoft.Xrm.RemotePlugin.Client.Interceptors.SandboxFabricPluginTraceInterceptor.Intercept(IInvocation invocation, IExecutionContext context, SandboxFabricCallTracker sandboxFabricCallTracker) +0x1f
The error message looked so strange to me and I couldn’t get any idea on what is happening, I thought some problem with the Plugin Code and it was executing more than 2 mins and hence causing error related to Sandbox service of Dynamics 365. I was executing this logic placed inside an action from Power Automate…this took couple of hours to figure out what was happening…
With no clue, I had started to change Plugin Code in the following ways…
Change the Synchronous Plugin to Asynchronous Plugin
It doesn’t show any error in Power Automate now, but in the Plugin Trace Log, it still throws the error
Add Try – Catch Block
Add try catch block made me understood that Plugin was causing an exception due to type casting issue in my logic. This worked…
FYI, I have removed some sensitive information from the below error message.
Microsoft recommends us to use Try – Catch block for efficient error handling, in the first place, so always use proper error handling while developing Plugins, Actions or Custom Workflows in Dynamics 365 to avoid such errors.
If you face this kind of error, this is some issue within your code and nothing to do with Microsoft Services, no need to raise a Microsoft Support Ticket for resolving this.
In App notifications are trending these days where many customers are showing interest in implementing these for their businesses.
So, in this blog post, I am going to show you the easiest way to generate In App notification using XrmToolBox in few clicks. Use the below tool to generate one.
So, let me walk you through step by step
Step 1: Open In App Notification Builder in XrmToolBox
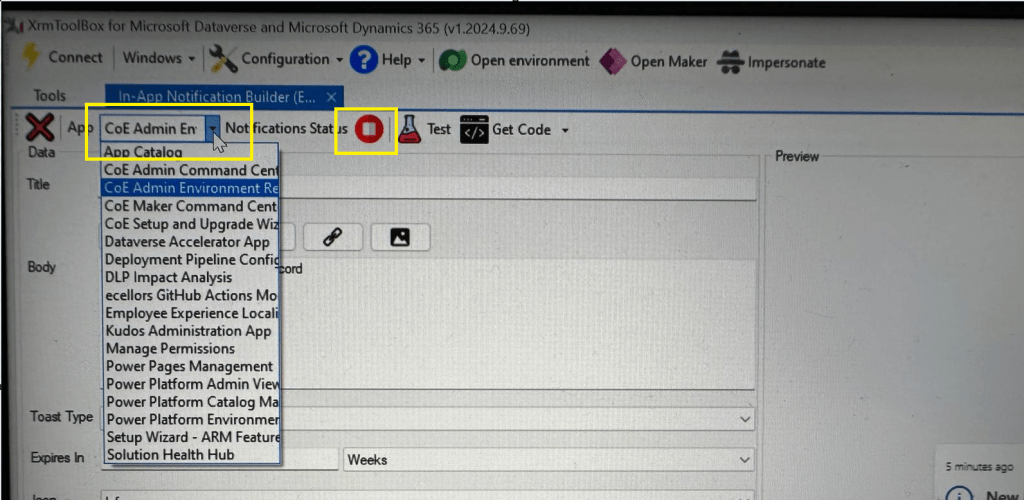
Step 2: In App notification is a setting that should be enabled at App level, so meaning if you have developed few Model Driven Apps, you will be able to enable the In App notification individually for each one of them.
Step 3: In the above snapshot, we should be able to select the respective App for which we want to enable the In App Notification. Red bubble besides indicate that the In App notification is not enabled for this App.
So, we need to enable it by clicking on the red icon itself, you should then be able to get this prompt as below.
Step 5: Upon confirming the confirmation dialog box, the In App notification will be enabled for that App and you the red button turns to green as below saying that In App Notification is enabled.
Now that the In App notification is enabled in the App, we will proceed with the remaining setup.
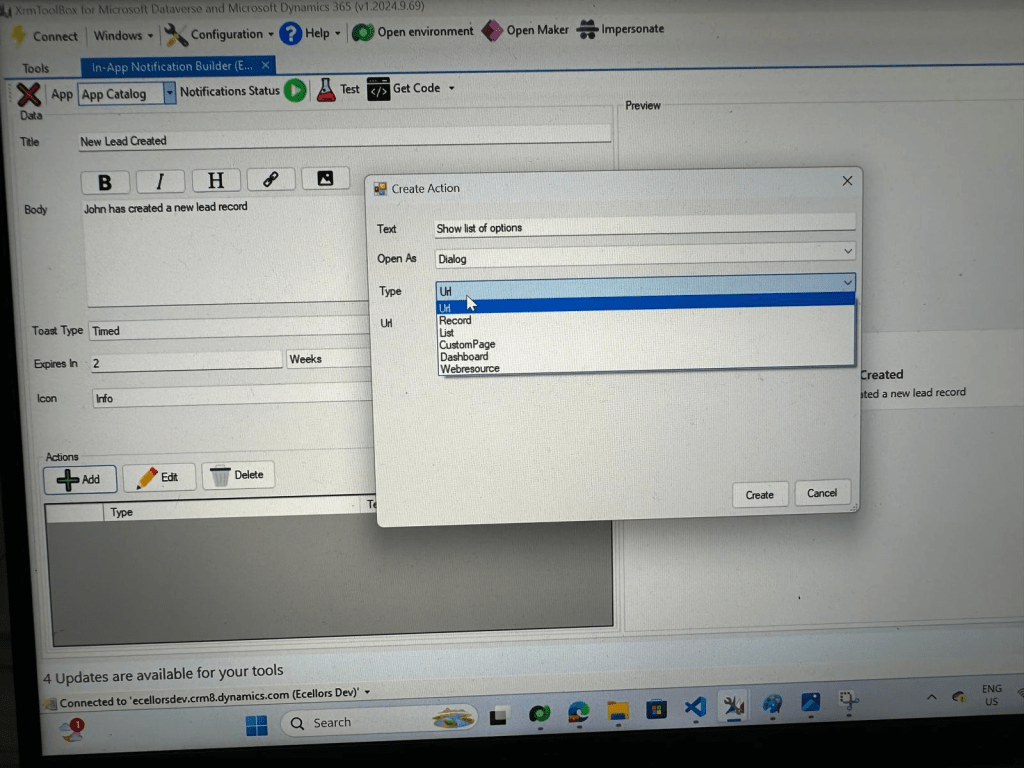
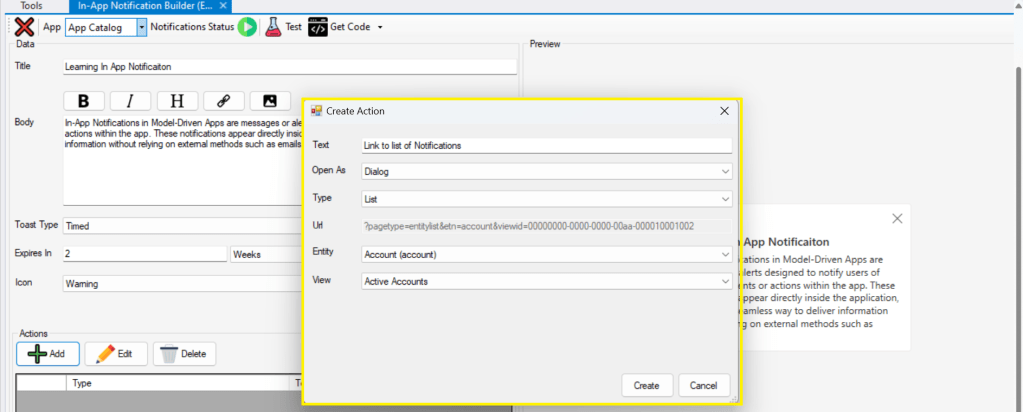
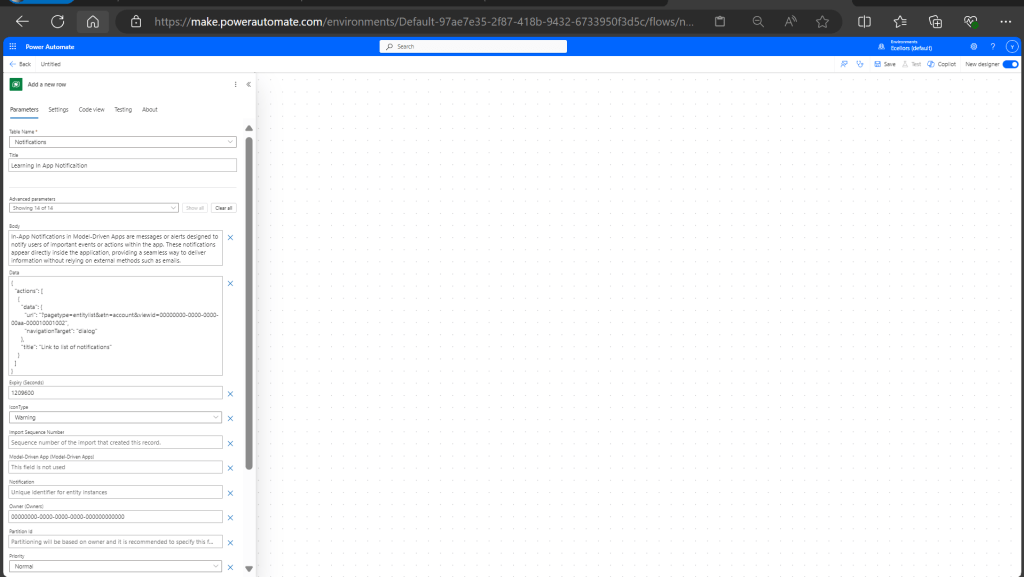
Step 6: You can proceed to give a meaningful title, body for you In App Notification. Also mention the required toast type and specify the expiry duration, Icon. Also Click on Add icon and choose the action required to be performed when In App notification is clicked.
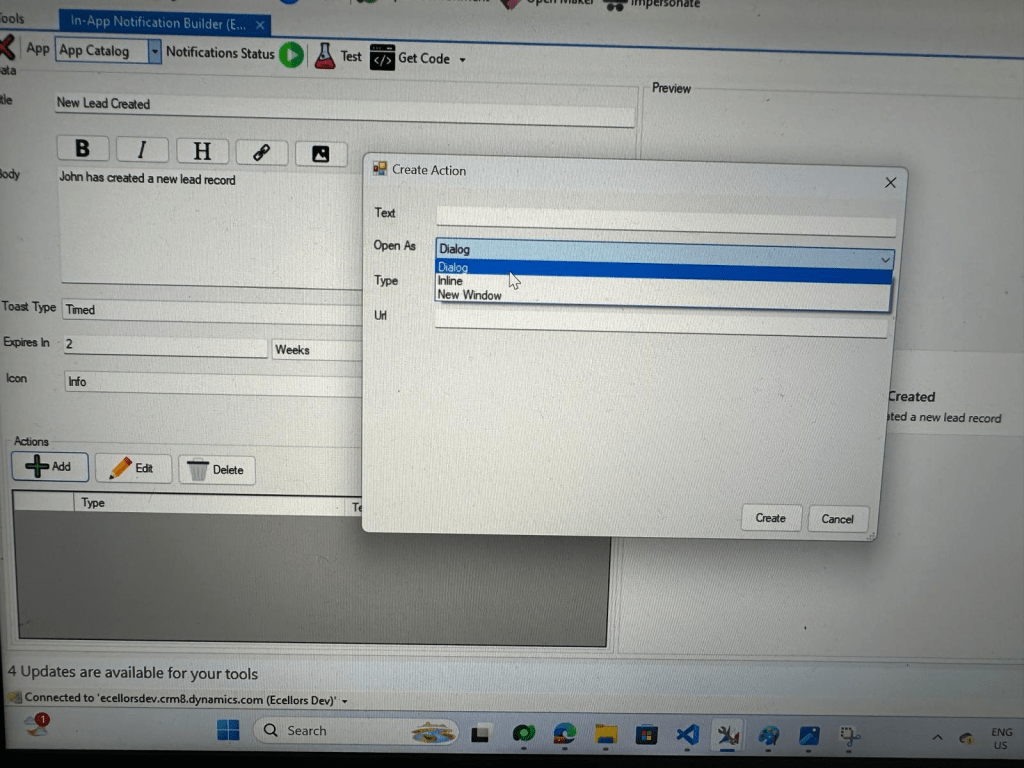
Step 9: You can even choose the type of action to be performed…
For example, let’s use to open as dialog and show list view
Your screen should look something like below
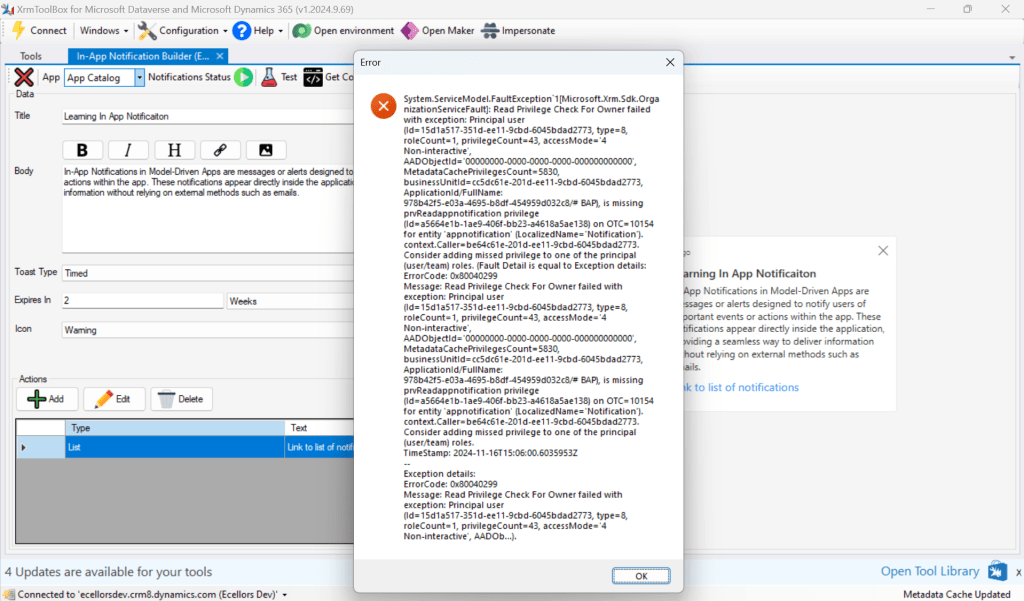
Step 10: Once done, you can click on create and that’s it you have now created In App Notification. Now let’s test this for the user who have priveleges to access this App.
If not, you will face this error..
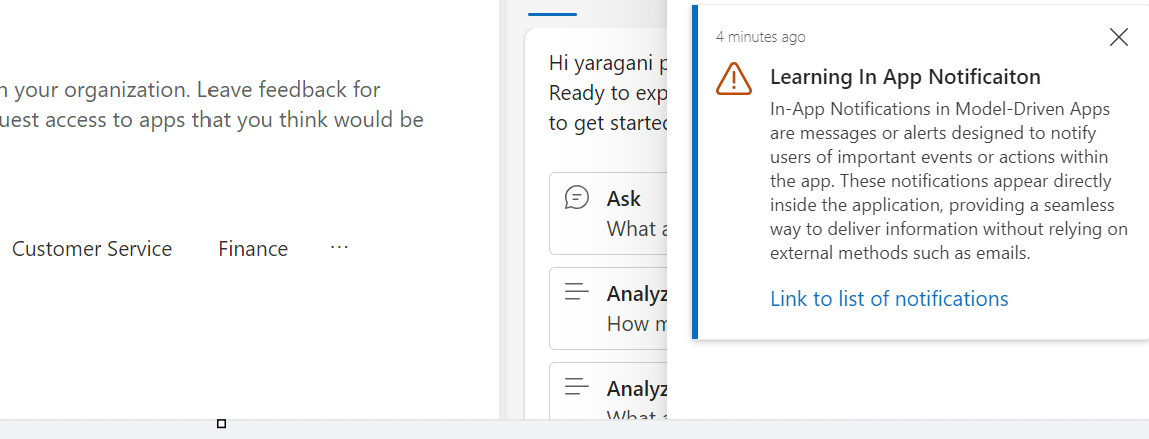
Log in with user account for which the In App Notification is triggered.
Hurray!!!! That’s it, how easy it was to create In App Notification in Low Code manner.
You can even get the code behind this as well…
However, there were other ways to trigger the In App Notification from a Pro Code angle, let’s discuss those as well.
In this case you need to manually turn the In App Notification feature on by going to settings for the Model Driven App as below first.
Notifications can be sent using the SendAppNotification message using SDK.
You can either trigger from and can choose based on your convenience to trigger a similar notification.
Client Scripting
This file contains hidden or bidirectional Unicode text that may be interpreted or compiled differently than what appears below. To review, open the file in an editor that reveals hidden Unicode characters.
Learn more about bidirectional Unicode characters
'body': `In-App Notifications in Model-Driven Apps are messages or alerts designed to notify users of important events or actions within the app. These notifications appear directly inside the application, providing a seamless way to deliver information without relying on external methods such as emails.`,
This file contains hidden or bidirectional Unicode text that may be interpreted or compiled differently than what appears below. To review, open the file in an editor that reveals hidden Unicode characters.
Learn more about bidirectional Unicode characters
["body"] = @"In-App Notifications in Model-Driven Apps are messages or alerts designed to notify users of important events or actions within the app. These notifications appear directly inside the application, providing a seamless way to deliver information without relying on external methods such as emails.",
["ownerid"] = new EntityReference("systemuser", new Guid("00000000-0000-0000-0000-000000000000")),
["icontype"] = new OptionSetValue(100000003), // Warning
["toasttype"] = new OptionSetValue(200000000), // Timed
This blog post is all about the latest features released in Power BI Desktop for DAX(Data Analysis Expressions) using DAX Query View.
Do you have the requirement any time to document your DAX functions used in your Power BI Report, then use the DAX query view which introduced new DAX functions to get metadata about your semantic model with the INFO DAX functions.
Firstly, if you were not aware, DAX Query view is the recent addition where we can query the model similar to how the analysts and developers used Power BI Desktop or other 3rd party tools to get the same information earlier. You can access DAX Query view as below in green.
When you navigate to the DAX Query view, key points to note are as below
DAX Queries will be directly saved to your Model when saved from DAX Query View
DAX Query View will not be visible when the Power BI Report is published to the Power BI Service
The results of the DAX will be visible at the bottom of the page as shown below
IntelliSense is provided by default
There were 4 DAX INFO.VIEW Functions introduced as below
List all your Measures using INFO.VIEW.MEASURES() This lists down all the measures in your Semantic Model, it also provides the Expression used for the Measure along with which table it was created.
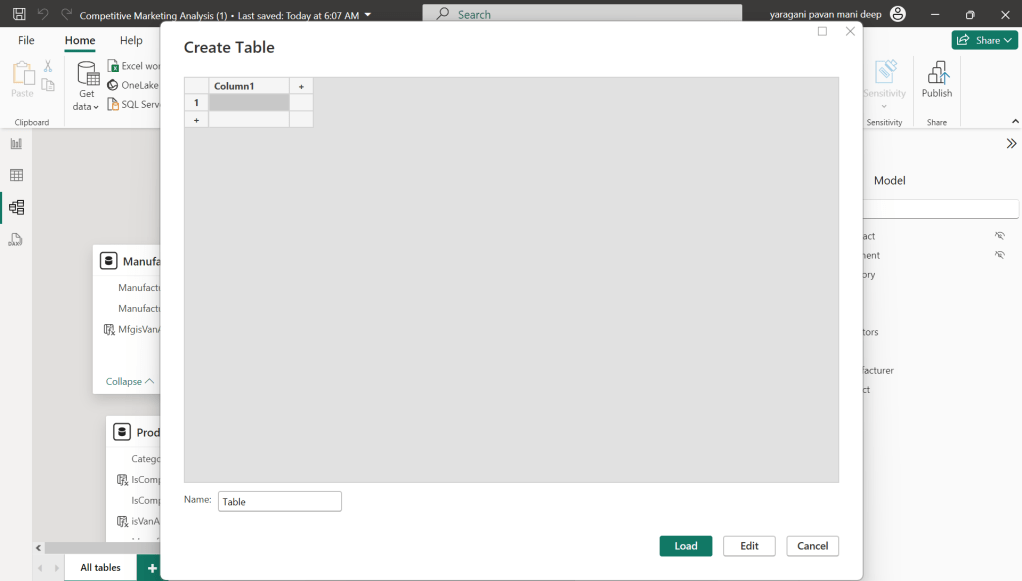
I have selected the whole results of the measures and Copy the results you see see in the table below
Just go to Model View and click Enter Data
You will be shown a screen like this
Just do a Cntrl + V as you have previously copied the table information
That’s it, how easy it was to document all the Measures, similarly you can document all the Meta Data available for the Power BI Report.
That’s it for today, hope you learned a new feature in Power BI Desktop…
One of my colleagues asked about Dataverse search, hence I am writing this article on Dataverse Search in Dynamics 365 and in the end, will compare different search options available in Dynamics 365.
Dataverse Search:
In layman terms, Dataverse Search is a powerful search tool that helps you find information quickly across your organization’s data in Microsoft Dataverse, which is the underlying data platform for apps like Power Apps, Dynamics 365, and more, shows you all the related information from across different tables or records in one place.
In short, Dataverse Search is the evolved version of Relevance Search, offering a more robust, faster, and user-friendly search experience including search results for text in documents that are stored in Dataverse such as PDF, Microsoft Office documents, HTML, XML, ZIP, EML, plain text, and JSON file formats. It also searches text in notes and attachments. Before enabling it, just note that once Dataverse search is enabled, it will be affected in all your Model Driven Apps, as of now, just take note.
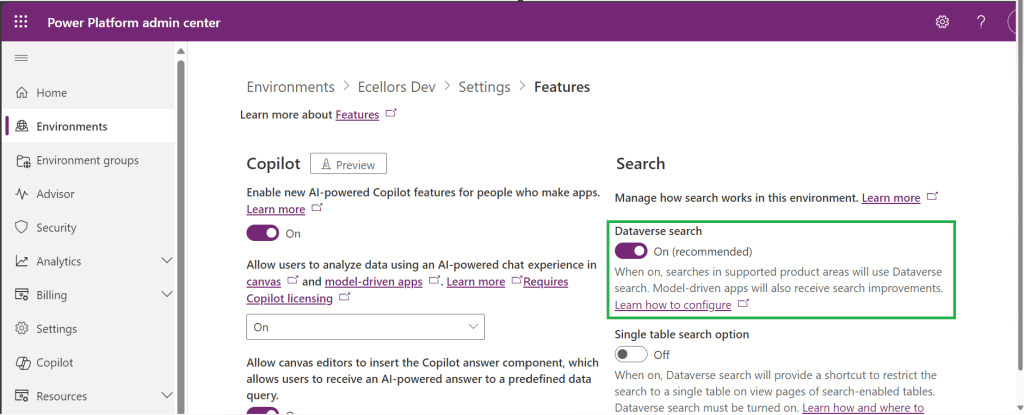
It is on by default, here is where you can now turn off the Dataverse Search:
Click on Environments –> Choose your required environment –> Settings –>Features
3. Disable/Enable the Dataverse search feature.
Once enabled, we need to configure the tables for Dataverse Search so that indexing is performed at the backend, in order to do this…
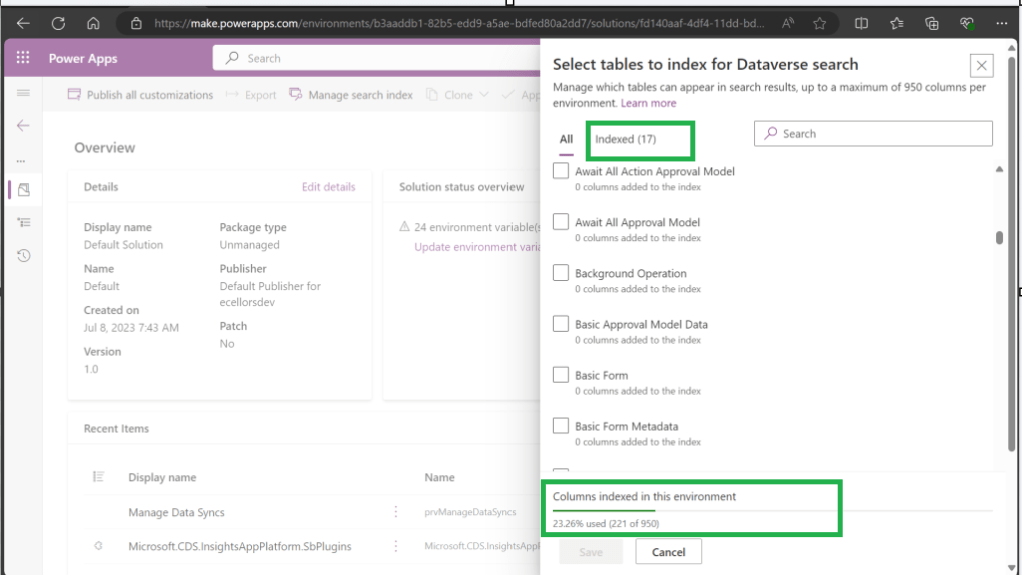
Navigate to https://make.powerapps.com, select your desired solution –> Click on Overview as shown below
Now you need to choose Manage Search Index and you can choose your desired table and fields, there isn’t a limit on the number of tables you can configure, but there is a limit on the number of fields you can configure for an environment, a maximum of 1000 fields are permitted both including system and custom fields, 50 fields are used by system, so you can configure 950 fields.
Just note that some field types are treated as multiple fields in the Dataverse search index as indicated in this table.
Field type
Number of fields used in the Dataverse search index
Lookup (customer, owner, or Lookup type attribute)
3
Option Set (state, or status type attribute)
2
All other types of fields
1
At the bottom of the snap above, you could see the percentage of columns indexed in this environment.
When Dataverse search is enabled, the search box is always available at the top of every page in your app. You can start a new search and quickly find the information that you’re looking for.
When Dataverse search is turned on, it becomes your default and only global search experience for all of your model-driven apps. You won’t be able to switch to quick find search also known as categorized search.
You can also enable Quick actions as shown in the below table
Table
Quick actions
Account
Assign, Share, Email a link
Contact
Assign, Share, Email a link
Appointment
Mark complete, Cancel, Set Regarding, Assign, Email a link
Task
Mark complete, Cancel, Set Regarding, Assign, Email a link
Phone Call
Mark complete, Cancel, Set Regarding, Assign, Email a link
Email
Cancel, Set Regarding, Email a link
Here is the short table comparing all types of searches in Dynamics 365…
Yes. Note: For non-production environments an administrator must manually enable it.
Yes, for the table grid. No, for multiple-table quick find (categorized search). An administrator must first disable Dataverse search before multiple-table grid find can be enabled.
Yes
Single-table search scope
Not available in a table grid. You can filter the search results by a table on the results page.
Available in a table grid.
Available in a table grid.
Multi-table search scope
There is no maximum limit on the number of tables you can search.
Searches up to 10 tables, grouped by a table.
Multi-table search not available.
Search behavior
Finds matches to any word in the search term in any column in the table.
Finds matches to all words in the search term in one column in a table; however, the words can be matched in any order in the column.
Query builder where you can define search criteria for the selected row type. Can also be used to prepare data for export to Office Excel so that you analyze, summarize,or aggregate data, or create PivotTables to view your data from different perspectives.
Searchable columns
Text columns like Single Line of Text, Multiple Lines of Text, Lookups, and Option Sets. Doesn’t support searching in columns of Numeric or Date data type.
All searchable columns.
All searchable columns.
Search results
Returns the search results in order of their relevance, in a single list.
For single-table, returns the search results in a table grid. For multi-table, returns the search results grouped by categories, such as accounts, contacts, or leads.
Returns search results of the selected row type with the columns you have specified, in the sort order you have configured.
Hope you learned something today…if you have any questions, do let me know in the comments…
This is the second blog post series on Canvas Apps where you can learn and grow from Zero – Hero in Canvas Power Apps. In this blog post, we will talk about different ways you can get started with creating canvas apps.
Introduction
Power Apps Canvas Apps allow users to build powerful applications with a drag-and-drop interface, requiring little to no coding. Whether you’re a beginner or an experienced user, setting up your first Canvas App is a straightforward process. This guide walks you through each step.
Basic knowledge of what you want to build (e.g., a simple data entry form).
Step 1: Accessing Power Apps Studio
There were different ways you can create a Canvas Apps
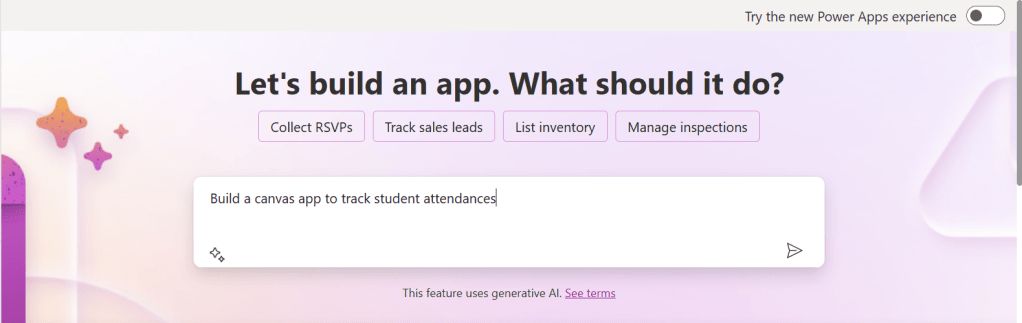
You can create a canvas app by giving your requirement in Copilot which will in turn build your Canvas Apps.
2. You can design them using any of the existing templates available
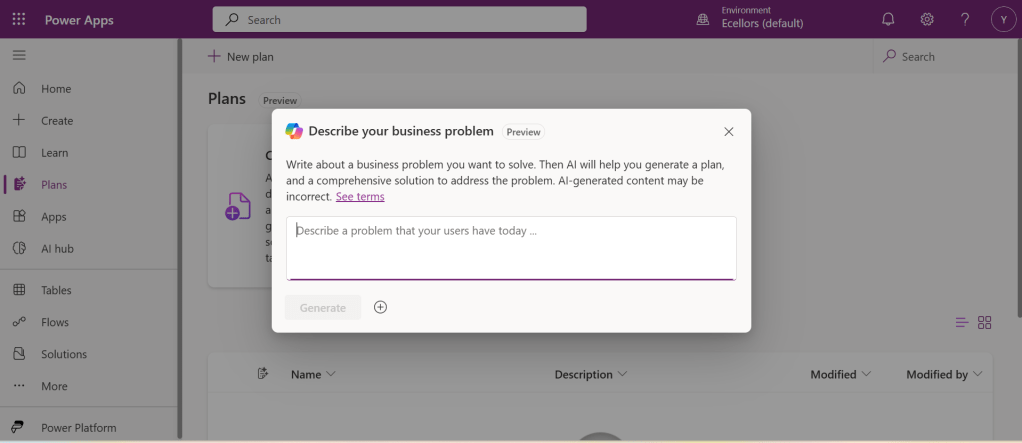
3. You can also design your App using Plan designer which is the latest feature released and still in preview, for this you need to enable
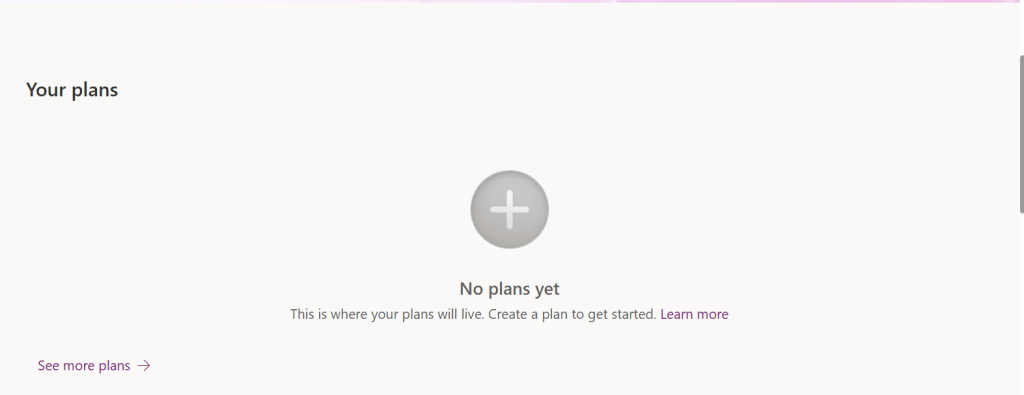
For this you need to have an plan available
You can click on See more plans option available, create new plans if necessary
You have to state your business problem, this is pretty much same as using the Copilot in the old experience but here you just tell what problem you have been solving by creating the App, that’s it.
I entered Tracking Student Attendances as my problem and within a matter of 1 min, it designed whole data model where you can accept or propose for a new change.
Once you accept, next it will go ahead and start preparing the data necessary.
After you accept this, it will start designing for the user experiences
Once everything is done, you
It will ask you to save in a solution, this way you will be able to save all your changes to a solution which can be safely moved across environments.
And that’s it, your fully functional app is ready in few mins.
Step 2: Designing Your App
Once inside the Power Apps Studio:
Drag and drop controls from the left-side panel to the canvas.
Add labels, text inputs, buttons, and galleries as needed.
Resize and align elements for a clean layout.
Below is the sample Power App screen in Studio containing the components.
Step 3: Connecting to a Data Source
Click on Data in the left panel.
Select Add data and choose a source like SharePoint, Dataverse, or Excel.
Connect your app to the data source.
Step 4: Adding Functionality with Formulas
Power Apps uses Excel-like formulas to add functionality. Example:
To navigate to another screen: Navigate(Screen2, ScreenTransition.Fade)
To filter data: Filter(Orders, Status="Pending")
Step 5: Previewing and Testing Your App
Click on the Play button in the top-right corner.
Test the app’s functionality.
Fix any layout or data issues as needed.
Image Suggestion: Screenshot showing the app running in preview mode.
Step 6: Saving and Publishing
Click File > Save As.
Choose Cloud as the storage option.
Click Publish to make your app available.
Image Suggestion: Screenshot of the Save & Publish screen.
Conclusion
Congratulations! You’ve built your first Canvas App. You can continue refining it by adding more features, integrating AI, or automating workflows.
Are you ready to explore more? Share your first Canvas App experience in the comments!
Do you want step by step guided walk through, then check this App in a Day Workshop from Microsoft where you can start from scratch and build a fully functional Canvas App.
This is a post related to Power Automate, I will try to keep it short giving a background of this first.
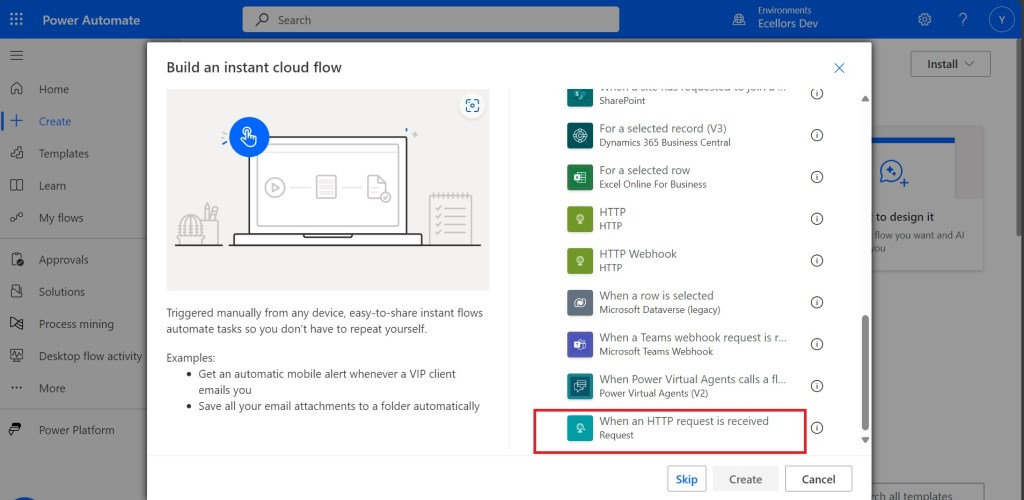
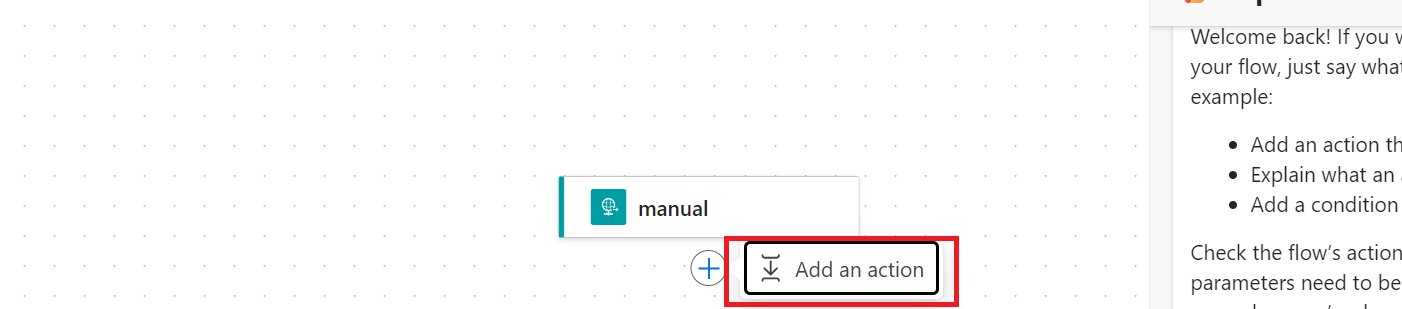
Recently we faced one issue with Power Automate where we had actually created a Power Automate Flow which uses the trigger ‘When a HTTP Request is received’ where for the request the method name is not specified in the trigger.
So, we need to update the existing flow without generating a new one as saving your Power Automate without giving Method name gave error which couldn’t be modified later. There was one way from the code but not the Power Automate editor, so here we would try to update the flow from code. I will show you two approaches after showing the existing flow steps.
Once installed, identify the Power Automate flow which you want to edit, once you were on this page, click on the extension –> Power Automate Tools
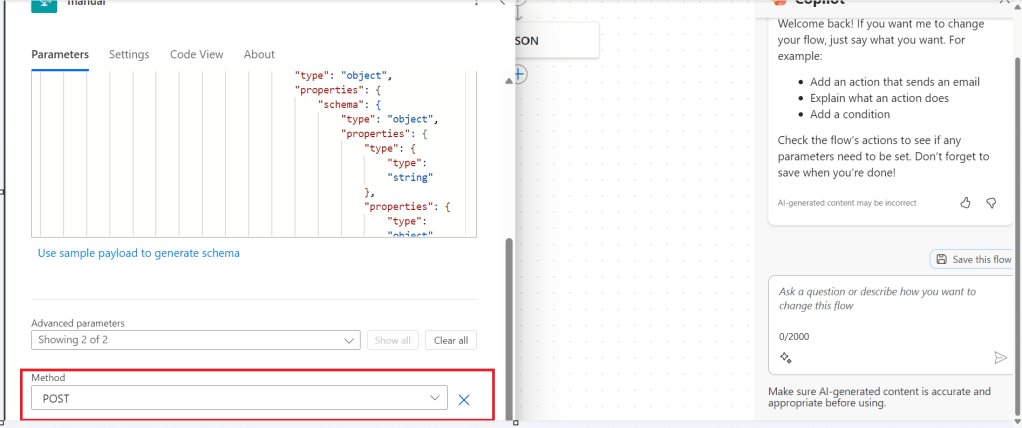
You can just modify the code and add the piece of step needed wherever required,
here I would add method name to my HTTP Trigger
I will add Post Method here
"method": "POST",
It will look like
You get a chance to validate and then click on save, even you will the same IntelliSense you would have on https://make.powerautomate.com
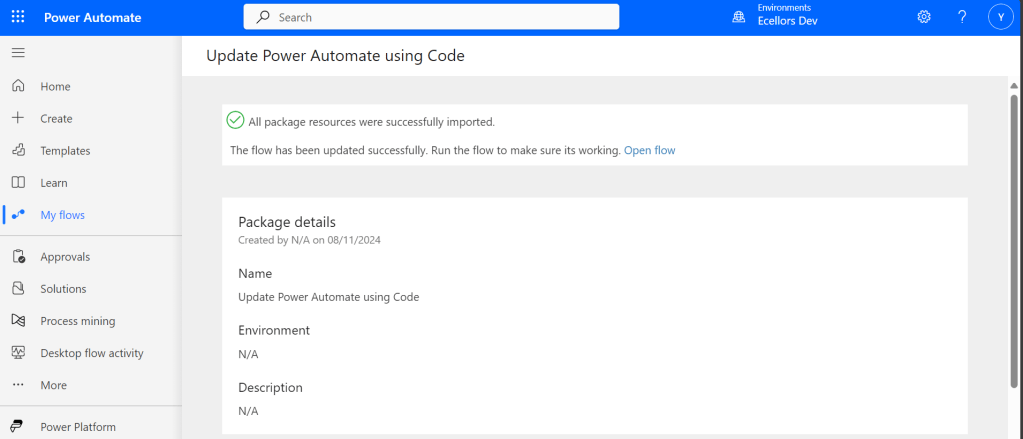
Upon saving, your Power Automate flow, an alert will be shown to you, and the flow will be updated.
Just refresh your Power Automate flow and check
That’s it, your flow is now updated.
Well, if your tenant have policies where you can’t use the Power Automate Tools extension, you can then follow this approach is easier as well.
For showing this one, I will remove the Method name Post again from the flow, save it and then update using below method.
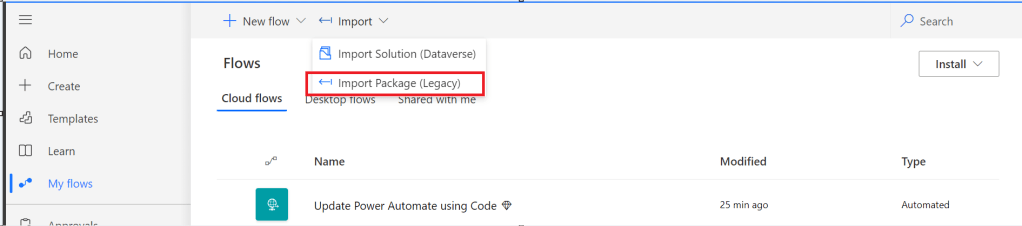
Export & Import method
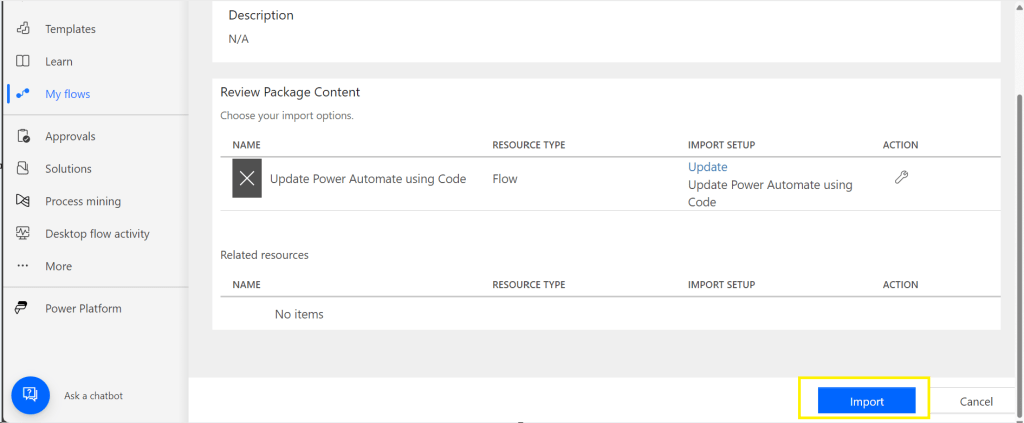
Here you would need to export the flow, here we would use the export via Package (.zip) method.
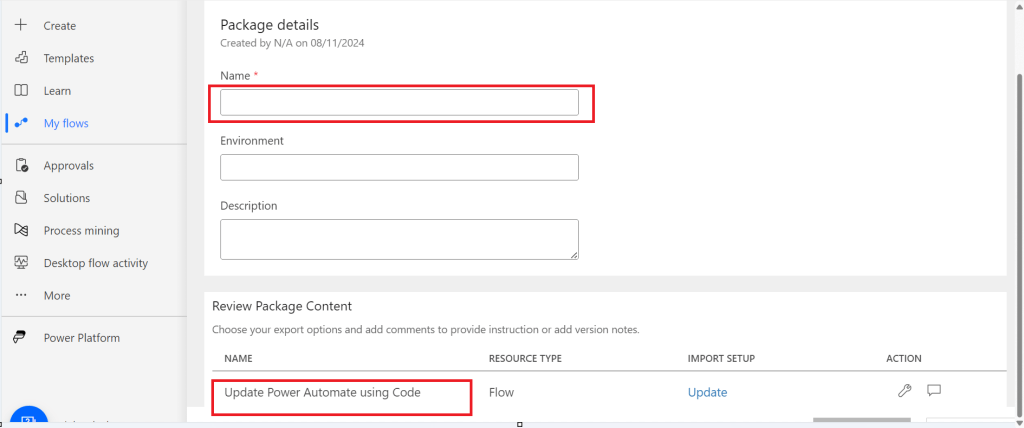
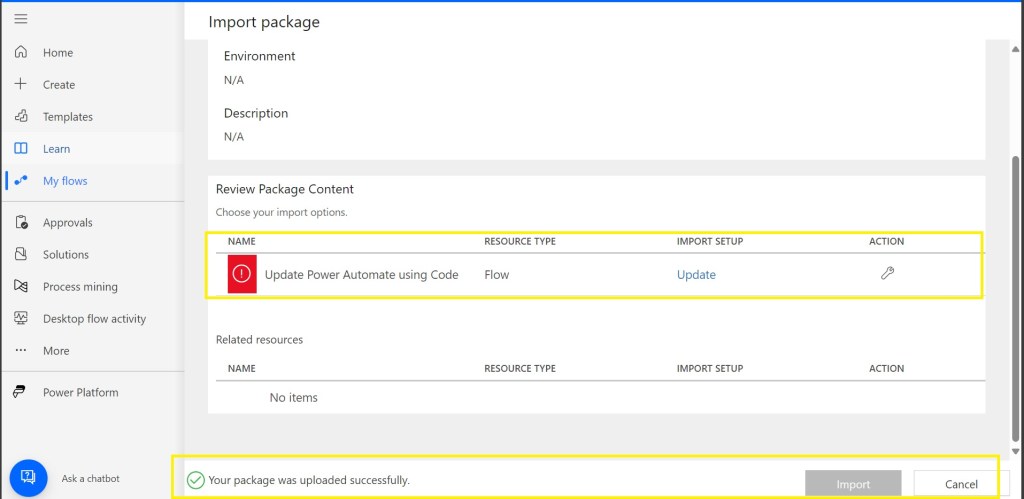
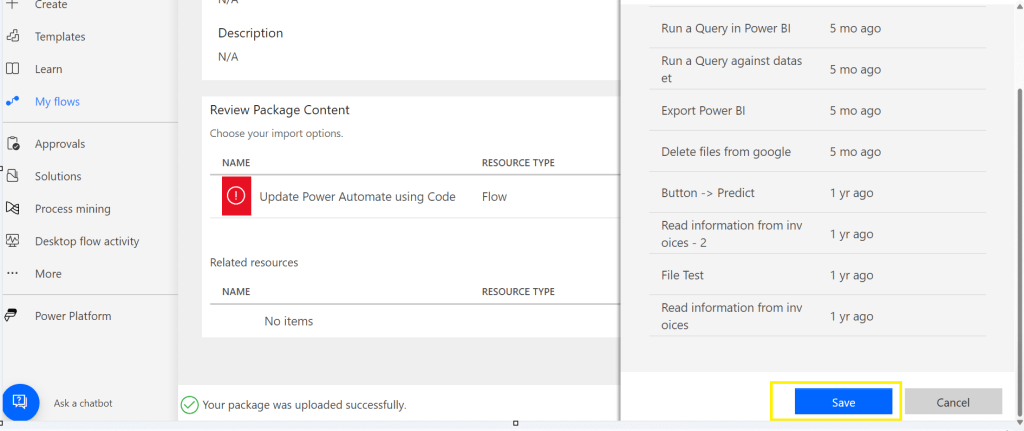
In the next step of export, you will be prompted to key in details as below, just copy the flow name from Review Package Content and paste it in the Name field. Just enter the flow name, it would be enough.
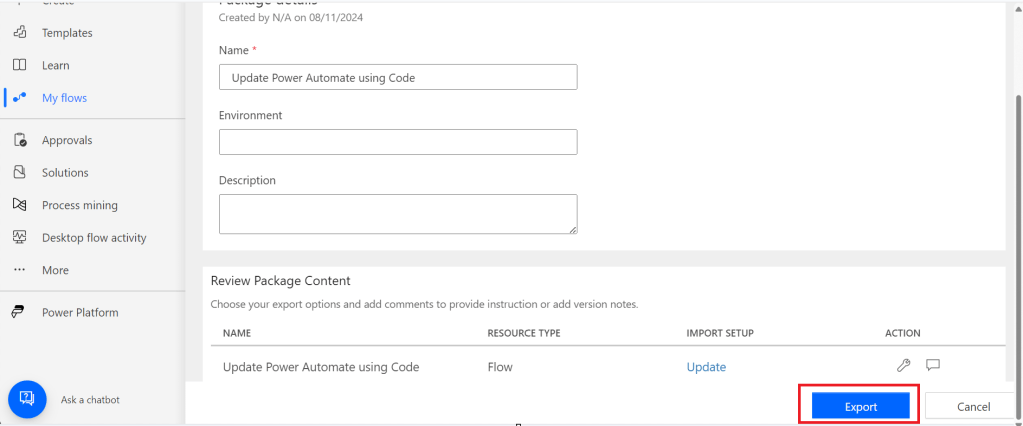
Then click on export
The package will be exported to your local machine
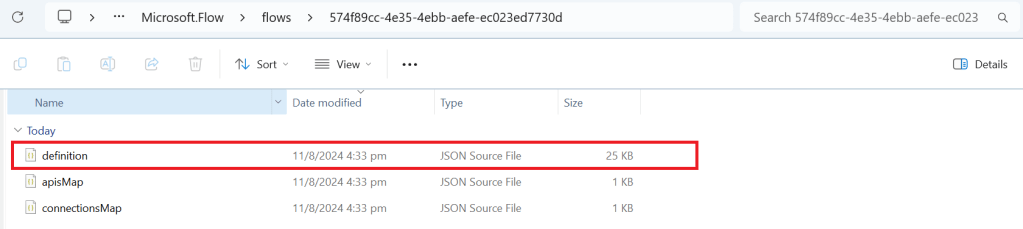
We need to look for definition file, there would be few JSON files in the exported file
You can navigate the last subfolder available
Open the JSON file using your favorite IDE, I prefer using Visual Studio Code, once opened, you will see something like this
Click on Cntrl + A, once all the text is selected, right click and choose Format document, then your text will be properly aligned.
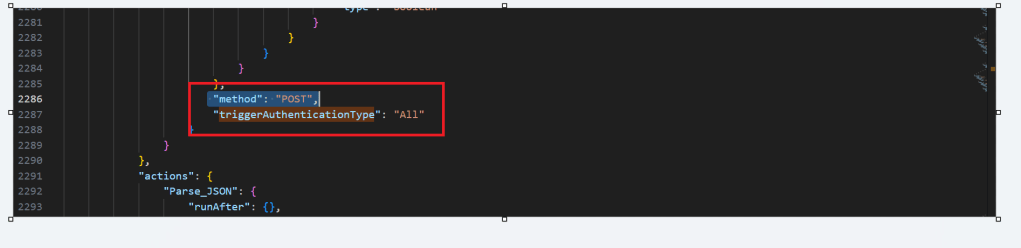
Look for the
triggerAuthenticationType
Now copy paste the code for the method
"method": "POST",
Now your code should look like, hit save as and save the file to a different folder, since we cant override the existing zip folder.
Now once again navigate the last subfolder and delete the definition file present. Once deleted, copy the saved file in your folder to the last subfolder, so your subfolder should look exactly same as below
Last few weeks was very busy for me, I missed interacting with the community.
Here I would like to share one tip which can greatly help your debugging…
Just to give a little background, I was working with the Plugins for Dynamics 365 recently where I was working with API, the Plugin seem to work fine when debugged using Profiler, I tested the piece of the Plugin Code in Console, it worked either, but Plugin is not working when the respective action which triggers the Plugin is being fired. I scratched my head, what is the problem…
Just then, I tried using the below block of code, replaced the catch block of Plugin Code with below code.
This file contains hidden or bidirectional Unicode text that may be interpreted or compiled differently than what appears below. To review, open the file in an editor that reveals hidden Unicode characters.
Learn more about bidirectional Unicode characters
Soon, I observed from the detailed error message above function posted, it is failing because of version problem of the referenced DLL and current DLL version was not supported with my assembly.
Soon I was able to reference my Plugin with correct DLL version which fixed the issue. No further debugging was needed.
Are you a Power Platform or Dynamics 365 CE Developer, you would definitely need to work on Plugin Registration tool at any given point of time and having a local application for Plugin Registration tool greatly helps…in this post, I will show a little different way to install Plugin registration tool and that too very easily.
Well, this approach is especially useful to me when I got a new laptop and need to work on Plugin Registration Tool where the Plugins already build for the implementation.
First 3 ways might have known to everyone through which you can download Plugin registration tool…do you know there is fourth approach as well…
Because there were limitations to use these approaches at least in my experience, I found the fourth one very useful.
XrmToolBox – Not quite convenient to profile and debug your plugins
https://xrm.tools/SDK – Dlls in the downloaded folder will be blocked and would need to manually unblock the DLL’s for the Tool to work properly
CLI – People rarely use this.
Just do note that the approach is very easy and works only if you have a Plugin Project already. Please follow the steps below
Just open the Plugin project.
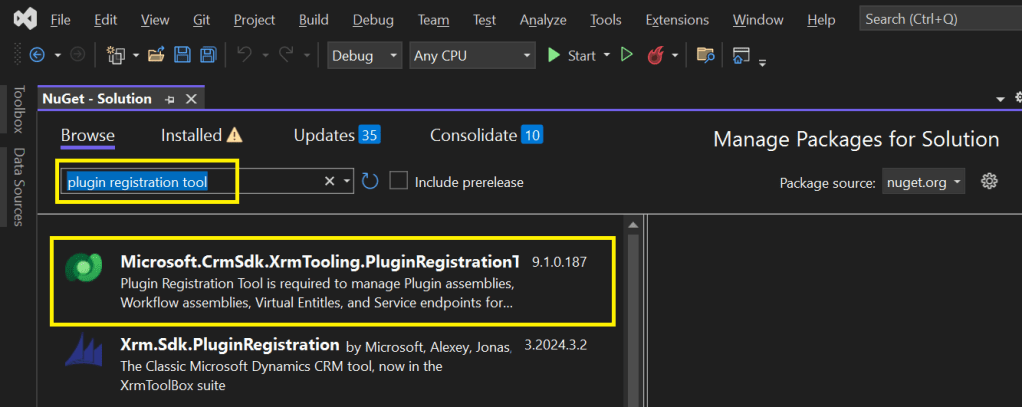
Right click on the solution and choose manage Nuget Packages for the solution
Search for Plugin Registration tool as below
4. Choose the Plugin project and click install, confirm the prompt and agree the license agreement shown
5. Once installed, next go to the Project folder in the local machine.
6. Navigate to Packages folder, you should see a folder for Plugin Registration tool below
7. There you go, you can open the Plugin Registration Application under tools folder. You can undo the changes for the Assembly it is linked to Source control.
That’s it, how easy it was? Hope this would help someone.