🚀 You’re Invited to the Global AI Bootcamp 2025 – Singapore Edition!
Are you passionate about AI, Power Platform, and Microsoft technologies? Want to learn how AI is transforming businesses and industries? Then this event is for you!
🎯 What to Expect? ✅ Expert-led sessions on AI, Copilot, Power Platform, and more ✅ Hands-on workshops to apply AI in real-world scenarios ✅ Networking opportunities with industry leaders and AI enthusiasts ✅ Absolutely FREE to attend!
This post is about Dataverse and Git Integration which is the most sought after feature in the todays automation Era. This is a preview feature, you would need to create a new environment with Early Access enabled to test this feature or you can use an existing US Preview environment for testing this out.
While every MDA(Model Driven Application) and it’s components can be safely and moved across the environments using Solutions with the help of Azure DevOps Pipelines. However when coming to integrating Power Platform Solutions to Azure DevOps, we had to manually export the solution and download them each and every time when we would like to commit the Solution Artifacts to Azure DevOps Repo.
With this new Preview feature we can directly integrate the Power Platform Solutions to Azure DevOps.
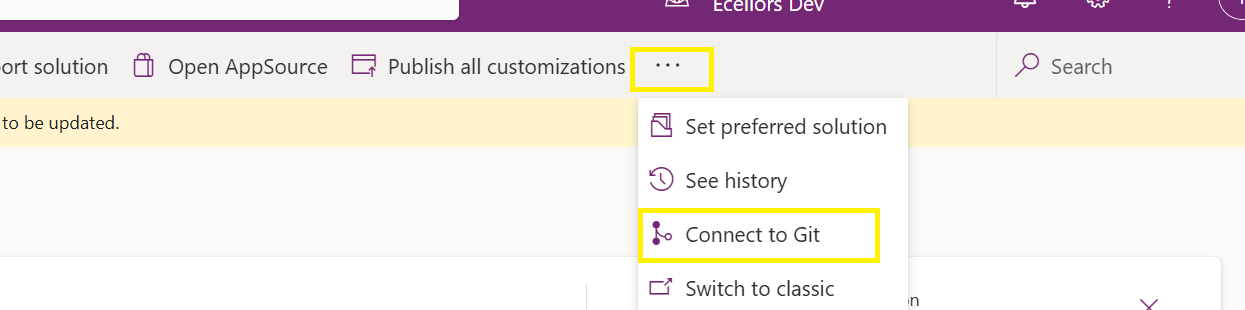
Let’s see this action…wait a moment, there were some prerequisites to be considered…
Environment should be a Managed Environment to start using this and you need to be an Admin for the environment
Azure DevOps subscription and license should be available to set this up, also permission to read source files and commits(should be a member of contributor group in Azure DevOps) from a Repo
Your email address used for Azure DevOps and Power Platform Solutions should be the same
Setup:
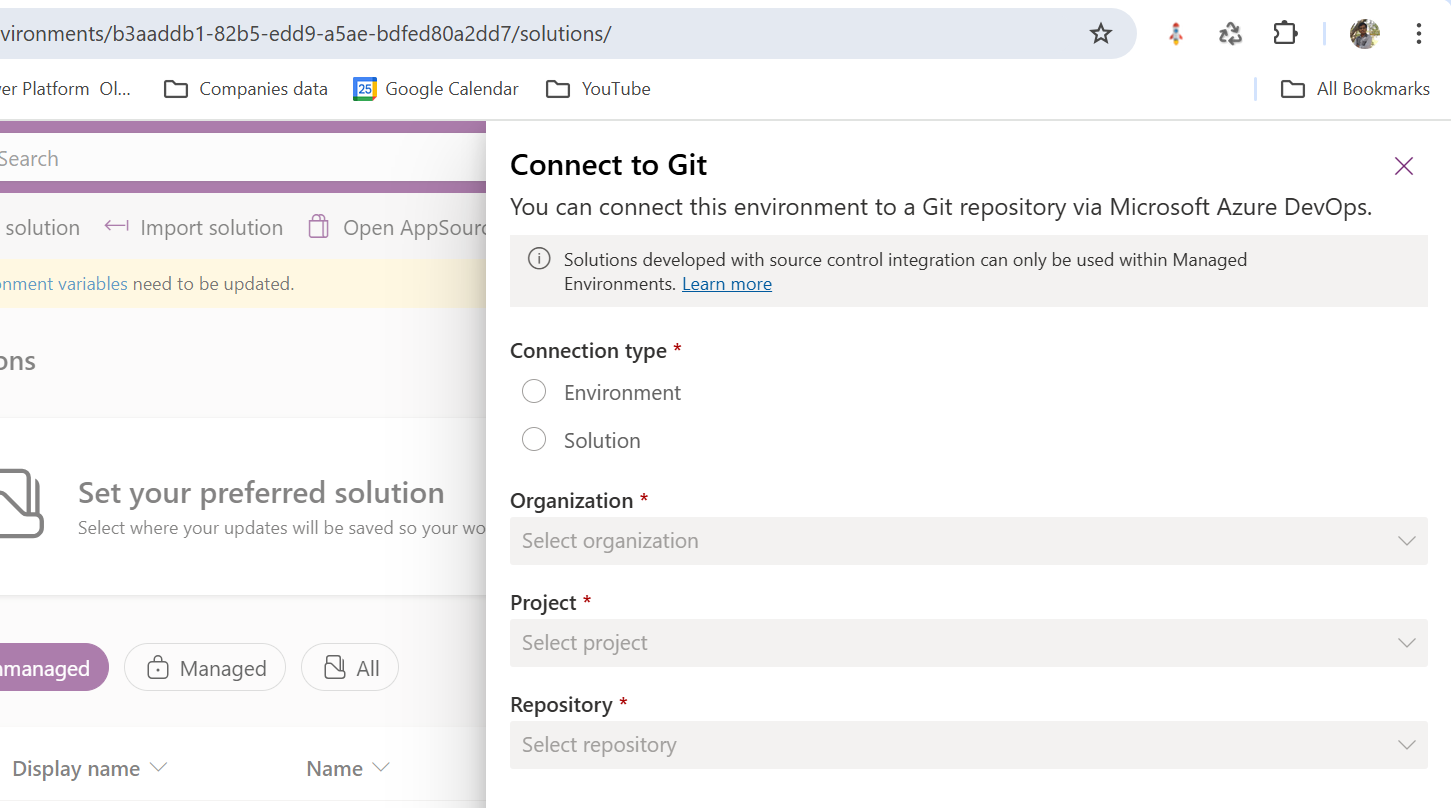
Connecting Dataverse with Azure DevOps is easy but requires a bit of understanding of the Binding options available.
Well, there were two types of Binding options
Environment Binding – Single root folder binds to all the unmanaged solutions in the environment
Solution Binding – Different solutions uses a different root folder in Azure DevOps for binding
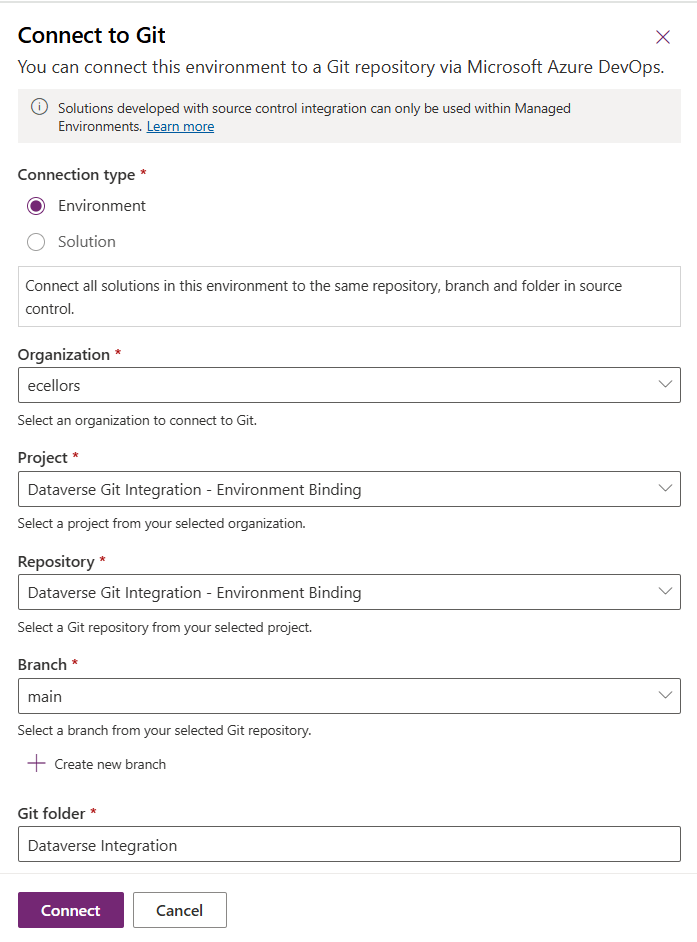
Note: Once the binding is setup, there isn’t away to change, so set this up carefully, else you may need to delete the folder and create a new one in Azure DevOps.
Let’s see one by one…for demoing purpose, I have created two projects in Azure DevOps Instance
Solution Binding: When we use this, all the components will be available as pending changes
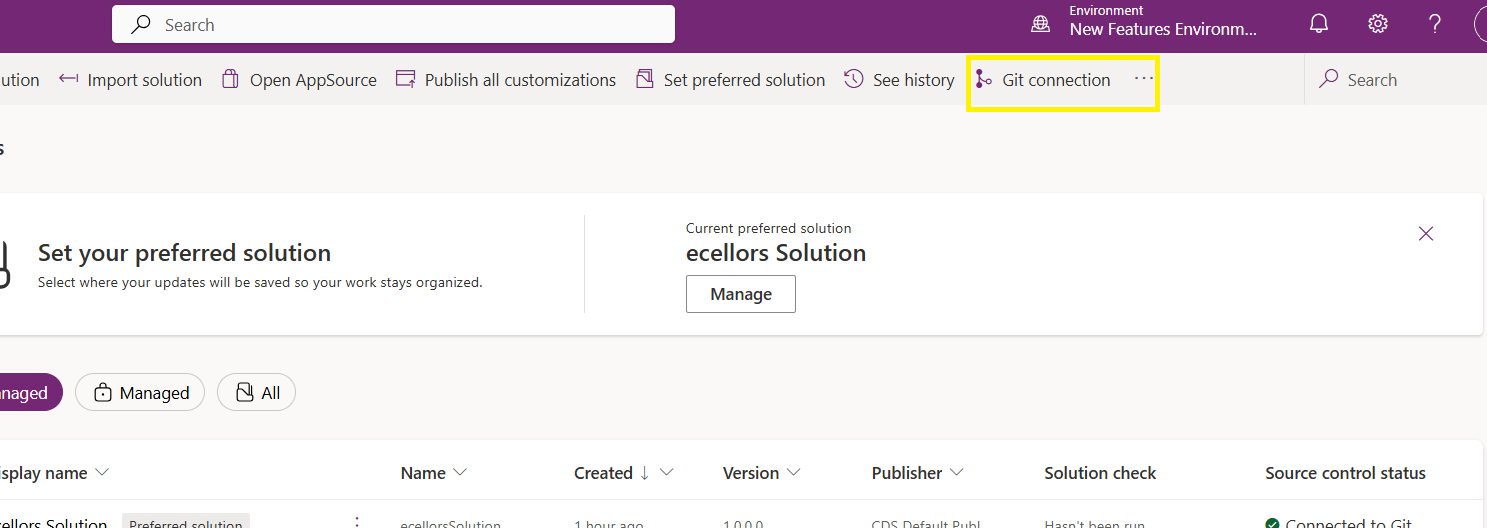
Environment Binding: When we use this, all the unmanaged solution components will be mapped to one Azure DevOps root folder. Let’s set this up.
We are currently able to use only Solution binding, as Environment Binding doesn’t show up any changes to be committed, but there is a catch here.
We can set up for Environment binding and verify if the Solution components are getting marked as pending changes or not. Do note that Setting up the Binding is a one time activity for environment, once setup, it can’t be changed from one type to another.
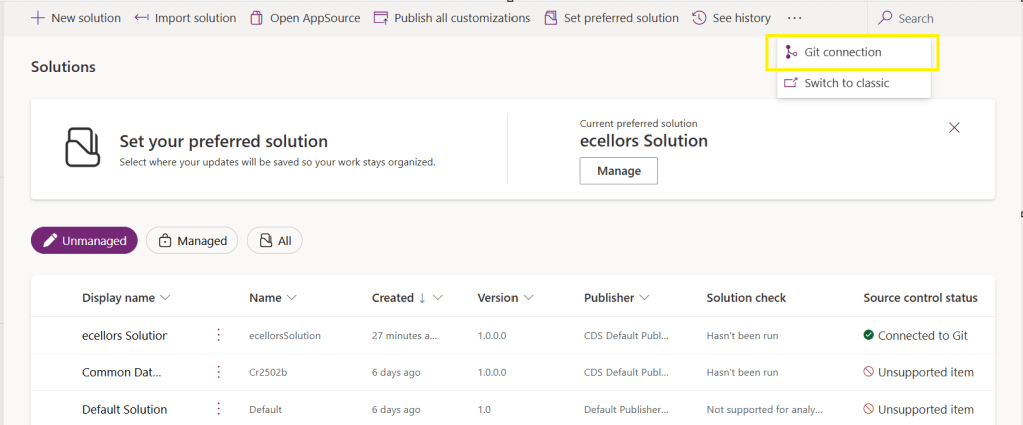
Since we were currently using Environment binding, let’s select the Connection Type as Environment
Then click on Connect, once connected, you should a alert message in power apps maker portal at the top.
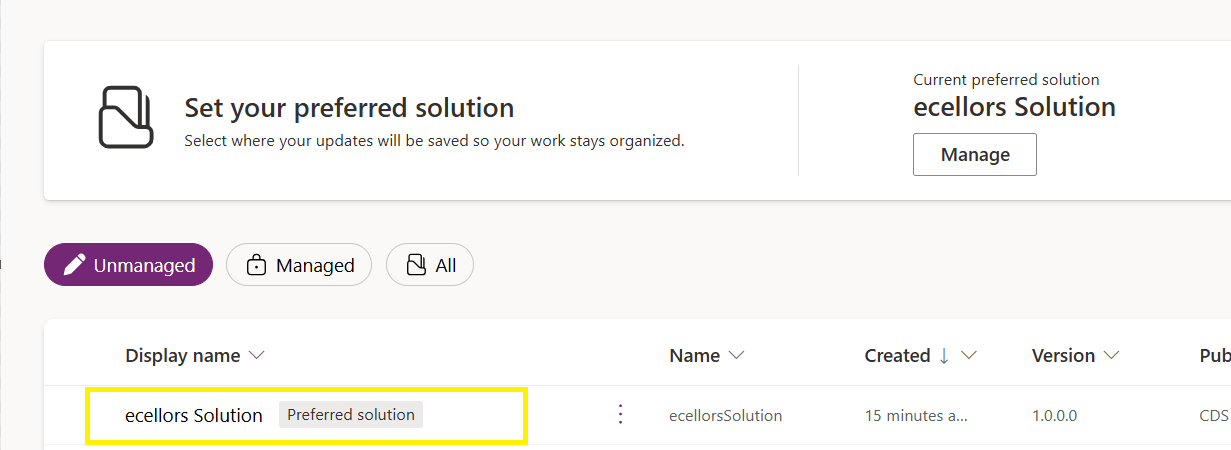
Now create a new solution as below named ecellors Solution
Verify the integration by clicking on Git Integration as below
It should show as below
Now let’s add few components to the solution we created
Once added, let’s publish the unmanaged solution and verify it..
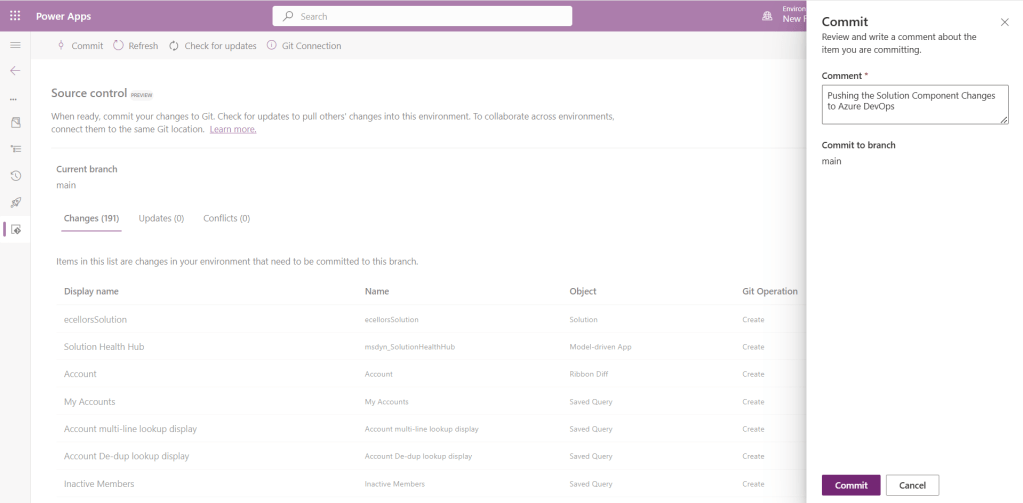
Do look closely, you should see a Source Control icon highlighted in yellow color for illustration.
Also, you should see a commit option available at the top
You should now be able to commit the solution components as if you are committing the code changes.
It also specifies the branch to which we were commiting…
While it takes few minutes unlike pushing the code to Azure DevOps to push the changes, however this would depend based on the number of solution components you were pushing..once it is done, it will show a commit message like below…
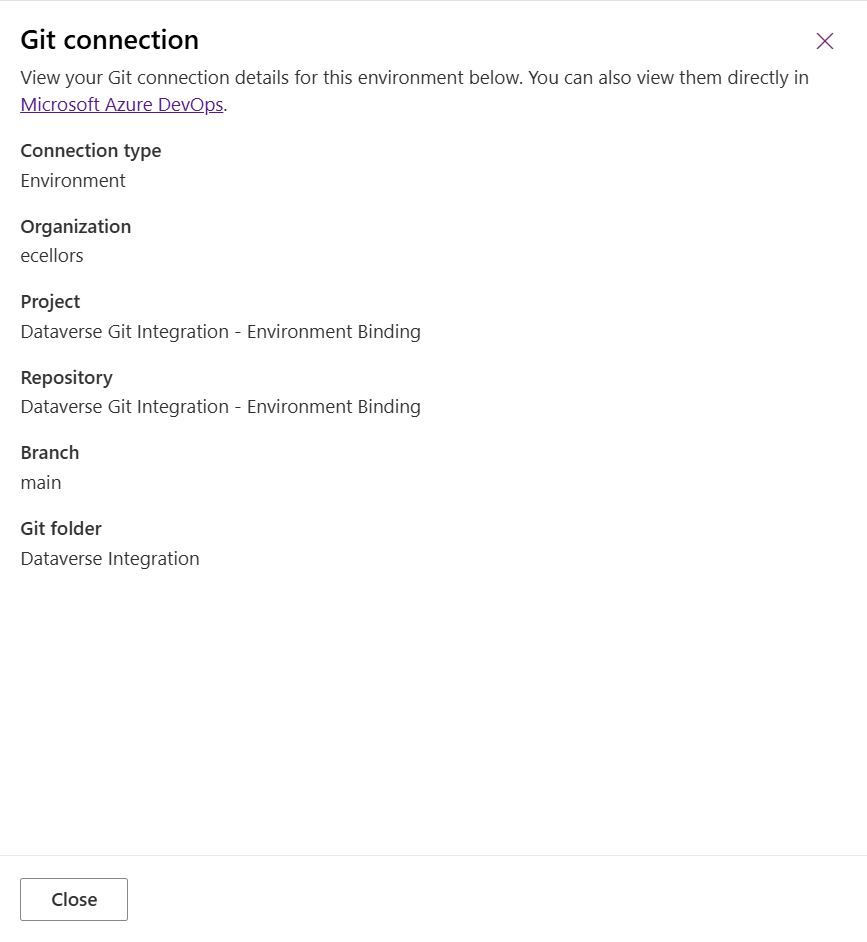
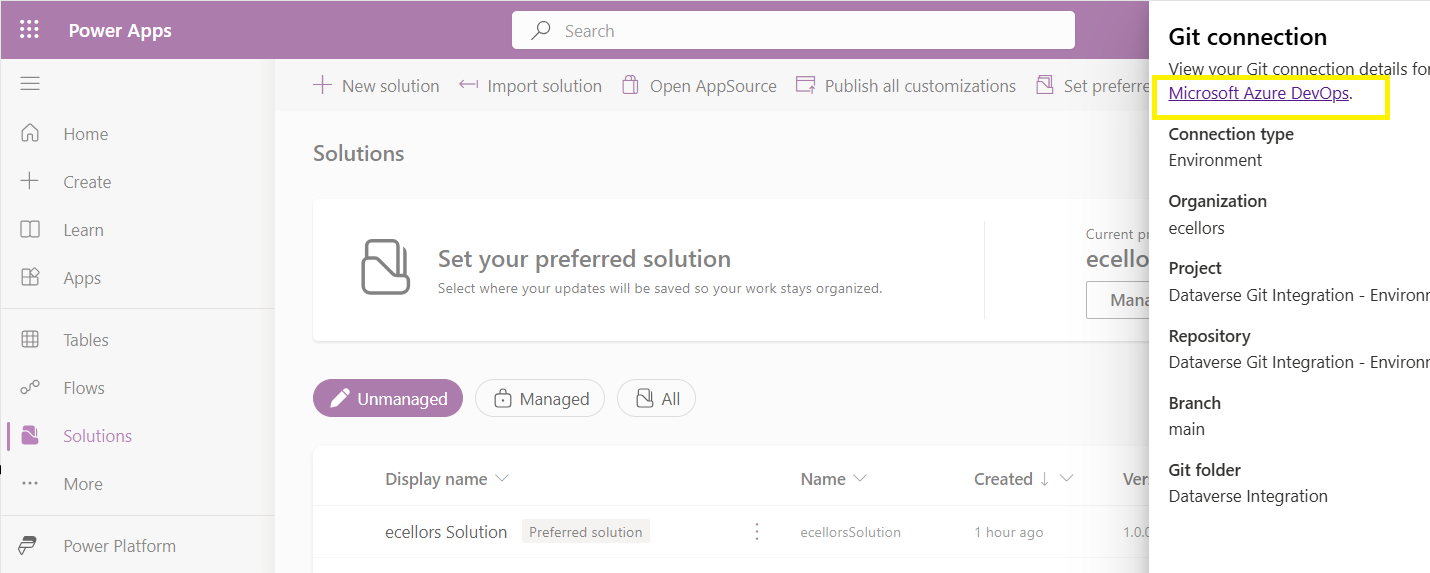
Now let’s verify our Azure DevOps Repo..for this you can go back to the main solutions page, click on Git Connection at the top..
After clicking on Git Connection, click on the link to Microsoft Azure DevOps as below
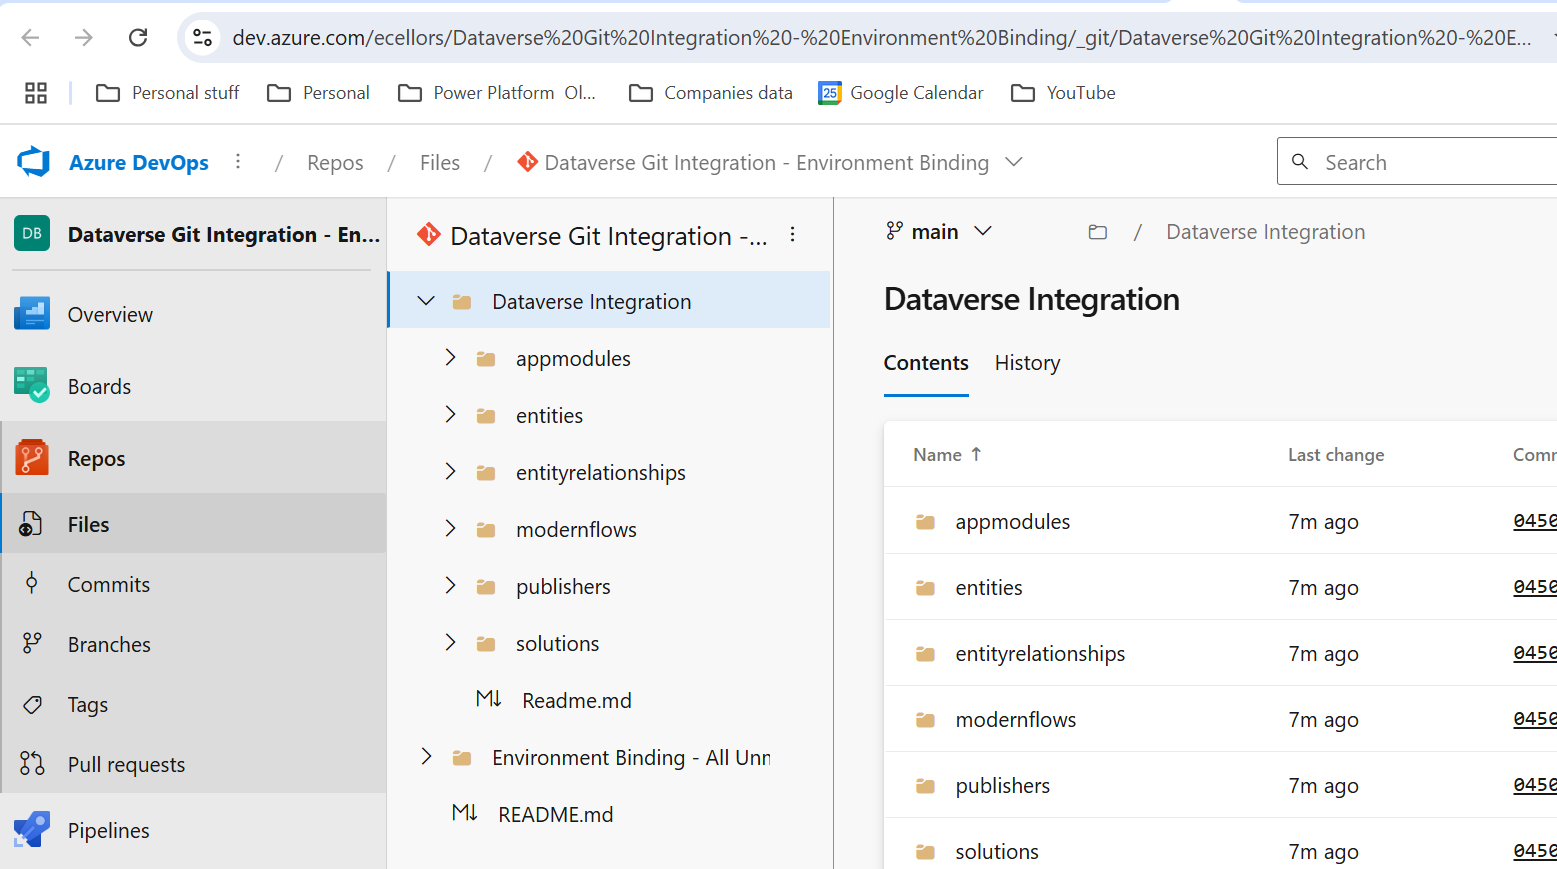
Then you should be navigated to Azure DevOps folder as below where all the solution files will be tracked component wise.
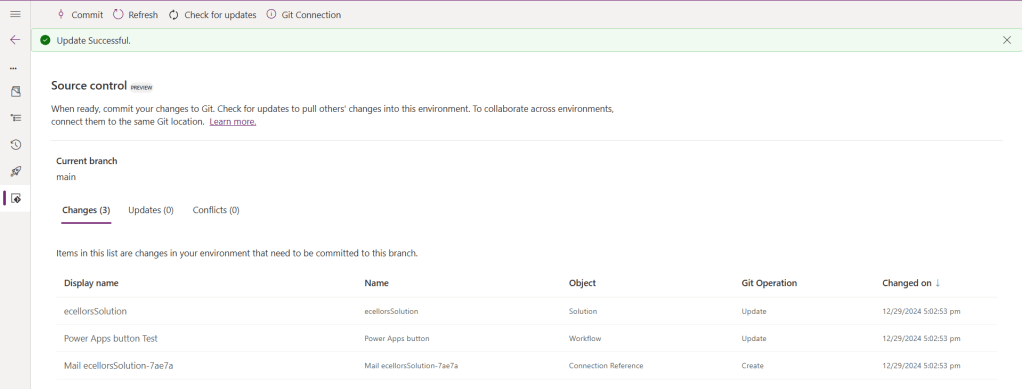
Now we will move back to Power Apps maker portal and make some changes to any of the components inside the solution…
Let’s say, I just edited the flow name and created a new connection reference, saved and published the customizations.
If you did some changes at the Azure DevOps repo level, you can come back and click on Check for updates, if there were any conflicts between changes done in Azure DevOps and component in solution, it will be shown as conflict.
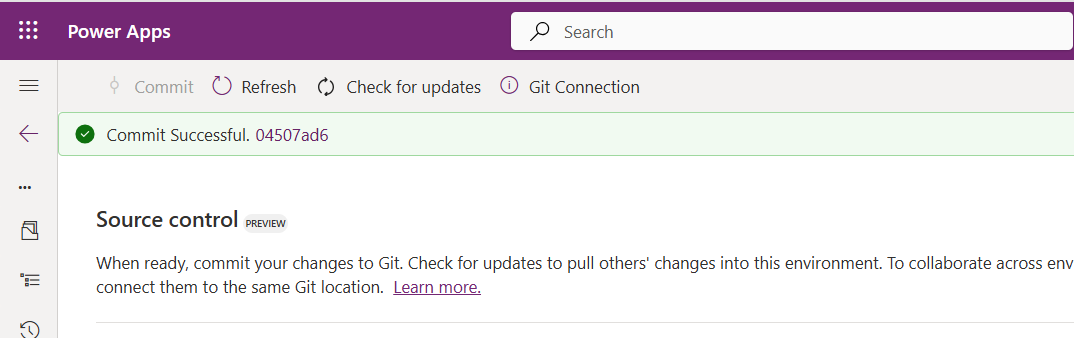
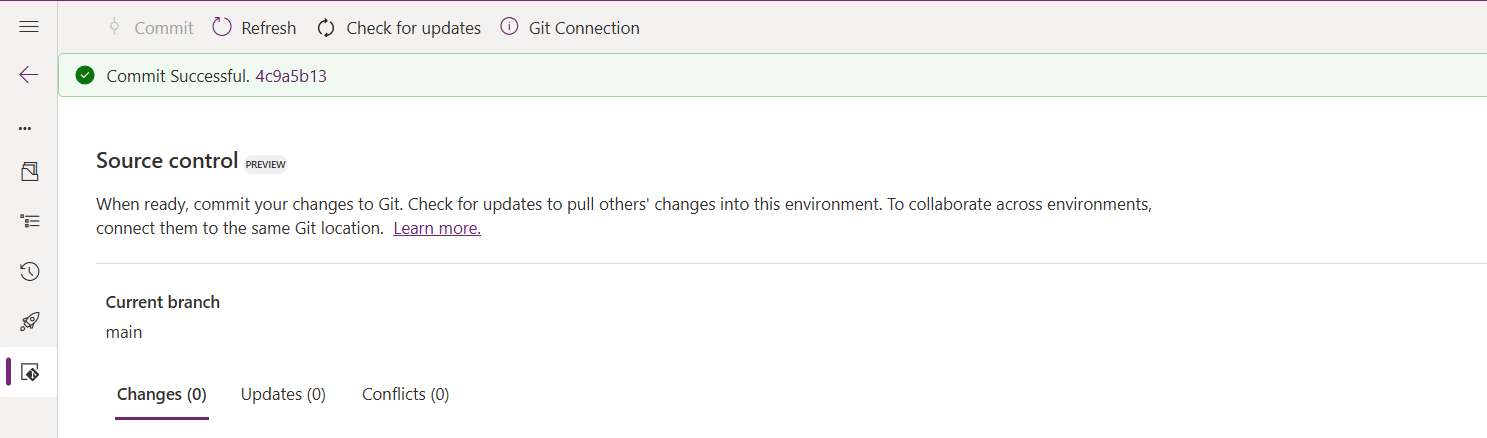
We now have 3 component changes and all were listed here…you can click on Commit.
As soon as the changes are committed, you should see a message saying Commit Successful and 0 Changes, 0 Updates, 0 Conflicts.
Now you successfully integrated Dataverse Solution components with Azure DevOps without any manual intervention required while deploying solutions using Azure DevOps Pipelines.
Hope you learned something new today…while feature is still in Preview and only available for early release, while couple of issues still need to fixed by Microsoft.
I have tested this feature by creating an environment in US Preview region and this feature will be a good value to projects using Automation and this solution repository can be further deployed to other environments using Azure DevOps Pipelines.
This will be rolled out soon next year, hope you learned something new today…
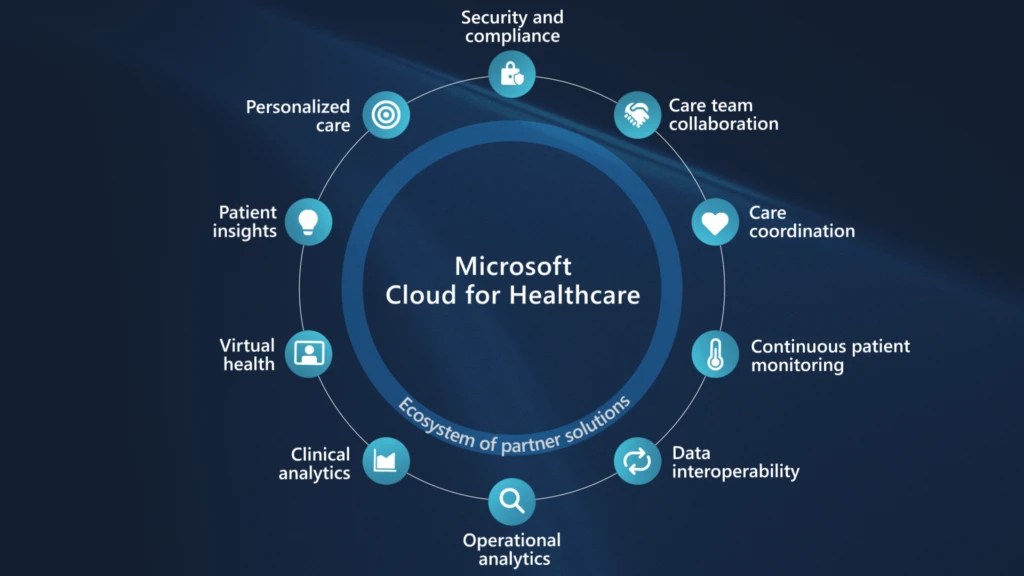
Microsoft Cloud for Healthcare provides capabilities to manage health data at scale and make it easier for healthcare organizations to improve the patient experience, coordinate care, and drive operational efficiency, while helping support security, compliance, and interoperability of health data.
Microsoft Cloud for Healthcare includes solutions that are built on capabilities within Microsoft Dynamics 365, Microsoft 365, Microsoft Azure, and Microsoft Power Platform.
This is an introduction blog post. Firstly, Microsoft Cloud for Healthcare solution should be installed from Microsoft Cloud Solution Center. To say about Microsoft Cloud Solution Center, it actually checks for requirements such as licenses, dependencies, and enables you to easily discover and deploy capabilities and solutions in Microsoft Cloud for Healthcare, there by simplifying the deployment process from a single location.
We will see what are the prerequisites.
Prerequisites
You must be a tenant admin, Dynamics 365 admin, or Power Platform admin to deploy Microsoft Cloud for Healthcare solutions.
You must have licenses for the Microsoft Cloud for Healthcare solutions and apps that you’re deploying. If your organization doesn’t have the necessary licenses, you’ll be notified during the deployment process in Solution Center.
Here are the solutions that are part of Microsoft Cloud for Healthcare, for each solution. We need to keep in mind that:
Some solutions have predeployment setup requirements.
Some solutions require configuration or have additional capabilities that you can set up after deployment.
Solution
Dependencies
Patient access
Power Pages, Dynamics 365 Customer Service
Patient service center
Dynamics 365 Customer Service, Digital Messaging add-on for Dynamics 365 Customer Service
Patient outreach
Dynamics 365 Marketing
Patient insight cards
Dynamics 365 Sales Premium
Care management
Dynamics 365 Customer Service*
Home health
Dynamics 365 Field Service
Data integration toolkit
Power Apps
Unified patient view
Power Apps
Patient trends (preview)
Power Apps, Dynamics 365 Customer Insights
Patient population dashboard (preview)
Power BI
Provider data model
Power Apps
Payor data model (preview)
Power Apps
Life sciences data model (preview)
Power Apps
Virtual Visits
Microsoft Teams
Text analytics for health
Azure subscription
Azure IoT for healthcare
Azure subscription
Azure Health Bot
Azure subscription
Azure Health Data Services
Azure subscription
Healthcare database templates
Azure subscription
Health document intelligence
Azure subscription
There were a ton of Microsoft Azure capabilities to explore which I will do in my upcoming blog posts. So here, I am using a personal Azure subscription and rest everything I will try to keep using Trial accounts as long as possible. So, you don’t need to worry if you will charge just to try it out.
Also, with the advent of AI, health care industry is getting revolutionized.
Interested…? Then keep looking this space as I will explore more with all of you. Stay tuned…
In today’s world, all the modern software applications use API for the front end to communicate with the backend systems, so lets see as it is very important for every developer working on Azure and API’s. Basically this is a PAAS Service from Azure. Follow along if you would like to know more details on this.
In short APIIM is a hybrid and multi cloud platform used to manage complete API life cycle. Azure API Management is made up of an API gateway, a management plane, and a developer portal.
Caching response to improve performance
Limit the number of API Calls
Security API and providing access
Interface to test API calls
API Analytics
Package related API Services
Transforms your API’s without
API Gateway is the first point of contact for any requests for your API which will route your requests to the appropriate backends. Imposes additional security restrictions with the help of JWT tokens and other certificates. Responses can be cached so that the API response could be faster.
Emits logs, metrics, and traces for monitoring, reporting, and troubleshooting
API Management are highly configurable, with control over URL mapping, query and path parameters, request and response content, and operation response caching.
Groups helps to provide conditional viewing capabilities.
Policy can help to change the behavior of an API without any code changes, this is well suited for your production API’s.
Also its easy to integrate API Management with all the other Azure Service available in the market.
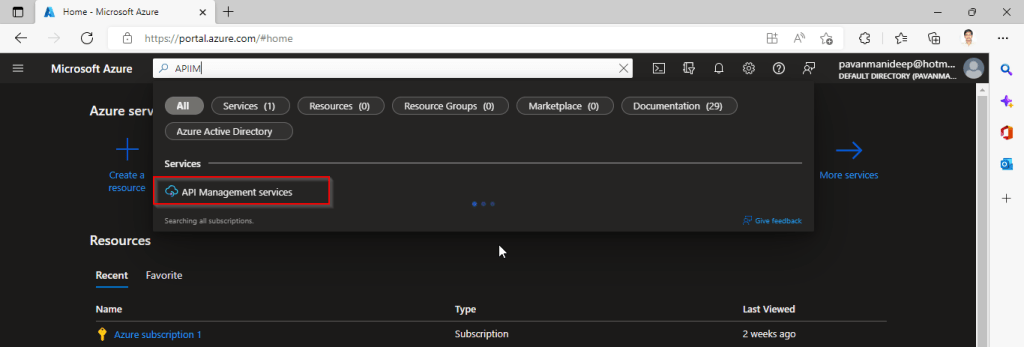
Now lets go into the hands on by creating an APIIM simply from Azure.
Go to Home – Microsoft Azure and search for APIIM and select API Management services and click on Create.
Input all the details, it was pretty self explanatory, coming to the pricing tier you could select based on your project needs and use case. Click on Review and Create and then Create.
It will take few minutes for the deployment to complete and you can use it.
The below Power point slide presentation is complete resource which can help you with all your queries related to Azure API Management.
I hope this gives you a bit of introduction to Azure API Management, now lets see how you can use this in your Power Platform Solutions.
For this, once your API ready, all you have do is to export your API’s from Azure API Management to your Power Platform Environment. With this the citizen developers can unleash the capabilities of Azure where the API’s are developed by professional developers. With this capability, citizen developers can use the Power Platform to create and distribute apps that are based on internal and external APIs managed by API Management.
Steps to follow would be as below:
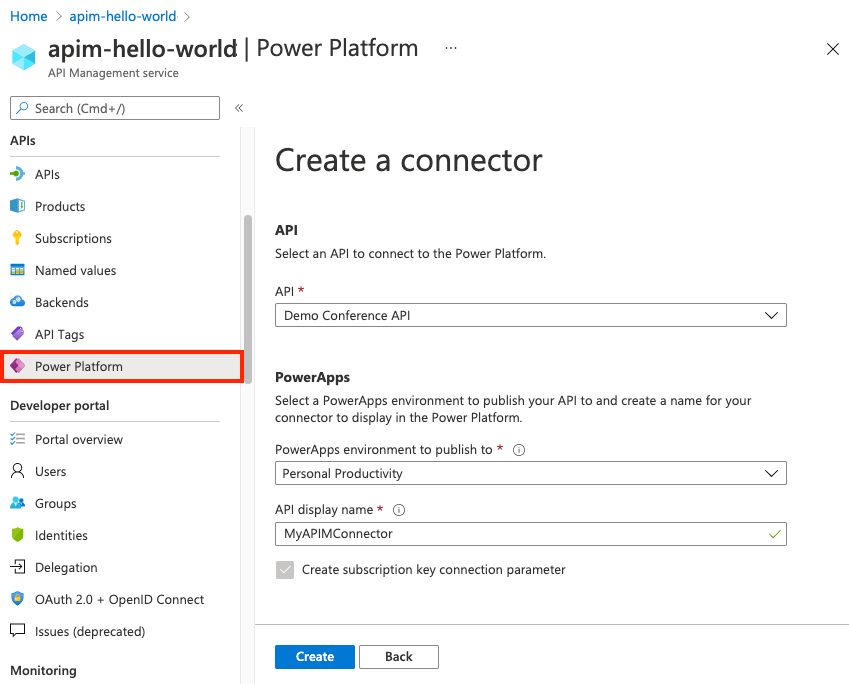
All you need to do is to create a custom connector for your API which can be used in Power Platform like Power Apps, Power Automate etc.
Navigate to your API Management service in the Azure portal.
In the menu, under APIs, select Power Platform.
Select Create a connector.
In the Create a connector window, do the following:
Select an API to publish to the Power Platform.
Select a Power Platform environment to publish the API to.
Enter a display name, which will be used as the name of the custom connector.
Optionally, if the API doesn’t already require a subscription, select Create subscription key connection parameter.
Optionally, if the API is protected by an OAuth 2.0 server, provide details including Client ID, Client secret, Authorization URL, Token URL, and Refresh URL.
Select Create.
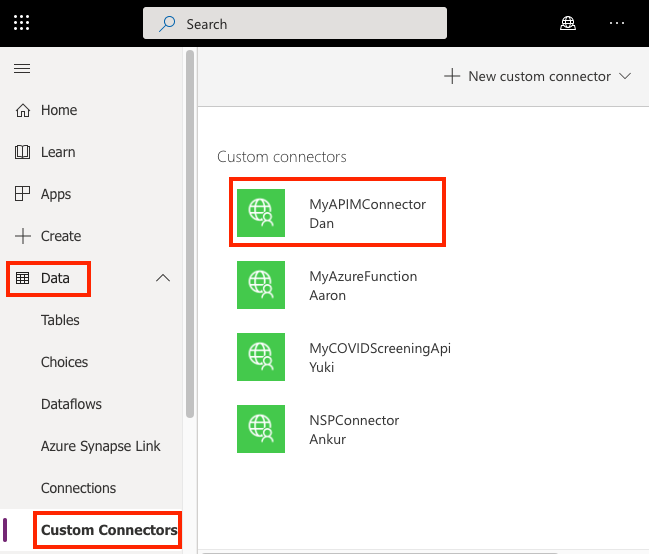
Once the connector is created, navigate to your Power Apps or Power Automate environment. You will see the API listed under Data > Custom Connectors.
I hope this will give you a complete picture about API Management in Azure…if you have any further queries, don’t hesitate to comment here…
This blog post talks all about integration of your Logic apps to your Dynamics CE instance and it’s advantages. Lets get started…
By the way, I can’t redefine the definition provided by Microsoft, so here it goes.
Azure Logic Apps is fully managed integration PaaS service that helps you schedule, automate, orchestrate tasks, business processes, and workflows when you need to integrate apps, data, systems, and services across enterprises or organizations and simplify how you design and build scalable solutions for app integration, data integration, system integration, enterprise application integration (EAI), and business-to-business (B2B) communication, whether in the cloud, on premises, or both. It’s simple to say that you can integrate any system and it is built on a containerized runtime.
Now let’s understand how does the logic apps work:
Every logic app workflow starts with a trigger, which fires when a specific event happens, or when new available data meets specific criteria. Each time that the trigger fires, the Logic Apps engine creates a logic app instance that runs the actions in the workflow. These actions can also include data conversions and flow controls, such as conditional statements, switch statements, loops, and branching. As soon as the Logic App stops running, these resources are discarded.
The interesting part here is that Logic Apps is more developer friendly and can used directly create integrations using logic apps either from Visual studio, Visual Studio Code or browser.
We were given flexibility to choose the type of Logic Apps, Single-tenant and multi-tenant. While creating logic apps, we can use Standard or Consumption based resource type. Logic Apps can create complex orchestrations and it is serverless. This means there is no upfront knowledge required for developer about the infrastructure. You have to bear in mind that it is both a stateful and stateless service unlike Azure Function which is stateless. It allows you to use webhooks as triggers. Coming to the pricing part, the price of Microsoft Azure Logic Apps is inexpensive. Look at it’s architecture below
You can simply edit your Azure logic App in Visual studio code / Visual studio and push your changes to your Devops repository…wow such a easy approach…don’t forget to try it out…
Do let me know if you have any queries or if you can add any more points, do let me know in comments….
That’s it for today…will come back next week with another article in #PowerfulAloneBetterTogether Series.
To start with Service Bus is fully managed messaging service which is used to connect any applications, devices, and services running in the cloud to any other applications or services. In this we can have queues which helps in the one directional communication and topics which provides two directional communication with the help of publish subscribe model.
Service bus can serve the following purposes
Used for messaging
For Decoupling producer and consumer of the message
Load balancing
For 1:N(publish and subscribe model) using Topics
Queues and Topics follow FIFO mechanism.
That said, lets see in action…
Create an Azure service bus namespace in Azure like below…
Following this, once you have created a namespace which is actually a container for all messaging components (queues and topics).
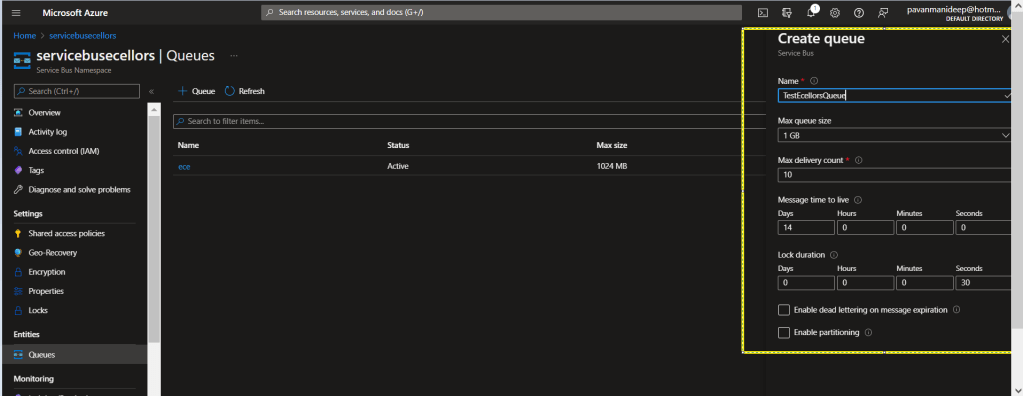
Next step is to create a queue or topic, in this case I am creating a queue….creating topic will be similar.
Fill up the details as required for the queue setup in the highlighted section…
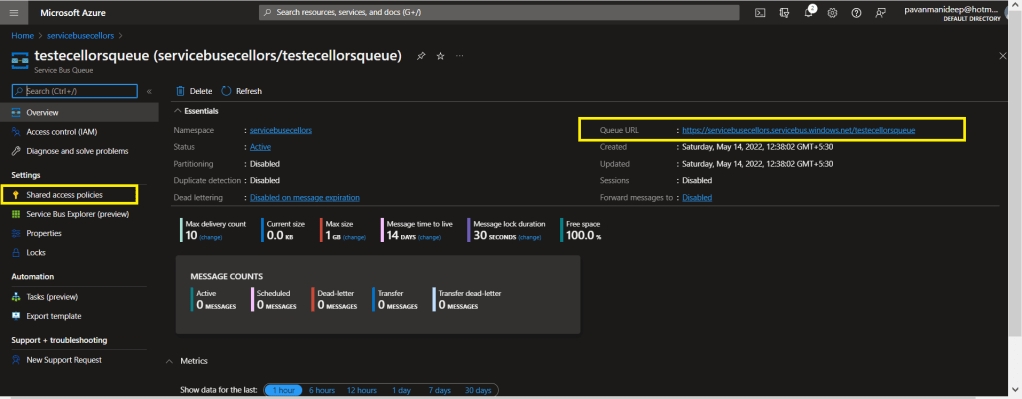
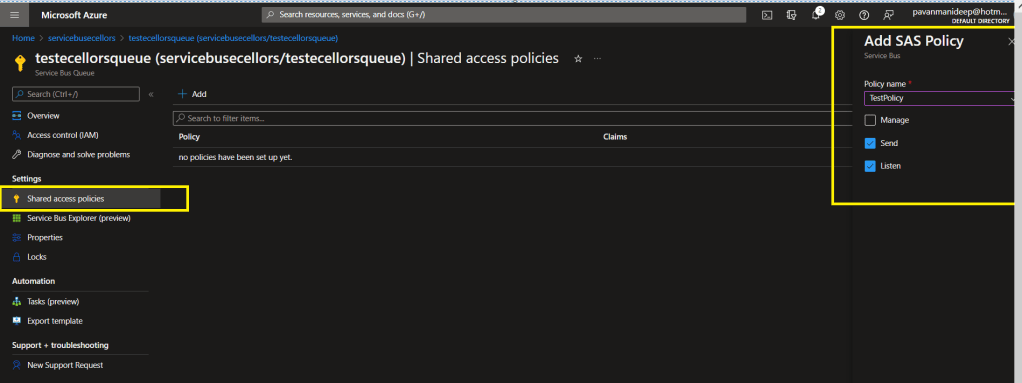
After creating a queue or topic, you need to create an access policy for the same as below
Do note the queue URL as highlighted above….access control in service bus is achieved through Shared Access policies.
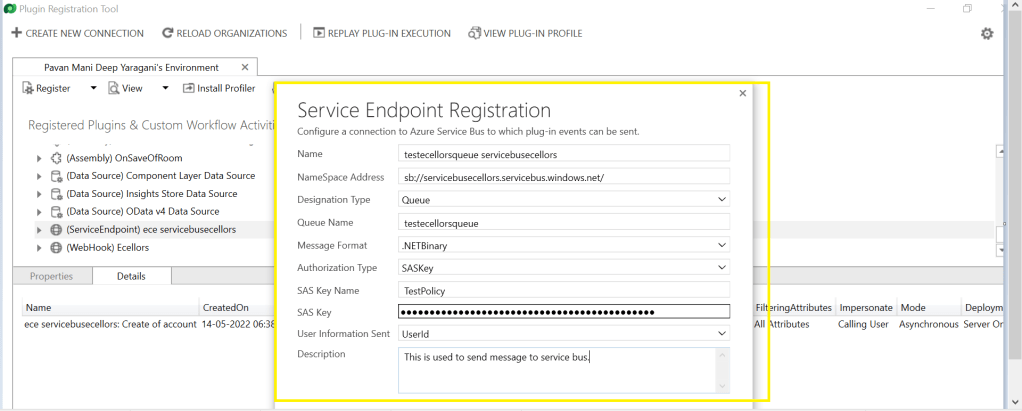
Once you have Primary connection string created, you need to go back to your Plugin registration tool and register a service end point for triggering your service bus message and provide the connection string in the below areas highlighted and click on next.
Next below appears for your review..
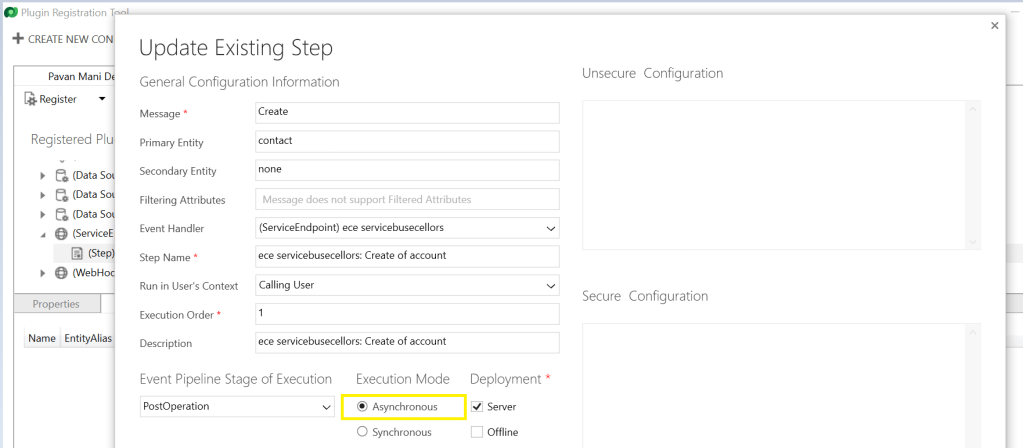
You can provide SAS Key or SAS Token for authentication in order to retrieve the messages from service bus and click on save. Now your end point is configured, now you can go ahead and create a step which will trigger the message to service bus from Dynamics, do note that you can only register an asynchronous operation inorder to communicate with your service bus.
You can perform the necessary operation and you can find the message being created in the service bus. If it didn’t show up immediately, please refresh and try after a few mins.
In order to consume these messages, you can use a console application for the sake of retrieval. Once the message is retrieved, it will be deleted from the queue by default.
Incase you want to use those messages for your troubleshooting purposes, you can peek command, the Peek operation on a queue or a subscription returns at most the requested number of messages. The following table shows the types of messages that are returned by the Peek operation.
Type of messages
Included?
Active messages
Yes
Dead-lettered messages
No
Locked messages
Yes
Expired messages
May be (before they are dead-lettered)
Scheduled messages
Yes for queues. No for subscriptions
I hope this provides right insights for integrating service bus with Azure and service bus is widely used when both systems were not in sync and available at the same time.
In this blog post, we will talk about the integration of Dynamics CE first party apps(Model driven) with Azure.
You can integrate with Function Apps from Dynamics using two ways…
Authenticate your Dynamics CE app within your Function app code
Register a web hook to trigger a call to Azure functions using a trigger
We’ll see both the scenarios…
Authenticate your Dynamics CE app within your Function app code
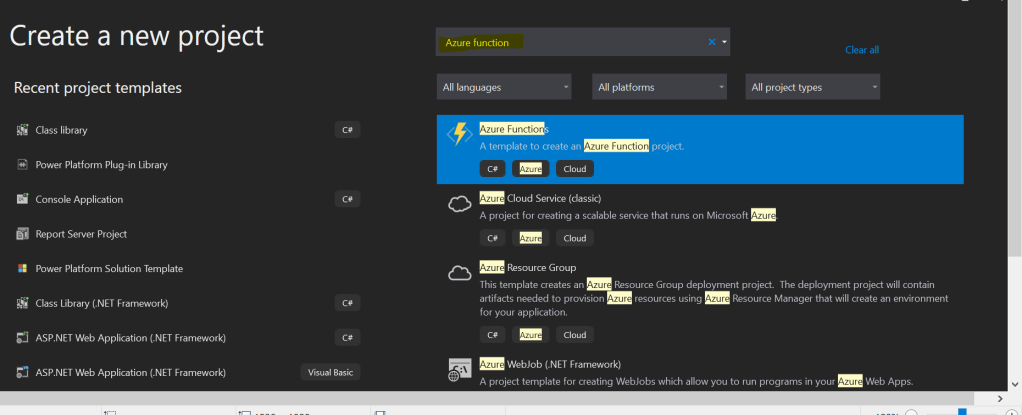
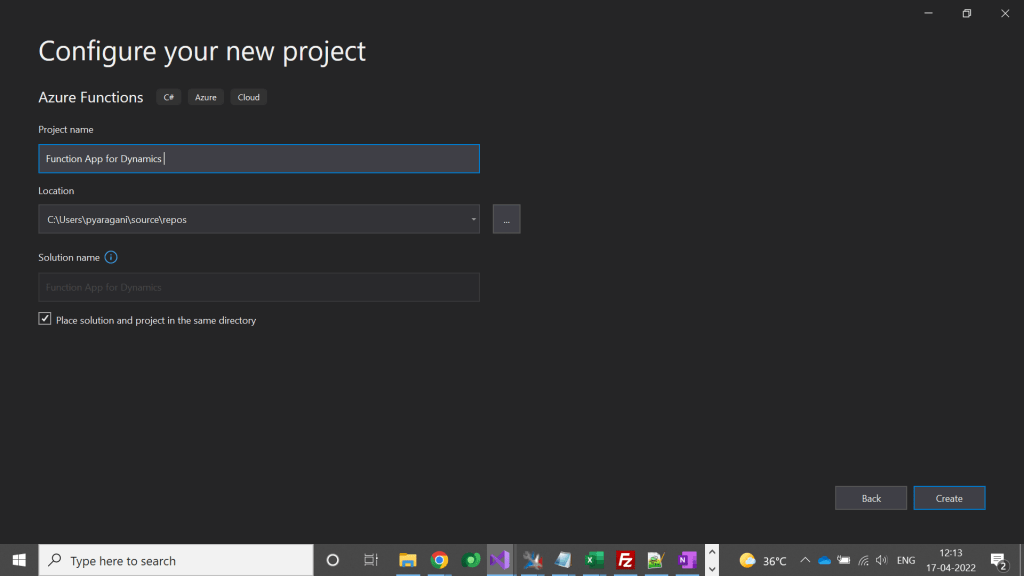
Open your favorite IDE and create azure function..in this case I’ll be using Visual studio.
Create a new Azure Function Project(Make sure you install the Azure functions project template using extensions).
Click on Next option at the bottom, in the next step specify your Function App name as below.
Don’t change other values and click on Create at the bottom of the page.
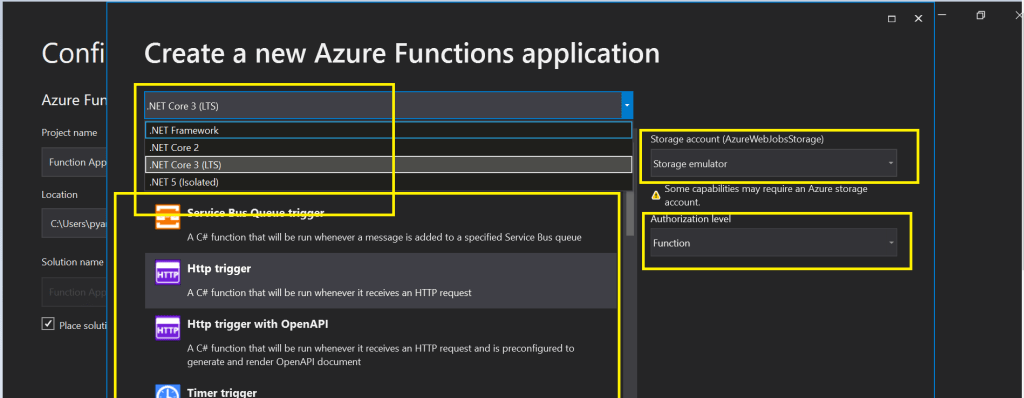
So in the next step, please make a note of the important things which were highlighted below..
Make sure you select the Target framework as .Net Framework.
You can select any trigger, but for simplicity I am selecting HTTP Trigger here.
In case you need to debug your Azure function and run it locally, then you need to be sure that you install Azurite Storage Emulator in your machine using this link, otherwise you can select None for the storage account option, if in that case make sure that your Azure function don’t need any storage.
Don’t change other values and click on Create at the bottom of the page.
This will take couple of mins to create the necessary scaffolding required for the Azure function.
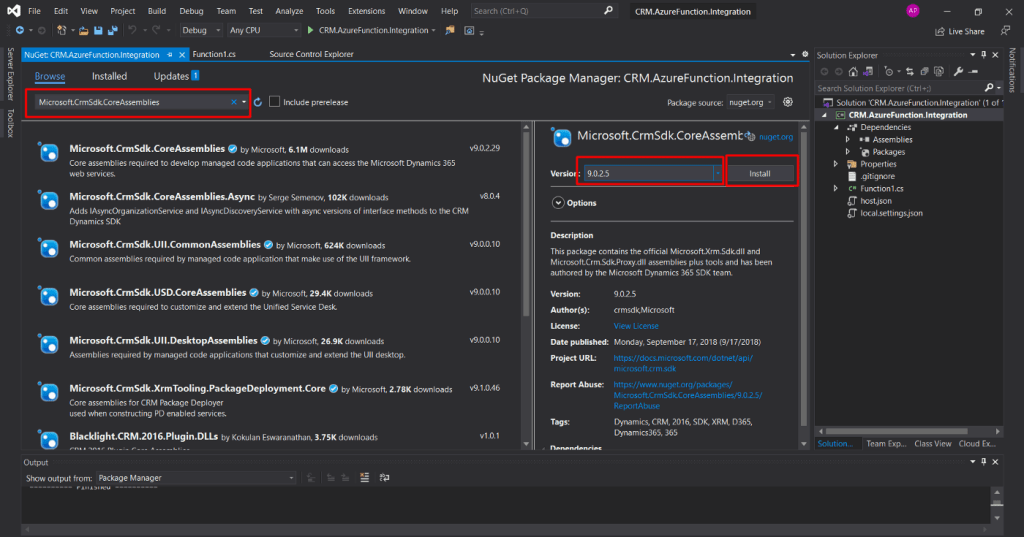
Now you need to authenticate to your Dynamics Instance, so firstly right click on your project and select Manage Nuget Packages. Then you need to browse for Microsoft.Crm.Sdk.CoreAssemblies and install.
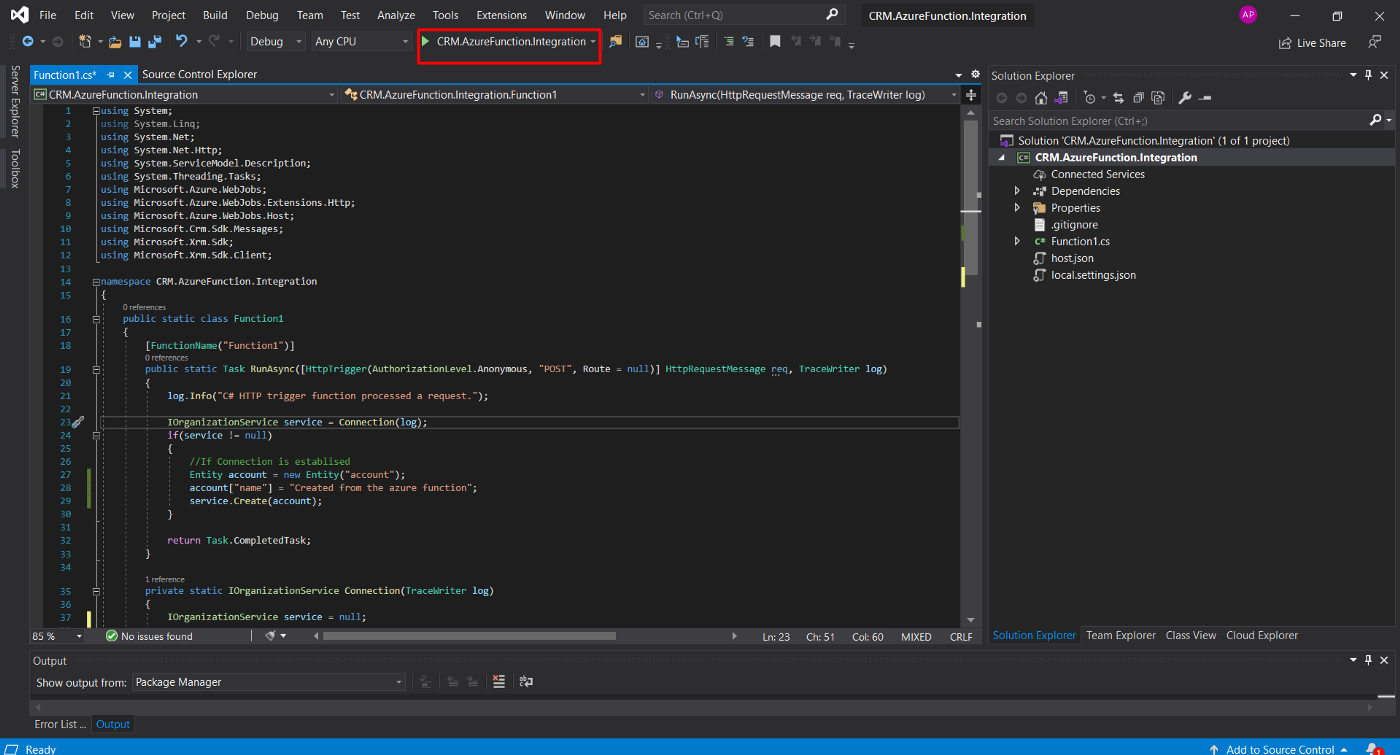
Then you will be able to authenticate your Azure function with Dynamics CE…once you were authenticated you can create a hard coded entity record in Dynamics whenever your function app runs.
The entire code…is hosted in GitHub for reference.
In this way you can an integration between Azure function and Dynamics 365
We will require the API testing tool, here I am using Postman and the following is the link to download “Postman”. https://www.postman.com/downloads/
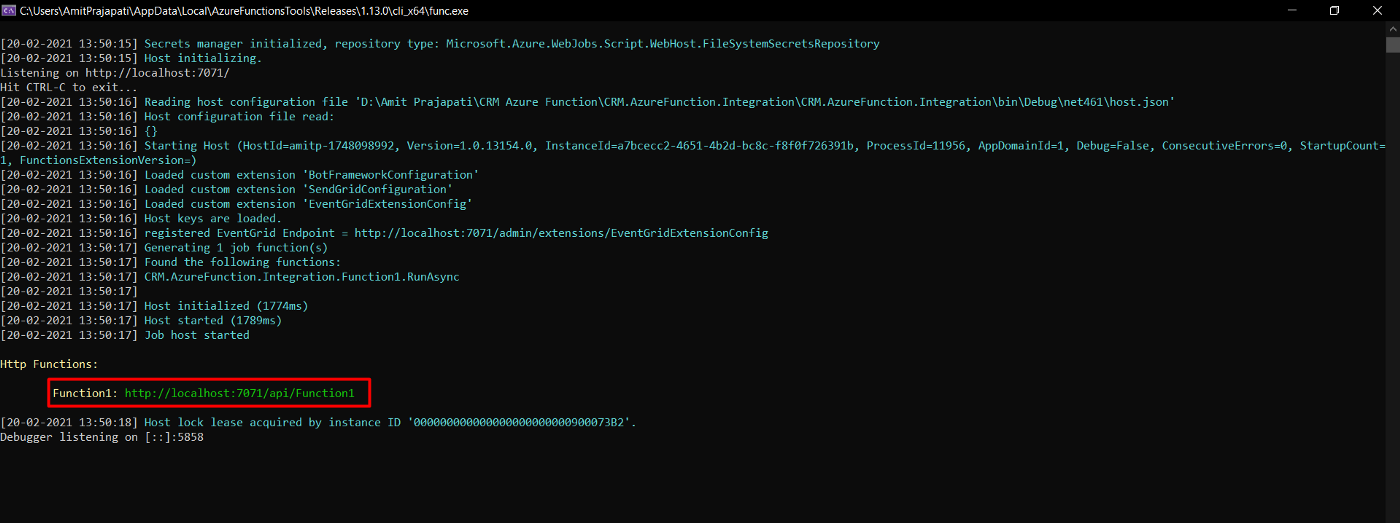
To test the application, click on the Start button on top of Navbar as mentioned below in the screenshot [Button will have Project Name]. It will take a few minutes to Load the Azure Emulator
Run the Function App on the Local machine for testing.
Following is the screen you will be able to see and copy the URL highlighted in the red below and paste that URL in Postman.
Azure Function Tool
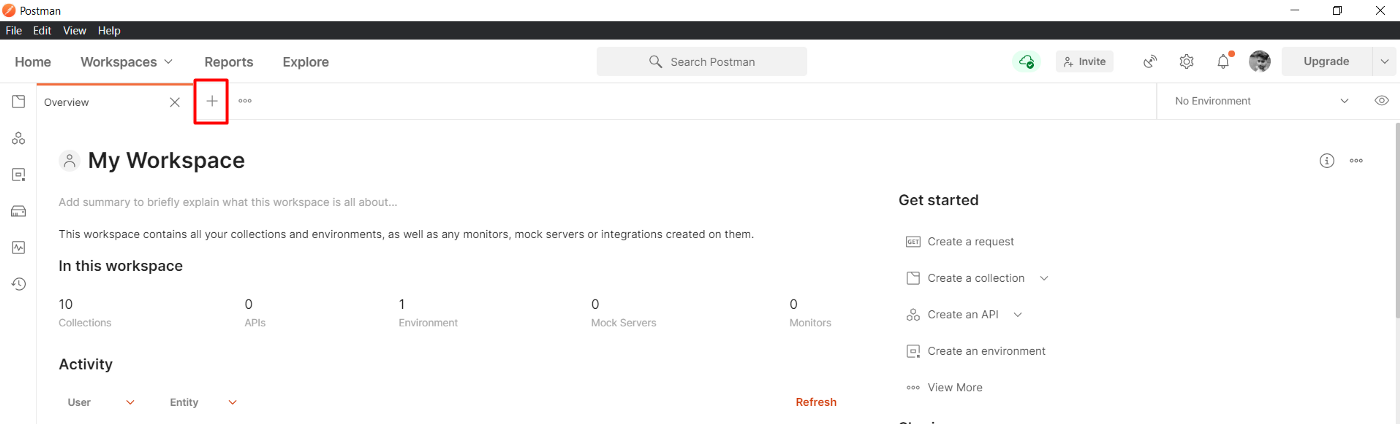
Open the Postman and click on the create a new tab
Postman Dashboard
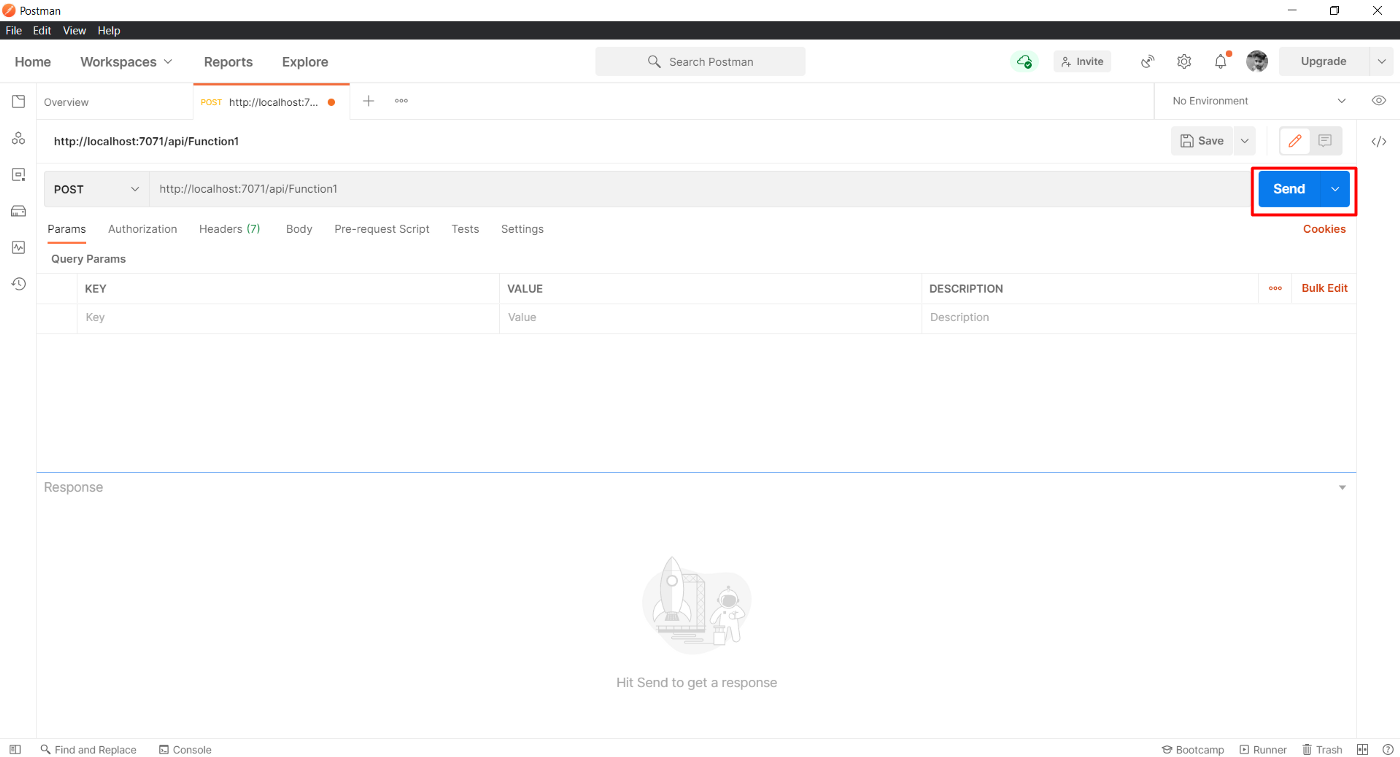
Select request as POST and paste the URL:
After pasting the URL, click on Send
You will get the following response on the Azure Function Tool and Postman
The result after Sending Post Request to Azure Function
If there any error or issue with the Azure Function code, the request will be failed and will be displayed on both Azure Function Tool and Postman [Status will be “4**” or “5**” ]
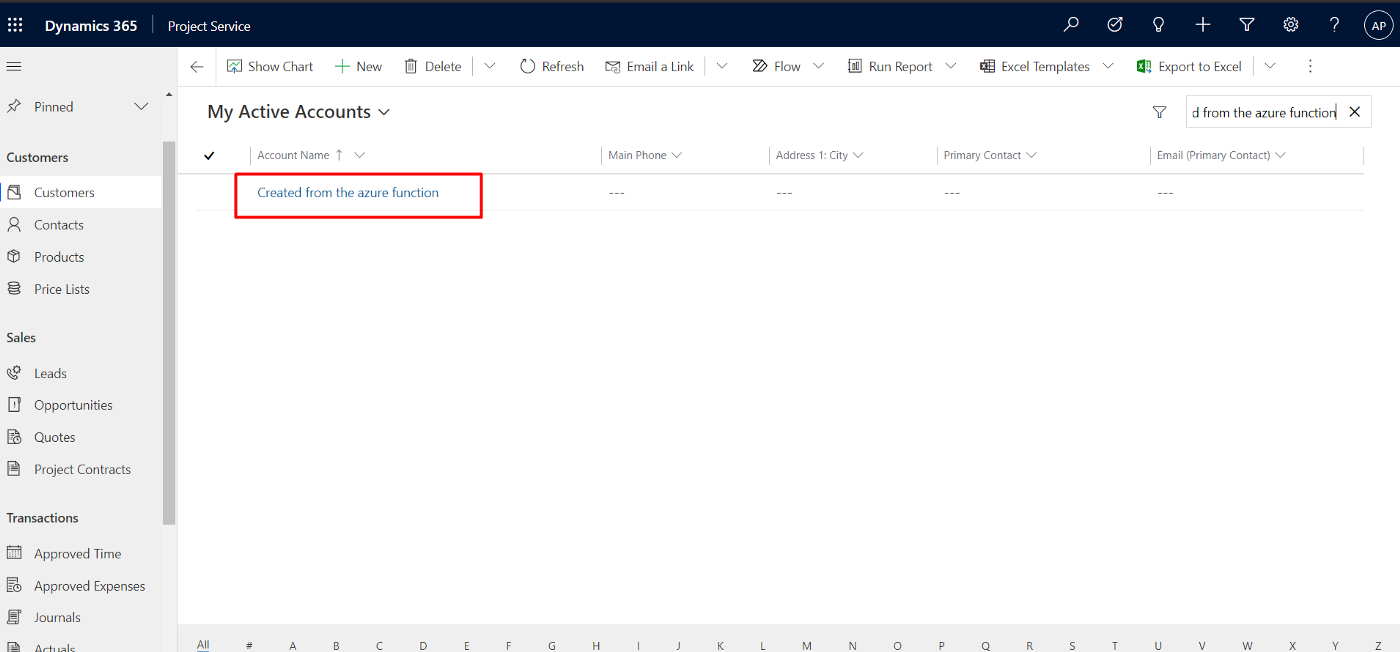
Now, we will take look at Dynamics 365 CRM environment and check whether the account is created or not.
Result
Created customer from Azure Function.
2. Register a web hook to trigger a call to Azure functions using a trigger
Hope every one should be very much interested in learning the base line for Power Platform which is Azure.
So this blog serves as the introduction in this #PowerfulAloneBetterTogether series.
Basically while designing your solution for your CE Apps, in order to improve the performance you need to make sure that you perform a minimal set of operations in CE and if in cases where you exceed the timeout limit in Dynamics CE and this is where the remote execution context should be passed to Azure Integration and move all your heavy operations outside your Dynamics CE preferably a line of business application.
So this is where we can think of the following possibilities for our integration…please click on respective link to navigate respectively…
I would be detailing about each of this integration with a separate blog post…how each one provides a bunch of alternatives to overcome our current limitations.
Hope this blog series would be of great help and will serve as a reference and your go to guide for your Power Platform and Azure Integrations.