Cannot connect to SQL Server from SSMS – Quick Tip

Hi Folks,

I will keep this blog post short…the few days back I have installed local SQL Server from this link in my laptop, I was able to connect to it then.

But later in less than a week, I was unable to connect to the same SQL Server from SSMS and gives me the below error.

To check this, firstly you need to see if such SQL Server is uninstalled and then check if it was running.

In my case, as I could already see the name of the Server in the SSMS, the next step is to check whether it is in running state. So, for this all you need to do was, just open the SQL Server Configuration Manager in your machine whenever you want to configure the network protocols which gets installed by default whenever you try to install the SQL Server and it actually shows up all the SQL Related Configurations.

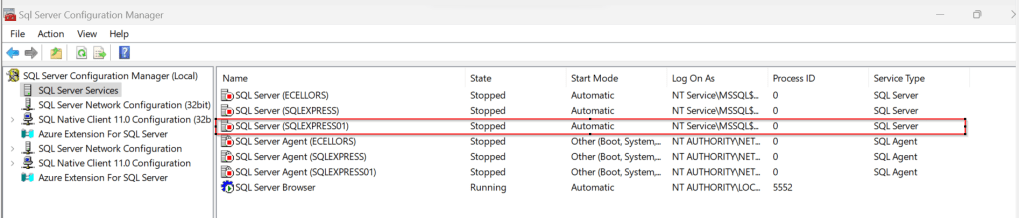
Just locate the SQL Server you were trying to connect and restart the same by right clicking on it…

Then try connecting to SQL Server, you should be able to connect to it…

That’s it…in the upcoming blog posts, we will see how we can work with On-premises Data Gateway to work with Dataflows in order to push the data to cloud and how you can show the data in Power BI.

Cheers,

PMDY

Avoiding Parallelism in Dynamics 365 Plugins/Custom Workflows: Unraveling the Pitfalls and Maximizing Efficiency

Subscribe to continue reading

Subscribe to get access to the rest of this post and other subscriber-only content.

Create a Custom Connector for your Web API from within Visual Studio

Hi Folks,

In this blog post, let’s see how we can create a custom connector without leaving our own Visual Studio for building a custom connector. Ideally for building any custom connector, we need to create them in https://make.powerapps.com or https://make.powerautomate.com. Last month Microsoft Announced that Power Platform is now a connected service in Visual Studio 2022. In this blog, we will utilize its capability…

Before diving deeper, let’s see what are the prerequisites..

  1. Visual Studio
  2. ASP .NET Web API knowledge
  3. Canvas Apps knowledge

Let’s get started..

Step 1:

Create ASP.NET Web API Project in Visual Studio

Step 2:Choose your option as below and click on Next..

Step 3:

Choose your next steps as below and click on Next to proceed, make sure to choose authentication type as None

Step 4:

Create a ASP.NET Core Web API Project

Step 5:

By adding Power Platform as a service dependency, you can update an existing custom connector, or create a new one from your API.

If you want to expose your local running API to a public endpoint, I prefer using Dev Tunnels feature of Visual Studio…

That’s it, you have started running your API.

Step 6:

Now let’s create a Mobile App with Power Apps…with the same login you have used for the Visual Studio to create a custom connector..

Step 7:

First check if Custom Connector has been created in your tenant and authenticate the connection….navigate to https://make.powerapps.com and click on Discover at the left of the page….and then click on Custom Connectors, you should see a connector which we created from Visual Studio….nice isn’t it…

Step 8:

All you need to create a connection by clicking on the + sign available..

Once connected, now try creating a mobile Canvas App..

In the Canvas App, try adding data…and search for Weather Sample which you created, you should see something like below…

Step 9:

Once the web API is running in your development environment, you can debug in real time and even Hot Reload your code.

References:

https://learn.microsoft.com/en-us/aspnet/core/test/dev-tunnels?view=aspnetcore-7.0#create-a-tunnel

Thank you for reading…

Cheers,

PMDY

Dataverse Low Code Plugins – Insight

Prerequisite: Intall Dataverse Accelerator from AppSource from Microsoft Power CAT Team. Follow along once you have installed…see Dataverse Accelerator Installation Post if you want to know how..

Firstly, open the environment from https://make.powerapps.com where you would like to test this out, install the Dataverse Accelerator Solution as described above.

You should see there is an option to create Plugin from UI itself, no need to open Visual Studio and write your .Net Class library and register using Plugin Registration tool.

Please note that this is still an Experimental Feature and lot of improvements yet to be made..below is my quick test on basic CRUD Operation using this Plugin..

There were two types of Low Code Plugins

  1. Instant Plugins
  2. Automated Plugins

Let’s see how they work by creating an Instant Plugin

Step 1: Click on New Plugin Button available

Step 2: Key in the display name and description, both are mandatory to be entered…we don’t have a way to customize here as of now…

Step 3:Then Click on Next and enter the Parameters in the Definition area…I just mentioned In and Out parameters for brevity, then added a simple expression to multiply the input variable supplied by 100…

Make sure you won’t get any errors

Step 4: Then click on Next and click on Save.

Step 5:Once Saved, you will get a new button for testing…

Step 6:Clicking on Test will get you to the below screen to enter your input parameter…

Step 7:Clicking on Run which gives the output in Web API and highlighted is the response received with a success.

Note:

For some of the Automated Plugins, got a failure message with no way to troubleshoot what was the error was…I have raised this to Microsoft, but they mentioned that these features are work in Progress…

Hope we get all the complex functionality there in Dynamics 365 CE Plugins be available within Dataverse Low Code Plugins with the help of Power Fx too in future….the App development is going to be lot more easier…with Microsoft Power Platform… and citizen developers can pitch in…

Reference: Dataverse Low Code Plugins Repo in GIT Hub

Thank you for reading…

Cheers,

PMDY