In the next few blog posts in this series, I will be talking all about Microsoft Copilot aka Power Virtual Agent from beginner to advanced topics, you might see longer posts but you don’t require any prerequisite knowledge on Copilot to follow.
So, lets’ get started and learn with me in this blog series, let’s dive into the capabilities of Generative AI using #copilot.
Actually, Copilots empowers teams to quickly and easily create powerful bots using a guided, no-code graphical experience.
In this blog post, we will see how you can create a simple Chatbot. Excited? so let’s get started.
Step 1: Go to https://aka.ms/TryPVA try out.
Step 2: Click on Try free option available.

Step 3: Enter your email address and click on Next.

Step 4: In case you have an existing Microsoft 365 Subscription, you will be shown something below.

Step 5: Click on SignIn, I have already had an account in Copilot Studio, in case you don’t have, one will be created.

Step 6:
a. Once you click on Get Started, Copilot Studio opens in a new tab and you will be asked to login once, enter your Signin details.
b. In case you previously logged created a Copilot Studio trial, you can continue using it, else extend it to 30 days if requested. Click on Done at the bottom.

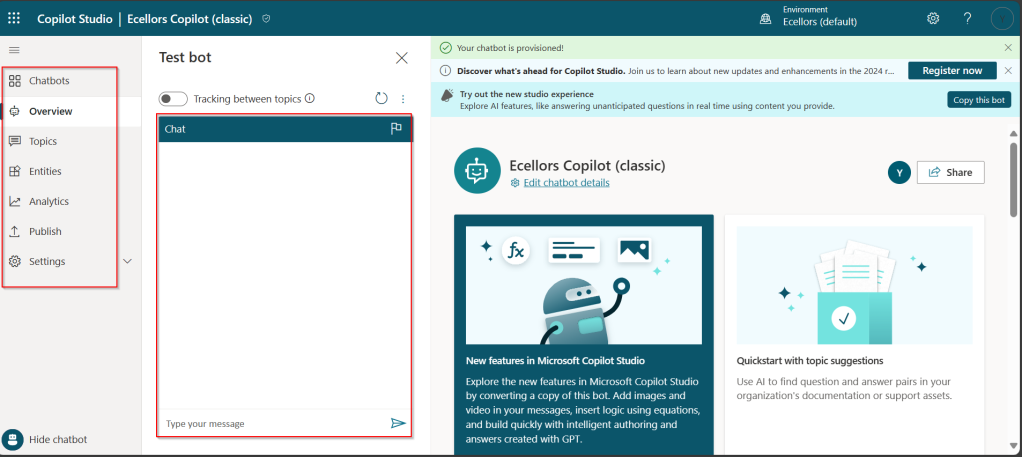
Step 7: Below is the home page of Copilot Studio.

I will be talking about each of the highlighted topics in great detail in the upcoming posts.
Note: Copilots are supported only in certain locations listed in the supported data locations, with data stored in respective data centers. If your company is located outside of the supported data locations, you need to create a custom environment with Region set to a supported data location before you can create your chatbot.
Step 8:In this step, we will create a Copilot, so click on New Copilot

Step 9: I have provided a name; chosen a language and we can provide an existing website to utilize the Generative AI Capabilities built in Copilot Studio.

So, here I have provided my blog address. By using this, Copilot can generate suggested topics which you have option to add to your existing topics.

Step 10:
a. Click on advanced options; you will be able to choose an icon for the Copilot
b. You can optionally include Lesson Topics
c. Choose an existing solution you wish to add this Copilot to
d. Choose appropriate Schema name.
e. You can optionally enable voice capabilities by choosing the language in which your copilot wants to speak to.

Step 11: You will be shown the below screen and within a few seconds, your Copilot will be ready.

Step 12: This is the main page of your Copilot; you will also be able to add additional Copilots or delete the Copilot.

Step 13: Now, let’s understand Topics what one of the building blocks of Copilot which are nothing but predefined categories or subjects which can help to classify and organize the KB/Support articles.

The topics shown on the right are prebuilt topics for the Copilot you have just created. Here you may wish to create new topics as necessary.

Step 14: Trigger phrases are those which customer enters in the chat window to start the conversation which then calls the relevant topics. There can be multiple trigger phrases for a single topic.
You may click to create a topic which then asks you to provide the trigger phrases, when you click to add a topic, the Trigger phrases node and a blank Message node are inserted for you.

Copilot opens the topic in the authoring canvas and displays the topic’s trigger phrases. You can add up to 1000 topics in a Copilot.

Step 15: You can add additional nodes by selecting the Plus (+) icon on the line or branch between or after a node.

Step 16: When you were adding a new node, you can choose from the below options available.

You can either use any of the available options as above..
a. Ask a question
If you want to ask a question and get response from end user, you may do so by adding a node, click on Ask a question.
For example, I choose Multiple choice options.

Based on what you enter in the Identify field, you can enter what options user may have. You can nodes further to create branching logic

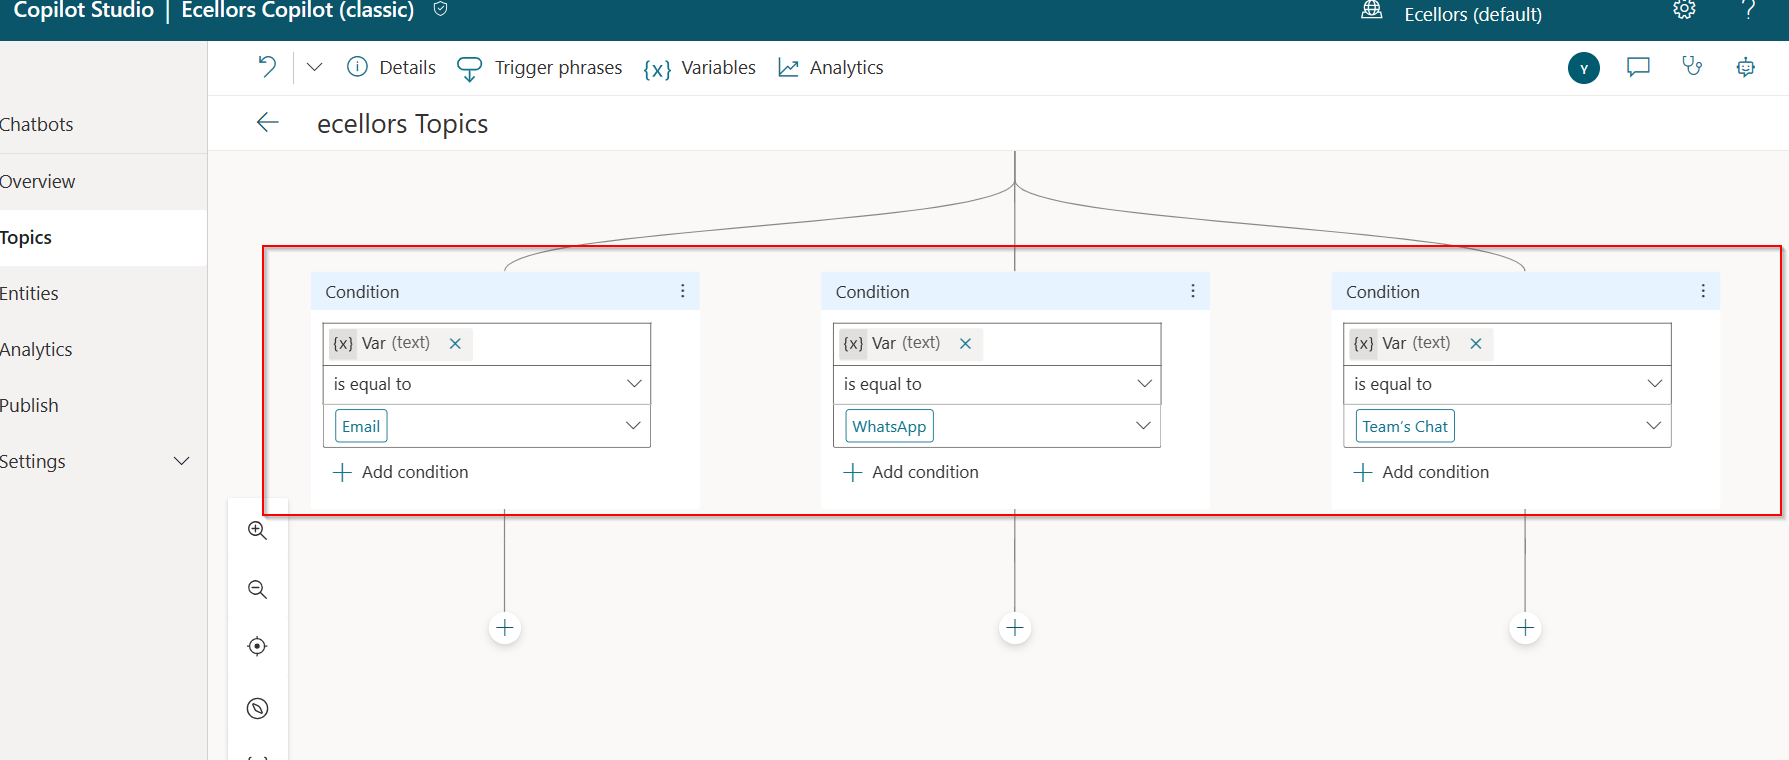
b. Add a condition
You can add a condition in the canvas as below to take your Copilot branch out conditionally.

c. Call an action: The options shown below are self explanatory. You can branch out with the possible options.

d. Show a message
You may choose to show a message to the user by entering your message in the text box available.

d. Goto another topic

f. End the conversation:
Finally, you can end the conversation by choosing to end the conversation with the available options or you can transfer to an agent to take the user queries further.

Step 17:
Copilot conversations are all about natural language understanding. Entity is the fundamental aspect which can be recognized from user’s input.
It can be simply can be thought real world subject like Person name, Phone number, Postal Code etc. We have system as well as custom entities while building.

You can also build custom entities you can choose from the options available.

Now that you have seen what are the building blocks of Copilot, in the upcoming blog posts let’s see on how to test and publish your copilots.
Thank you for reading.
Cheers,
PMDY
Discover more from ECELLORS CRM Blog
Subscribe to get the latest posts to your email.


2 thoughts on “#01 – Copilot Learn Series – Getting started with understanding Copilot Studio and basic building blocks of a Copilot (a.k.a Power Virtual agents)”