#01 – Copilot Learn Series – Getting started with understanding Copilot Studio and basic building blocks of a Copilot (a.k.a Power Virtual agents)

In the next few blog posts in this series, I will be talking all about Microsoft Copilot aka Power Virtual Agent from beginner to advanced topics, you might see longer posts but you don’t require any prerequisite knowledge on Copilot to follow.

So, lets’ get started and learn with me in this blog series, let’s dive into the capabilities of Generative AI using #copilot.

Actually, Copilots empowers teams to quickly and easily create powerful bots using a guided, no-code graphical experience.

In this blog post, we will see how you can create a simple Chatbot. Excited? so let’s get started.

Step 1: Go to https://aka.ms/TryPVA try out.

Step 2: Click on Try free option available.

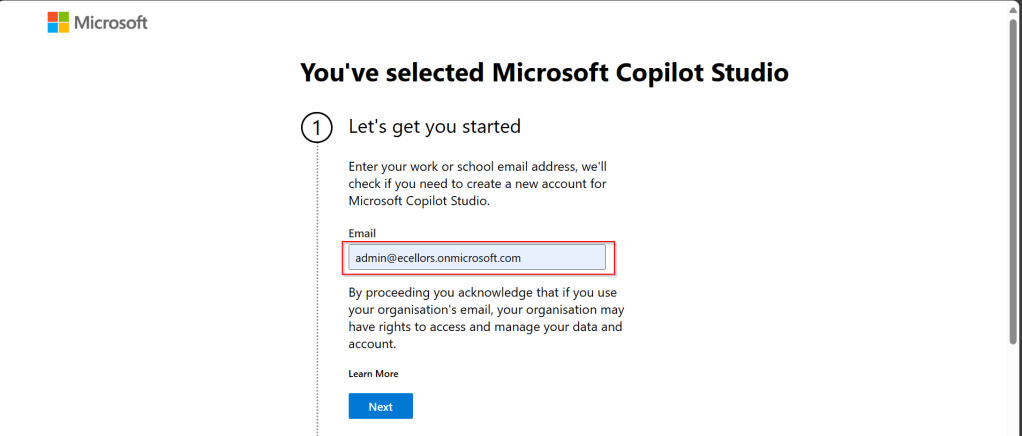
Step 3: Enter your email address and click on Next.

Step 4: In case you have an existing Microsoft 365 Subscription, you will be shown something below.

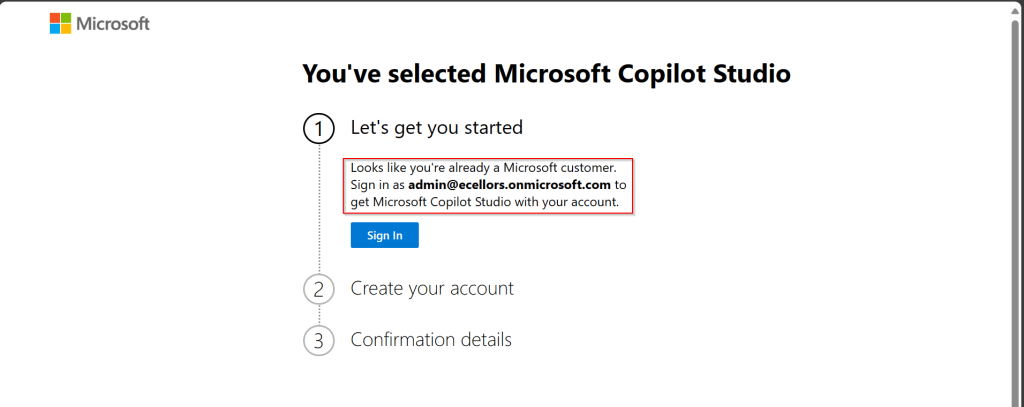
Step 5: Click on SignIn, I have already had an account in Copilot Studio, in case you don’t have, one will be created.

Step 6:

a. Once you click on Get Started, Copilot Studio opens in a new tab and you will be asked to login once, enter your Signin details.

b. In case you previously logged created a Copilot Studio trial, you can continue using it, else extend it to 30 days if requested. Click on Done at the bottom.

Step 7: Below is the home page of Copilot Studio.

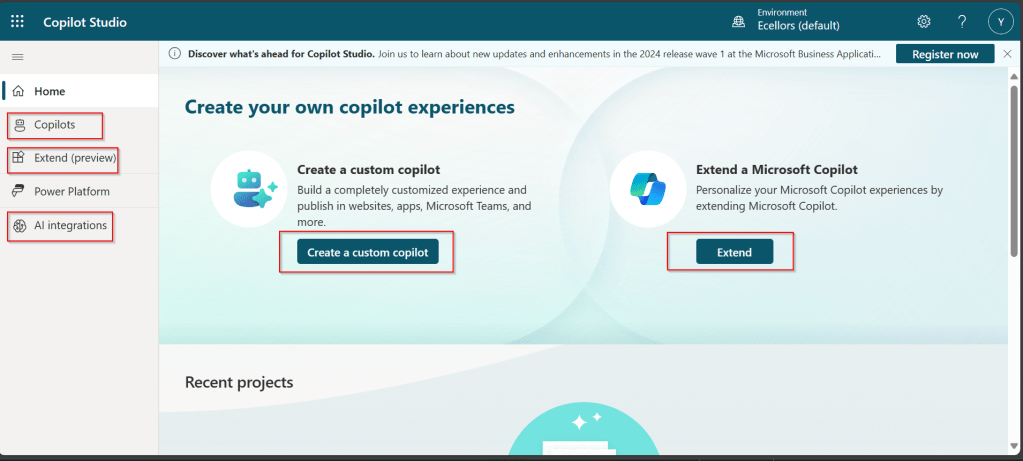
I will be talking about each of the highlighted topics in great detail in the upcoming posts.

Note: Copilots are supported only in certain locations listed in the supported data locations, with data stored in respective data centers. If your company is located outside of the supported data locations, you need to create a custom environment with Region set to a supported data location before you can create your chatbot.

Step 8:In this step, we will create a Copilot, so click on New Copilot

Step 9: I have provided a name; chosen a language and we can provide an existing website to utilize the Generative AI Capabilities built in Copilot Studio.

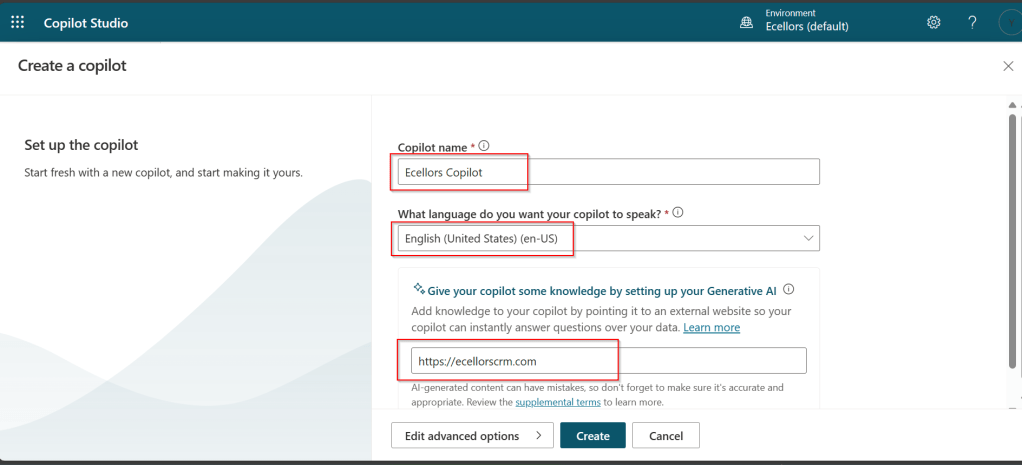
So, here I have provided my blog address. By using this, Copilot can generate suggested topics which you have option to add to your existing topics.
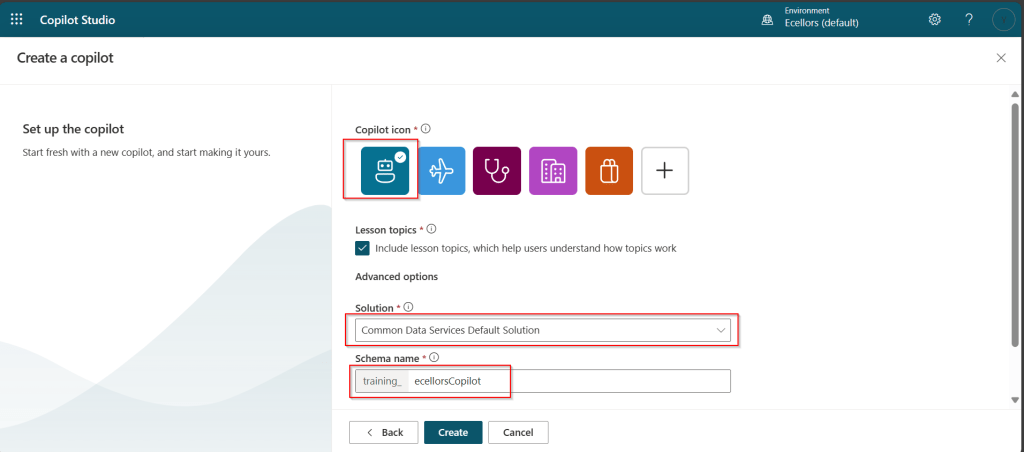
Step 10:

a. Click on advanced options; you will be able to choose an icon for the Copilot

b. You can optionally include Lesson Topics

c. Choose an existing solution you wish to add this Copilot to

d. Choose appropriate Schema name.

e. You can optionally enable voice capabilities by choosing the language in which your copilot wants to speak to.

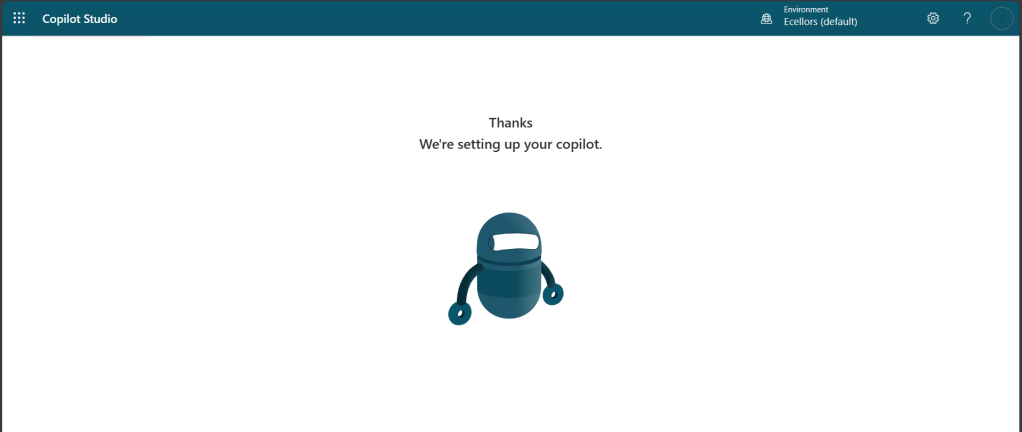
Step 11: You will be shown the below screen and within a few seconds, your Copilot will be ready.

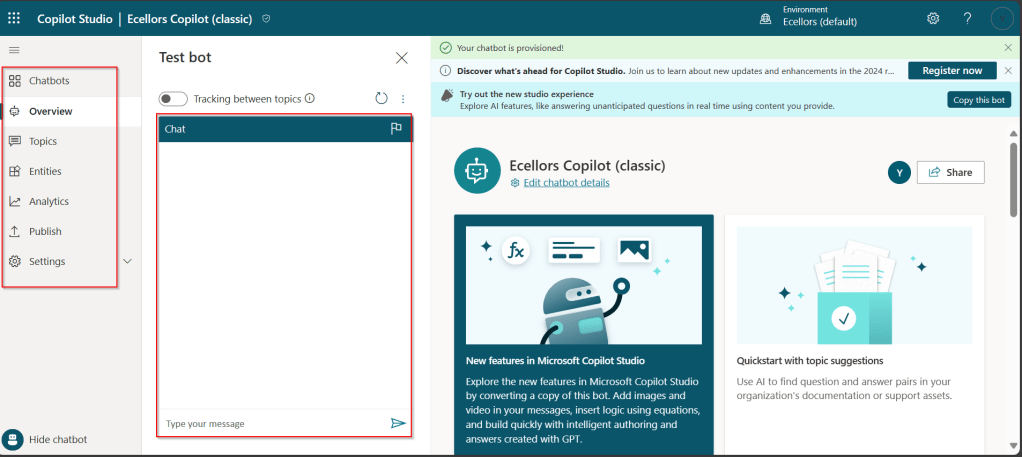
Step 12: This is the main page of your Copilot; you will also be able to add additional Copilots or delete the Copilot.

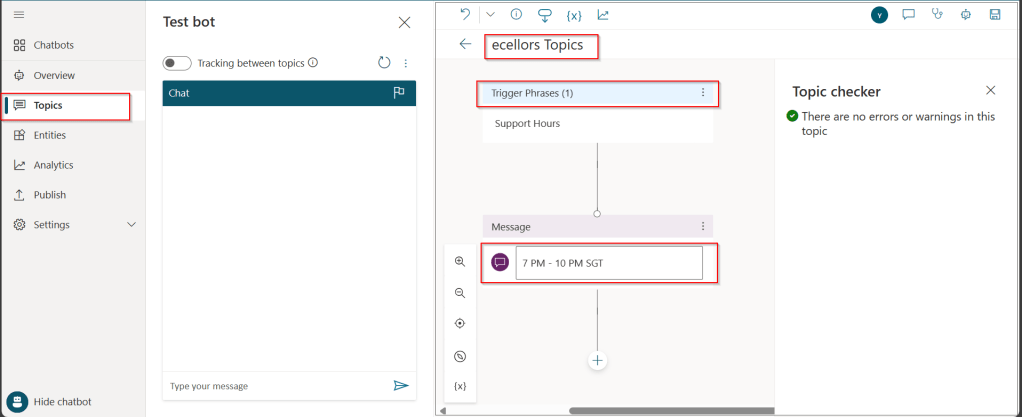
Step 13: Now, let’s understand Topics what one of the building blocks of Copilot which are nothing but predefined categories or subjects which can help to classify and organize the KB/Support articles.

The topics shown on the right are prebuilt topics for the Copilot you have just created. Here you may wish to create new topics as necessary.

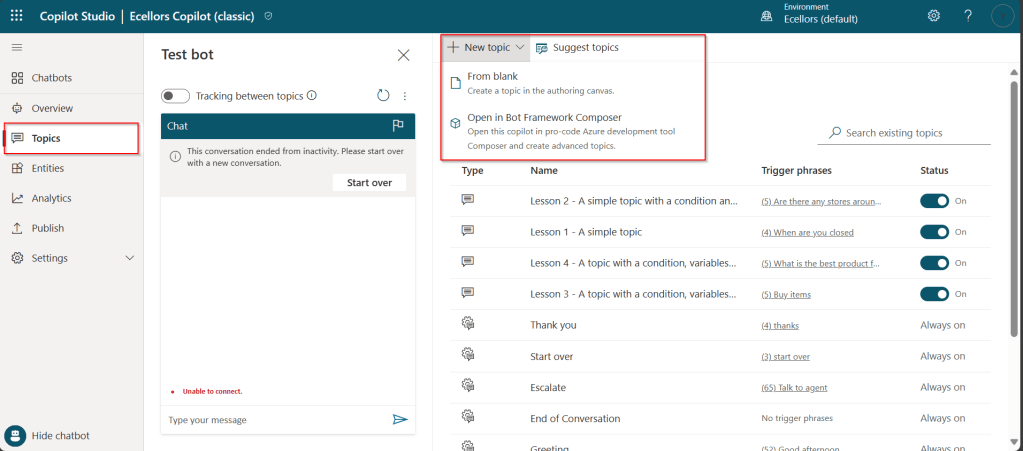
Step 14: Trigger phrases are those which customer enters in the chat window to start the conversation which then calls the relevant topics. There can be multiple trigger phrases for a single topic.

You may click to create a topic which then asks you to provide the trigger phrases, when you click to add a topic, the Trigger phrases node and a blank Message node are inserted for you.

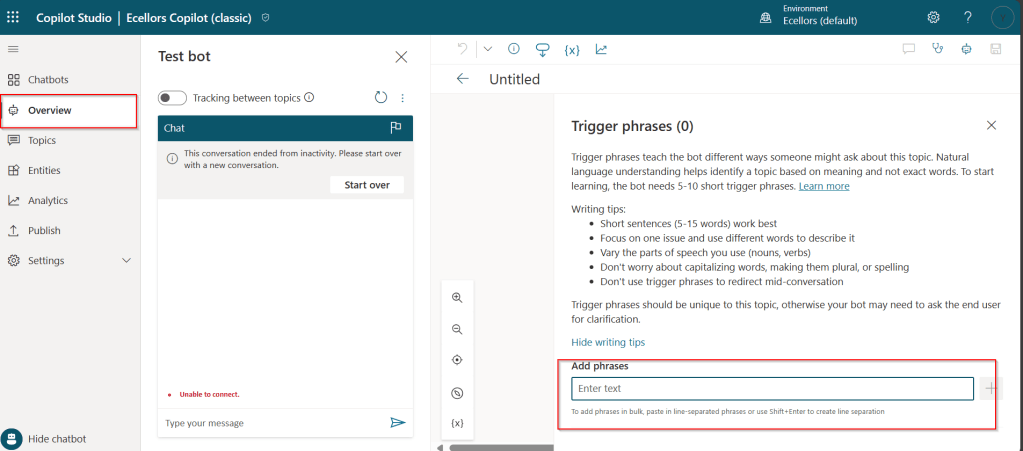
Copilot opens the topic in the authoring canvas and displays the topic’s trigger phrases. You can add up to 1000 topics in a Copilot.

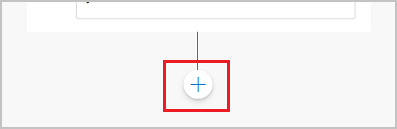
Step 15: You can add additional nodes by selecting the Plus (+) icon on the line or branch between or after a node.

Screenshot of adding a node

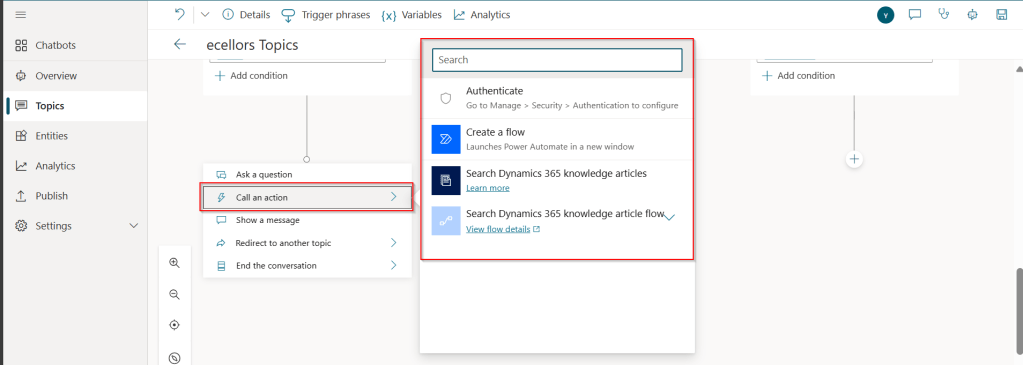
Step 16: When you were adding a new node, you can choose from the below options available.

You can either use any of the available options as above..

a. Ask a question

If you want to ask a question and get response from end user, you may do so by adding a node, click on Ask a question.

For example, I choose Multiple choice options.

Based on what you enter in the Identify field, you can enter what options user may have. You can nodes further to create branching logic
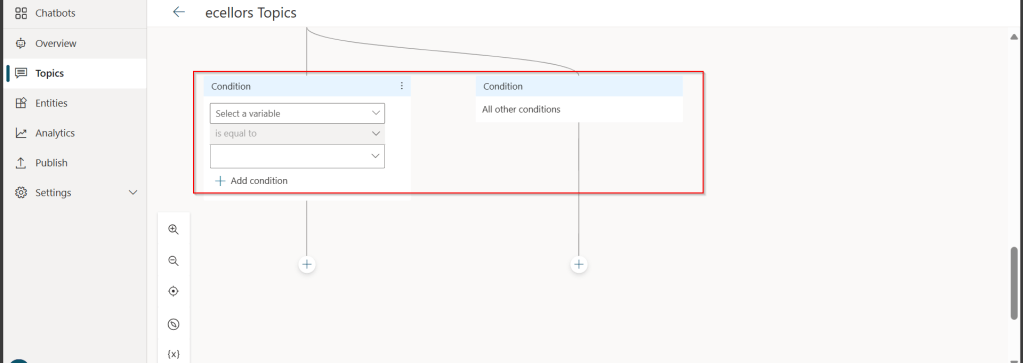
b. Add a condition

You can add a condition in the canvas as below to take your Copilot branch out conditionally.

c. Call an action: The options shown below are self explanatory. You can branch out with the possible options.

d. Show a message

You may choose to show a message to the user by entering your message in the text box available.

d. Goto another topic

f. End the conversation:

Finally, you can end the conversation by choosing to end the conversation with the available options or you can transfer to an agent to take the user queries further.

Step 17:

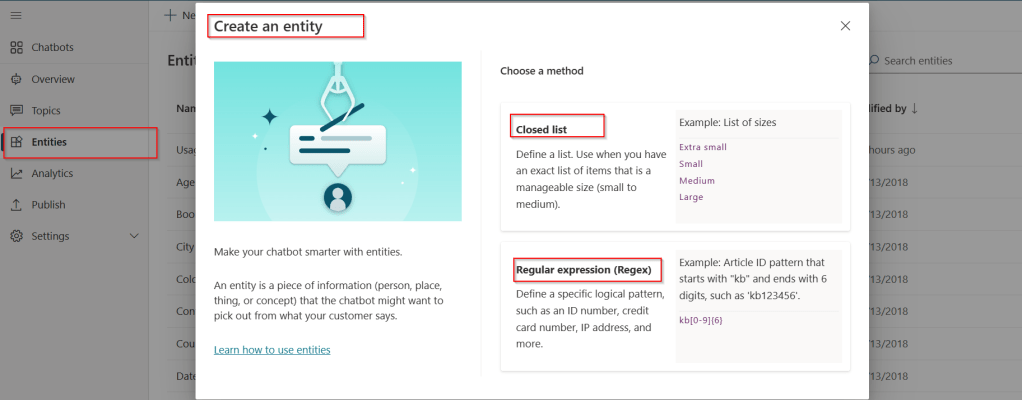
Copilot conversations are all about natural language understanding. Entity is the fundamental aspect which can be recognized from user’s input.

It can be simply can be thought real world subject like Person name, Phone number, Postal Code etc. We have system as well as custom entities while building.

You can also build custom entities you can choose from the options available.

Now that you have seen what are the building blocks of Copilot, in the upcoming blog posts let’s see on how to test and publish your copilots.

Thank you for reading.

Cheers,

PMDY

Using Bulk Operations messages – #01 (Plugins)

Well, this could be a very interesting post as we talk about optimizing the Dataverse performance using bulk operation messages and too using Dataverse plugin customizations but wait, this post is not complete because of an issue which I will talk later in the blog. First let’s dig into this feature by actually trying out. Generally, every business wants improved performance for any logic tagged out to out of box messages and so developers try to optimize their code in various ways when using Dataverse messages.

Firstly, before diving deeper into this article, let’s first understand the differences between Standard and Elastic tables, if you want to know a bit of introduction to elastic tables which were newly introduced last year, you can refer to my previous post on elastic tables here.

The type of table you choose to store your data has the greatest impact on how much throughput you can expect with bulk operations. You can choose out of two types of tables in Dataverse, below are some key differences you can refer to: 

 Standard TablesElastic Tables
Data StructureDefined SchemaFlexible Schema
Stores data in Azure SQLStores data in Azure Cosmos DB
Data IntegrityEnsuredLess Strict
Relationship modelSupportedLimited
PerformancePredictableVariable, preferred for unpredictable and spiky workloads
AgilityLimitedHigh
PersonalizationLimitedExtensive
Standard and Elastic Table Differences

Plugins:

With Bulk Operation messages, the APIs being introduced are Create MultipleUpdateMultiple,DeleteMultiple (only for Elastic tables), Upsert Request(preview). As of now you’re not required to migrate your plug-ins to use CreateMultiple and Update Multiple instead of Create and Update messages. Your logic for Create and Update continues to be applied when applications use CreateMultiple or UpdateMultiple

This is mainly done to prevent two separate business logics for short running and long duration activities. So, it means Microsoft have merged the message processing pipelines for these messages (Create, Create Multiple; Update, Update Multiple) that means Create, Update messages continue to trigger for your existing implemented scenarios, when you update to use Create Multiple, Update Multiple still the Create, Update will behave.

Few points for consideration:

  1. While I have tested and still could see IPluginExecutionContext only provides the information and still I have noted Microsoft Documentation suggests using IPluginExecutionContext4 for Bulk Messages in Plugins where it is being shown as null yet.
  2. While you were working with Create, Update, Delete, you could have used Target property to get the input parameters collection, while working with Bulk Operation messages, you need to use Targets instead of Target.
  3. Instead of checking whether the target is Entity you need to use Entity Collection, we need to loop through and perform our desired business logic
  4. Coming to Images in plugin, these will be retrieved only when you have used IPluginExecutionContext4.

Below is the image from Plugin Registration Tool to refer(e.g. I have taken UpdateMultiple as reference, you can utilize any of the bulk operation messages)

Sample:

Below is the sample, how your Bulk operation message plugin can look like…you don’t need to use all the contexts, I have used to just check that out.

using System;
using System.Collections.Generic;
using System.Linq;
using System.Text;
using System.Threading.Tasks;
using Microsoft.Crm.Sdk;
using Microsoft.Xrm.Sdk;
using Microsoft.Xrm.Sdk.Query;
namespace Plugin_Sample
{
public class BulkMessagePlugin : IPlugin
{
public void Execute(IServiceProvider serviceProvider)
{
IPluginExecutionContext context = (IPluginExecutionContext)serviceProvider.GetService(typeof(IPluginExecutionContext));
IPluginExecutionContext2 context2 = (IPluginExecutionContext2)serviceProvider.GetService(typeof(IPluginExecutionContext2));
IPluginExecutionContext3 context3 = (IPluginExecutionContext4)serviceProvider.GetService(typeof(IPluginExecutionContext3));
IPluginExecutionContext4 context4 = (IPluginExecutionContext4)serviceProvider.GetService(typeof(IPluginExecutionContext4));
ITracingService trace = (ITracingService)serviceProvider.GetService(typeof(ITracingService));
// Verify input parameters
if (context4.InputParameters.Contains("Targets") && context.InputParameters["Targets"] is EntityCollection entityCollection)
{
// Verify expected entity images from step registration
if (context4.PreEntityImagesCollection.Length == entityCollection.Entities.Count)
{
int count = 0;
foreach (Entity entity in entityCollection.Entities)
{
EntityImageCollection entityImages = context4.PreEntityImagesCollection[count];
// Verify expected entity image from step registration
if (entityImages.TryGetValue("preimage", out Entity preImage))
{
bool entityContainsSampleName = entity.Contains("fieldname");
bool entityImageContainsSampleName = preImage.Contains("fieldname");
if (entityContainsSampleName && entityImageContainsSampleName)
{
// Verify that the entity 'sample_name' values are different
if (entity["fieldname"] != preImage["fieldname"])
{
string newName = (string)entity["fieldname"];
string oldName = (string)preImage["fieldname"];
string message = $"\\r\\n – 'sample_name' changed from '{oldName}' to '{newName}'.";
// If the 'sample_description' is included in the update, do not overwrite it, just append to it.
if (entity.Contains("sample_description"))
{
entity["sample_description"] = entity["sample_description"] += message;
}
else // The sample description is not included in the update, overwrite with current value + addition.
{
entity["sample_description"] = preImage["sample_description"] += message;
}
}
}
}
}
}
}
}
}
}

I have posted this question to Microsoft regarding the same to know more details on this why the IPluginExecutionContext4 is null , while still I am not sure if this is not deployed to my region, my environment is in India.

Recommendations for Plugins:

  • Don’t try to introduce CreateMultiple, UpdateMultiple, UpsertMultiple in a separate step as it would trigger the logic to be fired twice one for Create operation and another for CreateMultiple.
  • Don’t use batch request types such as ExecuteMultipleRequest, ExecuteTransactionRequest, CreateMultipleRequest, UpdateMultipleRequest, UpsertMultipleRequest in Plugins as user experiences are degraded and timeout errors can occur.
  • Instead use Bulk operation messages like CreateMultipleRequestUpdateMultipleRequest, UpsertMultipleRequest
    • No need to use ExecuteTransactionRequest in Synchronous Plugins as already they will be executed in the transaction.

    Hope this guidance will help someone trying to customize their Power Platform solutions using Plugins.

    I will write another blog post on using Bulk operation messages for Client Applications…

    Cheers,

    PMDY