Power Platform Solution Blue Print Review – Quick Recap

The Solution blueprint review is covers all required topics. The workshop can also be conducted remotely. When the workshop is done remotely, it is typical to divide the review into several sessions over several days.

The following sections cover the top-level topics of the Solution blueprint review and provide a sampling of the types of questions that are covered in each section.

Program strategy

Program strategy covers the process and structures that will guide the implementation. It also reviews the approach that will be used to capture, validate, and manage requirements, and the plan and schedule for creation and adoption of the solution.

This topic focuses on answering questions such as:

  • What are the goals of the implementation, and are they documented, well understood, and can they be measured?
  • What is the methodology being used to guide the implementation, and is it well understood by the entire implementation team?
  • What is the structure that is in place for the team that will conduct the implementation?
  • Are roles and responsibilities of all project roles documented and understood?
  • What is the process to manage scope and changes to scope, status, risks, and issues?
  • What is the plan and timeline for the implementation?
  • What is the approach to managing work within the plan?
  • What are the external dependencies and how are they considered in the project plan?
  • What are the timelines for planned rollout?
  • What is the approach to change management and adoption?
  • What is the process for gathering, validating, and approving requirements?
  • How and where will requirements be tracked and managed?
  • What is the approach for traceability between requirements and other aspects of the implementation (such as testing, training, and so on)?
  • What is the process for assessing fits and gaps?

Test strategy

Test strategy covers the various aspects of the implementation that deal with validating that the implemented solution works as defined and will meet the business need.

This topic focuses on answering questions such as:

  • What are the phases of testing and how do they build on each other to ensure validation of the solution?
  • Who is responsible for defining, building, implementing, and managing testing?
  • What is the plan to test performance?
  • What is the plan to test security?
  • What is the plan to test the cutover process?
  • Has a regression testing approach been planned that will allow for efficient uptake of updates?

Business process strategy

Business process strategy considers the underlying business processes (the functionality) that will be implemented on the Microsoft Dynamics 365 platform as part of the solution and how these processes will be used to drive the overall solution design.

This topic focuses on answering questions such as:

  • What are the top processes that are in scope for the implementation?
  • What is currently known about the general fit for the processes within the Dynamics 365 application set?
    • How are processes being managed within the implementation and how do they relate to subsequent areas of the solution such as user stories, requirements, test cases, and training?
    • Is the business process implementation schedule documented and understood?
    • Are requirements established for offline implementation of business processes?

Based on the processes that are in scope, the solution architect who is conducting the review might ask a series of feature-related questions to gauge complexity or understand potential risks or opportunities to optimize the solution based on the future product roadmap.

Application strategy

Application strategy considers the various apps, services, and platforms that will make up the overall solution.

This topic focuses on answering questions such as:

  • Which Dynamics 365 applications or services will be deployed as part of the solution?
  • Which Microsoft Azure capabilities or services will be deployed as part of the solution?
  • What if new external application components or services will be deployed as part of the solution?
  • What if legacy application components or services will be deployed as part of the solution?
  • What extensions to the Dynamics 365 applications and platform are planned?

Data strategy

Data strategy considers the design of the data within the solution and the design for how legacy data will be migrated to the solution.

This topic focuses on answering questions such as:

  • What are the plans for key data design issues like legal entity structure and data localization?
  • What is the scope and planned flow of key master data entities?
  • What is the scope and planned flow of key transactional data entities?
  • What is the scope of data migration?
  • What is the overall data migration strategy and approach?
  • What are the overall volumes of data to be managed within the solution?
  • What are the steps that will be taken to optimize data migration performance?

Integration strategy

Integration strategy considers the design of communication and connectivity between the various components of the solution. This strategy includes the application interfaces, middleware, and the processes that are required to manage the operation of the integrations.

This topic focuses on answering questions such as:

  • What is the scope of the integration design at an interface/interchange level?
  • What are the known non-functional requirements, like transaction volumes and connection modes, for each interface?
  • What are the design patterns that have been identified for use in implementing interfaces?
  • What are the design patterns that have been identified for managing integrations?
  • What middleware components are planned to be used within the solution?

Business intelligence strategy

Business intelligence strategy considers the design of the business intelligence features of the solution. This strategy includes traditional reporting and analytics. It includes the use of reporting and analytics features within the Dynamics 365 components and external components that will connect to Dynamics 365 data.

This topic focuses on answering questions such as:

  • What are the processes within the solution that depend on reporting and analytics capabilities?
  • What are the sources of data in the solution that will drive reporting and analytics?
  • What are the capabilities and constraints of these data sources?
  • What are the requirements for data movement across solution components to facilitate analytics and reporting?
  • What solution components have been identified to support reporting and analytics requirements?
  • What are the requirements to combine enterprise data from multiple systems/sources, and what does that strategy look like?

Security strategy

Security strategy considers the design of security within the Dynamics 365 components of the solution and the other Microsoft Azure and external solution components.

This topic focuses on answering questions such as:

  • What is the overall authentication strategy for the solution? Does it comply with the constraints of the Dynamics 365 platform?
  • What is the design of the tenant and directory structures within Azure?
  • Do unusual authentication needs exist, and what are the design patterns that will be used to solve them?
  • Do extraordinary encryption needs exist, and what are the design patterns that will be used to solve them?
  • Are data privacy or residency requirements established, and what are the design patterns that will be used to solve them?
  • Are extraordinary requirements established for row-level security, and what are the design patterns that will be used to solve them?
  • Are requirements in place for security validation or other compliance requirements, and what are the plans to address them?

Application lifecycle management strategy

Application lifecycle management (ALM) strategy considers those aspects of the solution that are related to how the solution is developed and how it will be maintained given that the Dynamics 365 apps are managed through continuous update.

This topic focuses on answering questions such as:

  • What is the preproduction environment strategy, and how does it support the implementation approach?
  • Does the environment strategy support the requirements of continuous update?
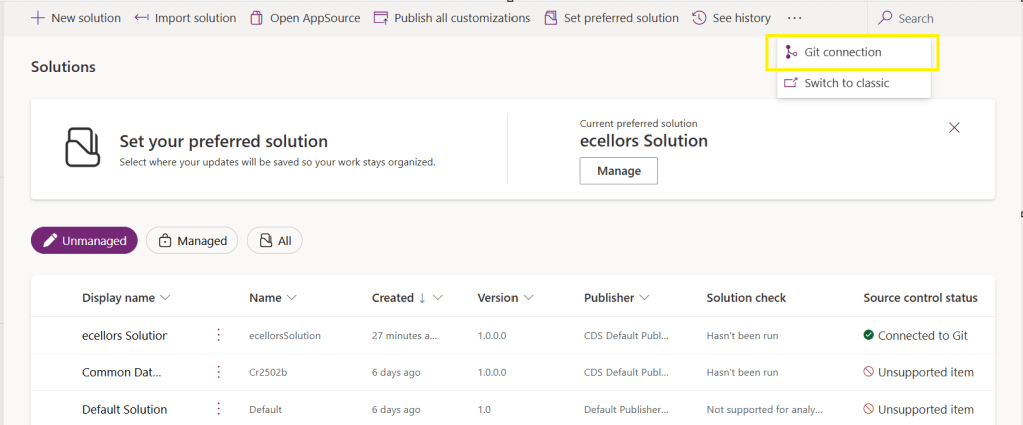
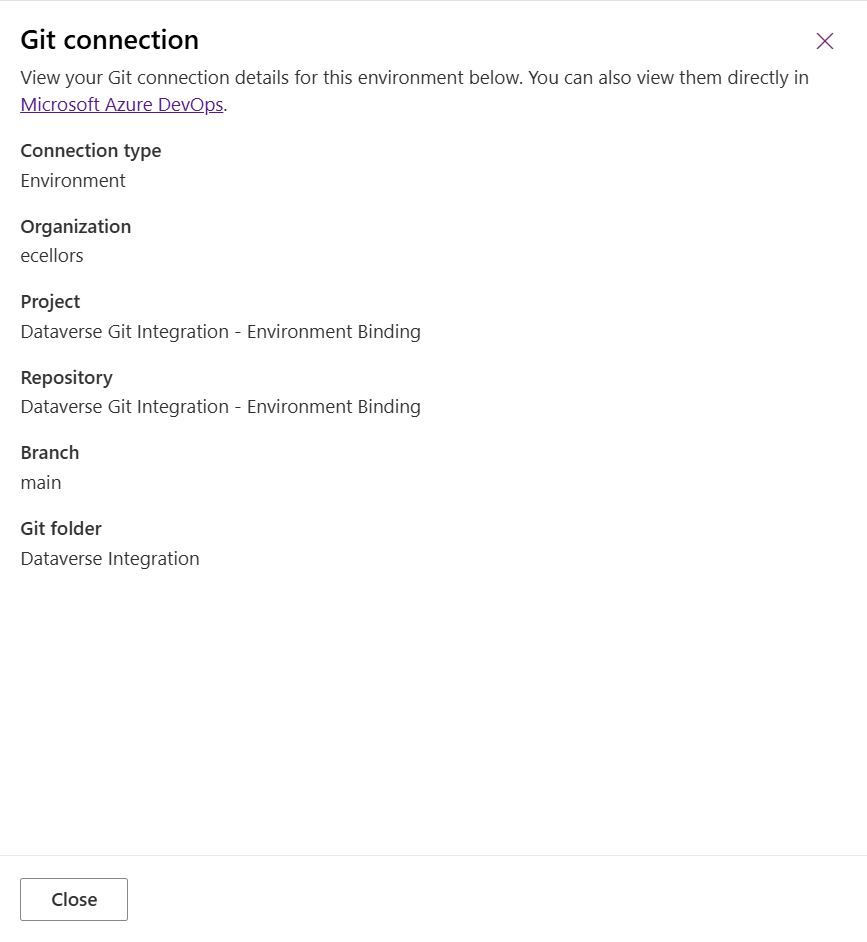
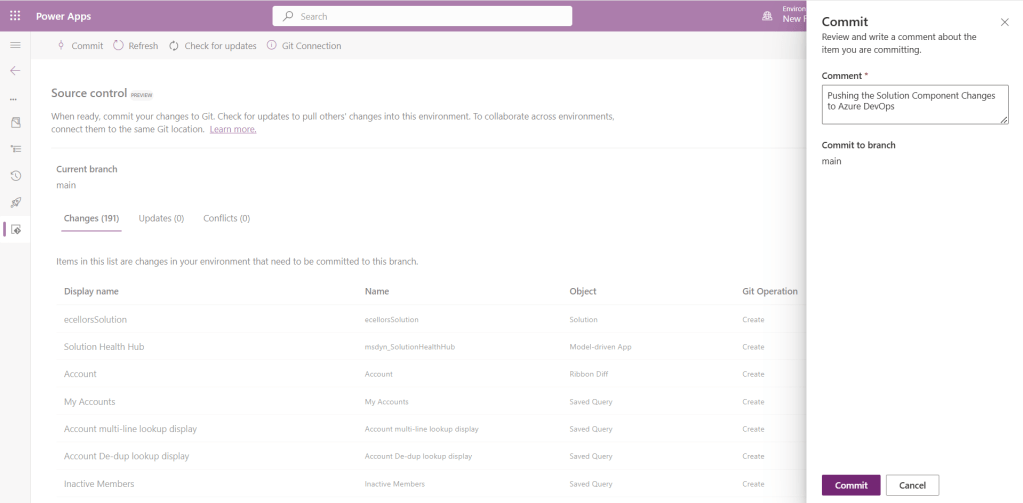
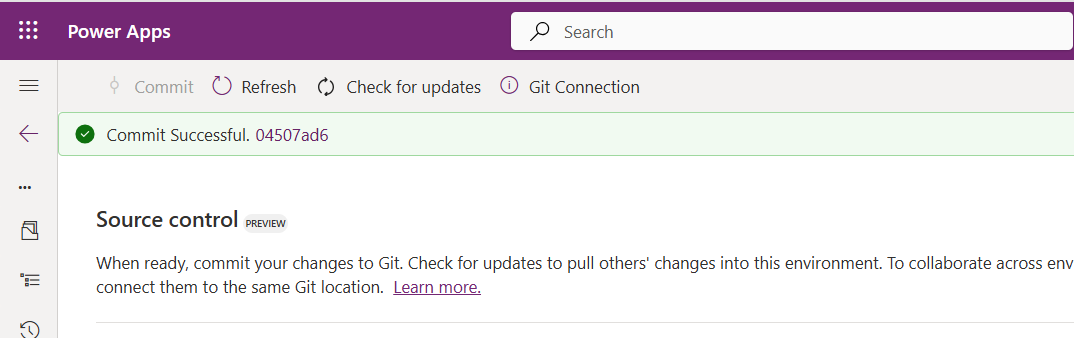
  • What plan for Azure DevOps will be used to support the implementation?
  • Does the implementation team understand the continuous update approach that is followed by Dynamics 365 and any other cloud services in the solution?
  • Does the planned ALM approach consider continuous update?
  • Who is responsible for managing the continuous update process?
  • Does the implementation team understand how continuous update will affect go-live events, and is a plan in place to optimize versions and updates to ensure supportability and stability during all phases?
  • Does the ALM approach include the management of configurations and extensions?

Environment and capacity strategy

Deployment architecture considers those aspects of the solution that are related to cloud infrastructure, environments, and the processes that are involved in operating the cloud solution.

This topic focuses on answering questions such as:

  • Has a determination been made about the number of production environments that will be deployed, and what are the factors that went into that decision?
  • What are the business continuance requirements for the solution, and do all solution components meet those requirements?
  • What are the master data and transactional processing volume requirements?
  • What locations will users access the solution from?
  • What are the network structures that are in place to provide connectivity to the solution?
  • Are requirements in place for mobile clients or the use of other specific client technologies?
  • Are the licensing requirements for the instances and supporting interfaces understood?

Solution blueprint is very essential for an effective Solution Architecture, using the above guiding principles will help in this process.

Thank you for reading…

Hope this helps…

Cheers,

PMDY

The refresh token has expired due to inactivity when connecting to Power Pages using Power Apps CLI – Quick Fix

Hi Folks,

This post is about a quick fix for an error occurred with Power Apps CLI.

I was trying to connect to my organization using CLI and that’s when I encountered this error.

Prerequisites:

Power Apps CLI, Visual Studio Code

After installing the prerequisites, I was trying to connect to my Power Pages available in my organization from VS Code terminal using below command.

pac paportalist 

It’s then I encountered the below error

It’s then I understood that due to inactivity, it is failing…

Your Power Platform CLI connection is failing due to an expired refresh token and an ExternalTokenManagement Authentication configuration issue. Here’s how you can resolve it:

Fix:

Reauthenticate with Dataverse

pac auth clear
pac auth create --url https://orgXXX.crm8.dynamics.com --username admin@Ecellors.onmicrosoft.com --password [your password]

Creating new authentication profile resolves this issue…

    Now try to run the above command.

    This should prompt a new login window to authenticate your request, provide the details and you should be able to login.

    Hope this helps..

    Cheers,

    PMDY

    Deploy dependent assemblies easily using PAC CLI

    Hi Folks,

    This is another post related to Plugins in Dynamics 365 CE.

    Considering medium to large scale implementations, there isn’t a single Power Platform Project which don’t require merging of external assemblies.

    We relied on ILMerge to merge those assemblies into a single DLL. We used to search for ILMerge assemblies in Nuget and installed them for use.

    Then the plugins are signed in for several reasons, primarily related to security, assembly integrity, and versioning of the sandbox worker process.

    But either of the above are no longer needed with the help of Dependent Assembly feature…with few simple steps, you can build the Plugin…Interesting, isn’t it, read on…

    Pre requisites:

    • Download Visual Studio 2022 Community Edition here
    • Download VS Code from here
    • Download Plugin registration tool from here
    • Download PAC CLI from here
    • Download and install NuGet Package Explorer from this link NuGet Package Explorer open the NuGet Package Explorer

    Avoid Direct Plugin Project Creation in Visual Studio

    • Never create a Plugin project directly from Visual Studio or any other IDE here after.
    Use Microsoft PowerApps CLI instead
    • Always use Power Apps CLI as it easy and only requires a single command to create the entire Plugin project scaffolding
    • This ensures a standardized and reliable development environment.
    • It automatically creates a Nuget Package file that will be used to avoid ‘Could not load assemblies or its dependencies‘.

    Ok, let’s begin.

    Once you have downloaded all the prerequisites mentioned, make sure you have installed them in your local machine. Others are straight forward to download, for NuGet Package explorer, you need to search in Windows store to install.

    1. Create a local folder for the Plugins

    Navigate to that folder from VS Code

    Now open terminal, run the pac command as below

    Execute the following command to create plugin project 

    • Browse to the directory where you want to create the plugin project
    • Execute the command on CMD to create plugin project “pac plugin init

    A plugin project will be created at your desired location as follows

    Plugin project in local folder will be created as below

    That’s it, you can close the VS Code for now.

    Click on the CS Proj file and open it in Visual Studio

    By default, 2 files are automatically created when you create a plugin project as shown above.

    Now will install Bouncy Castle which is an external library, right click on the Plugin Solution –> Manage Nuge Packages

    I have added Bouncy Castle NuGet Package to my plugin project for Encryption and Decryption. You can have your own required NuGet Package as per your need.

    Build your project

    After a successful build, you will get the output result as follows

    Browse the directory of your project

    Open the file Plugin_Project.1.0.0.nupkg in Nuget Package Explorer by double clicking it

    Now you can see that this nuget package file contains the information related to the added nuget package of Bouncy Castle that we want to include in our plugin project package as follows. In your case, you can have the required nuget package that you want to add 

    Now open up plugin registration tool

    Click to create new connection

    Provide login details and login

    Click to Register New Package

    Browse to the directory where your nuget package file was created automatically when you build the project and import this file 

    Select the Command Data Service Default Solution and import it

    Click on view and Display by package

    Now your Plugin Project is successfully registered with all dependent assemblies and ready to use.

    While this post gives you a structure on how you can do build a plugin assembly, you can add the business logic as per your need.

    Conclusion:

    In conclusion, navigating the intricacies of Microsoft Dynamics 365 CRM plugins demands a nuanced approach, especially when dealing with NuGet Packages and dependent assemblies. This article has delved into the critical process of resolving the persistent ‘Could not load assemblies or its dependencies‘ issue, offering a comprehensive, step-by-step demonstration.

    By following the recommended best practices, such as avoiding direct plugin project creation in Visual Studio and harnessing the power of Microsoft PowerApps CLI, developers can establish a standardized and reliable development environment. The CLI’s automatic creation of a NuGet Package file not only streamlines the process but also reduces the errors.

    To further facilitate your journey, prerequisites such as downloading and installing essential tools like the Plugin Registration tool, Microsoft PowerApps CLI, and NuGet Package Explorer are highlighted. The guide emphasizes the significance of these tools in ensuring a smooth plugin development experience.

    By adopting these practices and incorporating the suggested steps into your workflow, you not only troubleshoot existing issues but also fortify your understanding of the entire process. Take charge of your Dynamics 365 CRM plugin development, elevate your skills, and sidestep common pitfalls by mastering the art of handling NuGet Packages and dependencies seamlessly.

    References:

    Build and package plug-in code

    Cheers,

    PMDY 

    Visualize this view – what this mean to developers and end users…?

    Hi Folks,

    Have you noticed Visualize this view button in in the app bar of any grid view of Dynamics 365?

    Here is a dashboard built within couple of minutes. While this can greatly help end users visualize the data present in the system. So, in this post, let’s understand bit more details about this capability and what are the some of the features which are left behind.

    Let’s understand the how’s this is generated along with its capabilities and disadvantages compared to traditional Power BI dashboard both from Developer and end user perspective, please note that this is my understanding..

    For Developers:

    a. Visualize this view uses a PCF Control which calls the Power BI REST API and then generates the embed token for the report embedding that into an Iframe.

    b. Then uses Power BI JavaScript API to handle user interactions with the embedded report such as filtering or highlighting data points.

    c. When Power BI first generates your report, it takes a look through your data to identify patterns and distributions and pick a couple of fields to use as starting points for creating the initial set of visuals when data is not preselected.

    d. Any changes to the data fields calls the UpdateView of the PCF Control and there by passing the updated data fields to REST API and then displays the visuals.

    e. Visuals will be created with both selected and non-selected fields which are the related to the selected fields in the data pane.

    For End Users & Developers:

    Advantages:

    1. Visuals are generated when no data is selected
    2. Cross Highlighting is possible
    3. Click on the Report to see Personalize this visual option
    4. People with Contributor, Member, or Admin role assigned can save the Report to workspace
    5. Users with no access to Power BI cant view this feature, they can request for free Power BI License
    6. Free License users can save the Report to thier personal workspace
    7. Users get build permission when any role above Contributor is assigned and reshare permission is given
    8. The report will be saved as direct query with SSO enabled and honours dataverse settings
    9. Show data table presents a list of tables if the model comprises of multiple tables.
    10. Able to specify the aggregation for each of the field in the model.

    Disadvantages:

    1. Only able to export summarized data from Visuals, you will be able to export the data in table from data table.
    2. Only Visual Level, no page level or report level filters
    3. During these reports creation, the model is configured to use Direct Query with Single Sign On.
    4. Embed a report on a Dataverse form requires modifying the XML of the solution
    5. Report published into the workspace are available to download but downloaded reports will not be able to customize further in Power BI Desktop as it would be built using Native Queries.
    6. If the page is kept ideal for long time or the user navigates to other browser window, the session and report will be lost.

    Considerations & Limitations:

    1. Power BI Pro license is required to create these reports
    2. While this is wonderful for end users to visualize the data but this is not an alteranative to building reports using Power BI Desktop.

    Hope this helps.

    Cheers,

    PMDY

    Showing multiselect option set from Model Driven Apps in Power BI

    Hi Folks,

    Well, this post will show you how you can work with multi option sets from Dynamics 365 in Power BI. First of all, you need some basic understanding of Power BI Desktop to follow. However, I made it clear for people with little background to follow and relate to. I scanned through the internet, but I couldn’t find a similar post, hence I am blogging this if it might help someone. I have faced this issue and here is the solution, you don’t need to use XrmToolBox nor Postman nor complex Power Query as many out in internet would suggest.

    So, follow with me along, if you were trying show the values in Multi OptionSet from Model Driven Apps in Power BI as below, then this post is absolutely for you.

    Practically if we retrieve the value of Multi OptionSet field as shown in the above image. You get something like below in comma separated values.

    Now based on use case and the requirement, we need to transform our data, i.e. Split the values into rows or columns using a delimiter, in this case, we use comma as delimiter. Here I am splitting into multiple rows as I need to show the contacts for different option values selected in the record.

    Select on the respective field and choose Split Column option available in the ribbon.

    Next, you will be presented with Split Column Delimiter Dialog box, you may select the options as below and click on Ok.

    Next in the Split Column by Delimiter, choose as below.

    Once clicked on Ok, now the Multi OptionSet was changed to Single OptionSet and showing the values in different rows.

    We can use Dataverse REST API to get the OptionSet values as below in Power BI, click on Get Data –> Web, enter the below in the URL to get the MultiSelect OptionSet Values –> Load. You can refer here some reference.

    https://ecellorshost.crm5.dynamics.com/api/data/v9.2/stringmaps?$filter=attributename%20eq%20%27powerbi_multioptionset%27

    Once data is loaded, it should look as below..

    So, now click on Close and Apply the transformation to be saved in the model, later create the data model relationships by going to the model view as below between the multiselect OptionSet field in the contact table and string map table.

    Once the relationship is established, we can proceed with plotting the visuals in visuals of your choice. For simplicity, used.

    Hope this helps someone looking out for such requirement which at least could save couple of seconds.

    Cheers,

    PMDY

    Dataverse – Git Integration – Preview – Quick Review

    Hi Folks,

    This post is about Dataverse and Git Integration which is the most sought after feature in the todays automation Era. This is a preview feature, you would need to create a new environment with Early Access enabled to test this feature or you can use an existing US Preview environment for testing this out.

    While every MDA(Model Driven Application) and it’s components can be safely and moved across the environments using Solutions with the help of Azure DevOps Pipelines. However when coming to integrating Power Platform Solutions to Azure DevOps, we had to manually export the solution and download them each and every time when we would like to commit the Solution Artifacts to Azure DevOps Repo.

    With this new Preview feature we can directly integrate the Power Platform Solutions to Azure DevOps.

    Let’s see this action…wait a moment, there were some prerequisites to be considered…

    1. Environment should be a Managed Environment to start using this and you need to be an Admin for the environment
    2. Azure DevOps subscription and license should be available to set this up, also permission to read source files and commits(should be a member of contributor group in Azure DevOps) from a Repo
    3. Your email address used for Azure DevOps and Power Platform Solutions should be the same

    Setup:

    Connecting Dataverse with Azure DevOps is easy but requires a bit of understanding of the Binding options available.

    Well, there were two types of Binding options

    1. Environment Binding – Single root folder binds to all the unmanaged solutions in the environment
    2. Solution Binding – Different solutions uses a different root folder in Azure DevOps for binding

    Note: Once the binding is setup, there isn’t away to change, so set this up carefully, else you may need to delete the folder and create a new one in Azure DevOps.

    Let’s see one by one…for demoing purpose, I have created two projects in Azure DevOps Instance

    1. Solution Binding: When we use this, all the components will be available as pending changes
    2. Environment Binding: When we use this, all the unmanaged solution components will be mapped to one Azure DevOps root folder. Let’s set this up.

    We are currently able to use only Solution binding, as Environment Binding doesn’t show up any changes to be committed, but there is a catch here.

    We can set up for Environment binding and verify if the Solution components are getting marked as pending changes or not. Do note that Setting up the Binding is a one time activity for environment, once setup, it can’t be changed from one type to another.

    Open https://make.powerapps.com and navigate to solutions and click on ellipses as below

    Once clicked on Connect to Git

    Since we were currently using Environment binding, let’s select the Connection Type as Environment

    Then click on Connect, once connected, you should a alert message in power apps maker portal at the top.

    Now create a new solution as below named ecellors Solution

    Verify the integration by clicking on Git Integration as below

    It should show as below

    Now let’s add few components to the solution we created

    Once added, let’s publish the unmanaged solution and verify it..

    Do look closely, you should see a Source Control icon highlighted in yellow color for illustration.

    Also, you should see a commit option available at the top

    You should now be able to commit the solution components as if you are committing the code changes.

    It also specifies the branch to which we were commiting…

    While it takes few minutes unlike pushing the code to Azure DevOps to push the changes, however this would depend based on the number of solution components you were pushing..once it is done, it will show a commit message like below…

    Now let’s verify our Azure DevOps Repo..for this you can go back to the main solutions page, click on Git Connection at the top..

    After clicking on Git Connection, click on the link to Microsoft Azure DevOps as below

    Then you should be navigated to Azure DevOps folder as below where all the solution files will be tracked component wise.

    Now we will move back to Power Apps maker portal and make some changes to any of the components inside the solution…

    Let’s say, I just edited the flow name and created a new connection reference, saved and published the customizations.

    If you did some changes at the Azure DevOps repo level, you can come back and click on Check for updates, if there were any conflicts between changes done in Azure DevOps and component in solution, it will be shown as conflict.

    We now have 3 component changes and all were listed here…you can click on Commit.

    As soon as the changes are committed, you should see a message saying Commit Successful and 0 Changes, 0 Updates, 0 Conflicts.

    Now you successfully integrated Dataverse Solution components with Azure DevOps without any manual intervention required while deploying solutions using Azure DevOps Pipelines.

    Hope you learned something new today…while feature is still in Preview and only available for early release, while couple of issues still need to fixed by Microsoft.

    I have tested this feature by creating an environment in US Preview region and this feature will be a good value to projects using Automation and this solution repository can be further deployed to other environments using Azure DevOps Pipelines.

    This will be rolled out soon next year, hope you learned something new today…

    Cheers,

    PMDY

    Using Preferred Solution in Power Apps saves you time..Quick Review

    Hi Folks,

    Today, I will be pointing out the advantages of using Preferred Solution and it’s consequences of using or removing it…while the feature is out there from quite few months, yet many of the Power Platform Projects are not utilizing this feature, it can reduce your hassles when many people are working together in a team and you can make sure everyone’s changes go to this solution.

    Here we understand what Preferred Solution means to the makers, firstly in order to use this affectively, let’s turn the feature to create Canvas Apps & Cloud Flows in Solutions by enabling this preview feature as suggested below from https://admin.powerplatform.com, this is not mandatory step but would be better as you can add Power Automate flows and Canvas Apps in the Solution and click Save.

    Next navigate to https://make.powerapps.com –> Solutions –> Set preferred solution

    If no preferred solution is set, by default, it will show the Common Data Service Default Solution to set as Default Solution, if you wish to set another Solution, you can select the respective Solution from the drop down.

    Enable/Disable the toggle to show Preferred Solution option in the Solutions Page.

    Just click on Apply.

    Advantages:

    1. Once preferred Solution is set, any components added by the makers would by default go the Preferred Solution, so makers need not worry about choosing right Solution while creating Power Platform Components.
    2. No need to worry if the solution components will be added in the default solution as the new components will be added to the preferred solution automatically.

    Limitations:

    1. Preferred Solutions can be only set in Modern Designer
    2. Components created in Classic Designer won’t go to Preferred Solutions
    3. Custom Connector, Connections, DataFlows, Canvas Apps created from Image or Figma Design, Copilots/Agents, Gateways

    You can always delete your preferred solution so that other makers can set their preferred solution, but do this with caution so that none of your team members or your works gets impacted.

    Hope this saves few seconds of your valuable time…

    Cheers,

    PMDY

    When to use NO-LOCK in SQL – Quick Review

    Hi Folks,

    Well this post is not related to Power Platform, but I want to bring it on here to specify the significance of using NOLOCK in Power Platform Implementations using SQL Server.

    Recently during our Deployment activity, we had a SSIS job which is writing a lot of data into SQL Server, at the same time, we were trying to read the data from the same table. I received never ending Executing query … message. It is when I had arguments on this, hence I would like to share the significance of NOLOCK.

    The default behaviour in SQL Server is for every query to acquire its own shared lock prior to reading data from a given table. This behaviour ensures that you are only reading committed data. However, the NOLOCK table hint allows you to instruct the query optimizer to read a given table without obtaining an exclusive or shared lock. The benefits of querying data using the NOLOCK table hint is that it requires less memory and prevents deadlocks from occurring with any other queries that may be reading similar data. 

    In SQL Server, the NOLOCK hint, also known as the READUNCOMMITTED isolation level, allows a SELECT statement to read data from a table without acquiring shared locks on the data. This means it can potentially read uncommitted changes made by other transactions, which can lead to what’s called dirty reads.

    Here’s an example:

    Let’s say you have a table named Employee with columns EmployeeID and EmployeeName.

    CREATE TABLE Employee (
        EmployeeID INT,
        EmployeeName VARCHAR(100)
    );
    
    INSERT INTO Employee (EmployeeID, EmployeeName)
    VALUES (1, 'Alice'), (2, 'Bob'), (3, 'Charlie');


    Now, if two transactions are happening concurrently:

    Transaction 1:

    BEGIN TRANSACTION
    UPDATE Employee
    SET EmployeeName = 'David'
    WHERE EmployeeID = 1;


    Transaction 2:

    SELECT EmployeeName
    FROM Employee WITH (NOLOCK)
    WHERE EmployeeID = 1;


    If Transaction 2 uses WITH (NOLOCK) when reading the Employee table, it might read the uncommitted change made by Transaction 1 and retrieve 'David' as the EmployeeName for EmployeeID 1. However, if Transaction 1 rolled back the update, Transaction 2 would have obtained inaccurate or non-existent data, resulting in a dirty read.

    Key takeaways about NOLOCK:

    • Pros: Reduces memory use, avoids blocking, speeds up reads.
    • Cons: May read uncommitted or inconsistent data.

    Using NOLOCK can be helpful in scenarios where you prioritize reading data speed over strict consistency. So, in my case as I want to just view the data, using NOLOCK is good without locking the query. However, it’s essential to be cautious since it can lead to inconsistent or inaccurate results, especially in critical transactional systems.

    Other considerations like potential data inconsistencies, increased chance of reading uncommitted data, and potential performance implications should be weighed before using NOLOCK.

    Conclusion:

    There are benefits and drawbacks to specifying NOLOCK table hint as a result they should not just be included in every T-SQL script without a clear understanding of what they do. Nevertheless, should a decision be made to use NOLOCK table hint, it is recommended that you include the WITH keyword. Using NOLOCK without WITH Statement is deprecated. Always use a COMMIT keyword at the end of the transaction.

    Hope this helps…

    Cheers,

    PMDY

    Is your plugin not running? Have you debugged? Plugin doesn’t run but your operation is successful when debugging…then try this out

    Hi Folks,

    Last few weeks was very busy for me, I missed interacting with the community.

    Here I would like to share one tip which can greatly help your debugging…

    Just to give a little background, I was working with the Plugins for Dynamics 365 recently where I was working with API, the Plugin seem to work fine when debugged using Profiler, I tested the piece of the Plugin Code in Console, it worked either, but Plugin is not working when the respective action which triggers the Plugin is being fired. I scratched my head, what is the problem…

    Just then, I tried using the below block of code, replaced the catch block of Plugin Code with below code.

    catch(WebException ex)
    {
    string stringResponse = string.Empty;
    int statusCode;
    using (WebResponse response = ex.Response)
    {
    HttpWebResponse httpResponse = (HttpWebResponse)response;
    statusCode = (int)httpResponse.StatusCode;
    using (Stream data = response.GetResponseStream())
    using (var reader = new StreamReader(data))
    {
    stringResponse = reader.ReadToEnd();
    }
    using (var ms = new MemoryStream(Encoding.Unicode.GetBytes(stringResponse)))
    {
    }
    }
    view raw Detailed Error hosted with ❤ by GitHub

    Soon, I observed from the detailed error message above function posted, it is failing because of version problem of the referenced DLL and current DLL version was not supported with my assembly.

    Soon I was able to reference my Plugin with correct DLL version which fixed the issue. No further debugging was needed.

    Hope this helps…

    Cheers,

    PMDY

    Another way to install Plugin Registration Tool for Dynamics 365 CE from Nuget

    Hi Folks,

    Are you a Power Platform or Dynamics 365 CE Developer, you would definitely need to work on Plugin Registration tool at any given point of time and having a local application for Plugin Registration tool greatly helps…in this post, I will show a little different way to install Plugin registration tool and that too very easily.

    Well, this approach is especially useful to me when I got a new laptop and need to work on Plugin Registration Tool where the Plugins already build for the implementation.

    First 3 ways might have known to everyone through which you can download Plugin registration tool…do you know there is fourth approach as well…

    1. From XrmToolBox
    2. From https://xrm.tools/SDK
    3. Installation from CLI
    4. See below

    Because there were limitations to use these approaches at least in my experience, I found the fourth one very useful.

    1. XrmToolBox – Not quite convenient to profile and debug your plugins
    2. https://xrm.tools/SDK – Dlls in the downloaded folder will be blocked and would need to manually unblock the DLL’s for the Tool to work properly
    3. CLI – People rarely use this.

    Just do note that the approach is very easy and works only if you have a Plugin Project already. Please follow the steps below

    1. Just open the Plugin project.
    2. Right click on the solution and choose manage Nuget Packages for the solution
    3. Search for Plugin Registration tool as below

    4. Choose the Plugin project and click install, confirm the prompt and agree the license agreement shown

    5. Once installed, next go to the Project folder in the local machine.

    6. Navigate to Packages folder, you should see a folder for Plugin Registration tool below

    7. There you go, you can open the Plugin Registration Application under tools folder. You can undo the changes for the Assembly it is linked to Source control.

    That’s it, how easy it was? Hope this would help someone.

    Cheers,

    PMDY