Thank you for visiting my blog today, this post is all about improving the performance of SSIS Data Flow Task which I would like to share with everyone.
Do you know, you can improve your SSIS Data Flow Task easily just by setting AutoAdjustBufferSize Property of your data flow task. If you already know this, you can skip further reading.
I already placed Balanced Data Distributors in my SSIS job, but the performance of Kingswaysoft CDS/CRM Component is not promising and too low.
Thank you for vising my blog today…I believe many of the Consultants or Power Platform professionals out there didn’t know about the HashSet available in .Net since version 3.5.
By the way, what is HashSet..here is a brief about it?
HashSet is a data structure which we mightn’t have come across, neither me until implementing one of my requirements. It offers several benefits compared to other data structures for specific use cases. HashSet is preferred and advantageous, here is a use case where HashSet can be useful than other Data Structures available…followed by Advantages and disadvantages.
Scenario: I have a requirement where I need to send an email to the owners of the record using Custom workflow when record is updated, I see many numbers of records are having same owner and hence same email addresses are being added to the To activity party which I want to prevent, it is then, I searched and found of this HashSet.
This file contains hidden or bidirectional Unicode text that may be interpreted or compiled differently than what appears below. To review, open the file in an editor that reveals hidden Unicode characters.
Learn more about bidirectional Unicode characters
In this way, you can get the owner of the record and add to the HashSet as shown above in the diagram. Also Hash Set can help prevent adding duplicate records making it an ideal way to deal in certain scenarios.
Advantages:
Fast Lookup: It is efficient for tasks that involve frequent lookups, such as membership checks.
Uniqueness: All elements are unique. It automatically handles duplicates and maintains a collection of distinct values. This is useful when you need to eliminate duplicates from a collection.
No Order: It does not maintain any specific order of elements. If the order of elements doesn’t matter for your use case, using a HashSet can be more efficient than other data structures like lists or arrays, which need to maintain a specific order.
Set Operations: It supports set operations like union, intersection, and difference efficiently and beneficial when you need to compare or combine sets of data, as it can help avoid nested loops and improve performance.
Hashing: It relies on hashing to store and retrieve elements. Hashing allows for quick data access and is suitable for applications where fast data retrieval is crucial.
Scalability: It typically scales well with a large number of elements, as long as the hash function is well-distributed, and collisions are minimal.
Limitations include:
Lack of order: It you need to maintain the order of elements, then this is a good candidate for your implementation.
Space usage: It is memory intensive and is not recommended when memory optimization is being considered.
Limited Metadata: It primarily stores keys (or elements), which means you have limited access to associated metadata or values. If you need to associate additional data with keys, you might consider other data structures like HashMap or custom classes.
I hope this gives an overview on using HashSet…however you can’t use Hash Set in all scenarios, it actually depends on your use case, please check the disadvantages too before using it… if you have any questions, don’t hesitate to ask…
I am a big fan of Power Automate…but this post is not about flows but features about Custom Workflow in Dynamics 365 CE.
Did you ever come across this problem where you were not able to debug custom workflow extension. I had come across this and this blog post is all about it…I successfully registered my Custom workflow, but it is not triggering at all.
So, I need to debug it to see what the exact issue was…as I am encounter this error.
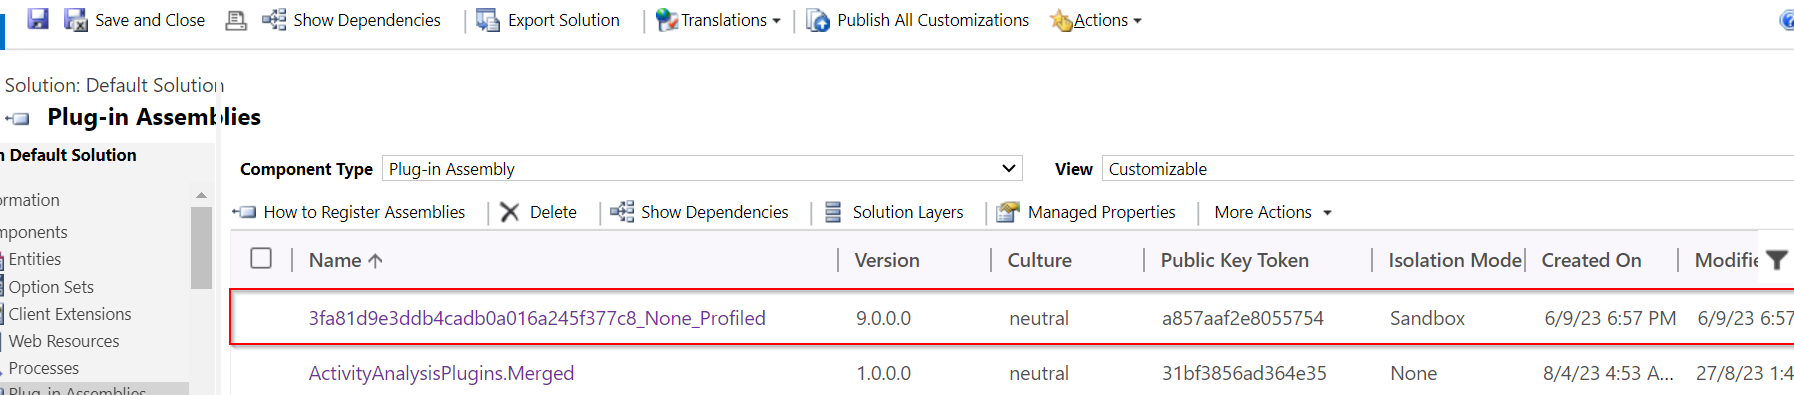
Error message says Duplicate workflow activity group name: ‘EcellorsDemo.Cases(1.0.0.0) (Profiled)‘. So, I tried to check my code, plugin steps and any activated plugins but couldn’t find any duplicates.
Usually while debugging your custom workflow using profiler, your workflow will go into draft mode and another copy of the same workflow gets created with name of (Profiled) attached to the name. However, in my case, I didn’t see the same behavior and at the same time, I was unable to use Profiler after the first profiling session and it gave me error shown above.
In order to resolve, this just delete the Plugin Assemblies which could find in the default solution like highlighted below…
Once you have deleted this, try to debug the custom workflow and voila!!!
Hope this helps someone troubleshooting Custom workflow…!
In the Dynamics 365 world, it’s all about efficiently handling the user requests. Whenever you add any user to the environment, the system will update the default personal settings for the user. Maybe you could have some processes in your system which is dependent on the user time zone. So, setting the time zone is very important. It is tedious to update the personal settings manually going to the user profile and updating it manually every time.
Of course, you have a wonderful tool in XrmToolBox from which we will be able to set the User Personal Settings in bulk so that we can update to all the users in one go. What if we want to automate this process, i.e. whenever you add a new user to the Dynamics 365 environment, you want to set that person time zone automatically without any manual intervention.
There you go…this post is for you then…you can do it simply using Plugin or Power Automate. In this blog post, we will see how we can utilize the Plugin as it is more effective approach.
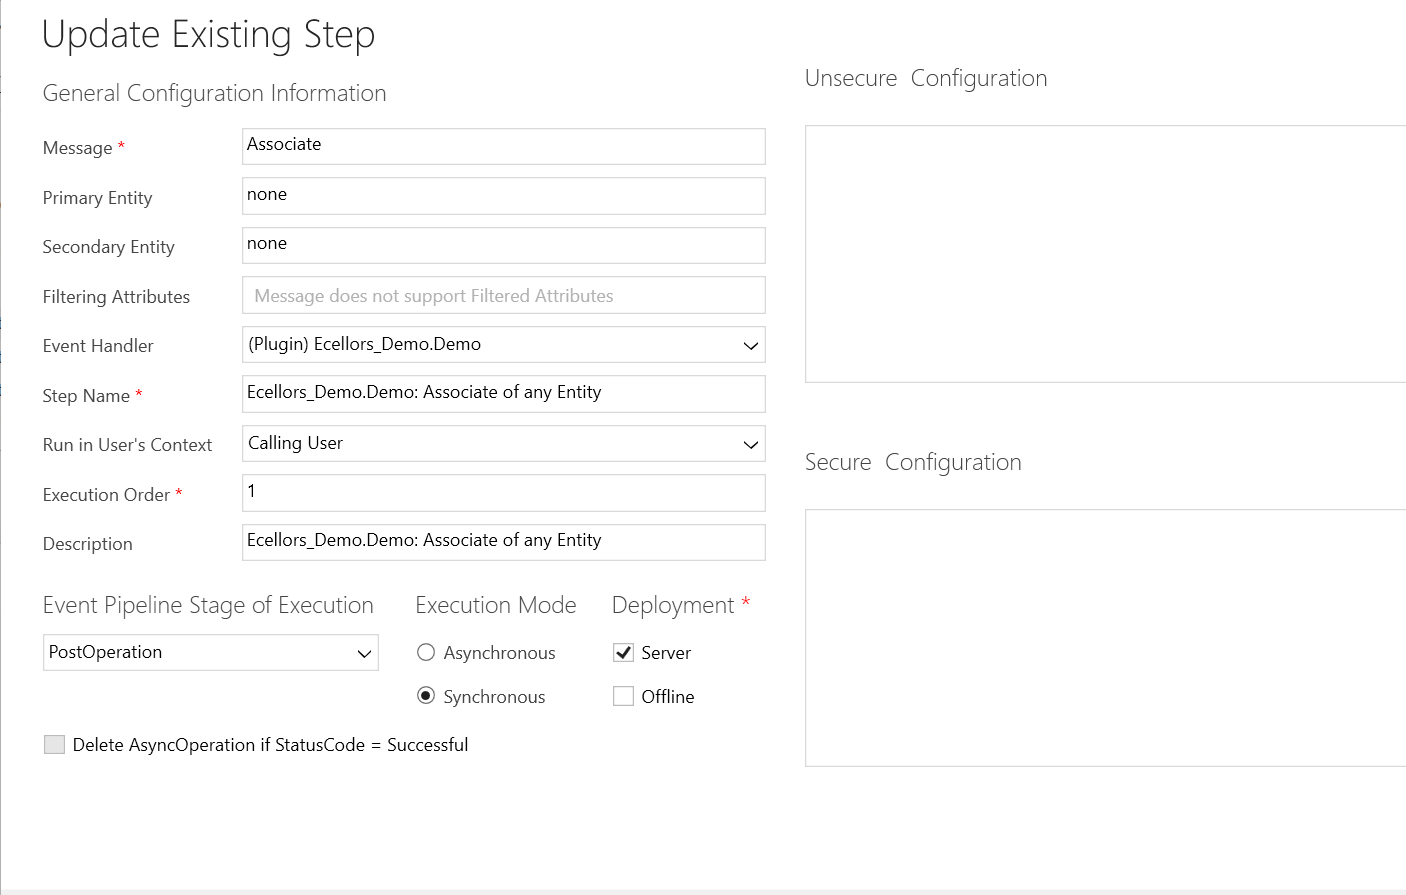
You need to write a Plugin on Associate Message.
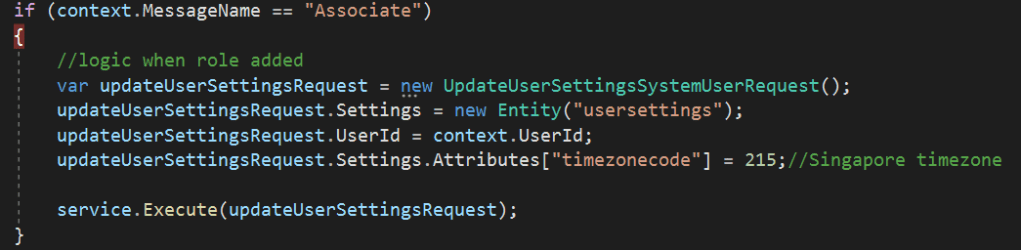
Just use this piece of code to set Personal settings…
This file contains hidden or bidirectional Unicode text that may be interpreted or compiled differently than what appears below. To review, open the file in an editor that reveals hidden Unicode characters.
Learn more about bidirectional Unicode characters
Update the personal settings as per your needs in this request. You can find all the attributes of the user settings table by using Fetch Xml Builder easily.
This post is for all who are working on D365 Model Driven Apps and mainly Plugins.
Yes, you saw it right, in this blog post, we will see how can debug plugin without using our favorite plugin profiler which is very widely used from quite some time by everyone working on Plugins for Dynamics 365. All this is done by a tool called Dataverse Browser, which is not yet on XrmToolBox. Please note that there were some limitations as detailed in limitation section below.
Here are 3 simple steps to follow..
Install Dataverse Browser
Attach the Debugger
Run your actual operation.
Step into your code and debug it.
The tool embeds a web browser based on Chromium. It works by translating the Web API requests to SDK requests. Then it analyzes if plugin steps are registered on the message and it loads them, make them run locally. All other requests are sent to the Dataverse, so that the plugins are interacting with the real database.
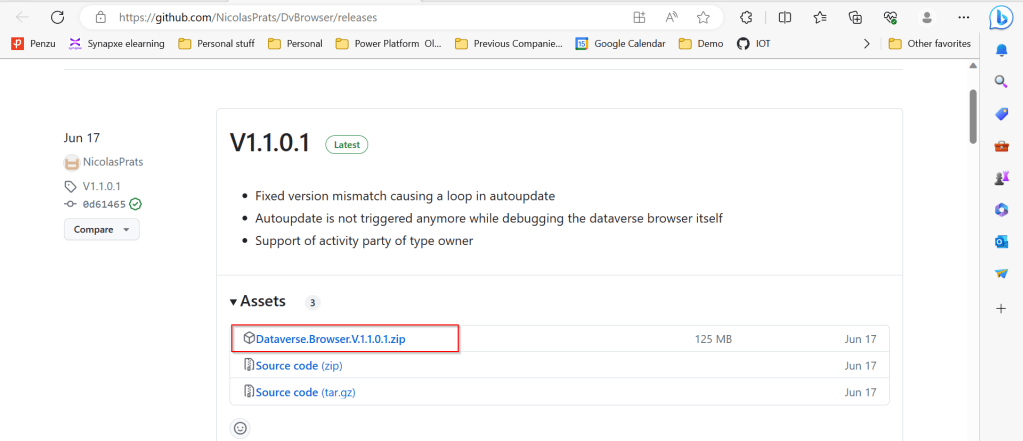
Download the latest source code of Dataverse browser here.
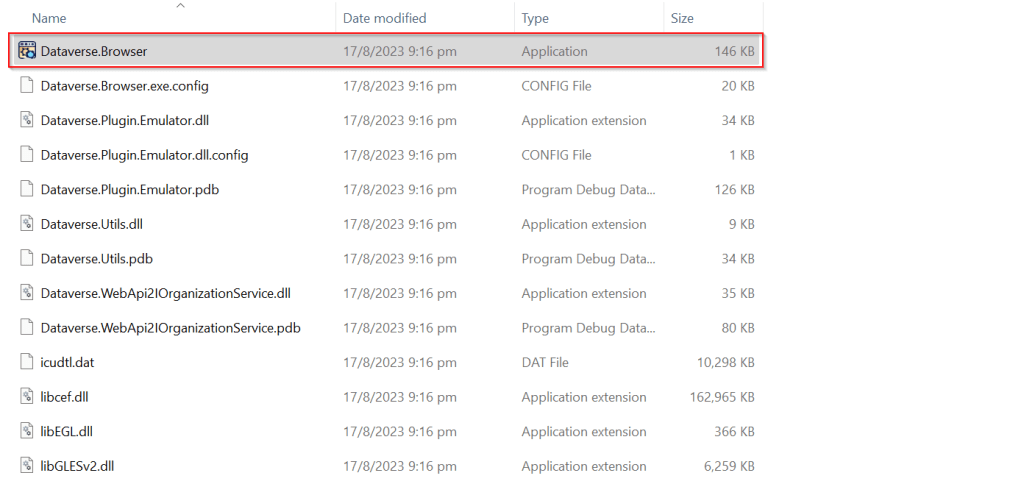
Next extract the zip file downloaded as highlighted below
Extract the zip file downloaded, open Dataverse.Browser Application as highlighted below.
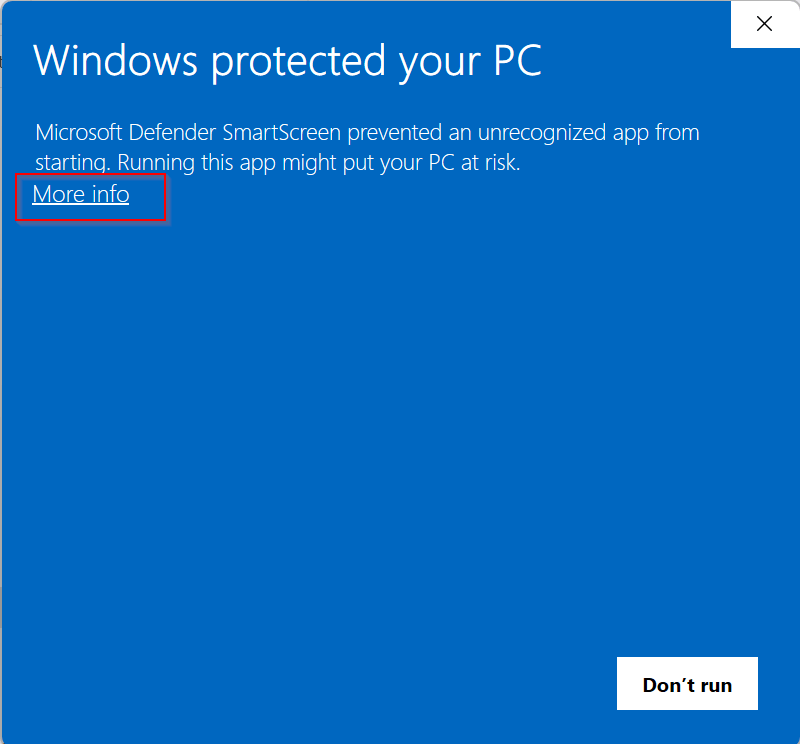
In the popup window, click on More info as highlighted below…
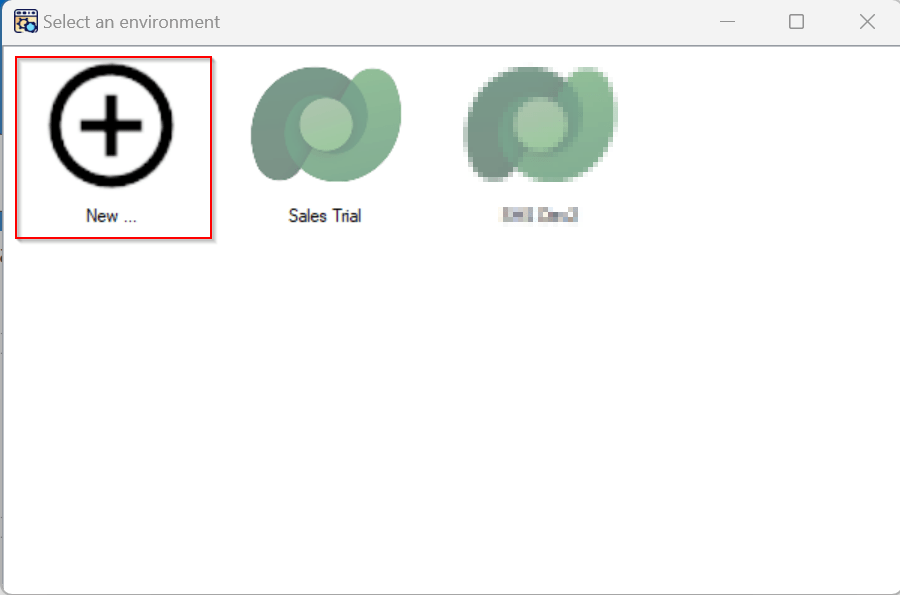
Then run the application anyway…you will be presented with a window where you can select the environment. Going forward, any time you want to open Dataverse browser, just open the Dataverse.Browser.exe and choose the environment as below.
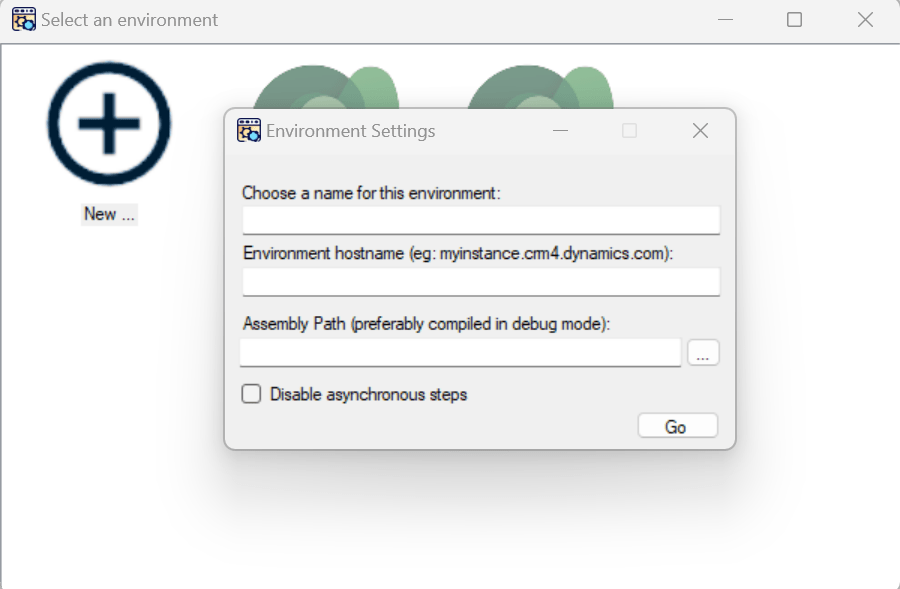
Click on New, enter the details as above and key in the details.
Enter the settings of your environment:
A name meaningful for you
The host name of your instance (without the https://)
The path to the plugins assembly file (the dll). For a better experience, it should be compiled in debug mode with the pdb file generated.
Then click Go.
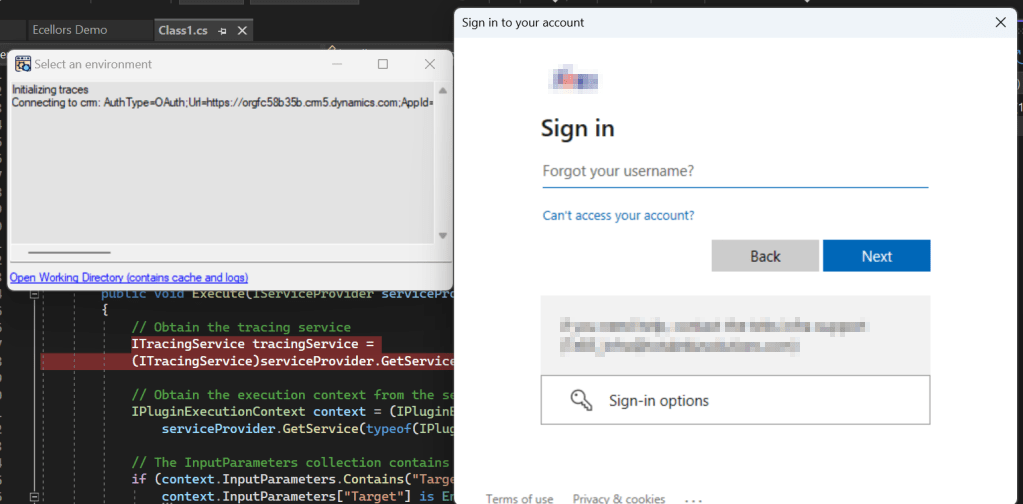
You just need to Authenticate to your instance.
Once Authenticated to the respective model driven apps, all the Web API requests sent to Dataverse will be shown as below.
I have following Plugin Libraries registered.
Next step is to choose the instance and perform the respective operation which triggers the Plugin. So, in here, I will perform an update to the Account entity from the Dataverse Browser which triggers the Plugin.
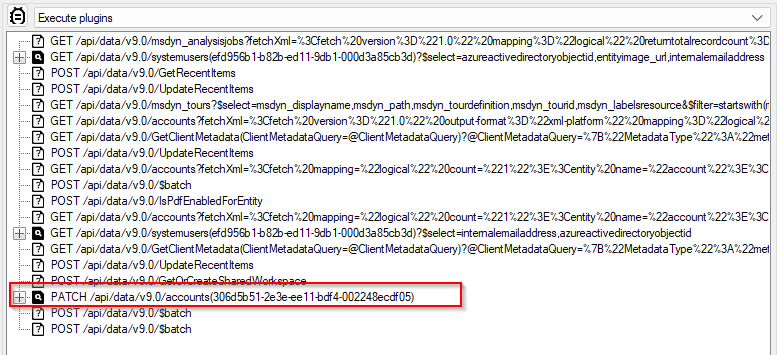
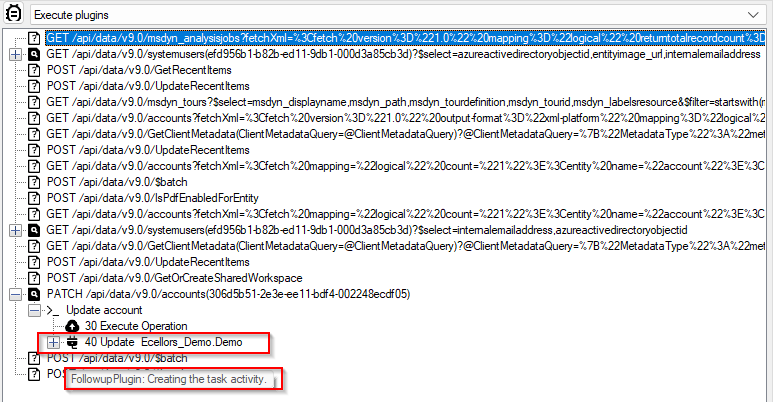
Once an update is performed, a Web API request gets recorded in the Dataverse browser as highlighted below.
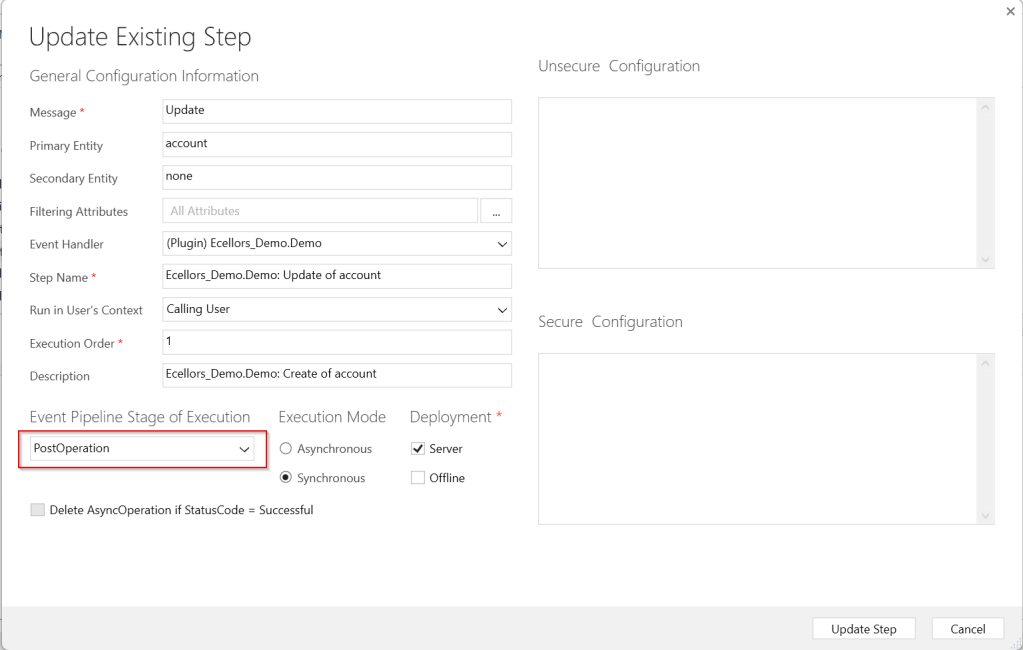
Since the Plugin is in Post Operation, i.e. Stage number is 40
Just expand the Patch Request, you should see two operations on 30, 40, but area of interest here is for the Plugin which was registered on stage 40.
Make sure you open the Visual Studio and perform the below steps from Dataverse Browser.
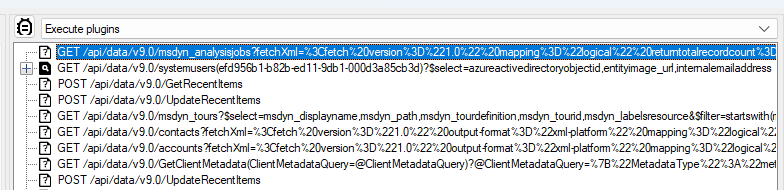
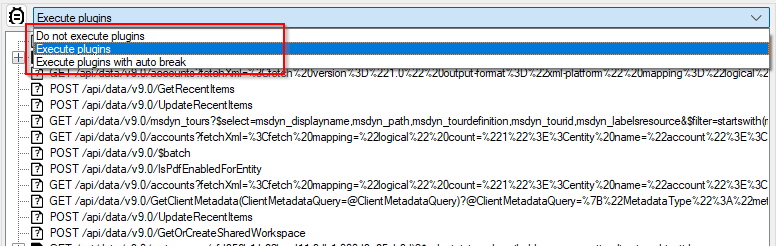
Attach the debugger from Dataverse Browser by clicking on the Plug Symbol as below which will show the list of debugger options available for you to select from. Here I have selected Execute Plugins, plugin will be invoked. You can either select any of the three options as presented below.
1.Do not execute plugins – recommended when you want to debug without actually triggering your plugin logic. i.e. With this approach even you can check the code in Production environment.
2. Execute plugins/Execute plugins with auto break – recommended when you want to debug by triggering your actual plugin, this is recommended in case your plugin code had changed recently and in Development environments.
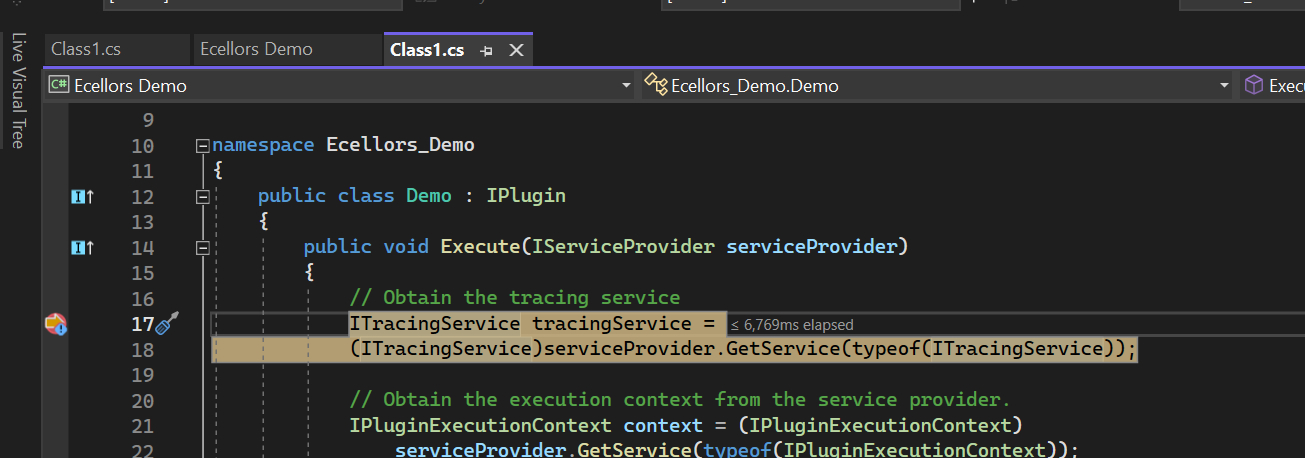
Just select Ecellors Demo – Microsoft Visual Studio: Visual Studio Professional 2022 version which will launch an existing Visual studio 2022 as below in break mode. Next click on Continue as highlighted below or press Click F5 on your keyboard.
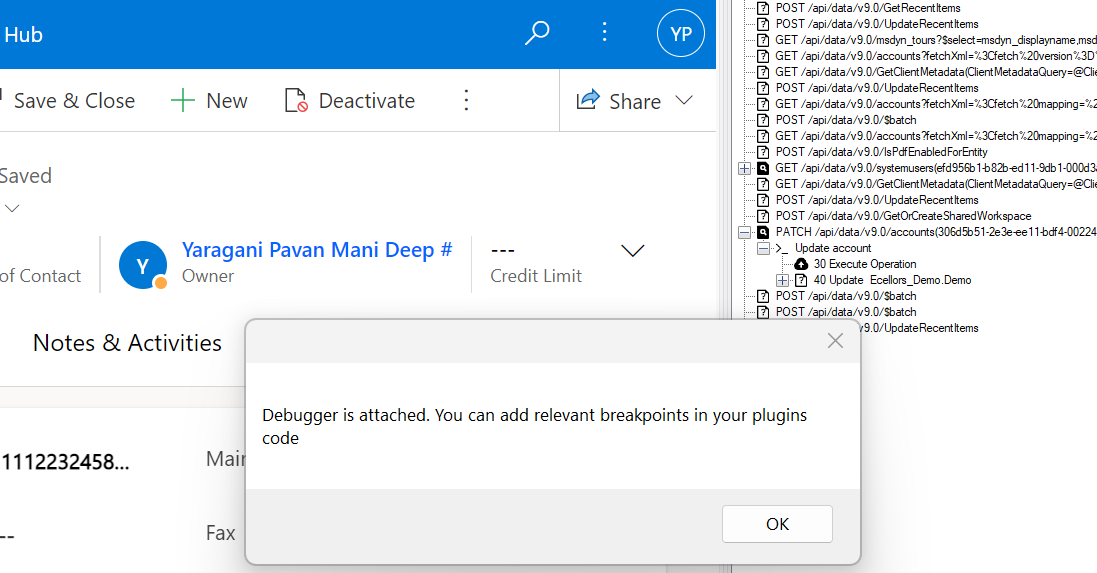
This shows you that the debugger has been attached when you navigate to Dataverse Browser asking you to place your breakpoints.
Now just place breakpoints in your code in Visual Studio. Just go back to Dataverse Browser and click on Ok on the Diaglog box.
Perform the operation which triggers the Plugin from Dataverse Browser itself, this will hit the break point in Visual Studio from where you can debug your plugin.
As you might have observed, your code need not throw exception in order to debug, you could do similarly to the way you would debug using Profiler. But here just that you don’t need to deploy the latest code to the Dataverse just for debugging purpose.
This gives a lot more flexibility eases the way you debug plugins.
Limitions:
There is no support for transactions.
When plugins are triggered because of a server-side operation, they will not be run locally.
For many reasons, behavior will never be perfectly similar to the one when plugins are executed on server side.
Happy debugging, I hope you found this post useful…
Do you know that you can connect to your Dataverse DB right from your old toolbox SSMS, an express version would be more than enough to try out. Possibly we didn’t think of, but yes, we can…so let’s see that in this blog post.
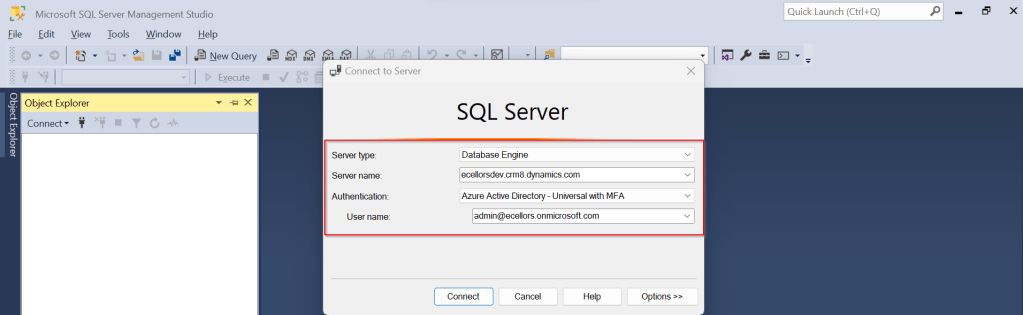
Open SSMS..
1.Select Server type as Database Engine
2. Server name as the environment URL from your Power Platform Admin Center as below.
3. So key in those details as below, make sure to Select Authentication method as Azure Active Directory – Universal with MFA option.
Once you click on Connect, you will be prompted for authentication via browser.
Once your Sign-In is successful, you will be able to see.
That’s it, how simple it was connecting to your Dataverse instances…
Having said that it’s easy to connect to Dataverse, not all operations performed using normal transact SQL are supported here using Dataverse SQL. You could see it says Read-Only besides the instance name, that means that you don’t have any capabilities to modify from SQL.
Because Dataverse SQL is a subset of Transact-SQL. If you want to see what statements are supported and what not, just go ahead to this link to find out.
This opens a whole lot of opportunities to explore, so don’t forget to check this out.
Did u ever been asked in your project to update the User Personal Settings….possibly you could have resorted to User Settings Utility in XrmToolBox…may be you could have updated the settings manually for each user in list provided to you…
Do you know you could update them in bulk at one shot in a much easier way, so you don’t need to update it manually one by one. I could see many blog posts talking about updating through this tool, but this was missed in those.
Scenario:
You have newly added users to your Azure Active Directory, now you need to set up the user personal settings for them so see proper time zone in Dynamics.
There were two ways:
Use a view
Choose users from FXB(Fetch XML Builder)
The first approach is easiest of course…
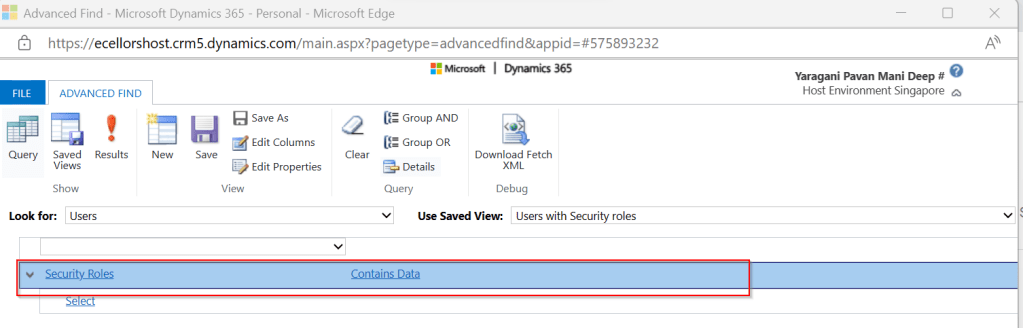
For this, lets create a view Users with Security in user entity as below…you know that you could only update settings for those who were having security role.
Mainly the user need prvReadUserSettings privilege to update the personal settings, the tool doesn’t allow if not.
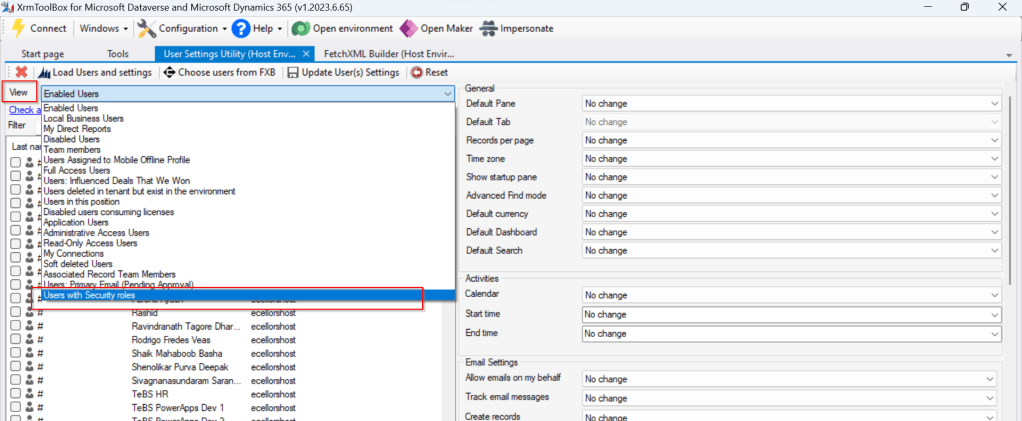
Once you have connected to the environment, click on Load Users and settings. Now just select the view which have created before…upon selecting the tool will list down all the active users satisfying the view criteria.
All you need is to click on Check all and there by selecting all the users satisfying your filter criteria, change the settings as per your needs on the right-hand side of the tool and click on Update User(s) Settings in one go.
Here I have 3 users in the view, all were updated in one shot…
Isn’t it easy, this trick will save you a lot of time if your user list grows…
In my previous blog post, I have already explained how you can utilize Power Pipelines which is the OOB Dynamics 365 Product capability.
Power Platform have many ways where we can deploy our solutions to higher environments…in this blog post, we will see how we can utilize Power Platform CLI to deploy our solutions.
Prerequisites: Power Platform CLI
If you don’t have installed yet in your machine, you can download Power Platform CLI from this link in either of the ways below
Once you got this installed, make sure you set your environment variable in your machine as below
Then you can use your favorite IDE or Command line. I personally recommend using Visual Studio Code because of the flexibility it offers and ease of installation, use.
Export and Import can be done very easily with CLI with a few commands once you were authenticated with your instance.
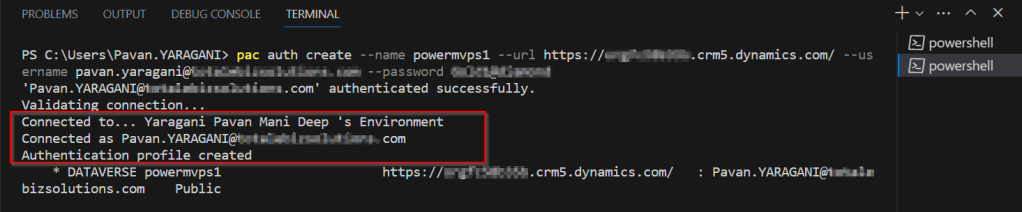
For authentication with your instance. Open a new terminal in visual studio code.
This file contains hidden or bidirectional Unicode text that may be interpreted or compiled differently than what appears below. To review, open the file in an editor that reveals hidden Unicode characters.
Learn more about bidirectional Unicode characters
Once you have set up correctly, it will show that it is connected.
Now in order to export your solution..use the below commands from Vs Code
This file contains hidden or bidirectional Unicode text that may be interpreted or compiled differently than what appears below. To review, open the file in an editor that reveals hidden Unicode characters.
Learn more about bidirectional Unicode characters
You should see a Solution zip file got created with the same name as mentioned above…
Similarly, u can import solutions using CLI..
Here I have a solution named ecellorstest in the same folder in my machine..
Let’s try to import using CLI..inorder to import your solution,use the below commands from Vs Code…
This file contains hidden or bidirectional Unicode text that may be interpreted or compiled differently than what appears below. To review, open the file in an editor that reveals hidden Unicode characters.
Learn more about bidirectional Unicode characters
In this blog post, let’s see how we can create a custom connector without leaving our own Visual Studio for building a custom connector. Ideally for building any custom connector, we need to create them in https://make.powerapps.com or https://make.powerautomate.com. Last month Microsoft Announced that Power Platform is now a connected service in Visual Studio 2022. In this blog, we will utilize its capability…
Before diving deeper, let’s see what are the prerequisites..
Visual Studio
ASP .NET Web API knowledge
Canvas Apps knowledge
Let’s get started..
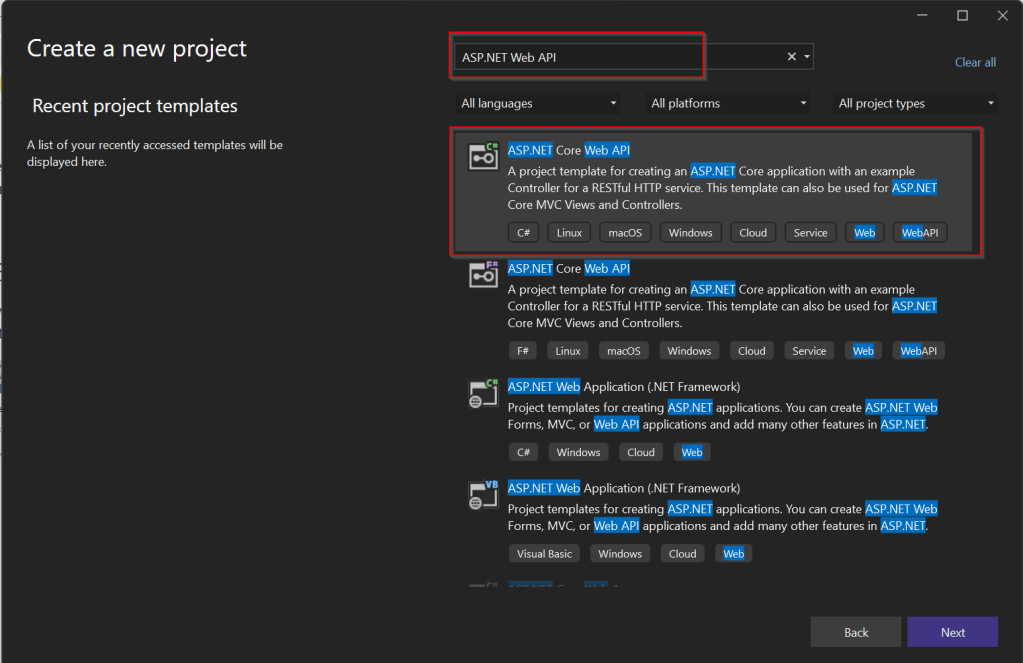
Step 1:
Create ASP.NET Web API Project in Visual Studio
Step 2:Choose your option as below and click on Next..
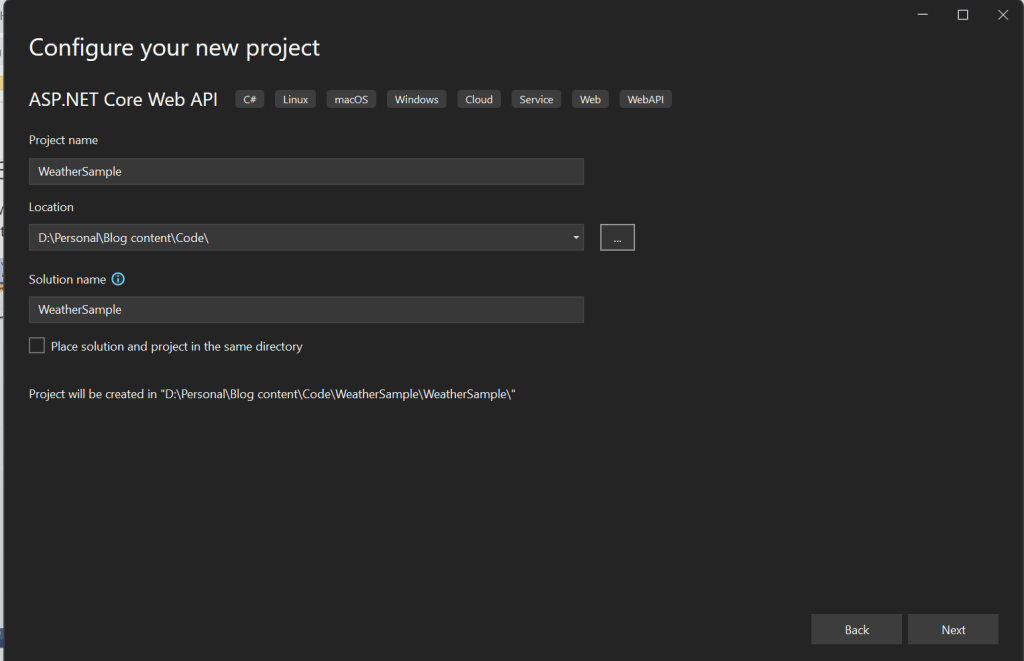
Step 3:
Choose your next steps as below and click on Next to proceed, make sure to choose authentication type as None
Step 4:
Create a ASP.NET Core Web API Project
Step 5:
By adding Power Platform as a service dependency, you can update an existing custom connector, or create a new one from your API.
If you want to expose your local running API to a public endpoint, I prefer using Dev Tunnels feature of Visual Studio…
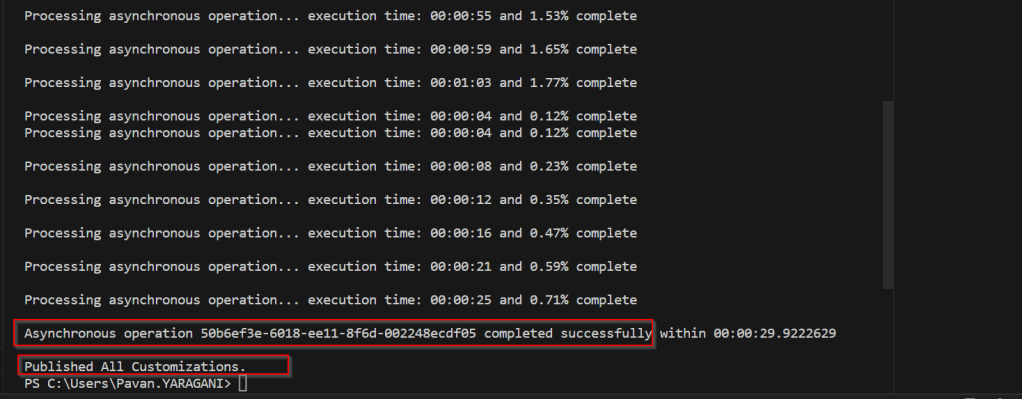
That’s it, you have started running your API.
Step 6:
Now let’s create a Mobile App with Power Apps…with the same login you have used for the Visual Studio to create a custom connector..
Step 7:
First check if Custom Connector has been created in your tenant and authenticate the connection….navigate to https://make.powerapps.com and click on Discover at the left of the page….and then click on Custom Connectors, you should see a connector which we created from Visual Studio….nice isn’t it…
Step 8:
All you need to create a connection by clicking on the + sign available..
Once connected, now try creating a mobile Canvas App..
In the Canvas App, try adding data…and search for Weather Sample which you created, you should see something like below…
Step 9:
Once the web API is running in your development environment, you can debug in real time and even Hot Reload your code.