Do you know you can change the Data type of an Primary column between Single Line of Text and Autonumber even after creation of your entity specifying a defined Primary Name Column. There is a catch….
So let’s see…
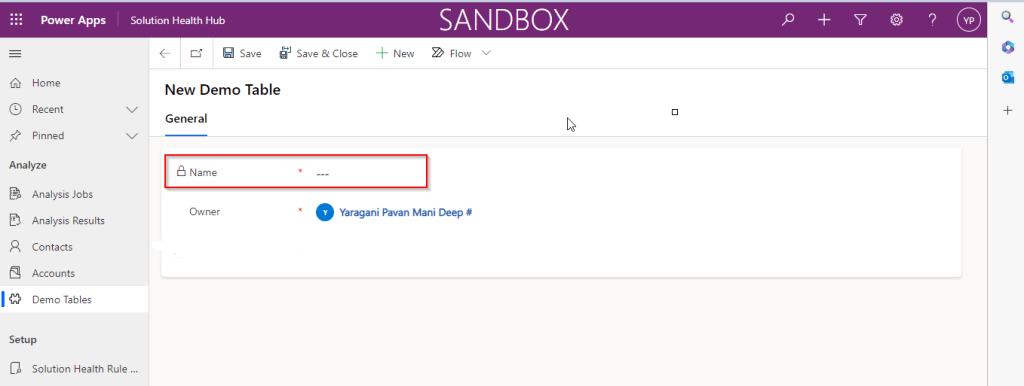
I first created a brand new Table called Demo Table and kept the Primary Column as Single Line of text. Earlier once the table is created, you will not be able to change the Primary name column if you wish to, the only way was to delete the table and re-create it with the correct type. But now you can change the type of the column at least to a unique autonumbering.
I want the Primary Name column to be unique, but when I look at the data in my table captured, I see many duplicates.
So let’s change the data type of the primary column data type to Autonumber.
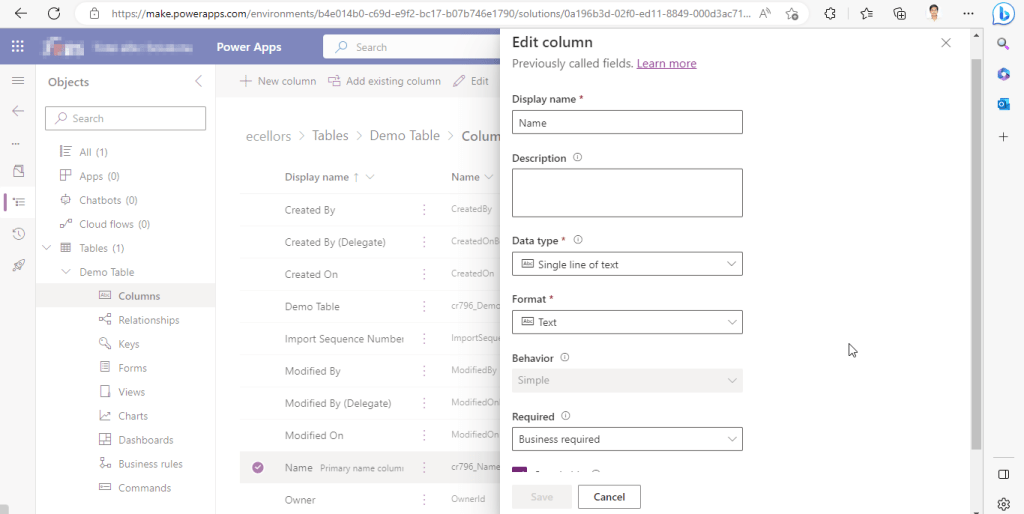
The primary field look as below initially…
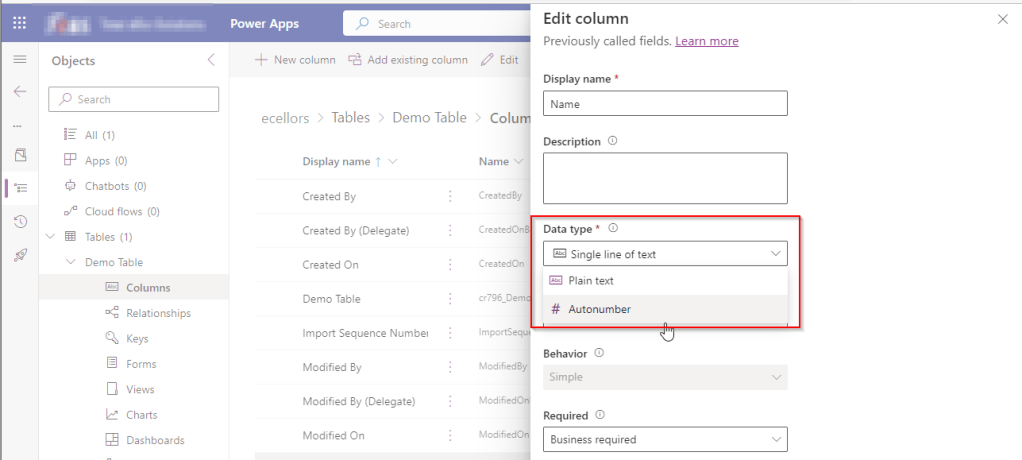
Select the Data Type available…
Now Select the Autonumber from the drop down available…you can optionally specify any custom prefix which you want for your Autonumber…and click Save and publish the customizations.
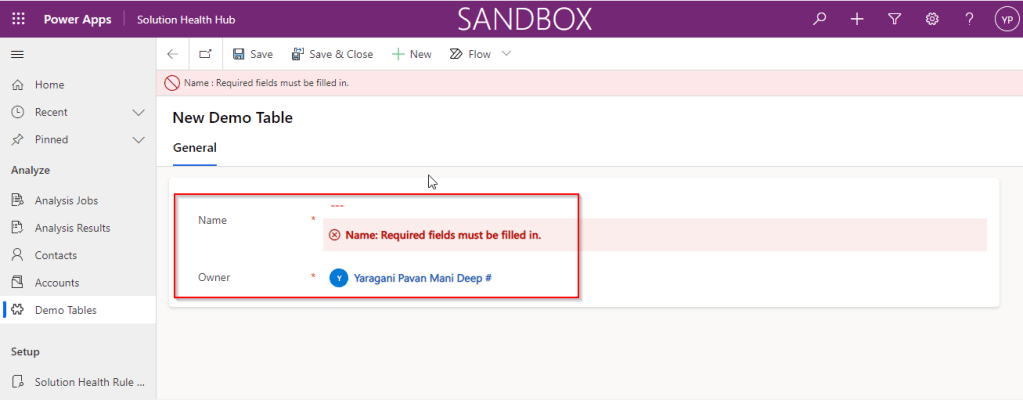
Now go back to your model driven app and then try creating a new record for the respective entity.
Since it was a primary field column, it is by default made mandatory…what’s up…the Autonumber column data type change is not reflecting….this is the same even if you check and publish the solution multiple times. Neither you can’t specify the field value because you already choose this to be an Autonumber and system should create it by itself.
If you were scratching your head, then this simple tip will help…
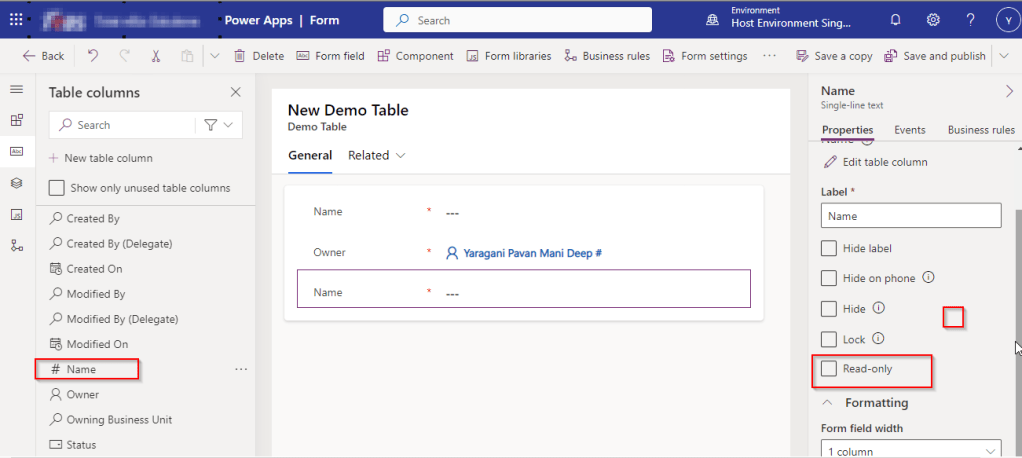
Just make the field read-only from the form where this field is being referred, so you don’t need to really enter value for it…then publish the customizations.
Once you have done…
Now try to save the record..
There you go, you can see an Autonumber being populated in the primary field…
This blog is just to let you know why you should stop implementing OData calls using V2.0 version. I am pretty sure almost every Dynamics CE project out there have used this OData calls definitely in their implementations from quite some time. While some of new implementations have replaced the logic using Web API, still some people go with using OData V2.0 calls to build their functionality using JavaScript.
Microsoft had actually planned to remove this endpoint from April 30, 2023. But they deferred this because many projects are’nt yet prepared for removal of this end point and help the customers prepare for this transition to Web API end point.
Identify if you still using OData V2.0 end point, actually Organization Data Service is an OData V2.0 endpoint which was introduced with Dynamics CRM 2011..it’s deprecated way back with Dynamics 365 CE version 8.0.
So now, how to identify where and all you were using OData End Points in your code…you shouldn’t expect that existing code will work with only minor changes and this work can be taken at a later stage. This was a high priority warning message from Microsoft stating the removal, so I urge all of you to be prepared for this removalvery soonand you shouldn’t be surprised.
So where to change…..?
Below are the places where you should change your way of implementation and align with Microsoft…
The Organization Data Service using this end point /XRMServices/2011/OrganizationData.svc in Javascript, you can find it out with the help of the checker service rule web-avoid-crm2011-service-odata for identification. This can be code which was making OData calls to perform CRUD Operations on the current table or related table.
Check any other code, including PowerShell scripts, that send requests to this endpoint: /xrmservices/2011/organizationdata.svc.
Cross Check your Power BI reports or Excel Data sources that may be using this endpoint.
Note:
This announcement does not involve the deprecated Organization Service SOAP endpoint, meaning using Organization service in plugins. At this time, no date has been announced for the removal of that endpoint. At the time of writing this blog post, Microsoft didn’t announce whether this removal is only for Online or On Premise Versions.
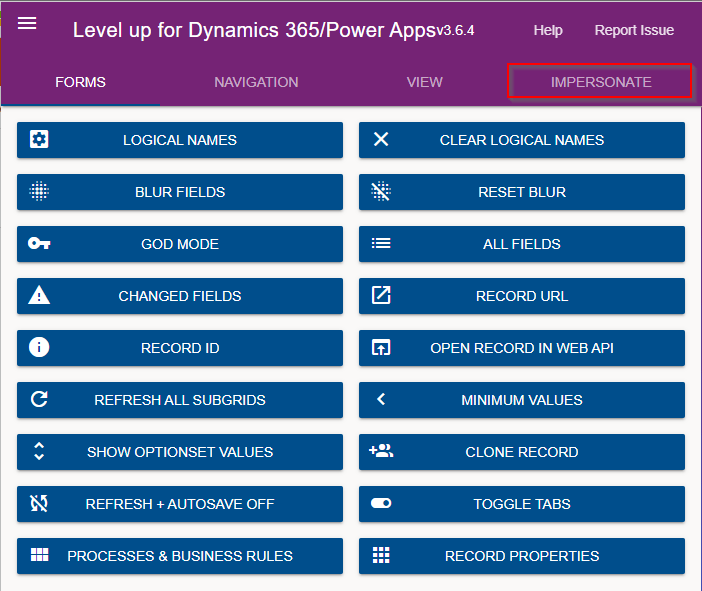
By this time, almost every Dynamics 365 Developer had some day or the other used Level up in their Custom Engagement consultant career.
While every one out in the Dynamics CRM Space know about the widely popular God mode available in Level Up which helps in the day to day administration and maintenance activity of CE applications.
Today in this blog post, lets see how we can achieve impersonation using Level up. We all know about impersonation in Dynamics CRM possibly using Plugins via Plugin Registration tool or directly through code.
But do you know, using Level Up, do you know that you even don’t need to write any piece of code but can impersonate to any user in the system with thin a few clicks right from your browser. If this interests you, just follow along…
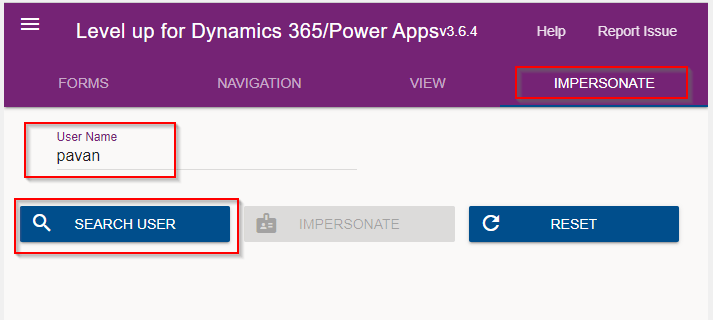
Just open the level up chrome extension. This is how your home screen look like once opened..to use this feature, just click on Impersonate as highlighted in the below image. For all this activity, I am logged in as Admin user to the system.
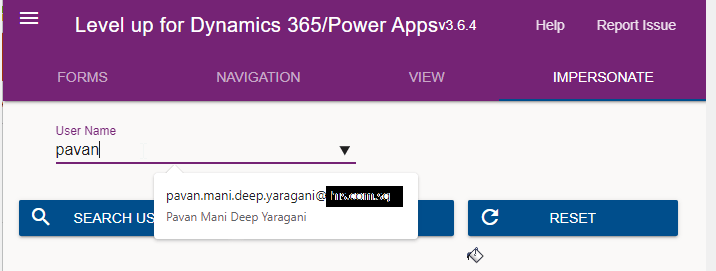
Next you can search with the username with whom you want to impersonate with i.e. here I would like to impersonate with my user account. You can search and impersonate with any user in the system.
Once you click on SEARCH USER
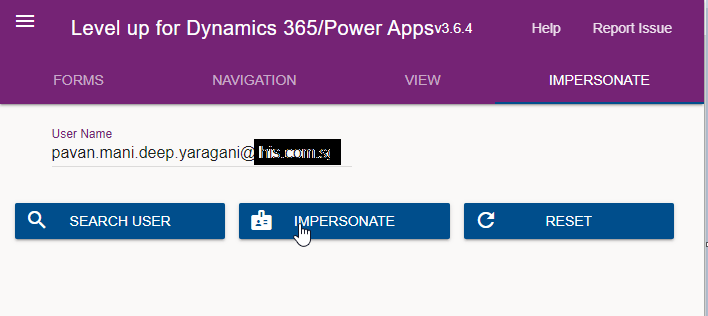
Upnext, click on impersonate button available as below
It opens a new window impersonated with the user account as the user choosen for the impersonation.
The screen shows as the user pavan is the logged in user…
Now you can perform all the operations same as what user pavan has…how cool is it…this feature perfects suits when you want to test out the application security roles where you would like to make a change to a user role and assign to other team member, test it without needing his/her presence. Cool to know, isn’t it….
References:
You can install the extension on Edge, Firefox and Chrome.
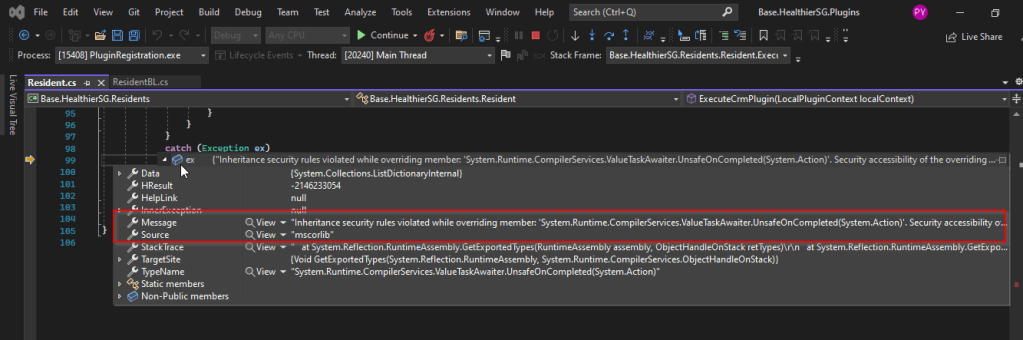
I recently came across the above error for one of my Dynamics 365 Plugins…this blog talks about applying a quick fix.
While debugging our Plugin logic line by line to understand why it’s not working, observed this error for messages like RetrieveMultiple, Retrieve when I use any Organization Service call.
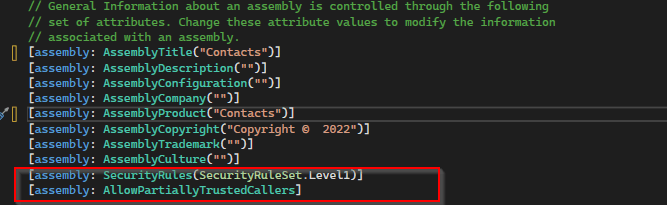
This was a .Net version downgrade issue caused by ILMerge as I downgraded one of the DLL to 4.6.2 version from 4.7.1. If you see this issue even without downgrading your DLL, you can use this fix.
After some research I came across this article and applied the same to my assembly which fixed the issue. Added these lines to my AssemblyInfo.cs class file..
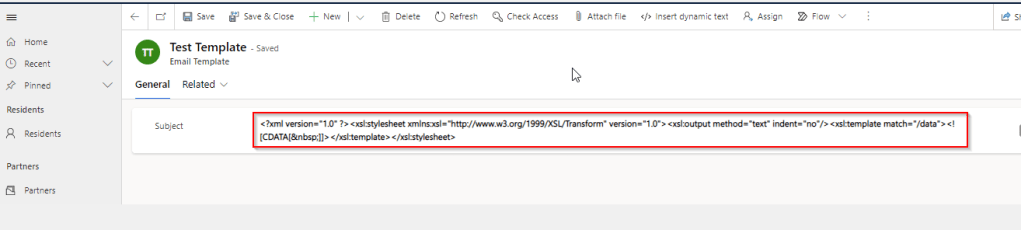
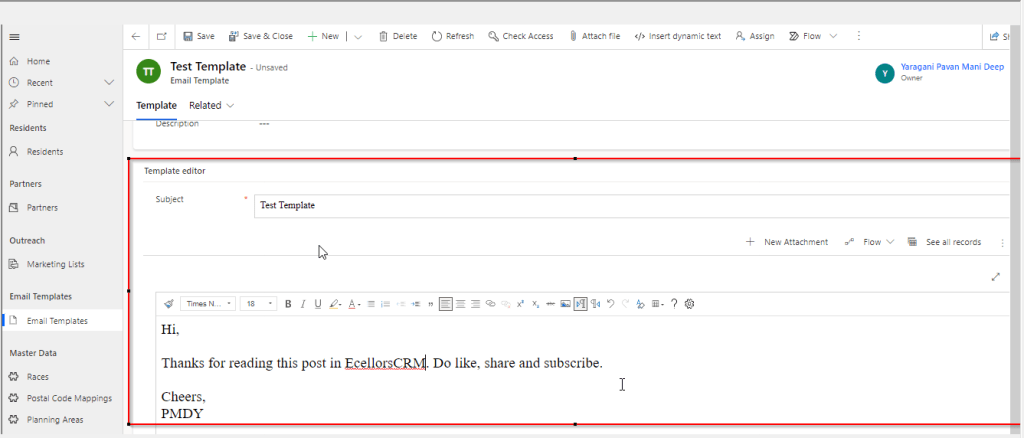
We recently came across a situation where the new and existing email templates keeps showing a xml as below.
This kept us annoying as already the existing ones are created using Rich Email Template editor. At first check, we verified in our Dev and SIT, badly we saw that this is same in both the environments. We double confirmed that no changes were made to the OOB Email template form, so we doubted that there was something wrong with our environment. Luckily we have one more environment where we able to see the email templates working fine. Then we confirmed that there is related to email template form related issue. Also when we tried to open the existing email templates in new designer from https://make.powerapps.com, they opened without any issue.
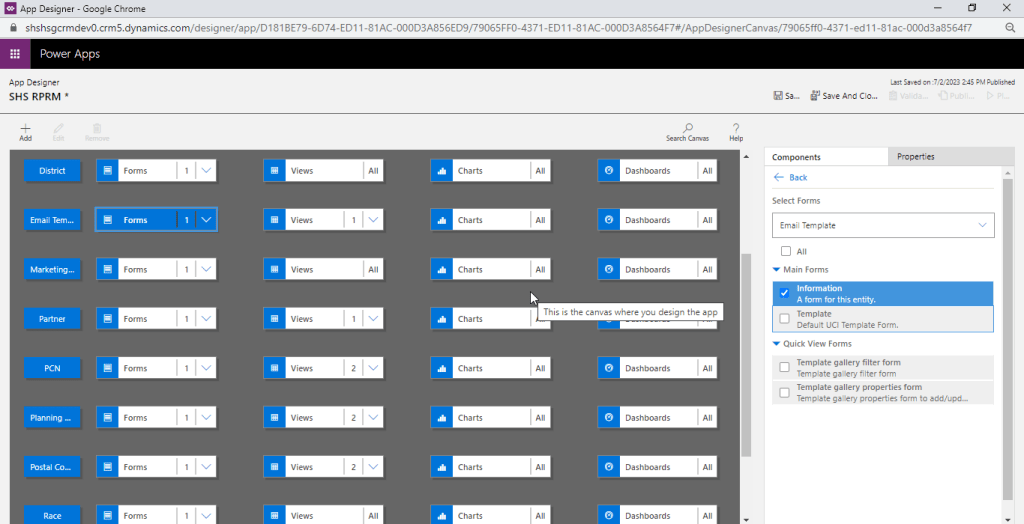
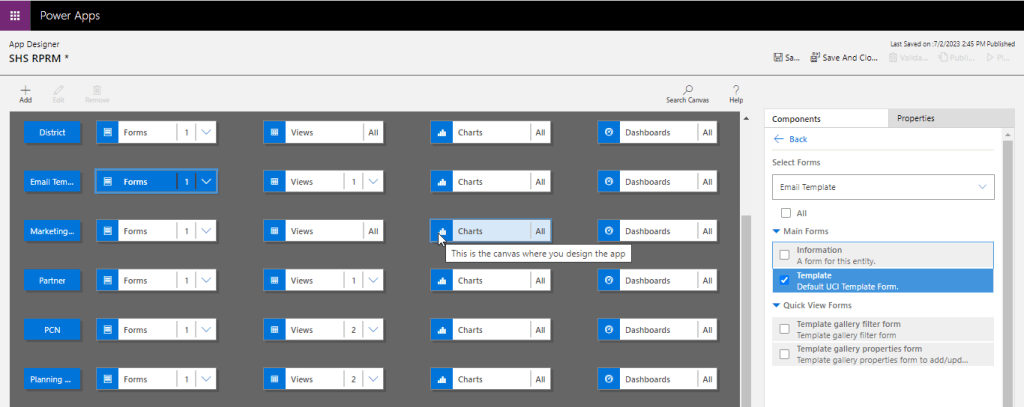
Fix: Open your model driven app in your custom solution created and launch it by double clicking on it. Just verify it the forms selected for Email Template entity….
The fix is quite obvious and there you are..inorder for email template to show properly, you should select Default UCI Template type form.
To start with this scenario, this is one of the most commonly asked functionalities when we talk about of adding members to marketing list using an excel import.
In this scenario, we will make use of Connections entity and associate the marketing list to the contacts on creation of the connection…ok…let us give it a try….we will make use of plugin here….which runs on Create and on Post operation and calls the below method…
 public void MarketingListImport()
        {
            Entity connectionER = (Entity)executionContext.InputParameters["Target"];
            Entity marketingList = new Entity();
            if (connectionER.Contains("record2id"))
            {
                EntityReference connectTo = connectionER.GetAttributeValue<EntityReference>("record2id");
                EntityReference connectFrom = connectionER.GetAttributeValue<EntityReference>("record1id");

                if (connectTo != null)
                {
                    marketingList = organizationService.Retrieve(connectTo.LogicalName, connectTo.Id, new ColumnSet("type", "createdfromcode"));
                }

                if (connectTo.LogicalName == "list")//Marketing list
                {
                    if (marketingList.Contains("type") && marketingList.GetAttributeValue<bool>("type") == false)
                    {

                        if (connectFrom.LogicalName == "contact" && marketingList.Contains("createdfromcode") && marketingList.GetAttributeValue<OptionSetValue>("createdfromcode").Value == 2)//Resident
                        {
                            // Add a list of contacts to the marketing list.
                            var addMemberListReq = new AddListMembersListRequest
                            {
                                MemberIds = new[] { connectFrom.Id },
                                ListId = connectTo.Id
                            };

                            organizationService.Execute(addMemberListReq);

                            tracingService.Trace("Contacts with GUIDs \r\n\t{{{0}}} is added to the list.",
                                connectFrom.Id);
                        }

                        else
                        {
                            throw new InvalidPluginExecutionException("Marketing list should be targeted at contact and contacts can be imported");
                        }
                    }

                    else
                    {
                        throw new InvalidPluginExecutionException("Members cannot be imported into a Dynamic Marketing list, please select a static marketing list and try again");
                    }
                }
            }
        }
    }
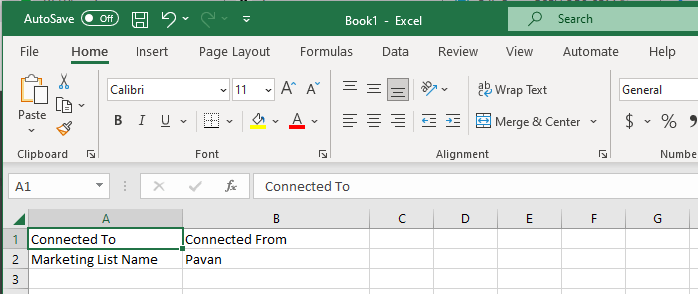
Once you were done writing the code, next step is to test the functionality…for this we will use the following template.
Import this template from the imports area under settings in your Dynamics 365…boom….the contacts in the template will be added to your Static Marketing List.
Every now and then when we were struck up with the issues with our code or with any power platform components like Power Automate, we had to definitely understand whether it is working from normal C# console application.
There were tons of articles over the internet and just it’s ophhhh…
So this post is just for a quick reference to connect to Dynamics 365 CE Instance to check if your actual function is returning valid data or not. I have just removed my functions for brevity.
You can just specify your Client Id, Client Secret, Instance URL below.
using System;
using System.Collections.Generic;
using System.Linq;
using System.Text;
using System.Threading.Tasks;
using Microsoft.Crm.Sdk;
using Microsoft.Crm.Sdk.Messages;
using Microsoft.Xrm.Sdk;
using Microsoft.Xrm.Tooling.Connector;
using System.ServiceModel;

namespace TestConsole
{
internal class Program
{
static void Main(string[] args)
{

        IOrganizationService orgService = GetOrganizationServiceClientSecret(your client id, your client secret, instance url);
        var response = orgService.Execute(new WhoAmIRequest());//To validate the request

        if(response != null)
        {
            Console.WriteLine("Connected to CRM");

            //Your function here
        }
    }

    public static IOrganizationService GetOrganizationServiceClientSecret(string clientId, string clientSecret, string organizationUri)
    {
        try
        {
            var conn = new CrmServiceClient($@"AuthType=ClientSecret;url={organizationUri};ClientId={clientId};ClientSecret={clientSecret}");
            return conn.OrganizationWebProxyClient != null ? conn.OrganizationWebProxyClient : (IOrganizationService)conn.OrganizationServiceProxy;
        }
        catch (Exception ex)
        {
            Console.WriteLine("Error while connecting to CRM " + ex.Message);
            Console.ReadKey();
            return null;
        }
    }
}

}
Whenever you want to check any thing from C# Console, I hope this piece code works for connecting to your Dynamics.
In today’s world, all the modern software applications use API for the front end to communicate with the backend systems, so lets see as it is very important for every developer working on Azure and API’s. Basically this is a PAAS Service from Azure. Follow along if you would like to know more details on this.
In short APIIM is a hybrid and multi cloud platform used to manage complete API life cycle. Azure API Management is made up of an API gateway, a management plane, and a developer portal.
Caching response to improve performance
Limit the number of API Calls
Security API and providing access
Interface to test API calls
API Analytics
Package related API Services
Transforms your API’s without
API Gateway is the first point of contact for any requests for your API which will route your requests to the appropriate backends. Imposes additional security restrictions with the help of JWT tokens and other certificates. Responses can be cached so that the API response could be faster.
Emits logs, metrics, and traces for monitoring, reporting, and troubleshooting
API Management are highly configurable, with control over URL mapping, query and path parameters, request and response content, and operation response caching.
Groups helps to provide conditional viewing capabilities.
Policy can help to change the behavior of an API without any code changes, this is well suited for your production API’s.
Also its easy to integrate API Management with all the other Azure Service available in the market.
Now lets go into the hands on by creating an APIIM simply from Azure.
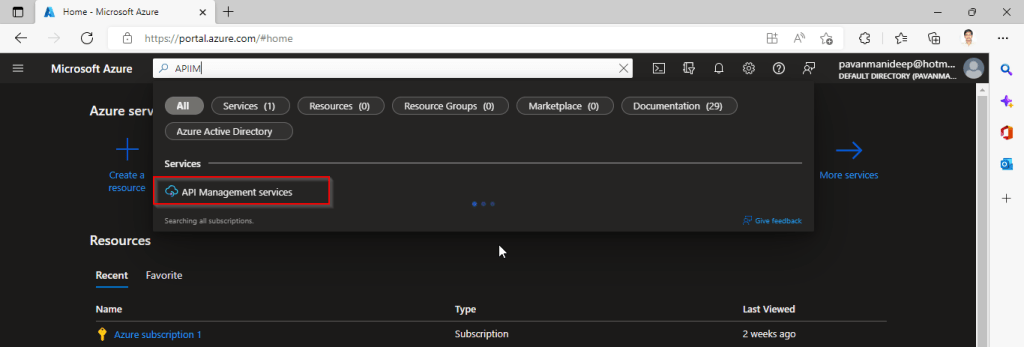
Go to Home – Microsoft Azure and search for APIIM and select API Management services and click on Create.
Input all the details, it was pretty self explanatory, coming to the pricing tier you could select based on your project needs and use case. Click on Review and Create and then Create.
It will take few minutes for the deployment to complete and you can use it.
The below Power point slide presentation is complete resource which can help you with all your queries related to Azure API Management.
I hope this gives you a bit of introduction to Azure API Management, now lets see how you can use this in your Power Platform Solutions.
For this, once your API ready, all you have do is to export your API’s from Azure API Management to your Power Platform Environment. With this the citizen developers can unleash the capabilities of Azure where the API’s are developed by professional developers. With this capability, citizen developers can use the Power Platform to create and distribute apps that are based on internal and external APIs managed by API Management.
Steps to follow would be as below:
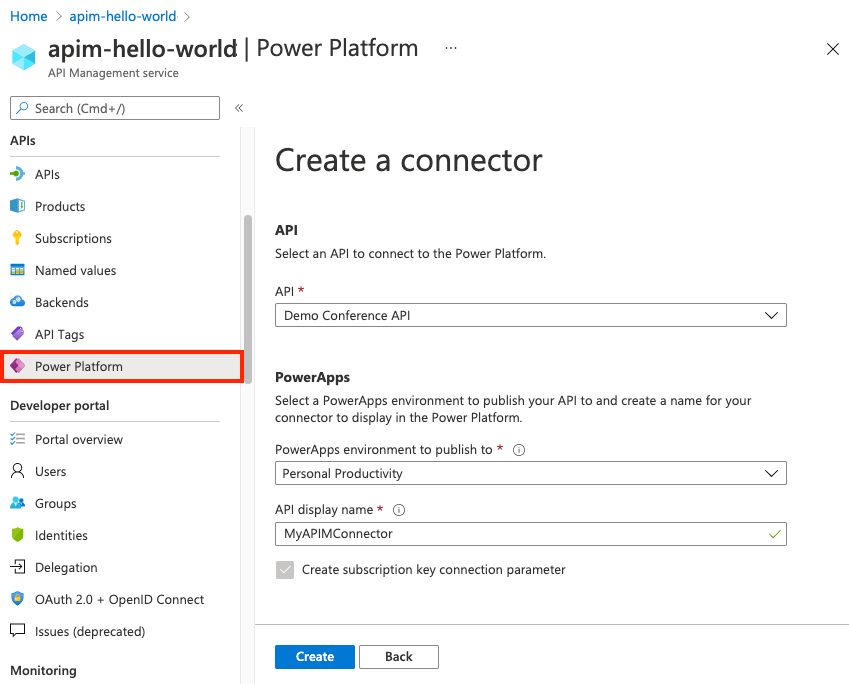
All you need to do is to create a custom connector for your API which can be used in Power Platform like Power Apps, Power Automate etc.
Navigate to your API Management service in the Azure portal.
In the menu, under APIs, select Power Platform.
Select Create a connector.
In the Create a connector window, do the following:
Select an API to publish to the Power Platform.
Select a Power Platform environment to publish the API to.
Enter a display name, which will be used as the name of the custom connector.
Optionally, if the API doesn’t already require a subscription, select Create subscription key connection parameter.
Optionally, if the API is protected by an OAuth 2.0 server, provide details including Client ID, Client secret, Authorization URL, Token URL, and Refresh URL.
Select Create.
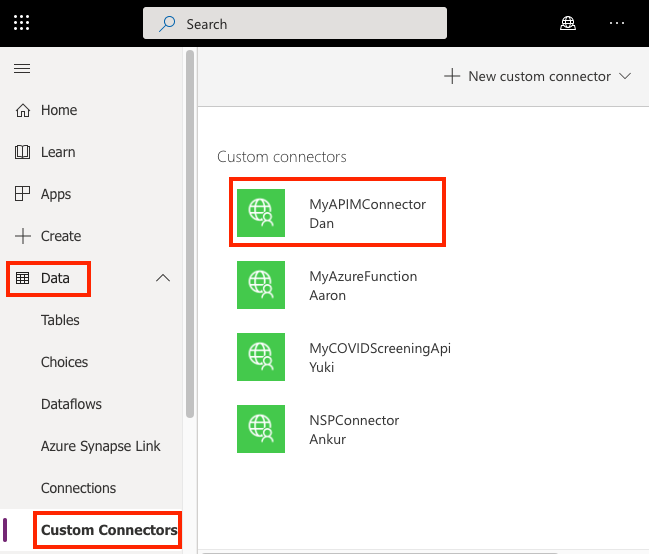
Once the connector is created, navigate to your Power Apps or Power Automate environment. You will see the API listed under Data > Custom Connectors.
I hope this will give you a complete picture about API Management in Azure…if you have any further queries, don’t hesitate to comment here…
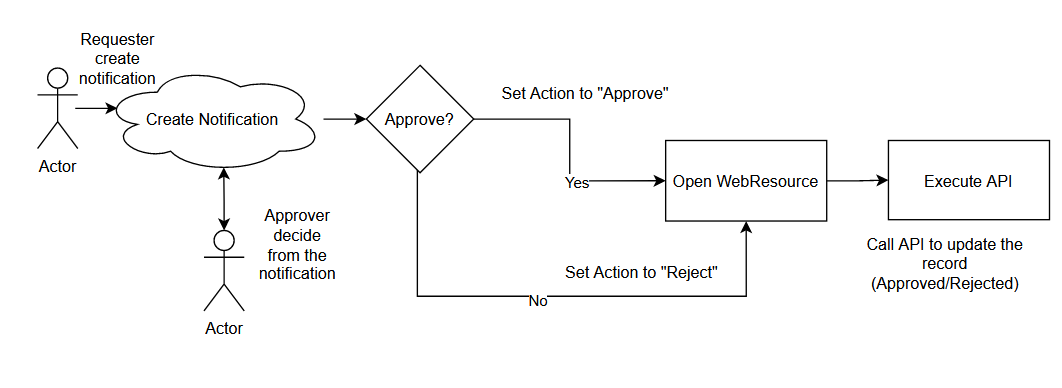
Do you know the In-App Notification feature from Model Driven Apps? This feature can create a notification that targeted a specific User. We also can add action to the notification so the User can also interact with multiple actions (now is limited to just an open URL). In short, this feature is very useful for creating the Approval process. Without further ado, let’s go to my proposed solution! 😎
The Necessary Part
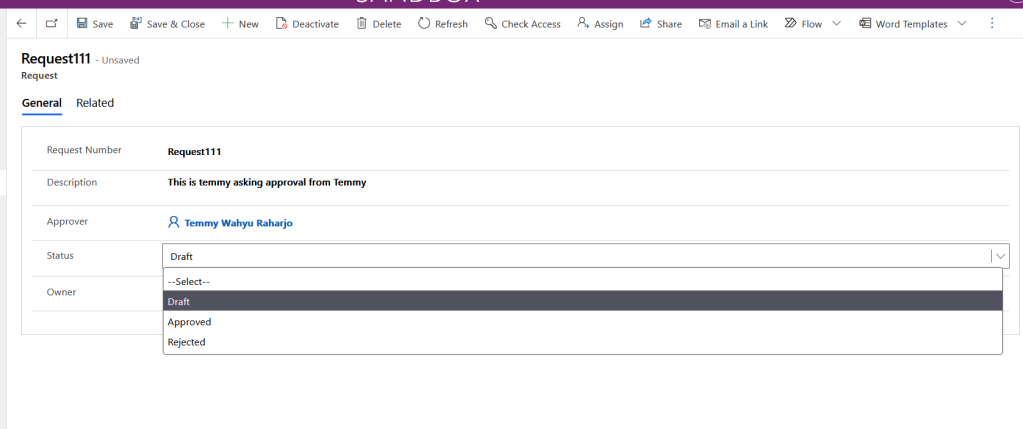
I created the below table for this demonstration purpose:
Request Table
As you can see, the User will fill in the Approver that needs to approve the request. Then in the status field, there are 3 options which are Draft, Approved, or Rejected.
For the next one, you need to create a Model-Driven App. The reason for it is because we need to turn on the feature from the Settings (in top-left from the App > go…
Recently I was trying to move the Plugins within a solution to another environment where I started to face the above mentioned error.
After checking found that the user who is deploying solution didnt have deployment administrator role. For this we need to provide Deployment administrator to the user who was actually deploying the solution, you will find deployment manager for your Dynamics Onpremise instance.
Once deployment administrator role is added, you should be able to move the solution.