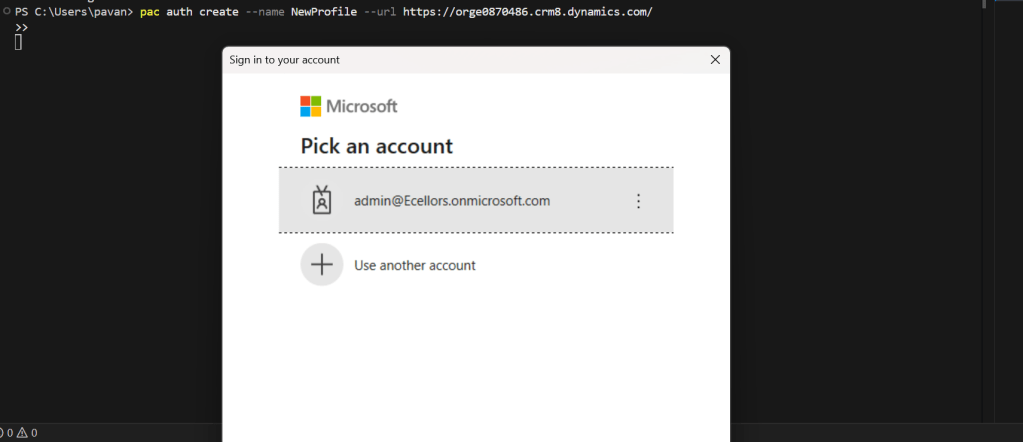
After installing the prerequisites, I was trying to connect to my Power Pages available in my organization from VS Code terminal using below command.
pac paportalist
It’s then I encountered the below error
It’s then I understood that due to inactivity, it is failing…
Your Power Platform CLI connection is failing due to an expired refresh token and an ExternalTokenManagement Authentication configuration issue. Here’s how you can resolve it:
Do you know that you can connect to your Dataverse DB right from your old toolbox SSMS, an express version would be more than enough to try out. Possibly we didn’t think of, but yes, we can…so let’s see that in this blog post.
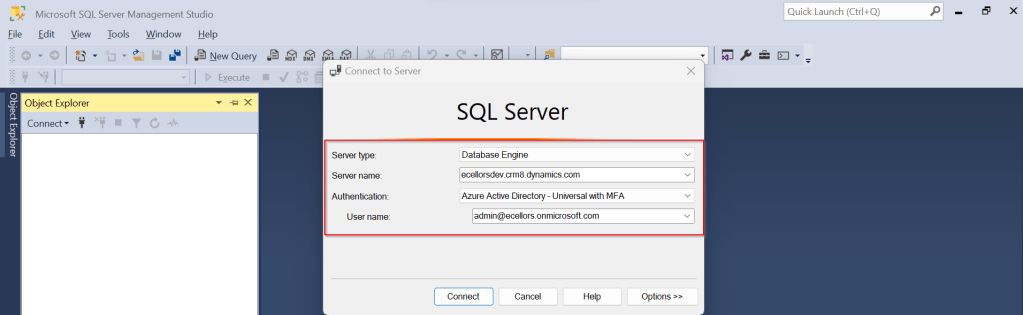
Open SSMS..
1.Select Server type as Database Engine
2. Server name as the environment URL from your Power Platform Admin Center as below.
3. So key in those details as below, make sure to Select Authentication method as Azure Active Directory – Universal with MFA option.
Once you click on Connect, you will be prompted for authentication via browser.
Once your Sign-In is successful, you will be able to see.
That’s it, how simple it was connecting to your Dataverse instances…
Having said that it’s easy to connect to Dataverse, not all operations performed using normal transact SQL are supported here using Dataverse SQL. You could see it says Read-Only besides the instance name, that means that you don’t have any capabilities to modify from SQL.
Because Dataverse SQL is a subset of Transact-SQL. If you want to see what statements are supported and what not, just go ahead to this link to find out.
This opens a whole lot of opportunities to explore, so don’t forget to check this out.
This blog post is just an observation from my experiences of getting the latest version of code from a remote development feature branch cloned from the main branch. I didn’t observe this my first sight and because of couple of other issues, I had overseen this, spent over a half an hour and I had to giggle after knowing this.
If you were aware, as of my last update in September 2021, Azure DevOps and Visual Studio have been integrated to support seamless code collaboration and version control.
So usually in day-to-day activities of any Developer working Microsoft Technology stack, Pull, Push, Clone, Merge of Azure DevOps repository directly from Visual Studio is quite common.
Usually, to clone a repository from Azure DevOps, you follow the below steps.
Step 1: Open Visual Studio of any version, preferably after VS 2017 Step 2: Click on Clone the repository.
Step 3: Enter the Azure DevOps Repository URL and provide the path in the prompt.
Step 4: Select your respective repository and click on Sign in
Step 5: Once you are done click on Clone, all your source code is now available in your IDE (Visual Studio)
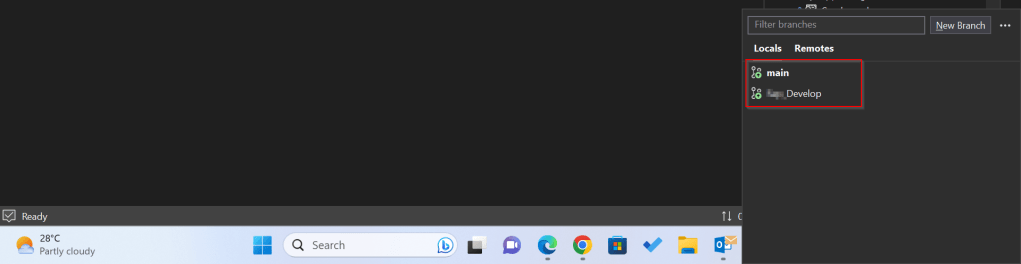
There might be cases when you check and see you were not able to get the latest changes from your feature branch, those were present in the repo but not in your Visual Studio. Closing the Visual Studio and redoing the Cloning process didn’t help. Then I thought it could be because of Cache of Visual Studio in my PC, so I tried clearing cache following my favorite blog post written earlier in this blog. Even this didn’t help either, thanks to my buddy Mallikarjun C who gave me the clue and here it goes.
Whenever you were cloning a solution using above approach, ideally you will be checked out to the Main branch and not the feature branch which you were expecting to be checked out to, as Main is set as Default branch.
If you just see below, it wasn’t checked out to Develop, instead it was main. By default, with this approach, you will by default checked out to main branch.
Hence you were seeing the changes of the main branch itself and not the Develop branch.
Instead of this, as I learned I suggest you clone directly to your favorite IDE from Azure DevOps itself in few clicks.
Step 1: While you are in your respective branch in Azure DevOps, click on Clone option as highlighted below.
Step 2: It will then ask you to choose the IDE to which you can download the source code.
As a Power Platform Admin/Consultant…did you often worry about your Power Platform Request Limits and usage left…? Do you receive warning messages from Microsoft regarding the usage of your database exceeded..? Want to see what are Custom Plugin Errors encountered while using your Model Driven App targeting Dataverse….then want to consolidate them and forward to your team to look into the issues without much efforts….then you were in the right place…
Expand Resources to the left…to find the Capacity menu
If you just want to know only the data usage, then you can ahead and click on Download as shown above to get one.
Want to get in depth analysis…then click on Details as highlighted in the same snap above.
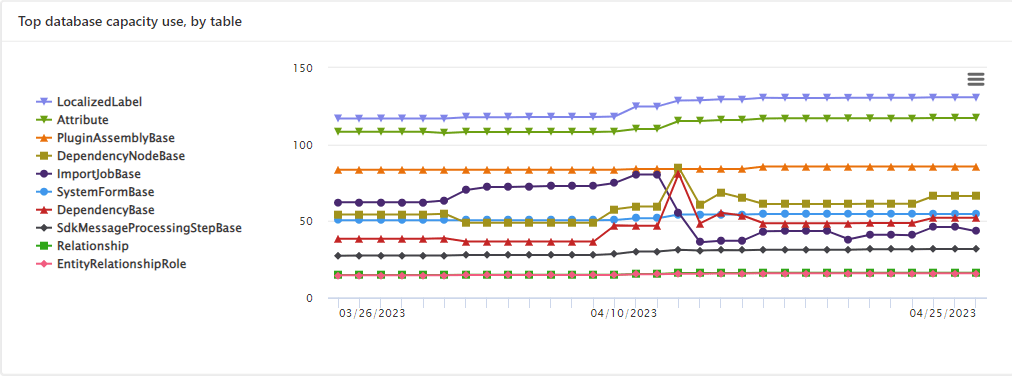
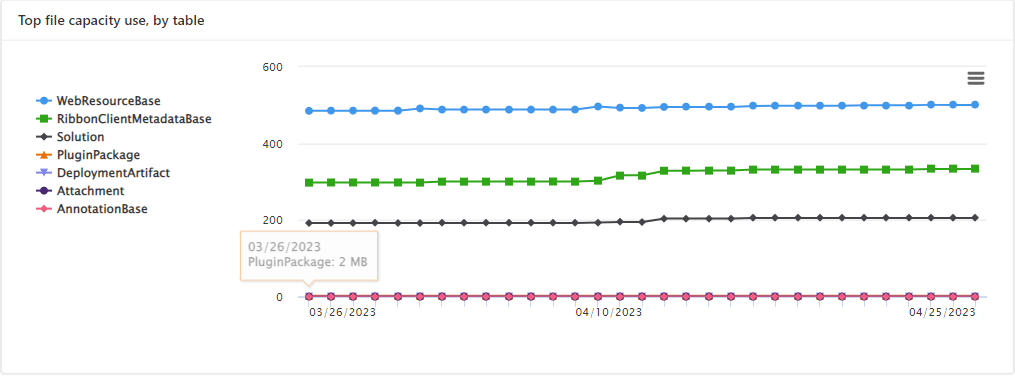
This page shows your Database usage/File usage and respective categorizations by table as below..
These are reports which I was able to extract from my trial environment, however all the reports were not available currently in my region. Yes, this is expected as this feature is still in preview and not recommended for Production Projects as of now. Definitely in the future…
Note:
Many people including me till now thought that Plugins or at least any operation performed within Model Driven app will not be counted for the API request limits. But…
If the requests are making CRUD, assign, or share–type requests, they’ll count except internal requests. For classic workflows, this includes actions such as checking conditions, starting child workflows, or stopping workflows.
You should never use any third party tools for Integration whenever you were facing any request limit issues.
Request limits are applied differently for licensed users and Non-licensed users.
You can add more capacity to any of your products by assigning your environment in the manage addons page.
In this blog post, I will talk about implementing a custom page for your implementations.
Here in our use case, customer want to see a pop up dialog box where they can reject the cases from a button and when reject is clicked, there should be a dialog box to capture the reject reason and comments and update them back to the record. So for this we had to implement a custom page and called from a Ribbon button. If you just want to show an alert, you can very easily implement using JavaScript with the help of OOB Alert Dialog…
But in case as user want to update entity details like optionset field, directly from the pop up, you should consider using the approach as we did using a custom page.
.
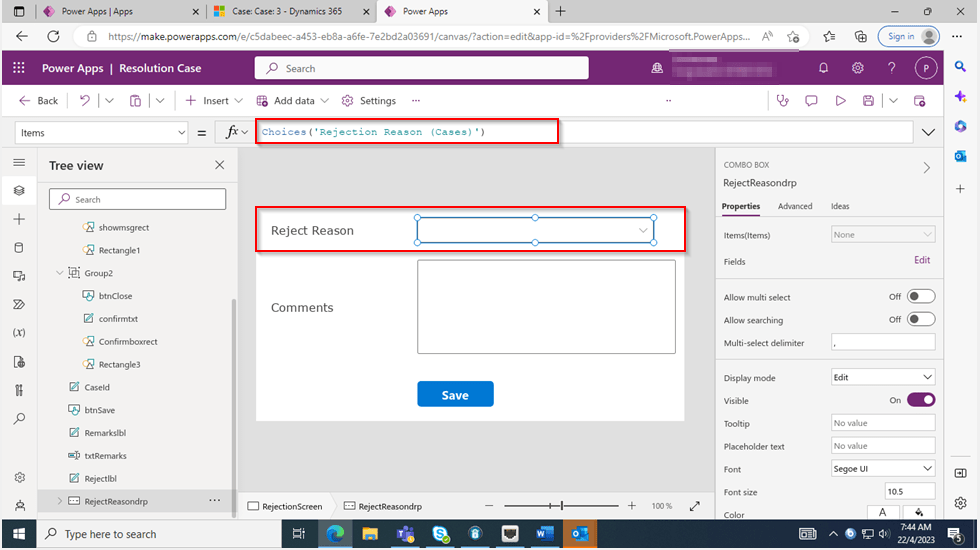
All we have used is JavaScript, Ribbon Workbench and Custom Page…First is to design the custom page in https://make.powerapps.com/
The optionset for Reject Reason is bound to the Reject Reason combo box using the below property.
On the App start, we will set the parameter with what we have supplied from the ribbon on-click function.
On the OnSelect property of the Save button, we can use the below function
Function:
This file contains hidden or bidirectional Unicode text that may be interpreted or compiled differently than what appears below. To review, open the file in an editor that reveals hidden Unicode characters.
Learn more about bidirectional Unicode characters
This file contains hidden or bidirectional Unicode text that may be interpreted or compiled differently than what appears below. To review, open the file in an editor that reveals hidden Unicode characters.
Learn more about bidirectional Unicode characters
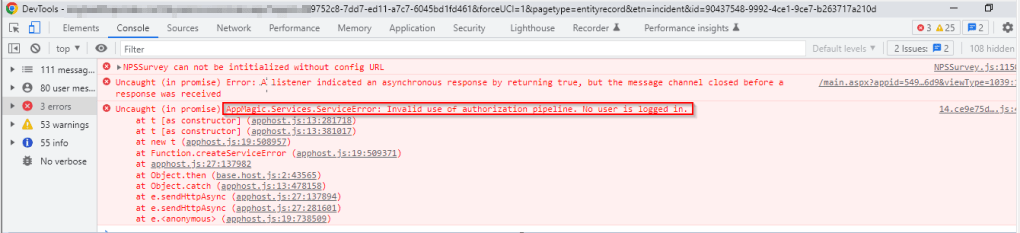
Finally publish the customizations and add the custom page to the model driven app…don’t forget to add this to your app as this mandatory to get the authorization to your page as below, else you see below error in developer tools of your browser as below…and no custom page opens up…
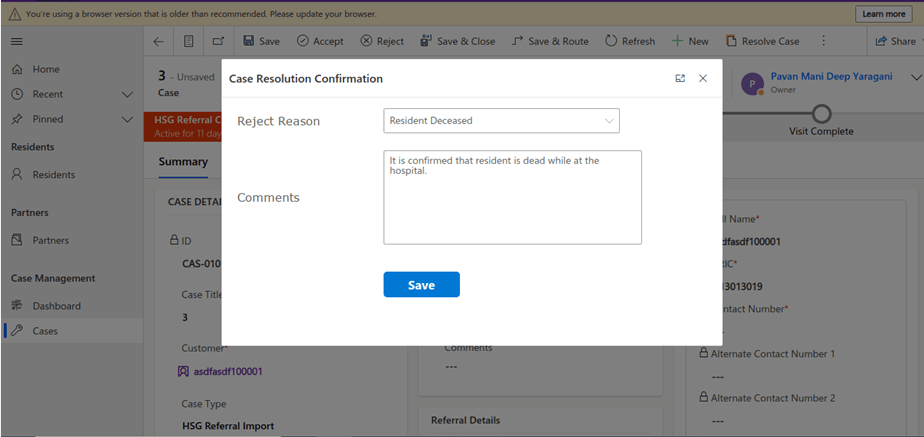
That’s it…when a Reject is clicked, you should a see a page as below..
Upon entering the details as above, you will be shown a confirmation screen as below..
Once you click on Close, the selected details will be updated back in the record.
Hope this helps someone implementing custom page for a similar requirement….
This blog is just to let you know why you should stop implementing OData calls using V2.0 version. I am pretty sure almost every Dynamics CE project out there have used this OData calls definitely in their implementations from quite some time. While some of new implementations have replaced the logic using Web API, still some people go with using OData V2.0 calls to build their functionality using JavaScript.
Microsoft had actually planned to remove this endpoint from April 30, 2023. But they deferred this because many projects are’nt yet prepared for removal of this end point and help the customers prepare for this transition to Web API end point.
Identify if you still using OData V2.0 end point, actually Organization Data Service is an OData V2.0 endpoint which was introduced with Dynamics CRM 2011..it’s deprecated way back with Dynamics 365 CE version 8.0.
So now, how to identify where and all you were using OData End Points in your code…you shouldn’t expect that existing code will work with only minor changes and this work can be taken at a later stage. This was a high priority warning message from Microsoft stating the removal, so I urge all of you to be prepared for this removalvery soonand you shouldn’t be surprised.
So where to change…..?
Below are the places where you should change your way of implementation and align with Microsoft…
The Organization Data Service using this end point /XRMServices/2011/OrganizationData.svc in Javascript, you can find it out with the help of the checker service rule web-avoid-crm2011-service-odata for identification. This can be code which was making OData calls to perform CRUD Operations on the current table or related table.
Check any other code, including PowerShell scripts, that send requests to this endpoint: /xrmservices/2011/organizationdata.svc.
Cross Check your Power BI reports or Excel Data sources that may be using this endpoint.
Note:
This announcement does not involve the deprecated Organization Service SOAP endpoint, meaning using Organization service in plugins. At this time, no date has been announced for the removal of that endpoint. At the time of writing this blog post, Microsoft didn’t announce whether this removal is only for Online or On Premise Versions.
Here is how I have quickly achieved the synchronous Retrieve multiple call using Web API and Promises with the help of JavaScript. I don’t want to make my post too detail, but I would like to share the approach.
All I want to do is to just Restrict saving the Contact creation if the Postal Code entered is not present in the system. But this call should be synchronous as the message should be shown immediately incase postal code is not found in the system and prevent saving the contact record. All you need to do is simple, just call the below function on change of Postal Code in Contacts.
Here in place of XMLHTTPRequest, I have used Xrm.WebAPI so that it won’t show a critial warning in Solution Checker.
This file contains hidden or bidirectional Unicode text that may be interpreted or compiled differently than what appears below. To review, open the file in an editor that reveals hidden Unicode characters.
Learn more about bidirectional Unicode characters
By this time, almost every Dynamics 365 Developer had some day or the other used Level up in their Custom Engagement consultant career.
While every one out in the Dynamics CRM Space know about the widely popular God mode available in Level Up which helps in the day to day administration and maintenance activity of CE applications.
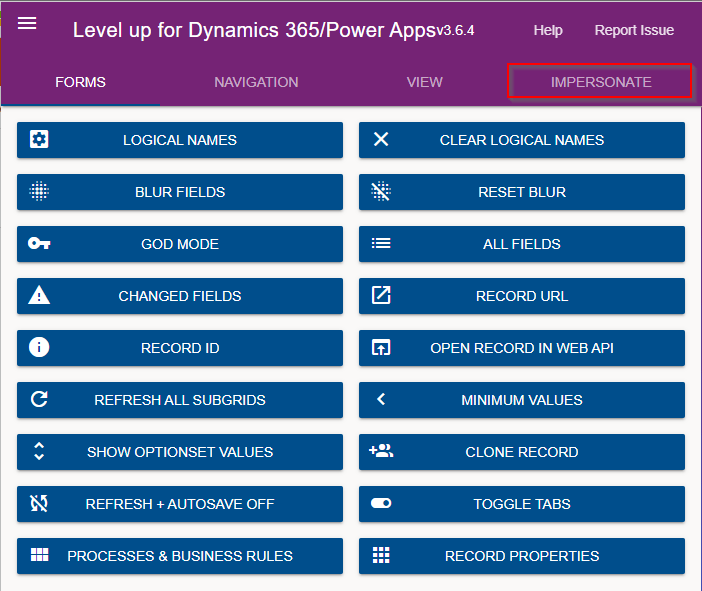
Today in this blog post, lets see how we can achieve impersonation using Level up. We all know about impersonation in Dynamics CRM possibly using Plugins via Plugin Registration tool or directly through code.
But do you know, using Level Up, do you know that you even don’t need to write any piece of code but can impersonate to any user in the system with thin a few clicks right from your browser. If this interests you, just follow along…
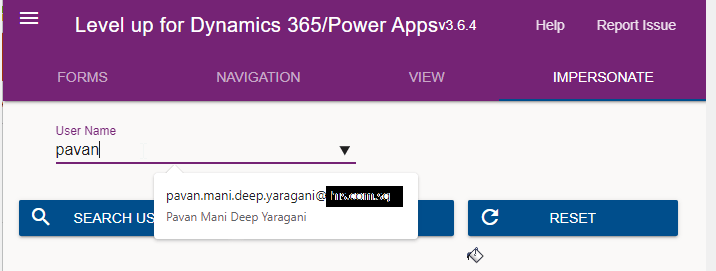
Just open the level up chrome extension. This is how your home screen look like once opened..to use this feature, just click on Impersonate as highlighted in the below image. For all this activity, I am logged in as Admin user to the system.
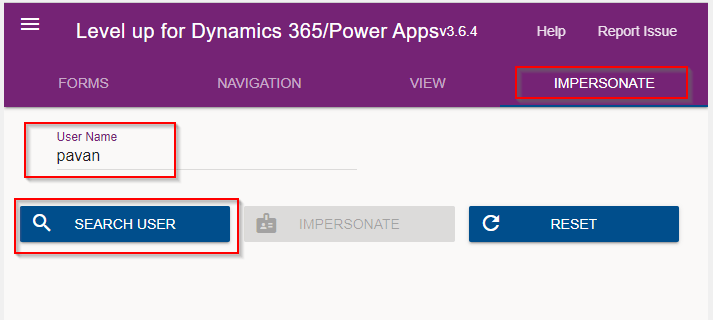
Next you can search with the username with whom you want to impersonate with i.e. here I would like to impersonate with my user account. You can search and impersonate with any user in the system.
Once you click on SEARCH USER
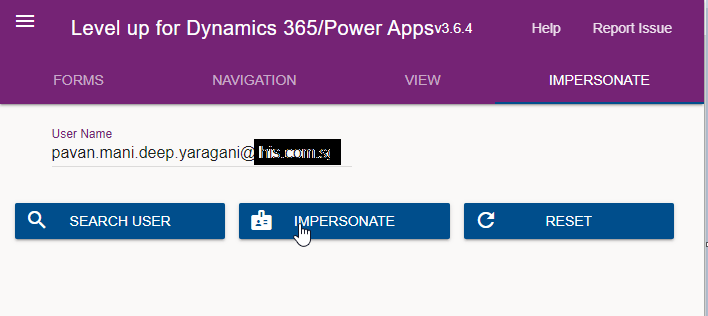
Upnext, click on impersonate button available as below
It opens a new window impersonated with the user account as the user choosen for the impersonation.
The screen shows as the user pavan is the logged in user…
Now you can perform all the operations same as what user pavan has…how cool is it…this feature perfects suits when you want to test out the application security roles where you would like to make a change to a user role and assign to other team member, test it without needing his/her presence. Cool to know, isn’t it….
References:
You can install the extension on Edge, Firefox and Chrome.
Have you or some one in your team accidentally deleted some your flows and want them to be back..? Then this post is for you…
There are the two ways you can restore deleted flows up to 20 days in either way…once after 20 days, even Microsoft Support couldn’t recover your flows.
In this blog post, we will see how you can recover your flows using first approach using Power Automate Management connector which is much simpler.
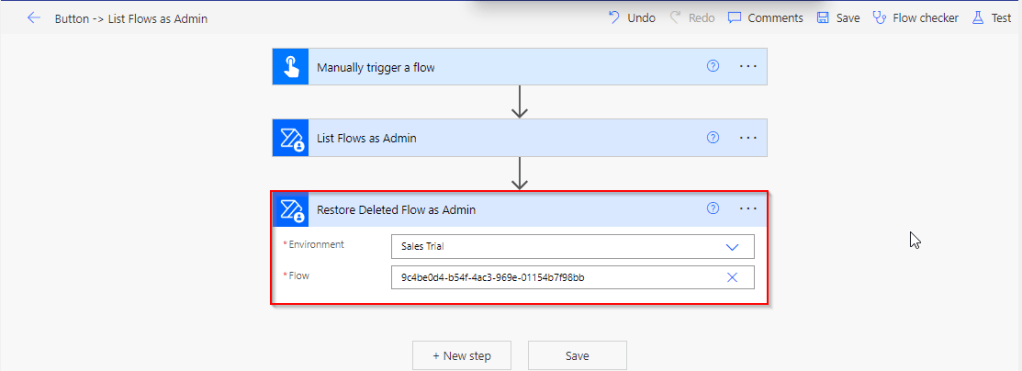
All you need is a button flow with two Power Automate management connector actions—List Flows as Admin and Restore Deleted Flows as Admin.
So let’s see…
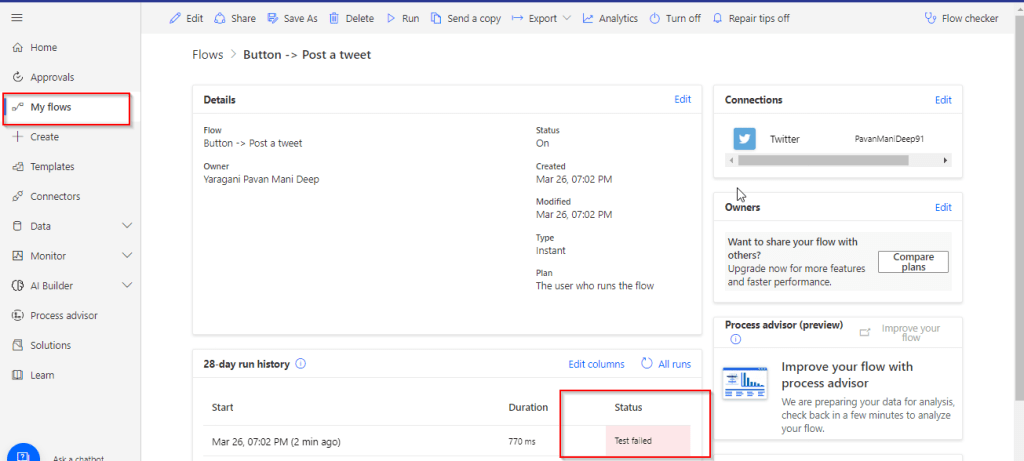
I have a very simple flow as below…
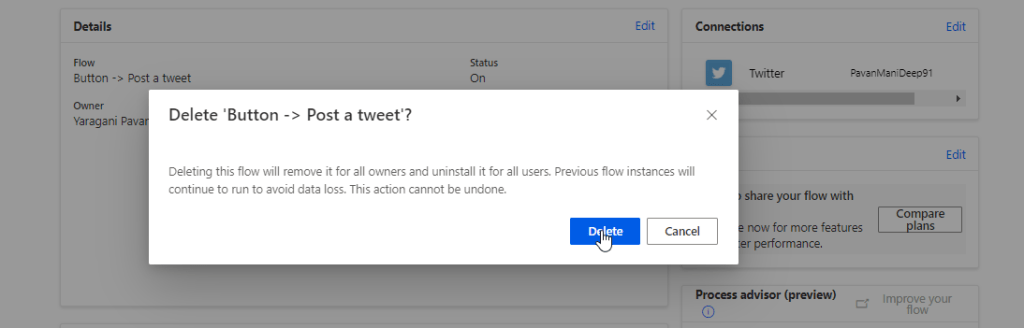
But is has been failing due to some authentication issue, so I have deleted it…
Later I understood the root cause for the authentication issue, I want the flow created to be back. But no problem, you can recover your flow as below…So follow these steps to quickly get your deleted flow back…using an another flow…
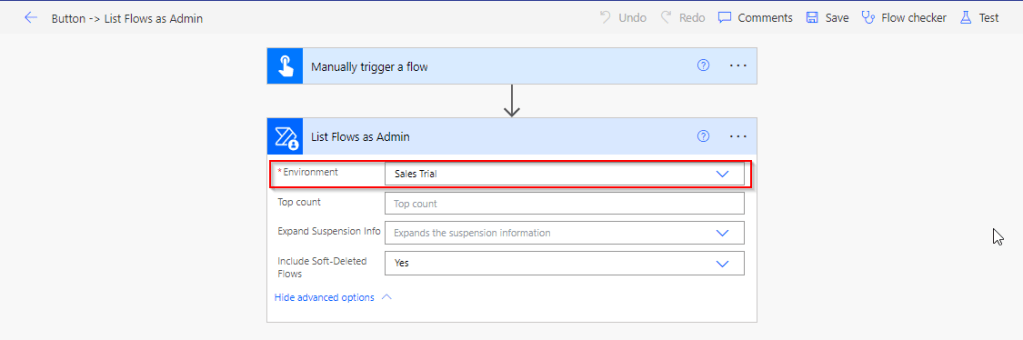
Choose a manual trigger…
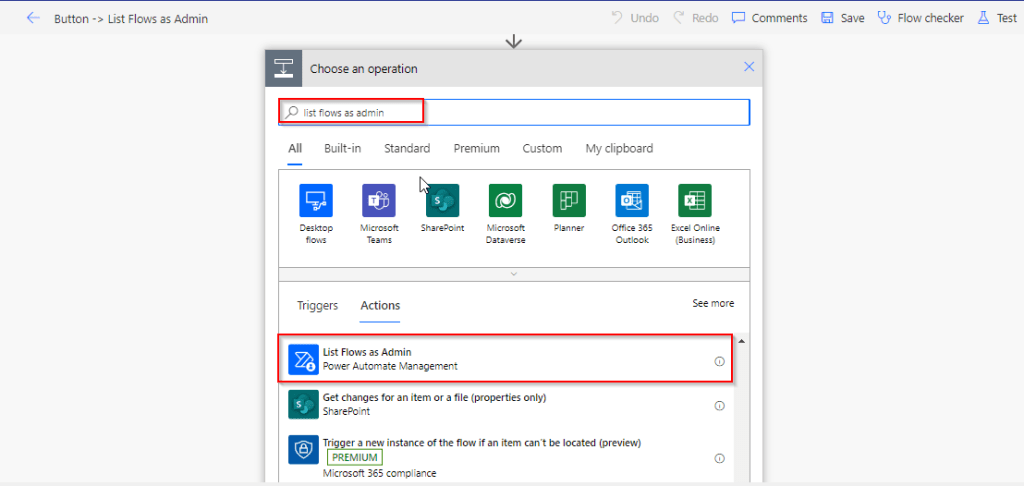
Next add an action, and choose an operation by searching list flows as admin.
Select your environment in the connector
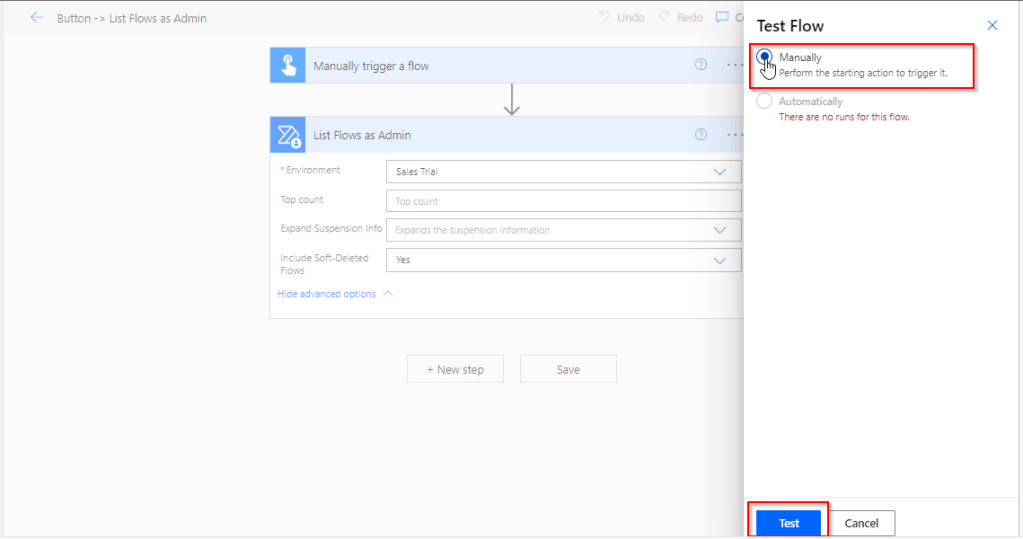
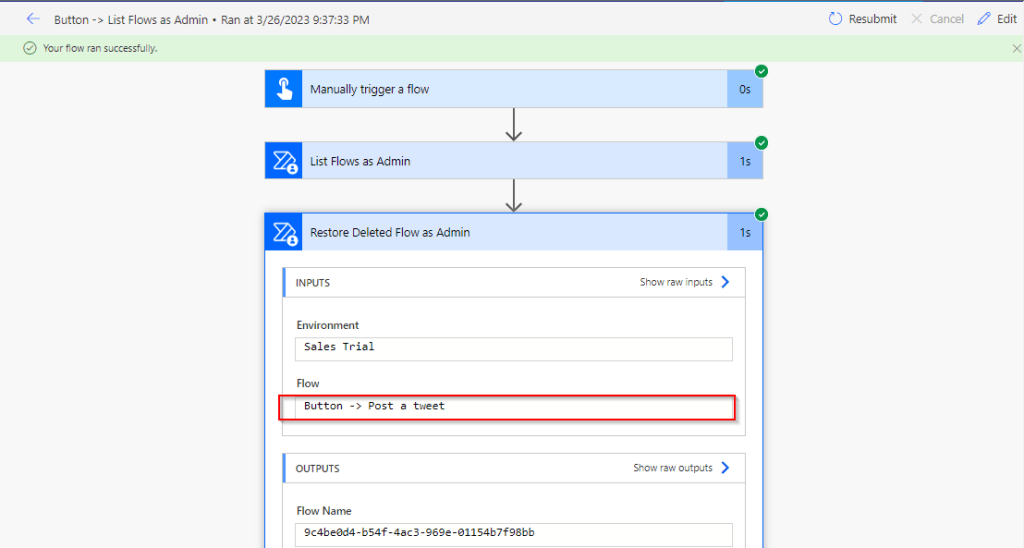
Save your flow and test it…
Once your flow is successful, verify the outputs..scroll to find out the flow, check for the display name and note down the name associated.
This connector will list down all the flows created in your tenant…when you expand the raw OUTPUTS/value. Note the name which is nothing but the Guid of your flow.
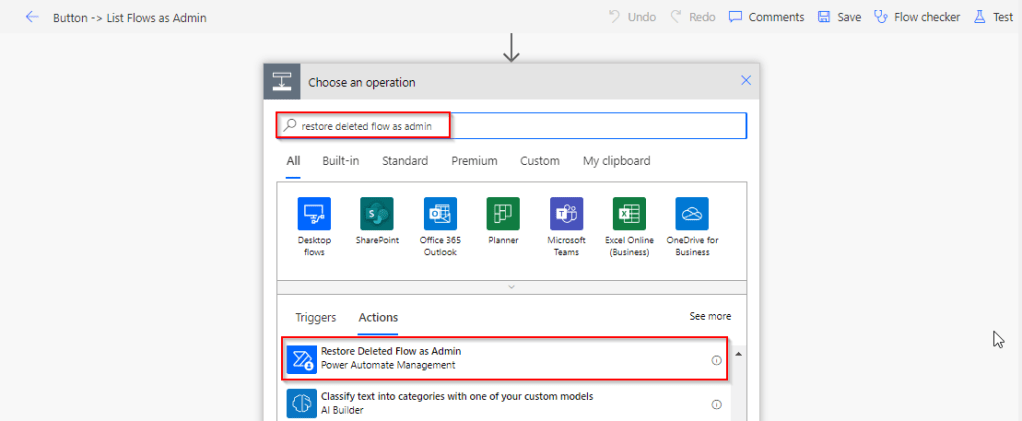
Add Restore Deleted Flows as Admin action and run the flow by searching for the same as below.
Add the Restore Deleted Flows as Admin action from the Power Automate Management Connector.
In the Flow field, enter the name value ie. Guid noted from previous step ie.
9c4be0d4-b54f-4ac3-969e-01154b7f98bb
Save the flow, and test/run it.
You can note your flow is back, you can find out under My Flows but it’s disabled state.
Note:
The steps in this article apply to both non-solution and solution flows.
Flows that were deleted more than 20 days ago can’t be recovered. Both restore methods (PowerShell script and Power Automate Management connector), as well as Microsoft Support can’t help to restore them.
After you restore a flow, it defaults to the disabled state. You must manually enable the flow, per your requirements.