Connecting to your Dataverse instance to run SQL Queries without using XrmToolBox

Hi Folks,

Do you know that you can connect to your Dataverse DB right from your old toolbox SSMS, an express version would be more than enough to try out. Possibly we didn’t think of, but yes, we can…so let’s see that in this blog post.

Open SSMS..

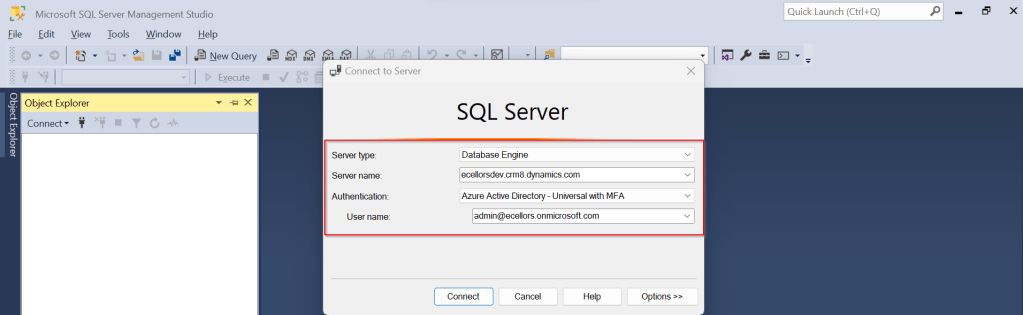
1.Select Server type as Database Engine

2. Server name as the environment URL from your Power Platform Admin Center as below.

3. So key in those details as below, make sure to Select Authentication method as Azure Active Directory – Universal with MFA option.

Once you click on Connect, you will be prompted for authentication via browser.

Once your Sign-In is successful, you will be able to see.

That’s it, how simple it was connecting to your Dataverse instances…

Having said that it’s easy to connect to Dataverse, not all operations performed using normal transact SQL are supported here using Dataverse SQL. You could see it says Read-Only besides the instance name, that means that you don’t have any capabilities to modify from SQL.

Because Dataverse SQL is a subset of Transact-SQL. If you want to see what statements are supported and what not, just go ahead to this link to find out.

This opens a whole lot of opportunities to explore, so don’t forget to check this out.

References:

Dataverse SQL and Transact SQL

Cheers,

PMDY

Deploying Solutions using Power Platform CLI

In my previous blog post, I have already explained how you can utilize Power Pipelines which is the OOB Dynamics 365 Product capability.

Power Platform have many ways where we can deploy our solutions to higher environments…in this blog post, we will see how we can utilize Power Platform CLI to deploy our solutions.

Prerequisites: Power Platform CLI

If you don’t have installed yet in your machine, you can download Power Platform CLI from this link in either of the ways below

1.Install using Power Platform Tools for Visual Studio Code

2. Install Power Platform CLI for Windows using PowerShell

Once you got this installed, make sure you set your environment variable in your machine as below

Then you can use your favorite IDE or Command line. I personally recommend using Visual Studio Code because of the flexibility it offers and ease of installation, use.

Export and Import can be done very easily with CLI with a few commands once you were authenticated with your instance.

For authentication with your instance. Open a new terminal in visual studio code.

pac auth create –name powermvps1 –url <give your org URL here> –username <give your username here> –password <give your password here>

As below..

Once you have set up correctly, it will show that it is connected.

Now in order to export your solution..use the below commands from Vs Code

pac solution export –path <Path of the Solution Zip file> –name <Solution Name> –managed false –include general

As below..

You should see a Solution zip file got created with the same name as mentioned above…

Similarly, u can import solutions using CLI..

Here I have a solution named ecellorstest in the same folder in my machine..

Let’s try to import using CLI..inorder to import your solution,use the below commands from Vs Code…

pac solution import –path <Solution Zip file path> –activate-plugins true –publish-changes true –async true

As below..

If we check in our instance, we see the solution is imported…

That’s it, how easy it was…however I have detailed about only a part of full capabilities of Power Platform CLI, its uses are unimaginable.

Reference: Power Platform CLI for Solutions

Cheers,

PMDY

Avoiding Parallelism in Dynamics 365 Plugins/Custom Workflows: Unraveling the Pitfalls and Maximizing Efficiency

Subscribe to continue reading

Subscribe to get access to the rest of this post and other subscriber-only content.

What’s the new table type being introduced..?

Hi Folks,

While you may have noticed this or not, but it’s real. Now Dynamics 365 CE existing table types have a new companion called Elastic, it is yet to be announced.

However let’s take a quick look of the table types showing up when you were trying to create a new one in Dataverse.

While everyone is aware about Standard, Activity, Virtual types in Model Driven Apps. Elastic tables are new tables which came in to Dataverse and probably it will be announced in the upcoming Microsoft Build 2023.

From my view, Elastic tables were

1. Built similar to the concept of Elastic Queries in Azure which is usually meant for the purposes of Data archiving needs.

2. You can scale out queries to large data tiers and visualize the results in business intelligence (BI) reports.

3. Elastic Query provides a complete T-SQL Database Querying capability on Azure SQL, possibly Dataverse.

Hope we get all the capabilities released with Elastic Queries of Azure SQL be released in Dataverse as well.

References:

Data Types in Model Driven Apps

Elastic Queries in Azure SQL

Cheers,

PMDY

Changing Data Type of Primary Column now allowed in Model Driven Apps

Hi Folks,

Do you know you can change the Data type of an Primary column between Single Line of Text and Autonumber even after creation of your entity specifying a defined Primary Name Column. There is a catch….

So let’s see…

I first created a brand new Table called Demo Table and kept the Primary Column as Single Line of text. Earlier once the table is created, you will not be able to change the Primary name column if you wish to, the only way was to delete the table and re-create it with the correct type. But now you can change the type of the column at least to a unique autonumbering.

I want the Primary Name column to be unique, but when I look at the data in my table captured, I see many duplicates.

So let’s change the data type of the primary column data type to Autonumber.

The primary field look as below initially…

Select the Data Type available…

Now Select the Autonumber from the drop down available…you can optionally specify any custom prefix which you want for your Autonumber…and click Save and publish the customizations.

Now go back to your model driven app and then try creating a new record for the respective entity.

Since it was a primary field column, it is by default made mandatory…what’s up…the Autonumber column data type change is not reflecting….this is the same even if you check and publish the solution multiple times. Neither you can’t specify the field value because you already choose this to be an Autonumber and system should create it by itself.

If you were scratching your head, then this simple tip will help…

Just make the field read-only from the form where this field is being referred, so you don’t need to really enter value for it…then publish the customizations.

Once you have done…

Now try to save the record..

There you go, you can see an Autonumber being populated in the primary field…

Cheers,

PMDY

Power Platform Requests usage…check it out in a no code way now in Admin Center(Preview)

Hi Folks,

As a Power Platform Admin/Consultant…did you often worry about your Power Platform Request Limits and usage left…? Do you receive warning messages from Microsoft regarding the usage of your database exceeded..? Want to see what are Custom Plugin Errors encountered while using your Model Driven App targeting Dataverse….then want to consolidate them and forward to your team to look into the issues without much efforts….then you were in the right place…

Just login with your credentials to admin page https://admin.powerplatform.microsoft.com/.

Expand Resources to the left…to find the Capacity menu

If you just want to know only the data usage, then you can ahead and click on Download as shown above to get one.

Want to get in depth analysis…then click on Details as highlighted in the same snap above.

This page shows your Database usage/File usage and respective categorizations by table as below..

These are reports which I was able to extract from my trial environment, however all the reports were not available currently in my region. Yes, this is expected as this feature is still in preview and not recommended for Production Projects as of now. Definitely in the future…

Note:

  1. Many people including me till now thought that Plugins or at least any operation performed within Model Driven app will not be counted for the API request limits. But…
  2. If the requests are making CRUD, assign, or share–type requests, they’ll count except internal requests. For classic workflows, this includes actions such as checking conditions, starting child workflows, or stopping workflows.
  3. You should never use any third party tools for Integration whenever you were facing any request limit issues.
  4. Request limits are applied differently for licensed users and Non-licensed users.
  5. You can add more capacity to any of your products by assigning your environment in the manage addons page.

Hope you found this post helpful…

Cheers,

PMDY

Opening a Custom page to capture entity details for Case Rejection in Model Driven Apps

Hi Folks,

In this blog post, I will talk about implementing a custom page for your implementations.

Here in our use case, customer want to see a pop up dialog box where they can reject the cases from a button and when reject is clicked, there should be a dialog box to capture the reject reason and comments and update them back to the record. So for this we had to implement a custom page and called from a Ribbon button. If you just want to show an alert, you can very easily implement using JavaScript with the help of OOB Alert Dialog…

Xrm.Navigation.openAlertDialog(alertStrings,alertOptions).then(closeCallback,errorCallback);

But in case as user want to update entity details like optionset field, directly from the pop up, you should consider using the approach as we did using a custom page.

.

All we have used is JavaScript, Ribbon Workbench and Custom Page…First is to design the custom page in https://make.powerapps.com/

The optionset for Reject Reason is bound to the Reject Reason combo box using the below property.

On the App start, we will set the parameter with what we have supplied from the ribbon on-click function.

On the OnSelect property of the Save button, we can use the below function

Function:

If(IsBlank(RejectReasondrp.Selected) Or IsBlank(txtRemarks.Value),Set(varmsg,"Fill both the values")&&Set(varmsgpopup, true),
Patch(Cases,LookUp(Cases,Case=GUID(CaseId.Text)),{Comments:txtRemarks.Value,'Rejection Reason':RejectReasondrp.Selected.Value}));
If(!IsBlank(RejectReasondrp.Selected) && !IsBlank(txtRemarks.Value),Set(varShowpopup,true),"");
view raw OnSavePowerFx hosted with ❤ by GitHub

Here’s the js code for the button OnClick Event…

//On Click of Reject button
onClickOfRejectRibbonButton: function (executionContext) {
"use strict";
var formContext = executionContext;
var recordId = formContext.data.entity.getId();
recordId = recordId.replace("{", "");
recordId = recordId.replace("}", "");
var contactId = formContext.getAttribute("customerid").getValue()[0].id;
contactId = contactId.replace("{", "");
contactId = contactId.replace("}", "");
var pageInput = {
pageType: "custom",
name: "new_custompage_7e429",
entityName: "incident",
recordId: recordId
};
var navigationOptions = {
target: 2,
position: 1,
height: 400,
width: 700,
title: "Case Resolution Confirmation" // Enter Title Of Your Choice
};
//Using navigateTo Client API.
Xrm.Navigation.navigateTo(pageInput, navigationOptions).then(
function success() {
// Run code on success
//formContext.data.refresh();
},
function error() {
// Handle errors
formContext.data.refresh();
}
);
}

Here the ribbon workbench customization added…

Finally publish the customizations and add the custom page to the model driven app…don’t forget to add this to your app as this mandatory to get the authorization to your page as below, else you see below error in developer tools of your browser as below…and no custom page opens up…

That’s it…when a Reject is clicked, you should a see a page as below..

Upon entering the details as above, you will be shown a confirmation screen as below..

Once you click on Close, the selected details will be updated back in the record.

Hope this helps someone implementing custom page for a similar requirement….

Cheers,

PMDY

Stop using OData V2.0 endpoint going further for your implementations….!

Hi Folks,

This blog is just to let you know why you should stop implementing OData calls using V2.0 version. I am pretty sure almost every Dynamics CE project out there have used this OData calls definitely in their implementations from quite some time. While some of new implementations have replaced the logic using Web API, still some people go with using OData V2.0 calls to build their functionality using JavaScript.

Microsoft had actually planned to remove this endpoint from April 30, 2023. But they deferred this because many projects are’nt yet prepared for removal of this end point and help the customers prepare for this transition to Web API end point.

Identify if you still using OData V2.0 end point, actually Organization Data Service is an OData V2.0 endpoint which was introduced with Dynamics CRM 2011..it’s deprecated way back with Dynamics 365 CE version 8.0.

So now, how to identify where and all you were using OData End Points in your code…you shouldn’t expect that existing code will work with only minor changes and this work can be taken at a later stage. This was a high priority warning message from Microsoft stating the removal, so I urge all of you to be prepared for this removal very soon and you shouldn’t be surprised.

So where to change…..?

Below are the places where you should change your way of implementation and align with Microsoft…

  1. The Organization Data Service using this end point /XRMServices/2011/OrganizationData.svc in Javascript, you can find it out with the help of the checker service rule web-avoid-crm2011-service-odata for identification. This can be code which was making OData calls to perform CRUD Operations on the current table or related table.
  2. Check any other code, including PowerShell scripts, that send requests to this endpoint: /xrmservices/2011/organizationdata.svc.
  3. Cross Check your Power BI reports or Excel Data sources that may be using this endpoint.

Note:

This announcement does not involve the deprecated Organization Service SOAP endpoint, meaning using Organization service in plugins. At this time, no date has been announced for the removal of that endpoint. At the time of writing this blog post, Microsoft didn’t announce whether this removal is only for Online or On Premise Versions.

References:

How to use Application Insights to identify usage of the OrganizationData.svc endpoint?

OData v2.0 Service removal date announcement

The Clock is Ticking on Your Endpoint

Do not use the OData v2.0 endpoint

Hope this saves time and effort implementing your Dynamics CE Solutions…

Cheers,

PMDY

Fixed – Invalid data from the network error in the custom page – Power Apps / Dataverse

Reblogged on ecellorscrm.com

Nishant Rana's avatarNishant Rana's Weblog

Recently in one of our custom pages, we were getting the below error

“Invalid data from the network”

We had this setting “Formula-level error management” as On, switching it off was hiding this error on the page.

To fix it we tried removing the fields one by one to figure out the issue. Eventually, we saw the error was going away if we remove one of the option set fields from the gallery or comment it’s formula. Later when we removed and added the field back in the gallery and the error got fixed for us.

The page loading properly without the error –

Hope it helps..


View original post