In 2017, Natraj Yegnaraman shared a clever method to cancel the save of a form. His approach was to cancel the save before the asynchronous operation and then retrigger the save if needed after the asynchronous operation is resolved. You can find all the details on the following link. This approach is explained by the […]
Cancel the save based on the result of an asynchronous operation
Tips for overcoming your problems working with SSRS Reports
Recently I have worked on some complex Fetch XML based SSRS reports, below were some basic tips to be kept in mind when you were working on a similar reporting project.
Things to take a note:
- When working with Prefiltered reports, make sure you add the prefilter at the beginning of the report dataset query.
2. Download report from CRM
Wondered how to edit an existing report, you can download the same from CRM, add it to your visual studio and edit your fetch xml report.
3. Missing reports for other users
Make sure you set the Report viewable by for the report.
4. Report missing records:
Tip: check if all main report and sub report parameters are same…even verify if multiple values are enabled for parameters is enabled for main report, it should be enabled for sub report parameters also.
5. Use Lookup and Lookupset necessarily accordingly to the need, do note its drawbacks before confirming your design and proceeding with development as it wont allow nested lookups…etc.
6. When comes to Testing the reports, test the report is CRM and not in the Visual studio.
7. Reports were run on the browser and they were browser specific, based on the user’s region, it will be rendered.
8. Make sure to add the same queries used in the main report to the sub report for Production uses.
9. Apply row or column grouping accordingly based on the requirement.
10. If data is being missed in some of the columns, make sure you check if there is any issue with the parameters, try to verify the sub report by validating the queries from the query designer and passing appropriate values to the parameters as and when required.
11. As we cant troubleshoot the SSRS Reports, the only way we can check and verify if by printing values obtained from the datasets.
12. Double check the Dataset properties if you still see any discrepancy with the parameters and their order as this is important when you have dependent parameters for executing your dataset.
13. You can add filters to your dataset from the dataset properties itself if required.
14. Make sure to click of refresh fields in the dataset properties window as and when if you update any dataset query.
15. Also note that SSRS reports are cached, one other way to clear your cache and re-run the report.
16. You can use built in fields if you want to display any of the report based data.
17. If you have changes in any of the sub reports, you don’t need to push all the report changed including the Parent report, instead you can add only the changed sub report to the solution and move across.
Hope one of the above tip had helped you in your project, that’s it for today…till then keep CRM’ing and be safe.
Thank you.
Cheers,
PMDY
Custom workflow to find the logged in user role
Hi Folks,
Have you ever got a requirement to find the user role before running any logic using workflows, then this post is for you. Please continue reading.
If suppose, you got to have to run a workflow to validate some of the business scenarios using a workflow, then verifying the logged in user role is not possible using OOB workflow. In this case, you would need to get this up and running with the help of Custom workflow at first place and once the role is verified, you would need to trigger your OOB workflow logic.
Custom workflow design: The custom workflow accepts an mandatory output parameter which returns a bool value if the logged in user security role matches.
The code can be found at my GIT Hub, please check it out in case you want to implement the same requirement, you can pass in the input parameters or add any additional output parameters according to your business needs.
Then you would need build this assembly by signing it, next part would be to register in your CRM with the help of Plugin registration tool.
Later you can refer the same library in your OOB workflow as below..

And you nailed it…that’s it for today, please stay tuned and be safe..
Happy CRM’ing…
Cheers,
PMDY
Power FX…get back your power with excel like formulas… A brief review…
Microsoft Power Fx is an open-source programming language that hopes to make coding as straightforward as building a spreadsheet. Wondered why Microsoft is bringing this excel backbone language to Power Platform range of Products & Services.
It is planned to expand Power Fx throughout the Power Platform over the next two years, including model-driven Power Apps, Microsoft Dataverse and Power Virtual Agents, Microsoft’s low-code chatbot platform. Developers will also be able to use it to directly edit apps in text editors like Visual Studio Code.
So Power Fx is the new name for the formula language for canvas apps. It’s a general-purpose, strong-typed, declarative, and functional programming language. Power Fx will be made available as open-source software. And source code can be found at this link..
When a formula is modified or a value is entered, the worksheet is immediately recalculated to reflect the changes.
Let’s look more in-depth at all the things that Power Fx is doing for us and the freedom it has to optimize because the formula was declarative:
- Asynchronous: All data operations in Power Fx are asynchronous. The maker doesn’t need to specify this, nor does the maker need to synchronize operations after the call is over. The maker doesn’t need to be aware of this concept at all, they don’t need to know what a promise or lambda function is.
- Local and remote: Power Fx uses the same syntax and functions for data that’s local in-memory and remote in a database or service. The user need not think about this distinction. Power Fx automatically delegates what it can to the server, to process filters and sorts there more efficiently.
- Relational data: Orders and Customers are two different tables, with a many-to-one relationship. The OData query requires an “$expand” with knowledge of the foreign key, similar to a Join in SQL. The formula has none of this; in fact, database keys are another concept the maker doesn’t need to know about. The maker can use simple dot notation to access the entire graph of relationships from a record.
- Projection: When writing a query, many developers write
select * from table, which brings back all the columns of data. Power Fx analyzes all the columns that are used through the entire app, even across formula dependencies. Projection is automatically optimized and, again, a maker doesn’t need to know what “projection” means. - Retrieve only what is needed: In this example, the
LookUpfunction implies that only one record should be retrieved and that’s all that’s returned. If more records are requested by using theFilterfunction—for which thousands of records might qualify—only a single page of data is returned at a time, on the order of 100 records per page. The user must gesture through a gallery or data table to see more data, and it will automatically be brought in for them. The maker can reason about large sets of data without needing to think about limiting data requests to manageable chunks. - Runs only when needed: We defined a formula for the
Textproperty of the label control. As the variable selected changes, theLookUpis automatically recalculated and the label is updated. The maker didn’t need to write an OnChange handler for Selection, and didn’t need to remember that this label is dependent upon it. This is declarative programming, as discussed earlier: the maker specified what they wanted to have in the label, not how or when it should be fetched. If this label isn’t visible because it’s on a screen that isn’t visible, or itsVisibleproperty is false, we can defer this calculation until the label is visible and effectively eliminate it if that rarely happens. - Excel syntax translation: Excel is used by many users, most of whom know that the ampersand (&) is used for string concatenation. JavaScript uses a plus sign (+), and other languages use a dot (.).
- Display names and localization:
First Nameis used in the Power Fx formula whilenwind_firstnameis used in the JavaScript equivalent. In Microsoft Dataverse and SharePoint, there’s a display name for columns and tables in addition to a unique logical name. The display names are often much more user-friendly, as in this case, but they have another important quality in that they can be localized. If you have a multilingual team, each team member can see table and field names in their own language. In all use cases, Power Fx makes sure that the correct logical name is sent to the database automatically.
These no-code tools have been built to read and write Power Fx to ensure that there’s plenty of headroom for someone to take it further.
Now lets see what’s in there for developers here…
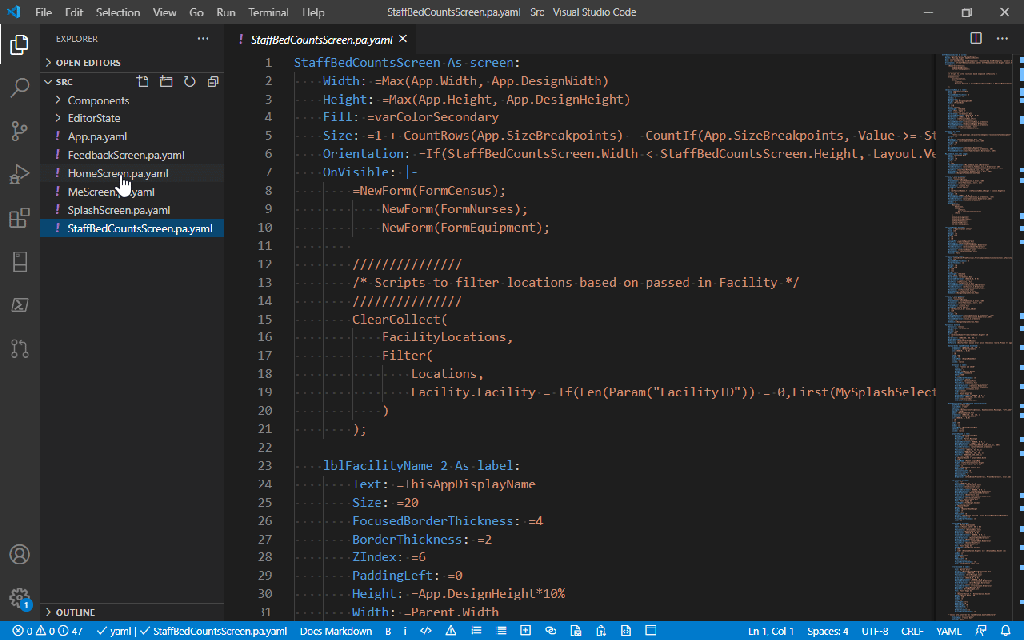
Professionals want to use professional tools to be most productive. Power Fx formulas can be stored in YAML source files, which are easy to edit with Visual Studio Code, Visual Studio, or any other text editor and enable Power Fx to be put under source control with GitHub, Azure DevOps, or any other source code control system. Take a look at below…
What a cool feature that Microsoft introduced all the excel functions and formulas to make low code apps. much easier ..if you want to further read regarding this…Microsoft Learn is the right place…this link can take you there…
Edit: 20/02/2022
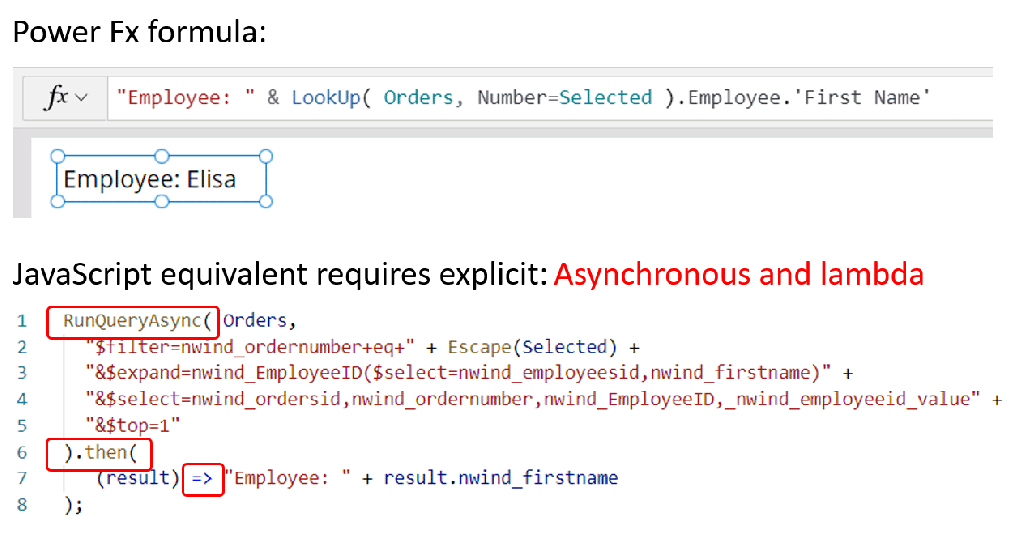
Checkout the below image to see how power fx# reduces the length of code, a developer need to write…
That’s it for today…
Cheers,
PMDY
Tips working on your reports for Power Platform solutions…
Of late, I have been working on various reporting requirements for a perfect CRM Solution. Here are my top tips when working on reports including SSRS, RDLC & Power BI Reports. This should be addition to my previous blog post on SSRS Tips..
- Firstly once your reporting requirements are confirmed, you should make a plan to make your achieve your goal
- Most viable way of creating reports is through the SSRS which comes by default to Dynamics.
- But it is often argued that SSRS alone will not be sufficient to fulfill our reporting needs and we should think of the alternatives like RDLC(.net way) or Power BI(make sure you have enough Power BI licenses to use).
- Power BI is ideal way if you want to know the hidden functionality of Dynamics, ex. goals, rollup queries…etc, you can easily get the fetch xml being used by CRM.
- If we want to built some custom ones, make sure you do checkout the RDLC format where you could write some .net coding and achieve the required data in the report.
- You can checkout the RDLC Report source code here…
This post will be updated….with more interesting content…in coming days…
Getting started with the Azure IoT Central Rest API
Azure IoT Central is a SaaS platform for IoT projects.
If you are looking for a way to manage and monitor your IoT devices outside the Azure Portal or are not able to build your own IoT platform, IoT Central is the place to be. And you can extend this portal with custom Azure resources using the export functionality.
All you need is to have browser access to Azure IoT Central. You can even run it for free for seven days to test it out. Also, the first two devices registered are free too.
Once you have worked with Azure IoT central, you have mastered it using the portal. If you want to scale up eg. the number of devices or users, automation of your tasks becomes necessary.
For this, Azure IoT Central offers a Rest API.
Let’s check this API out.
View original post 881 more words
Latest in Azure IOT this Ignite 2021
Hey Guys, this post is to introduce the new thing Azure Precept announced in this Ignite by Microsoft.
To know about Azure Precept in Depth, you can…follow the below links to check this out..
- Simplify Wi-Fi IoT device onboarding with Zero Touch Provisioning
- Under the hood with Azure Percept: Deploy edge AI to IoT devices in minutes
- Advanced Development with Azure Precept
This increases/enhances the Azure IOT product by deploying AI to IOT Edge Devices at a high level.
What a wonderful enhancement this is…can’t wait from trying out these….
Reference
Wi-Fi Easy Connect™ | Wi-Fi Alliance (wi-fi.org)
Please feel free to share your thoughts or ideas on Azure Precept…I would be glad to assist you on this…
Cheers,
PMDY
Get selected options from Multiselect Option set
{QuickPost}
Recently had a requirement to get all selected option texts from a multi select option set. Getting selected values is straight forward but I wanted to get the Label of selected values. For normal option set we can get it easily by using FormattedValues but that does not work with Multiselect Option set.
For C#:
Then found an handy code by Ravi Kashyap that was posted on community here. I have just restructured the function to make it generic.
Now just call the getSelectedOptionSetText() function and pass Organization Service, entity name and MultiSelect optionset field name.
The function first retrieves all the labels from the Option Set and then filters it with selected option set values.
public string getSelectedOptionSetText(IOrganizationService service, Entity enRecord, string fieldName)
{
    string selectedText = string.Empty;
    // Get the Formatted Values of MultiSelect OptionSet
    List multiSelectTextCollection =            GetOptionSetTextCollection(service, enRecord.LogicalName, fieldName);

   if (enRecord.Contains(fieldName))
   {
 OptionSetValueCollection multiSelectValueCollection…
View original post 135 more words
Counting the current number of IoT Hub messages and devices
Microsoft provides SDKs for both building IoT devices and accessing the IoT Hub (based on several programming languages).
Regarding the IoT Hub, with the SDK you are able to eg. register and control devices.
Still, some actions are possible with the IoT Hub which is not supported by the SDK.
For those actions, Microsoft supports an IoTHub Rest API which extends the capabilities of the SDK.
In the past, I demonstrated how to work with C2D messages using the REST API.
A few days back, I came along with this MS Learn question about IoT Hub message counts. This also has to be tackled by the REST API.
Let’s see how.
View original post 507 more words
Send Telemetry data to your Azure IOT Hub…using Device Client SDK’s…
In the earlier blog post, we have seen how to connect to your Azure IOT Hub using Raspberry PI Online Simulator and send telemetry data…
In this post, we will be using Azure IOT Device Client SDK’s for sending the Telemetry data to IOT Hub…
This approach uses .NET Core SDK libraries using a Console application….
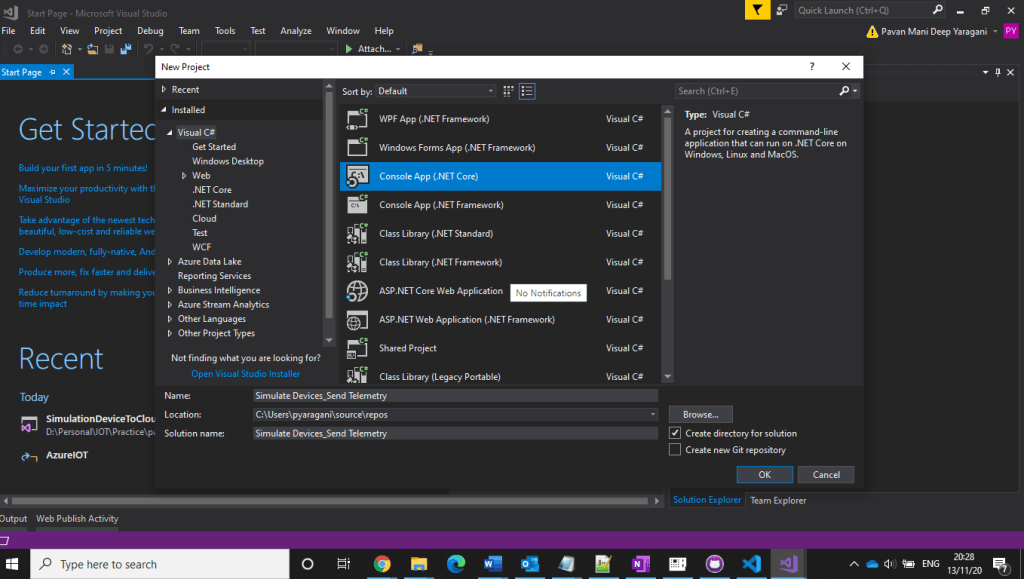
Creating a C# Console Application
- Open Visual Studio, go to File -> New -> and select Project.
- In Templates, select Visual C#, select Console App (.NET Framework) and give an appropriate name in the ‘Name’ textbox and then click the OK button.
3. Installing Microsoft Azure IOT Device Client SDK…Go to Project -> Manage NuGet Packages.
4. Click Browse tab and search for Microsoft.Azure.Devices.Client. You will see the Microsoft.Azure.Devices.Client device SDK will have listed in the search result and click Install button
5. Now, click the I Accept button to accept the license agreement.
6. It will take a few minutes to install the SDK in our project
7. Get IoT device connect string from Azure IoT Hub…navigate to Azure Portal –> IOT Hub –> IOT Devices –> Select respective device to be connected.
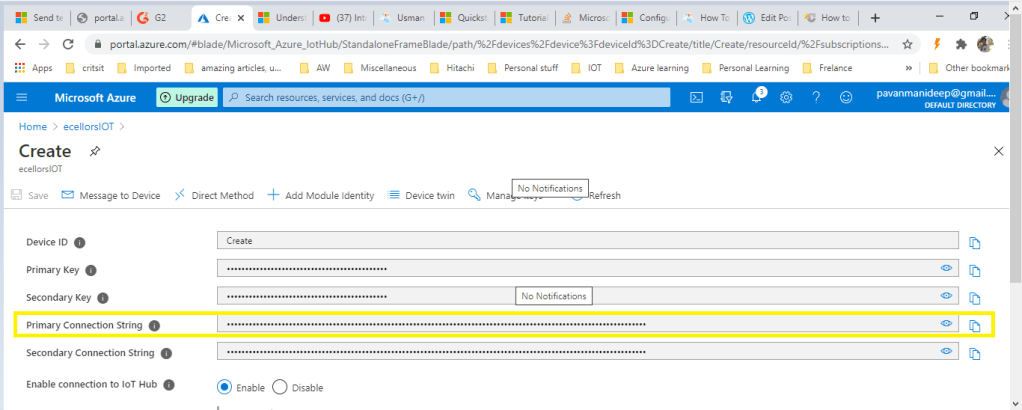
- Using Microsoft.Azure.Devices.Client library we can create device client. The device client has CreateFromConnectionString method which requires device connection string as parameter. Create a read only static string s_connectionString01 and assign the connection string that we copy from Azure Portal.
- Here you can create a random temperature and humidity values using Random() method.
- Copy the code in the Program.cs from the GitHub repository…
That’s it. Now, run the web application, go to Debug menu, and click on “Start without Debugging” or press F5. This will display the below result

Hope you had learned a new approach to send telemetry data to Azure IOT Hub…stay tuned…for more on Azure IOT….
Hope this helps….
Cheers,
PMDY
