Here is how you can quickly call action using Web API, with this method you can execute a single action, function, or CRUD operation. In the below example, let’s see how you can call an action. Here is function…to achieve this..
This file contains hidden or bidirectional Unicode text that may be interpreted or compiled differently than what appears below. To review, open the file in an editor that reveals hidden Unicode characters.
Learn more about bidirectional Unicode characters
This example details with Unbound action, which is not tagged to any entity, however if in case on Bound action, you will specify the entity name for bound parameter instead of null. You need to specify the Metadata accordingly for your Action. Let’s understand it’s syntax first…
Thank you for visiting my blog today…this is post is mainly for Pro developers. Encryption is crucial to maintain the confidentiality in this digital age for the security of our sensitive information. So here is a blog about it. This is in continuation to my previous blog post on encrypting files using GnuPG.
In this blog post, I will give you sample how you can encrypt/decrypt using GnuPG with command line scripts from C# code.
If you didn’t go through my previous article, I strongly recommend you go through that article below first to understand the background.
Next, in order to encrypt/decrypt a given csv file (taken for simplicity), we can use the following C# codes. For illustration purpose, I have just provided you the logic in the form of a Console.
Encryption:
This file contains hidden or bidirectional Unicode text that may be interpreted or compiled differently than what appears below. To review, open the file in an editor that reveals hidden Unicode characters.
Learn more about bidirectional Unicode characters
This file contains hidden or bidirectional Unicode text that may be interpreted or compiled differently than what appears below. To review, open the file in an editor that reveals hidden Unicode characters.
Learn more about bidirectional Unicode characters
string gpgPath = @"D:\Softwares\Kleo patra\GnuPG\bin\gpg.exe";//Once GPG installed, you can look for gpg.exe in the bin folder of the installation
string inputFile = "Input encrypted file";//Replace with your gpg encrypted file location
string outputFile = "Decrypted CSV file"; //give it a name for the decrypted file and location, output file path doesnt exists yet, you may give a sample name
All you need is to copy and replace the file locations in the code. Sit back and enjoy encrypting and decrypting with GnuPG. I should say once known, this is the easiest way to encrypt/decrypt from C# code, no strings attached.
If you need any other information, please do let me know in comments.
This post is about Dataverse and Git Integration which is the most sought after feature in the todays automation Era. This is a preview feature, you would need to create a new environment with Early Access enabled to test this feature or you can use an existing US Preview environment for testing this out.
While every MDA(Model Driven Application) and it’s components can be safely and moved across the environments using Solutions with the help of Azure DevOps Pipelines. However when coming to integrating Power Platform Solutions to Azure DevOps, we had to manually export the solution and download them each and every time when we would like to commit the Solution Artifacts to Azure DevOps Repo.
With this new Preview feature we can directly integrate the Power Platform Solutions to Azure DevOps.
Let’s see this action…wait a moment, there were some prerequisites to be considered…
Environment should be a Managed Environment to start using this and you need to be an Admin for the environment
Azure DevOps subscription and license should be available to set this up, also permission to read source files and commits(should be a member of contributor group in Azure DevOps) from a Repo
Your email address used for Azure DevOps and Power Platform Solutions should be the same
Setup:
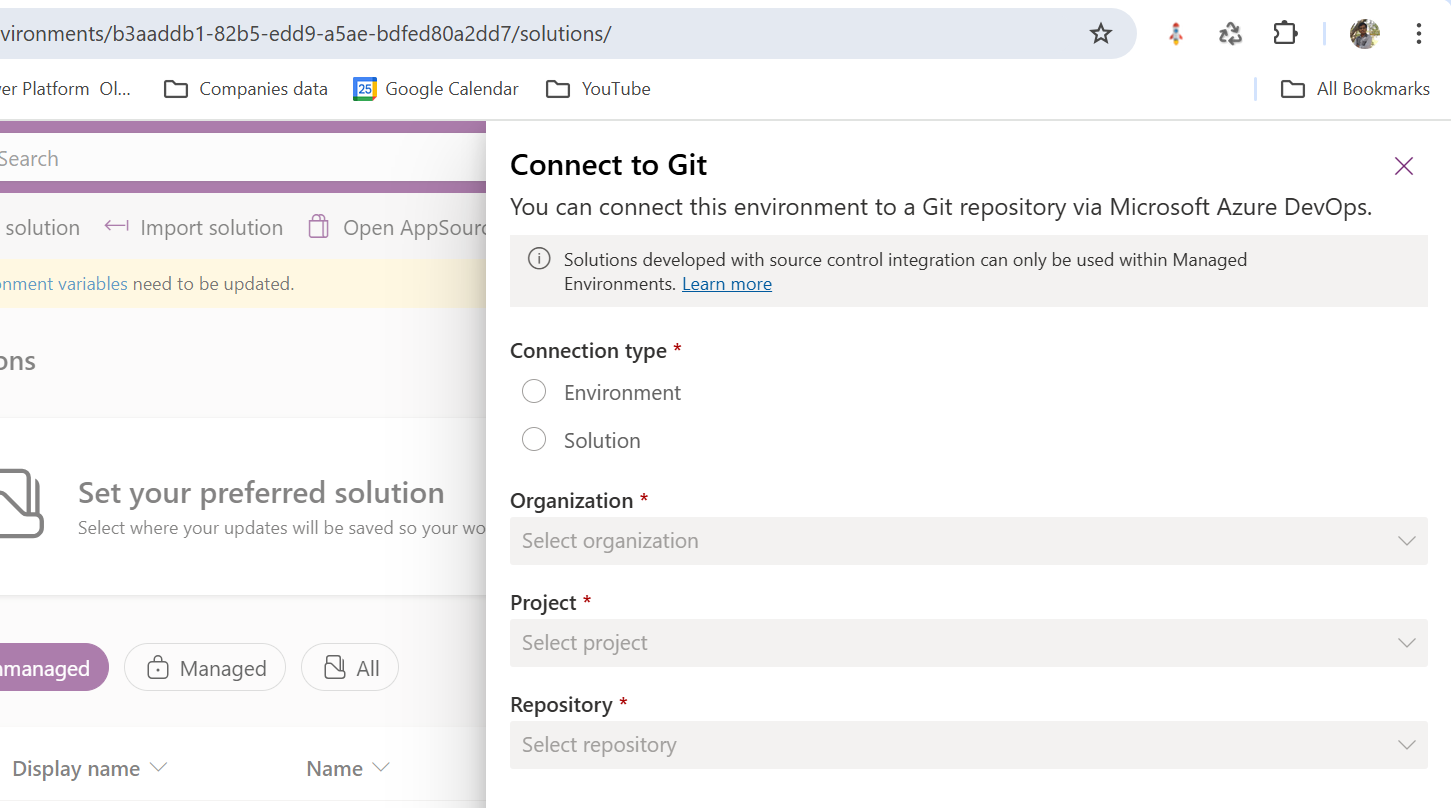
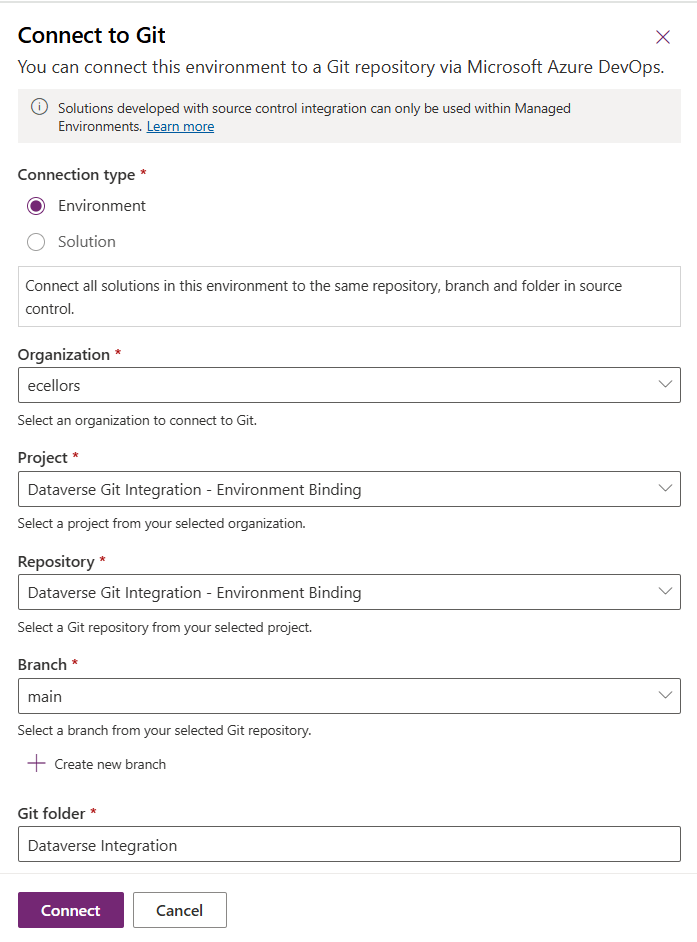
Connecting Dataverse with Azure DevOps is easy but requires a bit of understanding of the Binding options available.
Well, there were two types of Binding options
Environment Binding – Single root folder binds to all the unmanaged solutions in the environment
Solution Binding – Different solutions uses a different root folder in Azure DevOps for binding
Note: Once the binding is setup, there isn’t away to change, so set this up carefully, else you may need to delete the folder and create a new one in Azure DevOps.
Let’s see one by one…for demoing purpose, I have created two projects in Azure DevOps Instance
Solution Binding: When we use this, all the components will be available as pending changes
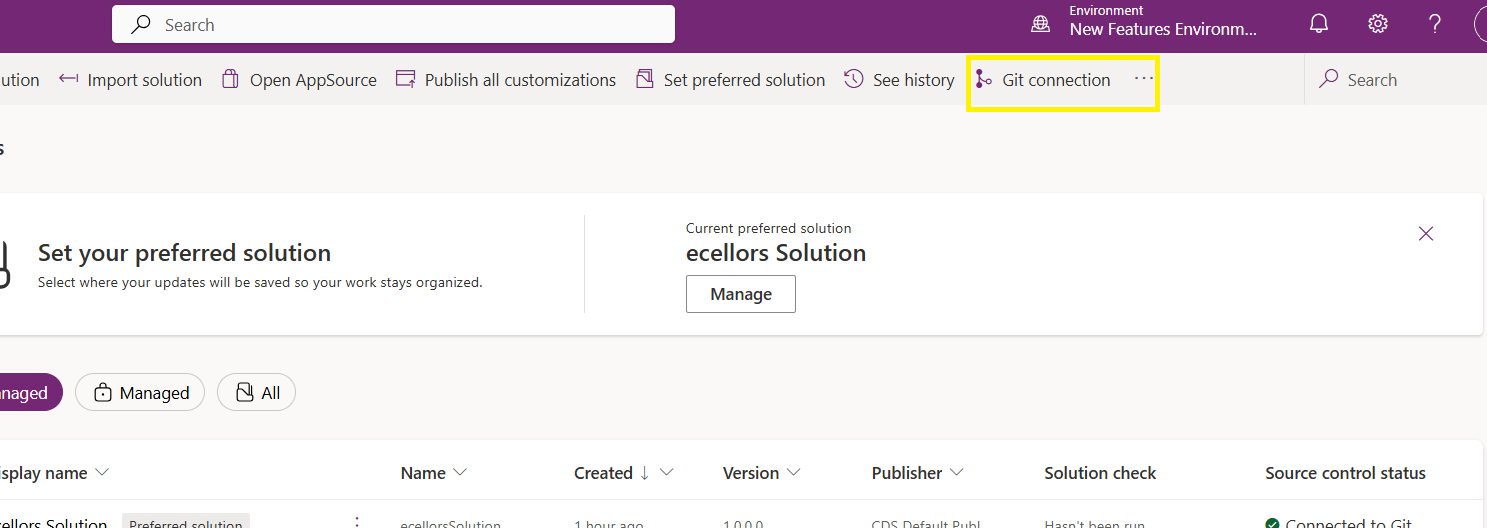
Environment Binding: When we use this, all the unmanaged solution components will be mapped to one Azure DevOps root folder. Let’s set this up.
We are currently able to use only Solution binding, as Environment Binding doesn’t show up any changes to be committed, but there is a catch here.
We can set up for Environment binding and verify if the Solution components are getting marked as pending changes or not. Do note that Setting up the Binding is a one time activity for environment, once setup, it can’t be changed from one type to another.
Since we were currently using Environment binding, let’s select the Connection Type as Environment
Then click on Connect, once connected, you should a alert message in power apps maker portal at the top.
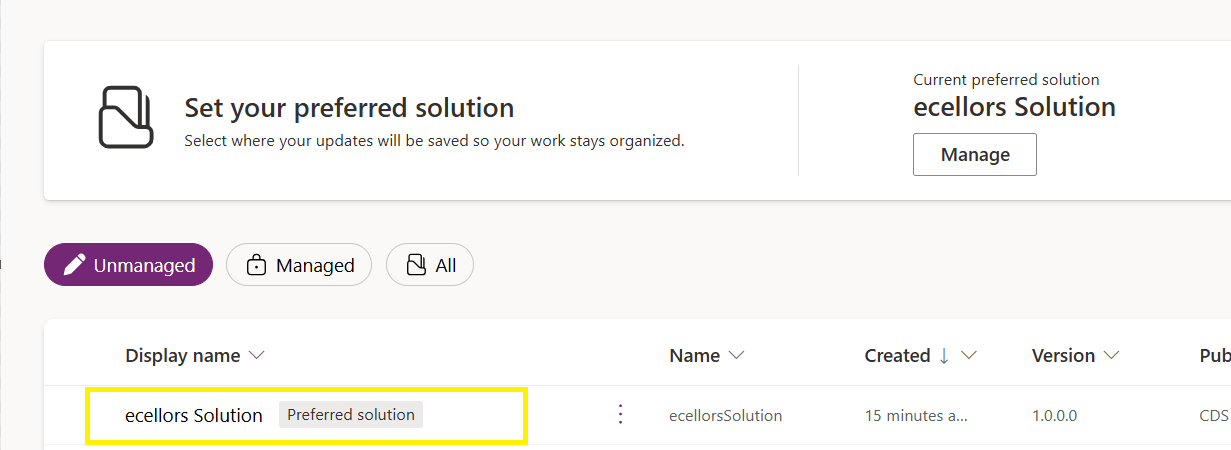
Now create a new solution as below named ecellors Solution
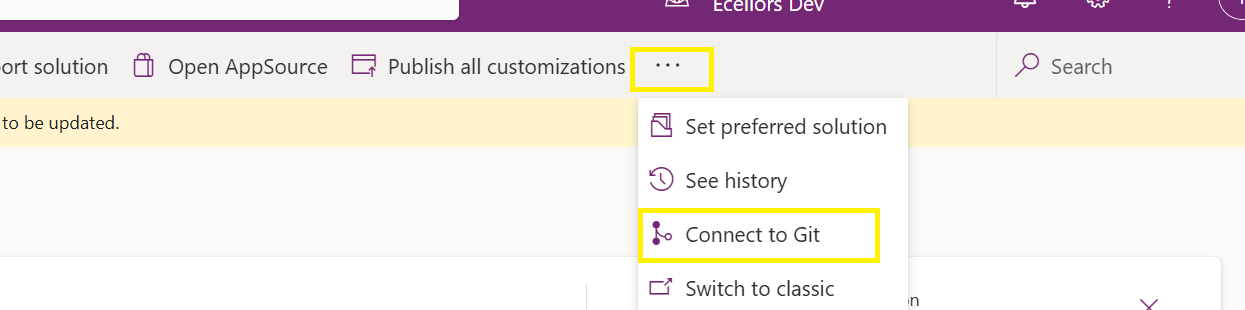
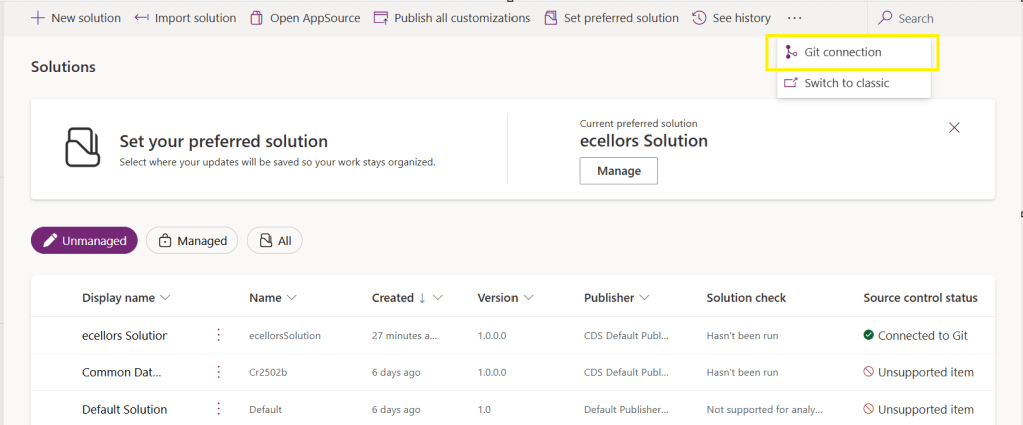
Verify the integration by clicking on Git Integration as below
It should show as below
Now let’s add few components to the solution we created
Once added, let’s publish the unmanaged solution and verify it..
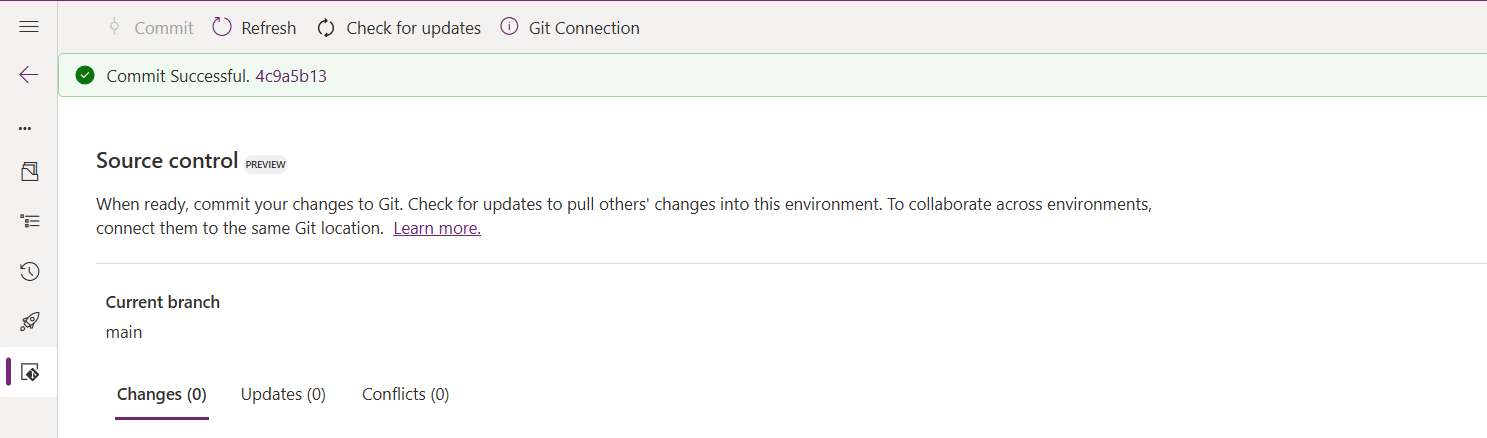
Do look closely, you should see a Source Control icon highlighted in yellow color for illustration.
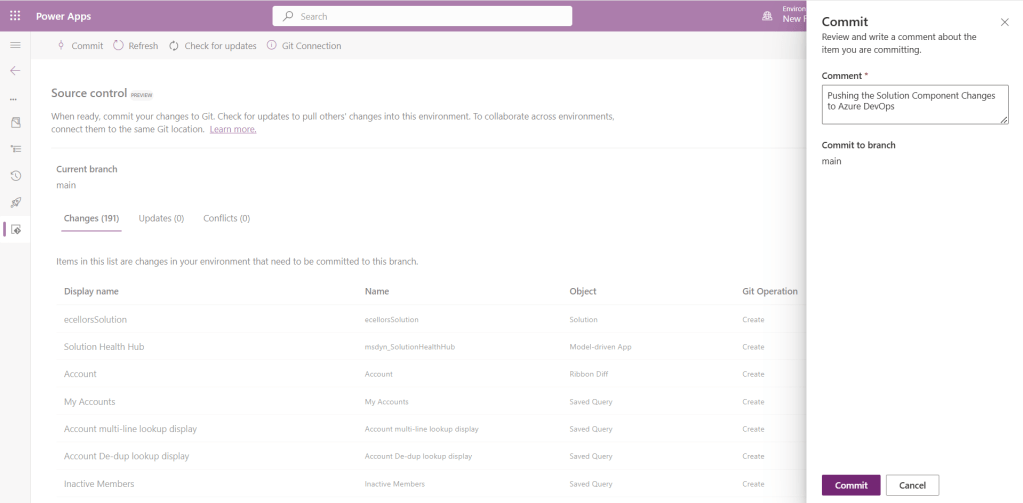
Also, you should see a commit option available at the top
You should now be able to commit the solution components as if you are committing the code changes.
It also specifies the branch to which we were commiting…
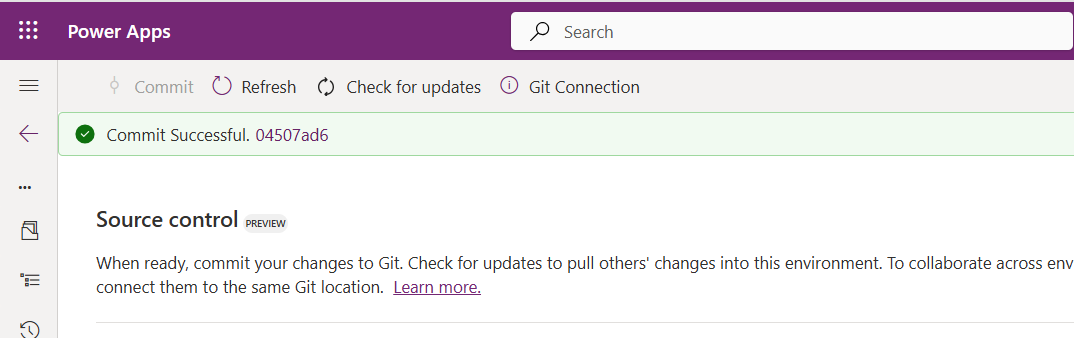
While it takes few minutes unlike pushing the code to Azure DevOps to push the changes, however this would depend based on the number of solution components you were pushing..once it is done, it will show a commit message like below…
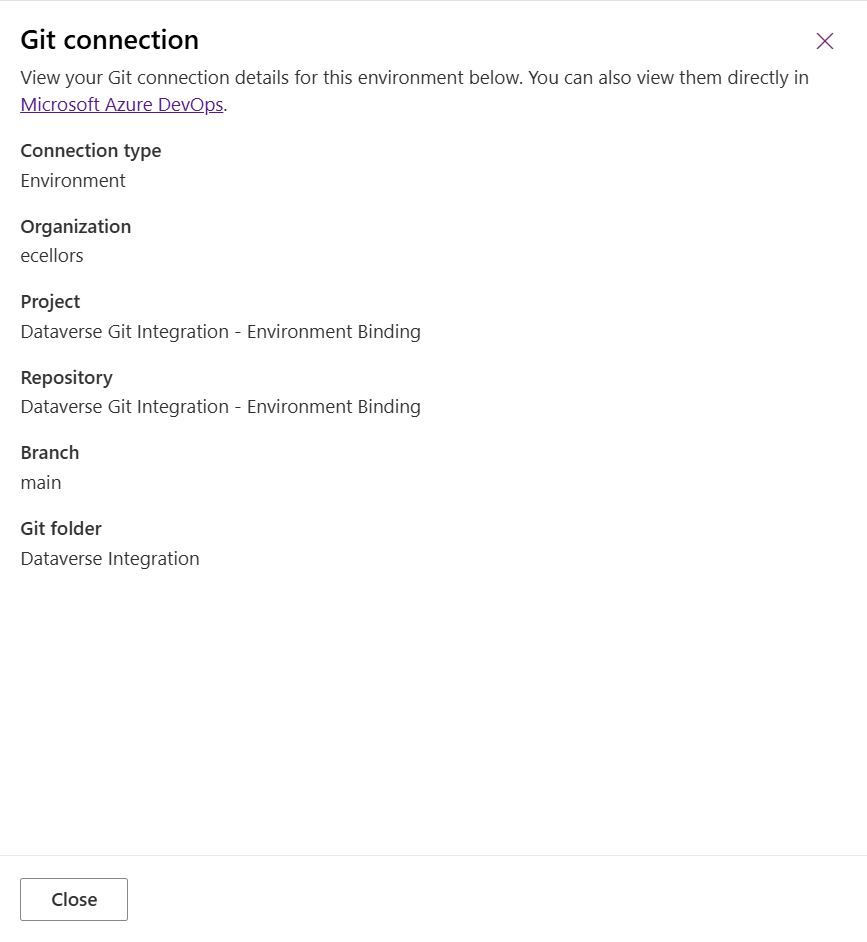
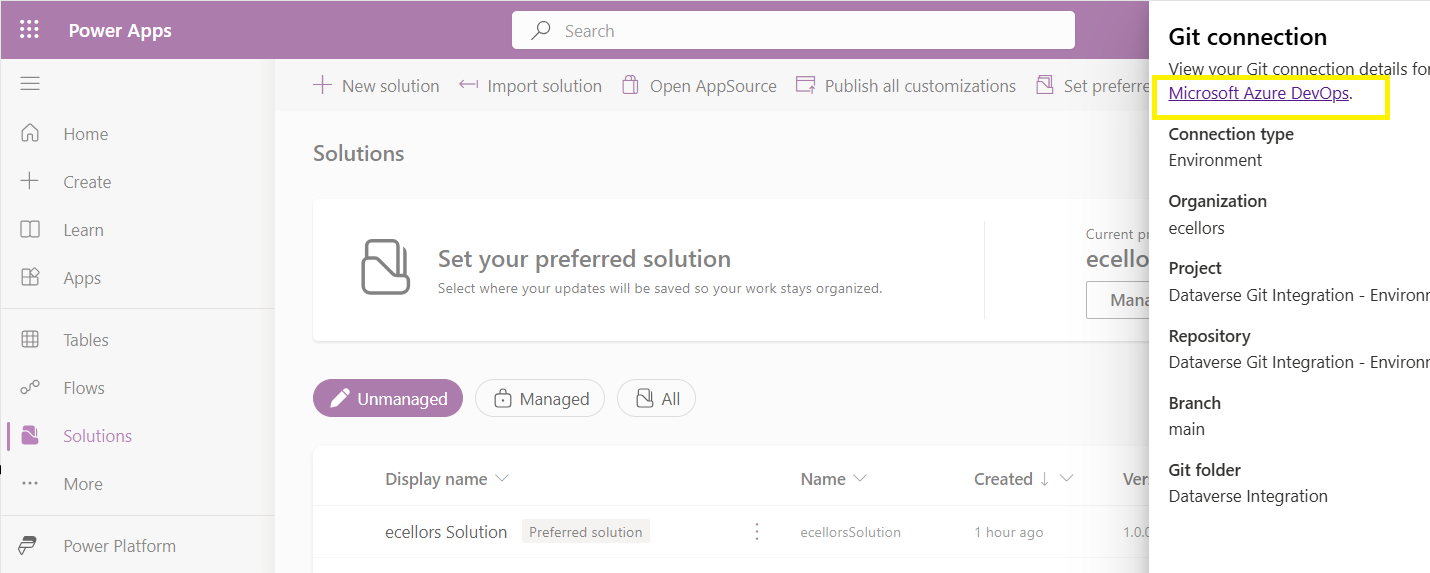
Now let’s verify our Azure DevOps Repo..for this you can go back to the main solutions page, click on Git Connection at the top..
After clicking on Git Connection, click on the link to Microsoft Azure DevOps as below
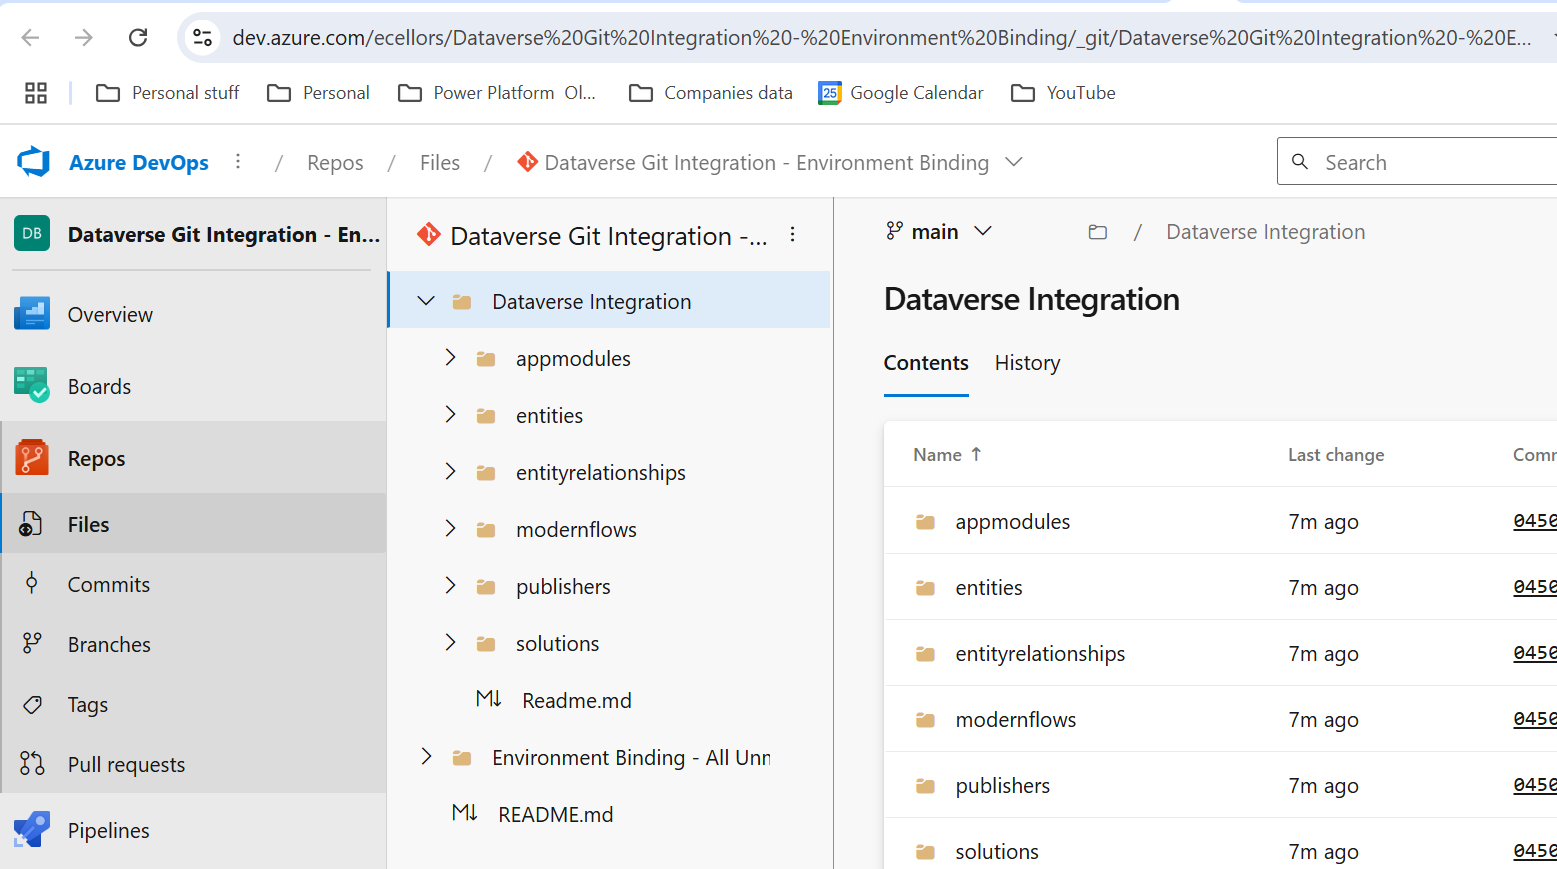
Then you should be navigated to Azure DevOps folder as below where all the solution files will be tracked component wise.
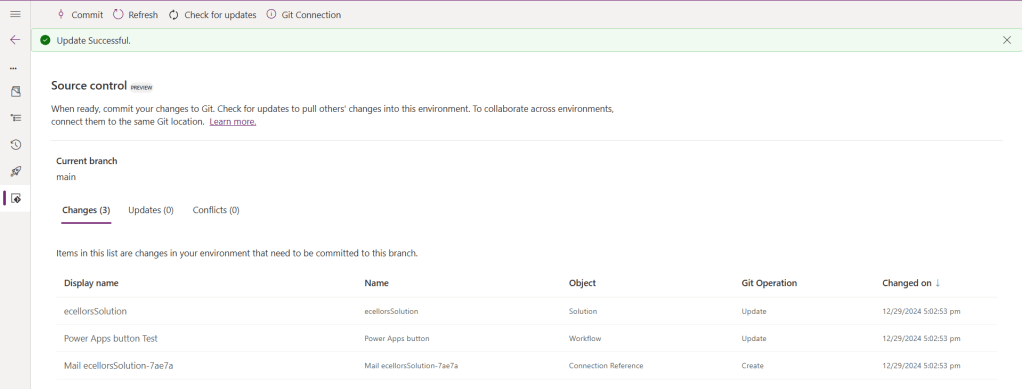
Now we will move back to Power Apps maker portal and make some changes to any of the components inside the solution…
Let’s say, I just edited the flow name and created a new connection reference, saved and published the customizations.
If you did some changes at the Azure DevOps repo level, you can come back and click on Check for updates, if there were any conflicts between changes done in Azure DevOps and component in solution, it will be shown as conflict.
We now have 3 component changes and all were listed here…you can click on Commit.
As soon as the changes are committed, you should see a message saying Commit Successful and 0 Changes, 0 Updates, 0 Conflicts.
Now you successfully integrated Dataverse Solution components with Azure DevOps without any manual intervention required while deploying solutions using Azure DevOps Pipelines.
Hope you learned something new today…while feature is still in Preview and only available for early release, while couple of issues still need to fixed by Microsoft.
I have tested this feature by creating an environment in US Preview region and this feature will be a good value to projects using Automation and this solution repository can be further deployed to other environments using Azure DevOps Pipelines.
This will be rolled out soon next year, hope you learned something new today…
This is an introductory post, but it’s worth going through where I will be sharing basics about using Centre of Excellence(COE) in Power Platform. Let’s get started.
So, what’s Center of Excellence? COE plays a key role in deriving strategy and move forward in this fast-paced world to keep up with the innovation. Firstly, we may need to ask ourselves few questions…Do your organization have lot of flows, apps and copilots aka power virtual agents? Do you want to effective manage them? Then how you want to move forward…using COE Starter kit is a great choice. It is absolutely free to download, the starter kit is a collection of components and tools which will help to oversee and adopt Power Platform Solutions. The assets part of the CoE Starter Kit should be seen as a template from which you inherit your individual solution or can serve as inspiration for implementing your own apps and flows.
There were some prerequisites before you can install your COE Starter Kit. Many of the medium to large scale enterprise Power Platform implementations should be possessing in their tenant.
Microsoft Power Platform Service Admin, global tenant admin, or Dynamics 365 service admin role.
Dataverse is the foundation for the kit.
Power Apps Per User license (non-trial) and Microsoft 365 license.
Power Automate Per User license, or Per Flow licenses (non-trial).
The identity must have access to an Office 365 mailbox that has the REST API enabled meeting the requirements of Outlook connector.
Make sure you enable the Power Apps Code Components in Power Platform Admin Center
If you want to track unique users and app launches, you need to have Azure App Registration having access to Microsoft 365 audit log.
If you would like to share the reports in Power BI, minimally you require a Power BI pro license.
Setting up communication groups to talk between Admins, Makers and Users.
Create 2 environments, 1 for test and 1 for production use of Starter Kit
Install Creator Kit in your environment by downloading the components from here
The following connectors should be allowed to effectively use data loss prevention policies(DLP)
Once you were done checking the requirements, you can download from the starter kit here.
You can optionally install from App Source here or using Power Platform CLI here.
The kit provides some automation and tooling to help teams build monitoring and automation necessary to support a CoE.
While we saw what advantages are of having COE in your organization and other prerequisites. In the upcoming blog post, we will see how you can install COE starter kit in your Power Platform tenant and set it up to effectively plan your organization resources for highest advantage.
Well this post is not related to Power Platform, but I want to bring it on here to specify the significance of using NOLOCK in Power Platform Implementations using SQL Server.
Recently during our Deployment activity, we had a SSIS job which is writing a lot of data into SQL Server, at the same time, we were trying to read the data from the same table. I received never ending Executing query … message. It is when I had arguments on this, hence I would like to share the significance of NOLOCK.
The default behaviour in SQL Server is for every query to acquire its own shared lock prior to reading data from a given table. This behaviour ensures that you are only reading committed data. However, the NOLOCK table hint allows you to instruct the query optimizer to read a given table without obtaining an exclusive or shared lock. The benefits of querying data using the NOLOCK table hint is that it requires less memory and prevents deadlocks from occurring with any other queries that may be reading similar data.
In SQL Server, the NOLOCK hint, also known as the READUNCOMMITTED isolation level, allows a SELECT statement to read data from a table without acquiring shared locks on the data. This means it can potentially read uncommitted changes made by other transactions, which can lead to what’s called dirty reads.
Here’s an example:
Let’s say you have a table named Employee with columns EmployeeID and EmployeeName.
Now, if two transactions are happening concurrently:
Transaction 1:
BEGIN TRANSACTION
UPDATE Employee
SET EmployeeName = 'David'
WHERE EmployeeID = 1;
Transaction 2:
SELECT EmployeeName
FROM Employee WITH (NOLOCK)
WHERE EmployeeID = 1;
If Transaction 2 uses WITH (NOLOCK) when reading the Employee table, it might read the uncommitted change made by Transaction 1 and retrieve 'David' as the EmployeeName for EmployeeID 1. However, if Transaction 1 rolled back the update, Transaction 2 would have obtained inaccurate or non-existent data, resulting in a dirty read.
Key takeaways about NOLOCK:
✅ Pros: Reduces memory use, avoids blocking, speeds up reads.
❌ Cons: May read uncommitted or inconsistent data.
Using NOLOCK can be helpful in scenarios where you prioritize reading data speed over strict consistency. So, in my case as I want to just view the data, using NOLOCK is good without locking the query. However, it’s essential to be cautious since it can lead to inconsistent or inaccurate results, especially in critical transactional systems.
Other considerations like potential data inconsistencies, increased chance of reading uncommitted data, and potential performance implications should be weighed before using NOLOCK.
Conclusion:
There are benefits and drawbacks to specifying NOLOCK table hint as a result they should not just be included in every T-SQL script without a clear understanding of what they do. Nevertheless, should a decision be made to use NOLOCK table hint, it is recommended that you include the WITHkeyword. Using NOLOCK without WITH Statement is deprecated. Always use a COMMIT keyword at the end of the transaction.
In App notifications are trending these days where many customers are showing interest in implementing these for their businesses.
So, in this blog post, I am going to show you the easiest way to generate In App notification using XrmToolBox in few clicks. Use the below tool to generate one.
So, let me walk you through step by step
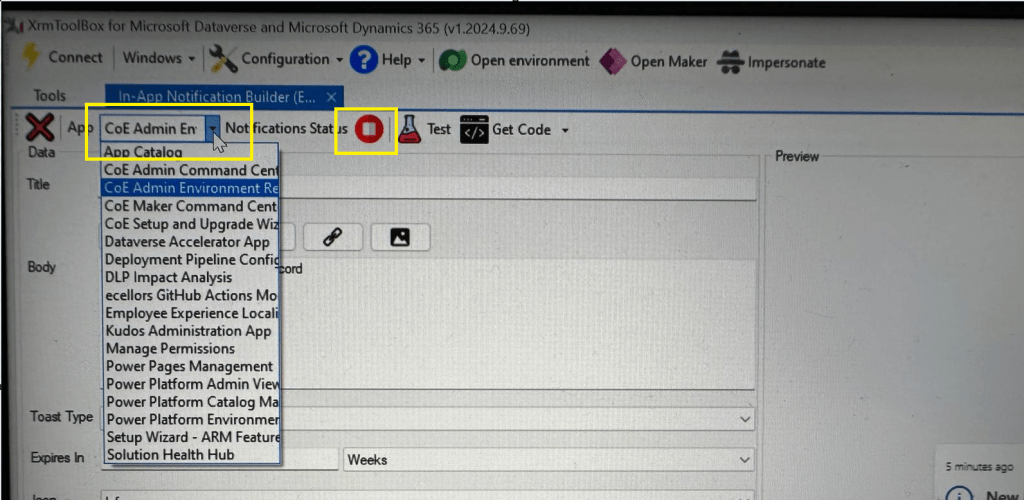
Step 1: Open In App Notification Builder in XrmToolBox
Step 2: In App notification is a setting that should be enabled at App level, so meaning if you have developed few Model Driven Apps, you will be able to enable the In App notification individually for each one of them.
Step 3: In the above snapshot, we should be able to select the respective App for which we want to enable the In App Notification. Red bubble besides indicate that the In App notification is not enabled for this App.
So, we need to enable it by clicking on the red icon itself, you should then be able to get this prompt as below.
Step 5: Upon confirming the confirmation dialog box, the In App notification will be enabled for that App and you the red button turns to green as below saying that In App Notification is enabled.
Now that the In App notification is enabled in the App, we will proceed with the remaining setup.
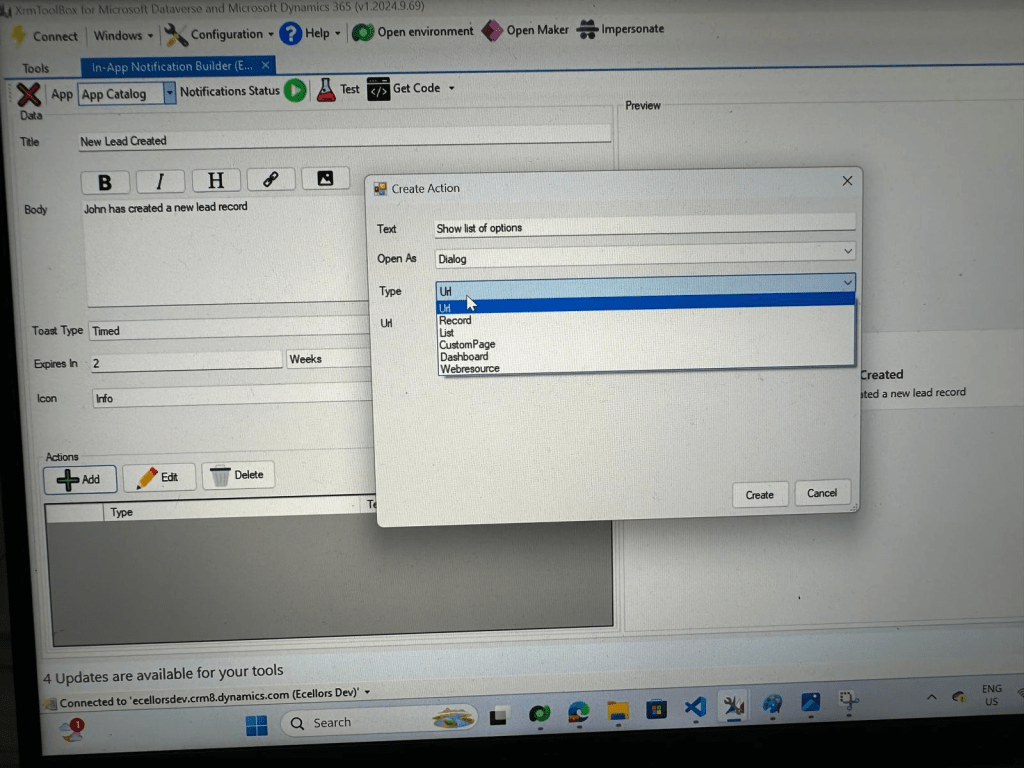
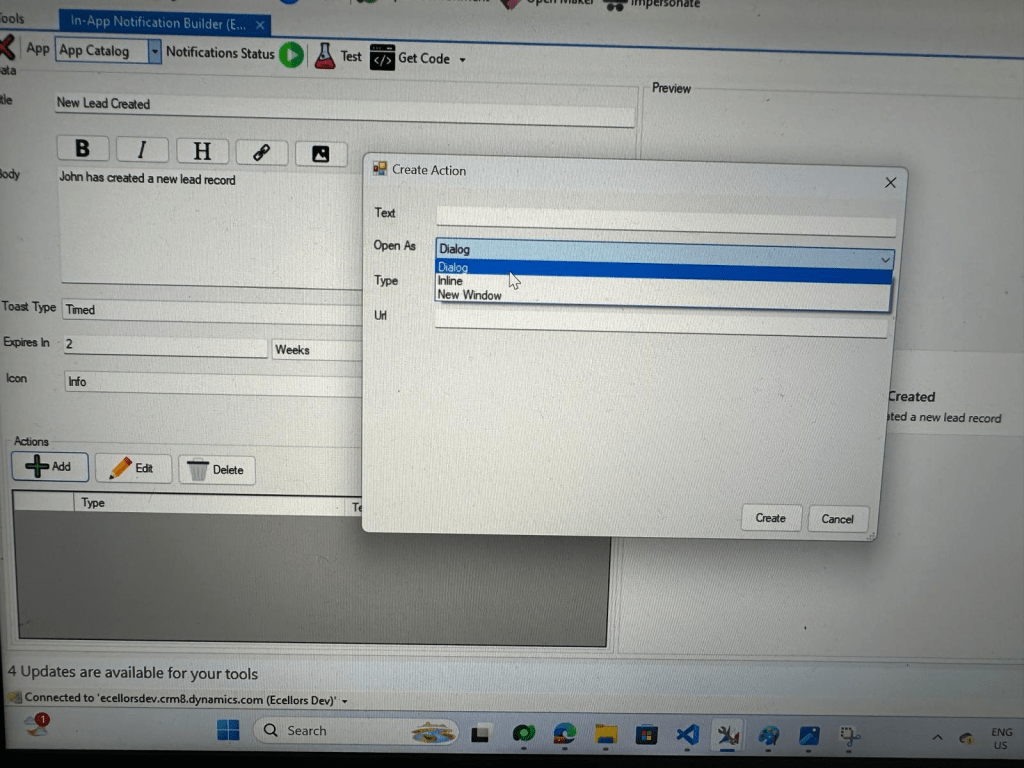
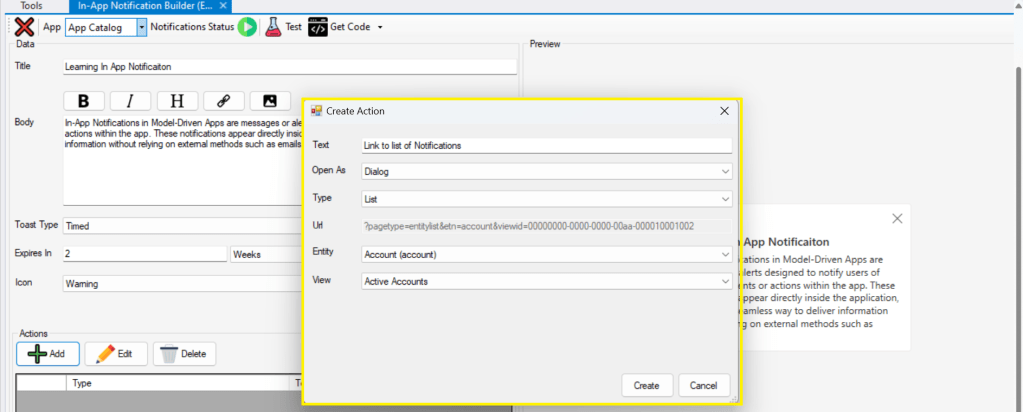
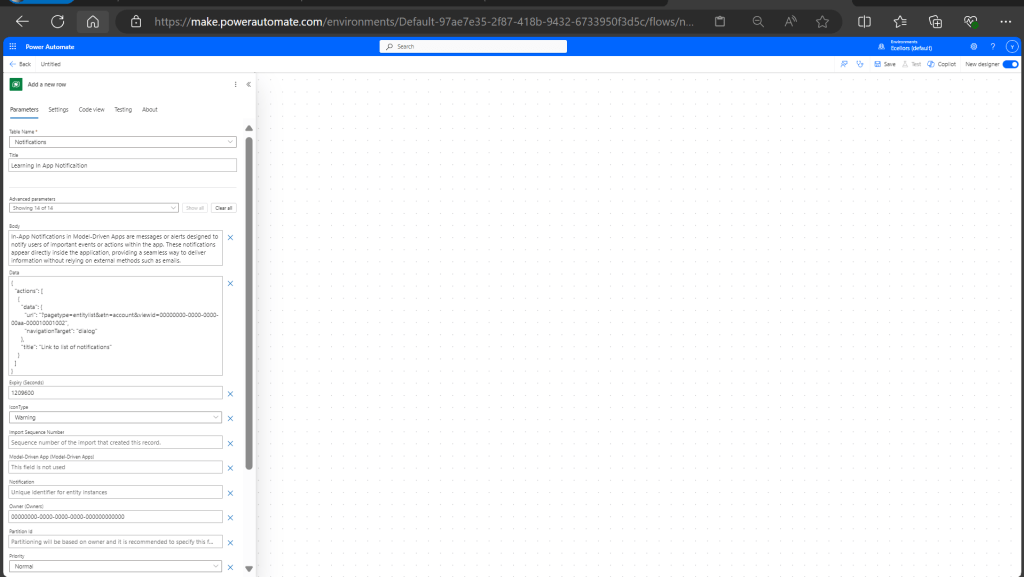
Step 6: You can proceed to give a meaningful title, body for you In App Notification. Also mention the required toast type and specify the expiry duration, Icon. Also Click on Add icon and choose the action required to be performed when In App notification is clicked.
Step 9: You can even choose the type of action to be performed…
For example, let’s use to open as dialog and show list view
Your screen should look something like below
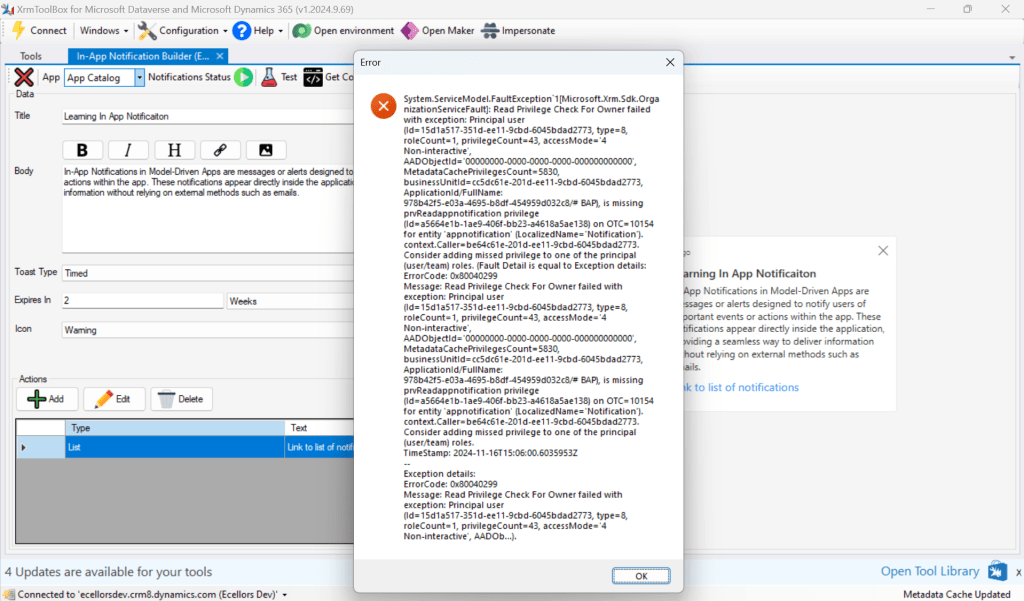
Step 10: Once done, you can click on create and that’s it you have now created In App Notification. Now let’s test this for the user who have priveleges to access this App.
If not, you will face this error..
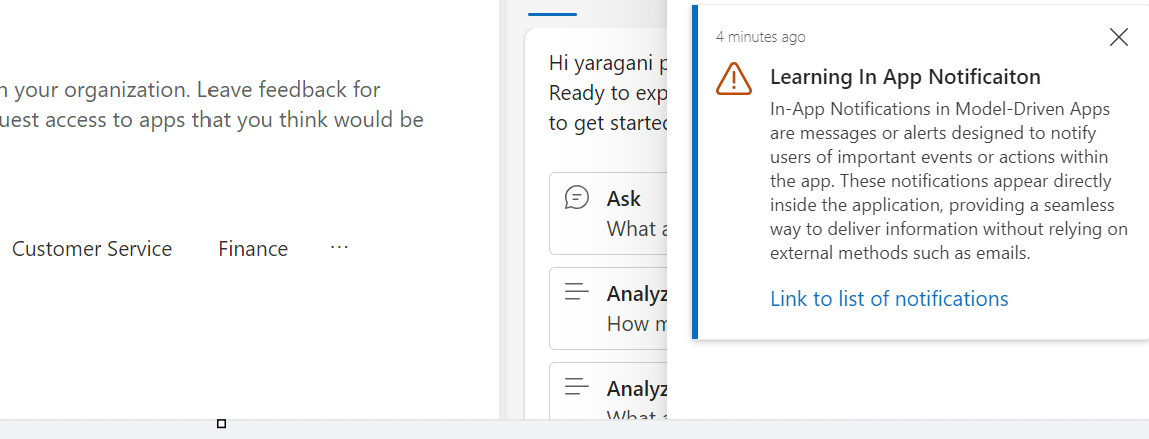
Log in with user account for which the In App Notification is triggered.
Hurray!!!! That’s it, how easy it was to create In App Notification in Low Code manner.
You can even get the code behind this as well…
However, there were other ways to trigger the In App Notification from a Pro Code angle, let’s discuss those as well.
In this case you need to manually turn the In App Notification feature on by going to settings for the Model Driven App as below first.
Notifications can be sent using the SendAppNotification message using SDK.
You can either trigger from and can choose based on your convenience to trigger a similar notification.
Client Scripting
This file contains hidden or bidirectional Unicode text that may be interpreted or compiled differently than what appears below. To review, open the file in an editor that reveals hidden Unicode characters.
Learn more about bidirectional Unicode characters
'body': `In-App Notifications in Model-Driven Apps are messages or alerts designed to notify users of important events or actions within the app. These notifications appear directly inside the application, providing a seamless way to deliver information without relying on external methods such as emails.`,
This file contains hidden or bidirectional Unicode text that may be interpreted or compiled differently than what appears below. To review, open the file in an editor that reveals hidden Unicode characters.
Learn more about bidirectional Unicode characters
["body"] = @"In-App Notifications in Model-Driven Apps are messages or alerts designed to notify users of important events or actions within the app. These notifications appear directly inside the application, providing a seamless way to deliver information without relying on external methods such as emails.",
["ownerid"] = new EntityReference("systemuser", new Guid("00000000-0000-0000-0000-000000000000")),
["icontype"] = new OptionSetValue(100000003), // Warning
["toasttype"] = new OptionSetValue(200000000), // Timed
This blog post is all about the latest features released in Power BI Desktop for DAX(Data Analysis Expressions) using DAX Query View.
Do you have the requirement any time to document your DAX functions used in your Power BI Report, then use the DAX query view which introduced new DAX functions to get metadata about your semantic model with the INFO DAX functions.
Firstly, if you were not aware, DAX Query view is the recent addition where we can query the model similar to how the analysts and developers used Power BI Desktop or other 3rd party tools to get the same information earlier. You can access DAX Query view as below in green.
When you navigate to the DAX Query view, key points to note are as below
DAX Queries will be directly saved to your Model when saved from DAX Query View
DAX Query View will not be visible when the Power BI Report is published to the Power BI Service
The results of the DAX will be visible at the bottom of the page as shown below
IntelliSense is provided by default
There were 4 DAX INFO.VIEW Functions introduced as below
List all your Measures using INFO.VIEW.MEASURES() This lists down all the measures in your Semantic Model, it also provides the Expression used for the Measure along with which table it was created.
I have selected the whole results of the measures and Copy the results you see see in the table below
Just go to Model View and click Enter Data
You will be shown a screen like this
Just do a Cntrl + V as you have previously copied the table information
That’s it, how easy it was to document all the Measures, similarly you can document all the Meta Data available for the Power BI Report.
That’s it for today, hope you learned a new feature in Power BI Desktop…
This is the second blog post series on Canvas Apps where you can learn and grow from Zero – Hero in Canvas Power Apps. In this blog post, we will talk about different ways you can get started with creating canvas apps.
Introduction
Power Apps Canvas Apps allow users to build powerful applications with a drag-and-drop interface, requiring little to no coding. Whether you’re a beginner or an experienced user, setting up your first Canvas App is a straightforward process. This guide walks you through each step.
Basic knowledge of what you want to build (e.g., a simple data entry form).
Step 1: Accessing Power Apps Studio
There were different ways you can create a Canvas Apps
You can create a canvas app by giving your requirement in Copilot which will in turn build your Canvas Apps.
2. You can design them using any of the existing templates available
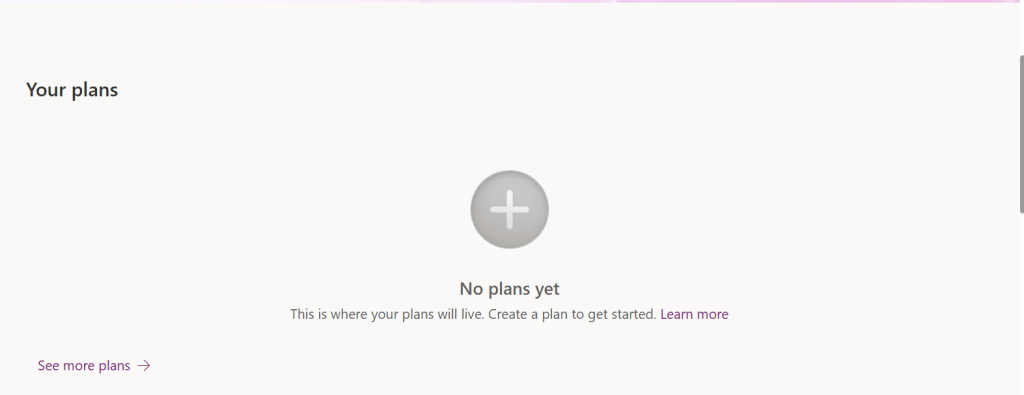
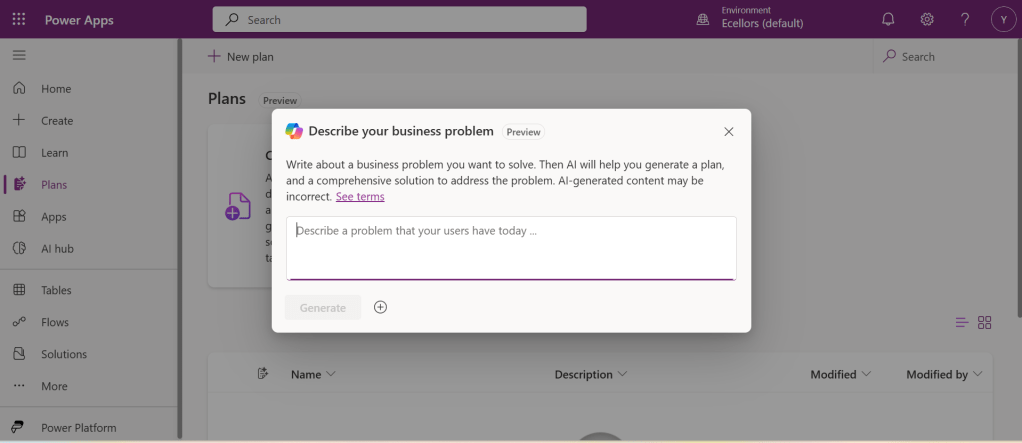
3. You can also design your App using Plan designer which is the latest feature released and still in preview, for this you need to enable
For this you need to have an plan available
You can click on See more plans option available, create new plans if necessary
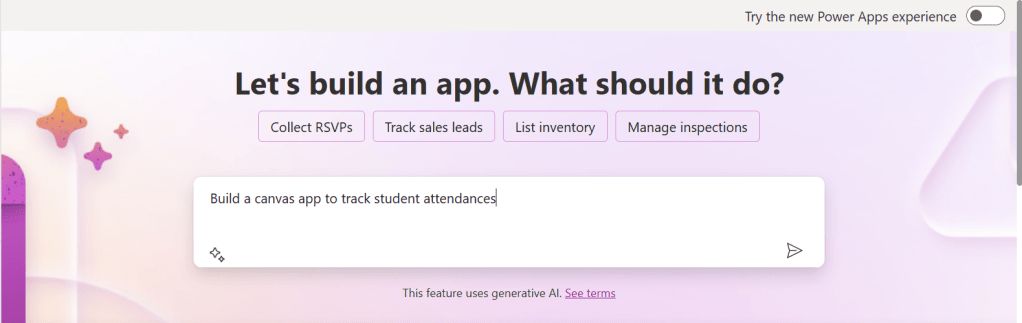
You have to state your business problem, this is pretty much same as using the Copilot in the old experience but here you just tell what problem you have been solving by creating the App, that’s it.
I entered Tracking Student Attendances as my problem and within a matter of 1 min, it designed whole data model where you can accept or propose for a new change.
Once you accept, next it will go ahead and start preparing the data necessary.
After you accept this, it will start designing for the user experiences
Once everything is done, you
It will ask you to save in a solution, this way you will be able to save all your changes to a solution which can be safely moved across environments.
And that’s it, your fully functional app is ready in few mins.
Step 2: Designing Your App
Once inside the Power Apps Studio:
Drag and drop controls from the left-side panel to the canvas.
Add labels, text inputs, buttons, and galleries as needed.
Resize and align elements for a clean layout.
Below is the sample Power App screen in Studio containing the components.
Step 3: Connecting to a Data Source
Click on Data in the left panel.
Select Add data and choose a source like SharePoint, Dataverse, or Excel.
Connect your app to the data source.
Step 4: Adding Functionality with Formulas
Power Apps uses Excel-like formulas to add functionality. Example:
To navigate to another screen: Navigate(Screen2, ScreenTransition.Fade)
To filter data: Filter(Orders, Status="Pending")
Step 5: Previewing and Testing Your App
Click on the Play button in the top-right corner.
Test the app’s functionality.
Fix any layout or data issues as needed.
Image Suggestion: Screenshot showing the app running in preview mode.
Step 6: Saving and Publishing
Click File > Save As.
Choose Cloud as the storage option.
Click Publish to make your app available.
Image Suggestion: Screenshot of the Save & Publish screen.
Conclusion
Congratulations! You’ve built your first Canvas App. You can continue refining it by adding more features, integrating AI, or automating workflows.
Are you ready to explore more? Share your first Canvas App experience in the comments!
Do you want step by step guided walk through, then check this App in a Day Workshop from Microsoft where you can start from scratch and build a fully functional Canvas App.
After a while, I am back with another interesting way to solve this type of problem in Power BI. It took increasingly more amount of time to figure out best approach, this post is to help suggest a way of solving differently. This post is a bit lengthy but I will try to explain it in the best way I can.
Here is the problem, I have date fields from 2 fact tables, I have to filter them using a single date slicer which is connected to a calendar table and show the data when any of dates in a particular row falls in the date slicer range. I initially thought this was an easy one and could be solved by creating a relationship between the two fact tables with calendar table, then slice and dice the data as I was able to filter the data with one fact table when connected to calendar table.
I was unable to do that because there were multiple date fields in one fact table and need to consider dates from two tables. I tried to get the value from the slicer using Calculated field since I have do row by row checking. Later understood that, date slicer values can be obtained using a calculated field but those will not be changing when the dates in date slicer is getting changed, this is because the Calculated fields using row context and will only be updated when data is loaded or user explicitly does the refresh. Instead we have to use measure which is calculated by filter context.
The interesting point here is that, if a measure is added to the visual, it returns same value for each row, so a measure shouldn’t be added to a visual as it calculates values on a table level and not at row level, it is ideal if you want to perform any aggregations.
I tried this approach using the great blog post from legends of Power BI(Marco Russo,Alberto Ferrari), but this looked increasingly complex to my scenario and don’t really need to use this, if you still wish to check this out, below is the link to that.
So, then I tried to calculate the Maximum and Minimum for each row in my fact table using MAXX; MINX functions
MaxxDate =

VAR Date1 = FactTable[Custom Date1]
VAR Date2 = FactTable[Custom Date2]

RETURN
MAXX(
    {
        Date1,
        Date2

    },
    [Value]
)
MinXDate =

VAR Date1 = FactTable[Custom Date1]
VAR Date2 = FactTable[Custom Date2]

RETURN
MAXX(
    {
        Date1,
        Date2

    },
    [Value]
)
After merging the two tables into a single one, then create two slicers connected to Maximum Date and Minimum Date for each row. I thought my problem is solved, but it isn’t, since I was only able to filter the dates which have a maximum or minimum value selected in the date slicer, any date value within the date range is being missed.
This file contains hidden or bidirectional Unicode text that may be interpreted or compiled differently than what appears below. To review, open the file in an editor that reveals hidden Unicode characters.
Learn more about bidirectional Unicode characters
2. Here I didn’t create any relationship between the fact and dimension tables, you can leave them as disconnected as below
3. All you need is a simple measure which calculates if any of the dates in the fact table fall under the slicer date range, here is the piece of code
This file contains hidden or bidirectional Unicode text that may be interpreted or compiled differently than what appears below. To review, open the file in an editor that reveals hidden Unicode characters.
Learn more about bidirectional Unicode characters
In this post, I will be talking about the features of Dataverse Accelerator in brief. Actually, the Microsoft Dataverse accelerator is an application that provides access to select preview features and tooling related to Dataverse development, it is based on Microsoft Power Pages. This is totally different from Dataverse Industry Accelerator.
Dataverse accelerator app is automatically available in all new Microsoft Dataverse environments. If your environment doesn’t already have it, you can install the Dataverse accelerator by going to Power Platform Admin Center –> Environments –> Dynamics 365 Apps –> Install App –> Choose Dataverse Accelerator
You can also refer to my previous blog post on installing it here if you prefer
Once installed, you should see something like below under the Apps
On selection of the Dataverse Accelerator App, you should see something like below, do note that you must have App-level access to the Dataverse accelerator model driven app, such as system customizer or direct access from a security role.
Now let’s quickly see what are features available with Dataverse Accelerator
Reusable, real-time workflows that execute a specific set of commands within Dataverse. Low-code plug-ins run server-side and are triggered by personalized event handlers, defined in Power Fx.
A modern interface to surface the existing plug-in trace log table in Dataverse environments, designed for developing and debugging Dataverse plug-ins and custom APIs. Do you remember viewing Plugin Trace logs from customizations, now you don’t need system administrator role to view trace logs, giving access to this app will do, rest everything remains the same.
A preauthenticated software testing tool which helps to quickly test and play with Dataverse API’s.
I wrote a blog post earlier on using Low Code Plugins, you may check it out here, while using Plugin Monitor is pretty straight forward.
You can find my blog post on using Postman to test Dataverse API’s here.
Now let’s see how can use the API Playground, basically you will be able to test the below from API Playground similar to Postman. All you need to open the API Playground from Dataverse accelerator. You will be preauthenticated while using API Playground.
Instant plug-ins are classified as any user-defined workflows registered as a custom API in the environment with a related Power Fx Expressions.
OData request
Allows more granular control over the request inputs to send OData requests.
Custom API, Instant Plugin – You select the relevant request in the drop down available in API Playground and provide the necessary input parameters if required for your request
OData request – Select OData as your request and provide the plural name of the entity and hit send
After a request is sent, the response is displayed in the lower half of your screen which would be something like below.
I will update this post as these features get released in my region(APAC), because at the time of writing this blog post, this API Playground feature is being rolled out globally and was still in preview.
The Dataverse accelerator isn’t available in GCC or GCC High environments.
Hope learned something about Dataverse Accelerator.