Establishing tenant hygiene with the CoE Starter Kit – Learn COE #04

Hi Folks,

In this blog post, I am going to talk about establishing tenant hygiene using COE Stater kit, in today’s world where there increasing Power Platform demand. Organizations have become mature, that every implementation is now looking for having some kind of governance being established.

If you were some one who want to get some knowledge of implementing governance, you were at right place.

In order to efficiently implement governance, we need to understand the environment strategy, your current implementation has used. Of course if you were looking for some guidance, there were examples of tooling available in the CoE Starter Kit and out-of-the-box capabilities to help CoE teams effectively manage and optimize their Power Platform solutions.

Few key steps to be considered for maintaing this in your environment, so let’s get started…

  1. Define Environment Strategy
  • Assign your admins the Power Platform service admin or Dynamics 365 service admin role.
  • Restrict the creation of net-new trial and production environments to admins
  • Rename the default environment to ‘Personal Productivity’
  • Provision a new Production environment for non-personal apps/flows
  • Define and implement your DLP policies for your environments
  • When establishing a DLP strategy, you may need multiple environments for the same department
  • When establishing your Power Platform environment strategy, based upon your licensing, you may find that you need to provision environments without a Dataverse (previously called Common Data Service) database and also use DLP policies to restrict the use of premium connectors.
  • Establish a process for requesting access or creation of environments
  • Dev/Test/Production environments for specific business groups or application
  • Individual-use environments for Proof of Concepts and training workshops
  • Use a service account to deploy production solutions
  • Reduce the number of shared development environments
  • Share resources with Microsoft Entra Security Groups.

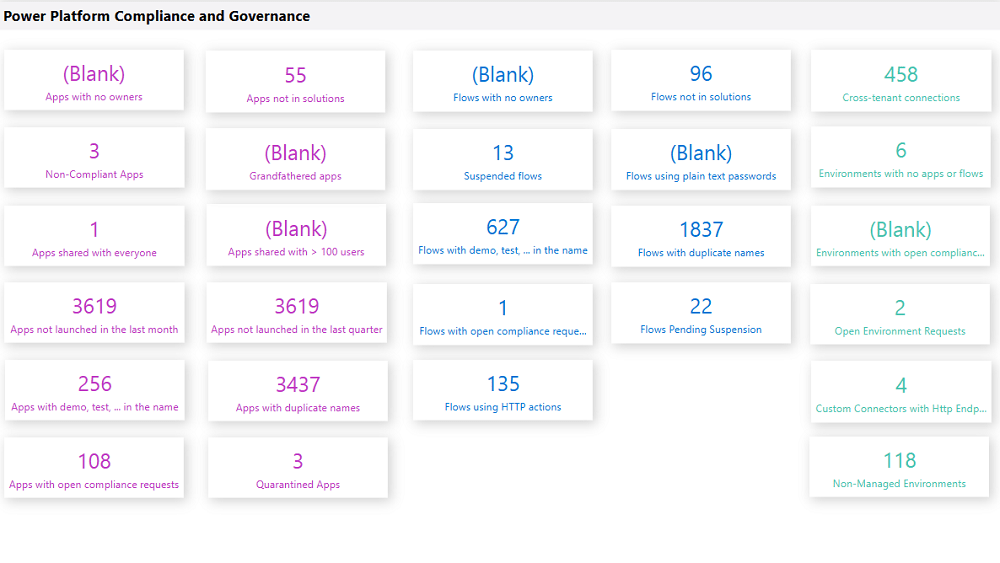
2. Compliance and Adoption:

The Compliance page in the CoE Starter Kit’s Compliance and adoption dashboard can help you identify apps and flows with no owners, noncompliant apps, and suspended flows.

  • Rename and secure the default environment
  • Identify unused apps, pending suspension, suspended cloud flows and not without an owner or not in solutions
  • Quarantined noncompliant apps and clean up orphaned resources
  • Enable Managed Environments and establish a data loss prevention policy
  • Apply cross tenant isolation
  • Assign Administrator roles appropriately
  • Apps and flows with duplicate names not compliant with DLP policies or billing policies
  • Apps shared with everyone and apps shared with more than 100 users and Apps not launched in the last month and in the last quarter
  • Flows using plain text passwords and using HTTP actions
  • Cross-tenant connections
  • Environments with no apps or flows
  • Custom connectors using HTTP environments

3. Managing Dataverse for Teams environments

If you were not using Dataverse for Teams, you can safely skip this step, else please review

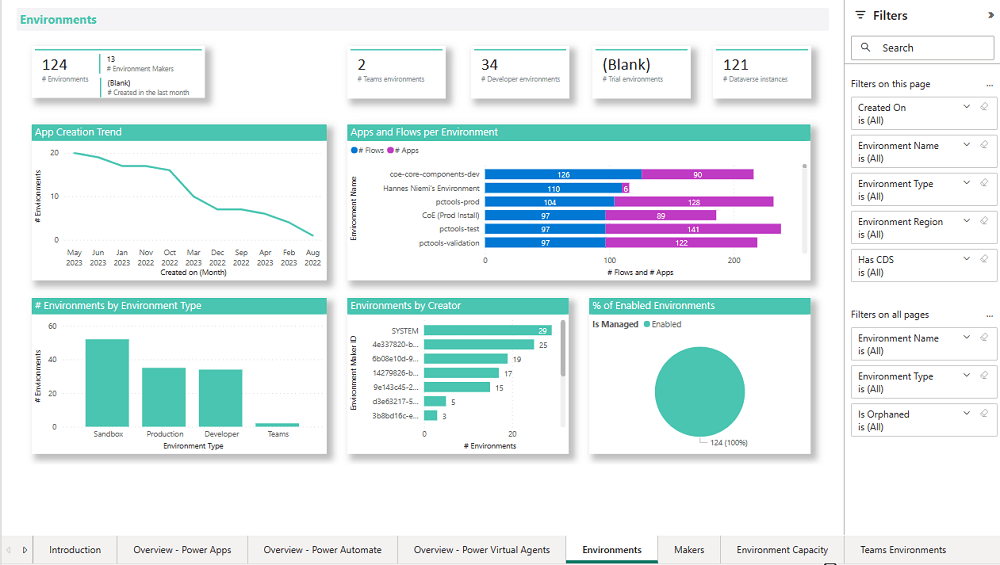
The Microsoft Teams environments page in the CoE Starter Kits dashboard provides you with an overview of your existing Teams environments, apps and flows in those environments, and the last launched date of apps.

Screenshot of a Microsoft Teams Environments overview.

By checking for new Dataverse for Teams environments daily, organizations can ensure they’re aware of all environments in use. 

State of Dataverse for TeamsPower Platform action
83 days after no user activitySend a warning that the environment will be disabled. Update the environment state on the Environments list page and the Environment page.
87 days after no user activitySend a warning that the environment will be disabled. Update the inactive environment state on the Environments list page and the Environment page.
90 days after no user activityDisable the environment. Send a notice that the environment has been disabled. Update the disabled environment state on the Environments list page and the Environment page.
113 days after no user activitySend a warning that the environment will be deleted. Update the disabled environment state on the Environments list page and the Environment page.
117 days after no user activitySend a warning that the environment will be deleted. Update the disabled environment state on the Environments list page and the Environment page.
120 days after no user activityDelete the environment. Send a notice that the environment has been deleted.

Please note a warning is displayed only if the Dataverse for Teams environment is <= 7 days until disablement.
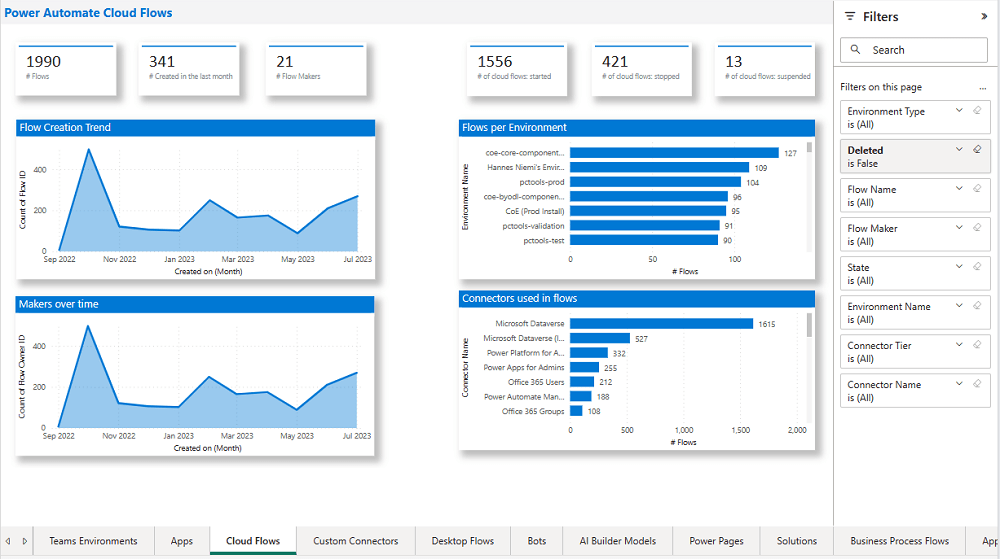
4. Highly used apps

The Power BI Dashboard available out of the box with COE Starter Kit will provide you the necessary guidance over high performing apps and also your most active users.

5. Communicating governance to your makers

This is one of the important step while setting up COE and governance guidelines, follow the below approaches

  • Clearly communicate the purpose and benefits of governance policies:Explain how governance policies protect organizational data
  • Make governance policies and guidelines easily accessible:Place the policies and guidelines in a central location that is easily accessible to all makers
  • Provide training and support:Offer training sessions and resources to help makers understand and comply with governance policies.
  • Encourage open communication: Foster culture where makers can ask questions and raise concerns about governance policies.
  • Incorporate governance into the development process:For example, you can require a compliance review before deploying a solution.

6. Administration of the platform

Power Platform Administrator Planning Tool which comes with COE Strater Kit provides guidance and best practices for administration. Also the planning tool can optimize environments, security, data loss prevention, monitoring and reporting.

6. Securing the environments

It is critical to establish a Data Loss Prevention (DLP) strategy to control connector availability.

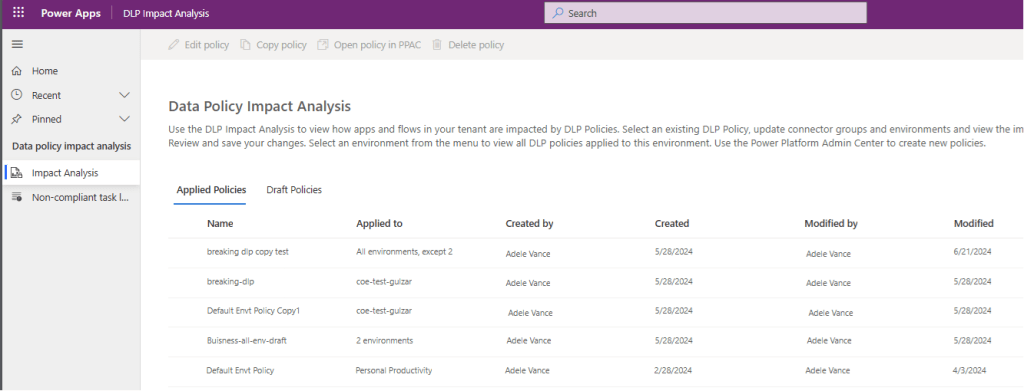
The DLP editor (impact analysis) tool is available for use before making changes to existing policies or creating new DLP policies. It reveals the impact of changes on existing apps and cloud flows and helps you make informed decisions.

Reference: COE Starter Kit Documentation

If you face issues using the COE Starter Kit, you can always report them at https://aka.ms/coe-starter-kit-issues

Hope this helps…. someone maintaining tenant governance with COE starter kit…. if you have any feedback or questions, do let me know in comments….

Cheers,

PMDY

Deploy dependent assemblies easily using PAC CLI

Hi Folks,

This is another post related to Plugins in Dynamics 365 CE.

Considering medium to large scale implementations, there isn’t a single Power Platform Project which don’t require merging of external assemblies.

We relied on ILMerge to merge those assemblies into a single DLL. We used to search for ILMerge assemblies in Nuget and installed them for use.

Then the plugins are signed in for several reasons, primarily related to security, assembly integrity, and versioning of the sandbox worker process.

But either of the above are no longer needed with the help of Dependent Assembly feature…with few simple steps, you can build the Plugin…Interesting, isn’t it, read on…

Pre requisites:

  • Download Visual Studio 2022 Community Edition here
  • Download VS Code from here
  • Download Plugin registration tool from here
  • Download PAC CLI from here
  • Download and install NuGet Package Explorer from this link NuGet Package Explorer open the NuGet Package Explorer

Avoid Direct Plugin Project Creation in Visual Studio

  • Never create a Plugin project directly from Visual Studio or any other IDE here after.
Use Microsoft PowerApps CLI instead
  • Always use Power Apps CLI as it easy and only requires a single command to create the entire Plugin project scaffolding
  • This ensures a standardized and reliable development environment.
  • It automatically creates a Nuget Package file that will be used to avoid ‘Could not load assemblies or its dependencies‘.

Ok, let’s begin.

Once you have downloaded all the prerequisites mentioned, make sure you have installed them in your local machine. Others are straight forward to download, for NuGet Package explorer, you need to search in Windows store to install.

  1. Create a local folder for the Plugins

Navigate to that folder from VS Code

Now open terminal, run the pac command as below

Execute the following command to create plugin project 

  • Browse to the directory where you want to create the plugin project
  • Execute the command on CMD to create plugin project “pac plugin init

A plugin project will be created at your desired location as follows

Plugin project in local folder will be created as below

That’s it, you can close the VS Code for now.

Click on the CS Proj file and open it in Visual Studio

By default, 2 files are automatically created when you create a plugin project as shown above.

Now will install Bouncy Castle which is an external library, right click on the Plugin Solution –> Manage Nuge Packages

I have added Bouncy Castle NuGet Package to my plugin project for Encryption and Decryption. You can have your own required NuGet Package as per your need.

Build your project

After a successful build, you will get the output result as follows

Browse the directory of your project

Open the file Plugin_Project.1.0.0.nupkg in Nuget Package Explorer by double clicking it

Now you can see that this nuget package file contains the information related to the added nuget package of Bouncy Castle that we want to include in our plugin project package as follows. In your case, you can have the required nuget package that you want to add 

Now open up plugin registration tool

Click to create new connection

Provide login details and login

Click to Register New Package

Browse to the directory where your nuget package file was created automatically when you build the project and import this file 

Select the Command Data Service Default Solution and import it

Click on view and Display by package

Now your Plugin Project is successfully registered with all dependent assemblies and ready to use.

While this post gives you a structure on how you can do build a plugin assembly, you can add the business logic as per your need.

Conclusion:

In conclusion, navigating the intricacies of Microsoft Dynamics 365 CRM plugins demands a nuanced approach, especially when dealing with NuGet Packages and dependent assemblies. This article has delved into the critical process of resolving the persistent ‘Could not load assemblies or its dependencies‘ issue, offering a comprehensive, step-by-step demonstration.

By following the recommended best practices, such as avoiding direct plugin project creation in Visual Studio and harnessing the power of Microsoft PowerApps CLI, developers can establish a standardized and reliable development environment. The CLI’s automatic creation of a NuGet Package file not only streamlines the process but also reduces the errors.

To further facilitate your journey, prerequisites such as downloading and installing essential tools like the Plugin Registration tool, Microsoft PowerApps CLI, and NuGet Package Explorer are highlighted. The guide emphasizes the significance of these tools in ensuring a smooth plugin development experience.

By adopting these practices and incorporating the suggested steps into your workflow, you not only troubleshoot existing issues but also fortify your understanding of the entire process. Take charge of your Dynamics 365 CRM plugin development, elevate your skills, and sidestep common pitfalls by mastering the art of handling NuGet Packages and dependencies seamlessly.

References:

Build and package plug-in code

Cheers,

PMDY 

Fix Plugin Registration Tool Connection Issues with Multi-Factor Authentication (MFA) Enabled in Dynamics 365

Hi Folks,

It’s been a since I posted on Dynamics 365 Plugins, so this blog post talks about one small tip when connecting to your Dynamics 365 instance from Plugin Registration Tool either if you were connecting from Standalone Plugin Registration Tool or using Plugin Registration Tool from XrmToolBox.

If you were looking to install plugin registration tool itself, you can check the below post or if you want to learn about all Plugin related issues at once, you can check the references at the bottom of this post, else you can continue reading this post.

If you don’t know this tip, it will be difficult and least you will spend many minutes figuring out the error message you see in the Plugin registration tool.

This is applicable for applications who have MFA enabled, even if you haven’t enabled, it was enabled by Microsoft by default to enforce security.

As usually, you select:

  1. Office 365
  2. Enable Display list of available organizations, Show Advanced
  3. Provide User Name, Password
  4. Click on Login

You will be prompted this error in such case

======================================================================================================================
Source : Microsoft.IdentityModel.Clients.ActiveDirectory
Method : MoveNext
Date : 12/4/2025
Time : 5:09:52 pm
Error : AADSTS50076: Due to a configuration change made by your administrator, or because you moved to a new location, you must use multi-factor authentication to access '00000007-0000-0000-c000-000000000000'. Trace ID: 7a7cac23-056c-4e77-ba82-98d50c0b7001 Correlation ID: d8b32fe6-6197-4d9a-a460-3834c8dc292a Timestamp: 2025-04-12 09:09:52Z
Stack Trace : at Microsoft.Xrm.Tooling.Connector.CrmWebSvc.ProcessAdalExecption(Uri serviceUrl, ClientCredentials clientCredentials, X509Certificate2 userCert, UserIdentifier& user, String clientId, Uri redirectUri, PromptBehavior promptBehavior, String tokenCachePath, Boolean isOnPrem, String authority, Uri& targetServiceUrl, AuthenticationContext& authContext, String& resource, CrmLogEntry logSink, Boolean useDefaultCreds, String& authToken, AdalException adalEx)
at Microsoft.Xrm.Tooling.Connector.CrmWebSvc.ExecuteAuthenticateServiceProcess(Uri serviceUrl, ClientCredentials clientCredentials, X509Certificate2 userCert, UserIdentifier user, String clientId, Uri redirectUri, PromptBehavior promptBehavior, String tokenCachePath, Boolean isOnPrem, String authority, Uri& targetServiceUrl, AuthenticationContext& authContext, String& resource, UserIdentifier& userIdent, CrmLogEntry logSink, Boolean useDefaultCreds, SecureString clientSecret)
at Microsoft.Xrm.Tooling.Connector.CrmWebSvc.DiscoverGlobalOrganizations(Uri discoveryServiceUri, ClientCredentials clientCredentials, X509Certificate2 loginCertificate, UserIdentifier user, String clientId, Uri redirectUri, PromptBehavior promptBehavior, String tokenCachePath, Boolean isOnPrem, String authority, UserIdentifier& userOut, CrmLogEntry logSink, Boolean useGlobalDisco, Boolean useDefaultCreds)
at Microsoft.Xrm.Tooling.Connector.CrmWebSvc.DiscoverOrganizations(Uri discoveryServiceUri, ClientCredentials clientCredentials, UserIdentifier user, String clientId, Uri redirectUri, PromptBehavior promptBehavior, String tokenCachePath, Boolean isOnPrem, String authority, UserIdentifier& userOut, CrmLogEntry logSink, Boolean useGlobalDisco, Boolean useDefaultCreds)
at Microsoft.Xrm.Tooling.CrmConnectControl.CrmConnectionManager.QueryOAuthDiscoveryServer(Uri discoServer, ClientCredentials liveCreds, UserIdentifier user, String clientId, Uri redirectUri, PromptBehavior promptBehavior, String tokenCachePath, Boolean useGlobalDisco)
at Microsoft.Xrm.Tooling.CrmConnectControl.CrmConnectionManager.QueryOnlineServerList(ObservableCollection`1 svrs, OrganizationDetailCollection col, ClientCredentials liveCreds, Uri trimToDiscoveryUri, Uri globalDiscoUriToUse)
at Microsoft.Xrm.Tooling.CrmConnectControl.CrmConnectionManager.FindCrmOnlineDiscoveryServer(ClientCredentials liveCreds)
at Microsoft.Xrm.Tooling.CrmConnectControl.CrmConnectionManager.ValidateServerConnection(CrmOrgByServer selectedOrg)
======================================================================================================================
Inner Exception Level 1 :
Source : Not Provided
Method : Not Provided
Date : 12/4/2025
Time : 5:09:52 pm
Error : Response status code does not indicate success: 400 (BadRequest).
Stack Trace : Not Provided
======================================================================================================================
Inner Exception Level 2 :
Source : Not Provided
Method : Not Provided
Date : 12/4/2025
Time : 5:09:52 pm
Error : {"error":"interaction_required","error_description":"AADSTS50076: Due to a configuration change made by your administrator, or because you moved to a new location, you must use multi-factor authentication to access '00000007-0000-0000-c000-000000000000'. Trace ID: 7a7cac23-056c-4e77-ba82-98d50c0b7001 Correlation ID: d8b32fe6-6197-4d9a-a460-3834c8dc292a Timestamp: 2025-04-12 09:09:52Z","error_codes":[50076],"timestamp":"2025-04-12 09:09:52Z","trace_id":"7a7cac23-056c-4e77-ba82-98d50c0b7001","correlation_id":"d8b32fe6-6197-4d9a-a460-3834c8dc292a","error_uri":"https://login.microsoftonline.com/error?code=50076&quot;,"suberror":"basic_action"}: Unknown error
Stack Trace : Not Provided
======================================================================================================================
======================================================================================================================
Inner Exception Level 2	: 
Source	: Not Provided
Method	: Not Provided
Date	: 12/4/2025
Time	: 5:09:52 pm
Error	: {"error":"interaction_required","error_description":"AADSTS50076: Due to a configuration change made by your administrator, or because you moved to a new location, you must use multi-factor authentication to access '00000007-0000-0000-c000-000000000000'. Trace ID: 7a7cac23-056c-4e77-ba82-98d50c0b7001 Correlation ID: d8b32fe6-6197-4d9a-a460-3834c8dc292a Timestamp: 2025-04-12 09:09:52Z","error_codes":[50076],"timestamp":"2025-04-12 09:09:52Z","trace_id":"7a7cac23-056c-4e77-ba82-98d50c0b7001","correlation_id":"d8b32fe6-6197-4d9a-a460-3834c8dc292a","error_uri":"https://login.microsoftonline.com/error?code=50076","suberror":"basic_action"}: Unknown error
Stack Trace	: Not Provided
======================================================================================================================

Based on the above inner exception, we can clearly understand that it is looking for Multifactor Authentication, so untick the Show Advanced checkbox, it then asks for Multifactor Authentication as shown below.

That’s it, with this simple tick of unchecking the Show Advanced, you were able to overcome this error, how cool is it…?

I have written lot of articles with respect to Plugin registration tool, you can check them below

Issues related to Plugins and Plugin Registration Tool

Hope this helps…

Cheers,

PMDY

Global AI Bootcamp 2025 – Singapore

🚀 You’re Invited to the Global AI Bootcamp 2025 – Singapore Edition!

Are you passionate about AI, Power Platform, and Microsoft technologies? Want to learn how AI is transforming businesses and industries? Then this event is for you!

🎯 What to Expect?
✅ Expert-led sessions on AI, Copilot, Power Platform, and more
✅ Hands-on workshops to apply AI in real-world scenarios
✅ Networking opportunities with industry leaders and AI enthusiasts
✅ Absolutely FREE to attend!


Event Date: Saturday, 8 March 2025

10:00 am – 4:00 pm (GMT+8)

Meeting Link

This is your chance to upgrade your AI skills, connect with like-minded professionals, and explore the latest AI innovations.

#GlobalAIBootcamp #AI #MicrosoftAI #PowerPlatform #SingaporeTech #FreeEvent

Call Custom Actions in Dataverse using Web API – Quick Recap

Hi Folks,

Here is how you can quickly call action using Web API, with this method you can execute a single action, function, or CRUD operation. In the below example, let’s see how you can call an action. Here is function…to achieve this..

var formContext = executionContext.getFormContext();
var message = "Please enter a valid NRIC Number";
var uniqueId = "nric_valid";
var NRIC = formContext.getAttribute("new_nric").getValue();
if(NRIC !== null)
{
var execute_ValidateNRIC = {
NRIC: NRIC, // Call this function only when NRIC value which is non-null
getMetadata: function () {
return {
boundParameter: null,
parameterTypes: {
NRIC: { typeName: "Edm.String", structuralProperty: 1 }
},
operationType: 0,
operationName: "new_ValidateNRIC",
outputParameterTypes: {
IsValid: { typeName: "Edm.Boolean" }
}
};
}
};
Xrm.WebApi.execute(execute_new_ValidateNRIC).then(
function success(response) {
if (response.ok) {
response.json().then(function (data) {
if (!data.IsValid) {
formContext.getControl("new_nric").setNotification(message, uniqueId);
} else {
formContext.getControl("new_nric").clearNotification(uniqueId);
}
}).catch(function (error) {
Xrm.Navigation.openAlertDialog("Error occured from Validate NRIC "+error);
});
}
}
).catch(function (error) {
Xrm.Navigation.openAlertDialog(error.message);
}).catch(function (error) {
Xrm.Navigation.openAlertDialog(error.message);
});
}
}

This example details with Unbound action, which is not tagged to any entity, however if in case on Bound action, you will specify the entity name for bound parameter instead of null. You need to specify the Metadata accordingly for your Action. Let’s understand it’s syntax first…

Xrm.WebApi.online.execute(request).then(successCallback, errorCallback);

Parameters

Encrypting/Decrypting a file using Public & Private Key Pair with GnuPG

Hi Folks,

Thank you for visiting my blog today…this is post is mainly for Pro developers. Encryption is crucial to maintain the confidentiality in this digital age for the security of our sensitive information. So here is a blog about it. This is in continuation to my previous blog post on encrypting files using GnuPG.

In this blog post, I will give you sample how you can encrypt/decrypt using GnuPG with command line scripts from C# code.

If you didn’t go through my previous article, I strongly recommend you go through that article below first to understand the background.

Next, in order to encrypt/decrypt a given csv file (taken for simplicity), we can use the following C# codes. For illustration purpose, I have just provided you the logic in the form of a Console.

Encryption:

using System;
using System.Collections.Generic;
using System.Linq;
using System.Text;
using System.Threading.Tasks;
using System.Diagnostics;
namespace eHintsBatchDecryptionTest
{
class Program
{
static void Main(string[] args)
{
string gpgPath = @"D:\Softwares\Kleo Patra\GnuPG\bin\gpg.exe"; //This is the place where you have installed GnuPG Software
string inputFile = "location of input file";
string outputFile = "location of output file";
string passphrase = "passPhrase";
DecryptGPGFile(gpgPath, inputFile, outputFile, passphrase);
}
static void DecryptGPGFile(string gpgPath, string inputFile, string outputFile, string passphrase)
{
using (Process process = new Process())
{
process.StartInfo.FileName = gpgPath;
process.StartInfo.Arguments = $"–batch –yes –pinentry-mode=loopback –passphrase {passphrase} -d -o \"{outputFile}\" \"{inputFile}\"";
process.StartInfo.UseShellExecute = false;
process.StartInfo.RedirectStandardOutput = true;
process.StartInfo.RedirectStandardError = true;
process.StartInfo.RedirectStandardInput = true;
process.StartInfo.CreateNoWindow = true;
process.Start();
string output = process.StandardOutput.ReadToEnd();
string error = process.StandardError.ReadToEnd();
process.WaitForExit();
if (process.ExitCode == 0)
{
Console.WriteLine("Decryption successful.");
}
else
{
Console.WriteLine("Decryption failed. Error: " + error);
}
}
}
}
}

Decryption:

using System;
using System.Collections.Generic;
using System.Linq;
using System.Text;
using System.Threading.Tasks;
using System.Diagnostics;
namespace BatchDecryptionTest
{
class Program
{
static void Main(string[] args)
{
string gpgPath = @"D:\Softwares\Kleo patra\GnuPG\bin\gpg.exe";//Once GPG installed, you can look for gpg.exe in the bin folder of the installation
string inputFile = "Input encrypted file";//Replace with your gpg encrypted file location
string outputFile = "Decrypted CSV file"; //give it a name for the decrypted file and location, output file path doesnt exists yet, you may give a sample name
string passphrase = "passPhrase";
DecryptGPGFile(gpgPath, inputFile, outputFile, passphrase);
}
static void DecryptGPGFile(string gpgPath, string inputFile, string outputFile, string passphrase)
{
using (Process process = new Process())
{
process.StartInfo.FileName = gpgPath;
process.StartInfo.Arguments = $"–batch –yes –pinentry-mode=loopback –passphrase {passphrase} -d -o \"{outputFile}\" \"{inputFile}\""; //Pass the PassPhrase, Input and Output file paths as parameters
process.StartInfo.UseShellExecute = false;
process.StartInfo.RedirectStandardOutput = true;
process.StartInfo.RedirectStandardError = true;
process.StartInfo.RedirectStandardInput = true;
process.StartInfo.CreateNoWindow = true;
process.Start();
string output = process.StandardOutput.ReadToEnd();
string error = process.StandardError.ReadToEnd();
process.WaitForExit();
if (process.ExitCode == 0)
{
Console.WriteLine("Decryption successful.");
}
else
{
Console.WriteLine("Decryption failed. Error: " + error);
}
}
}
}
}

All you need is to copy and replace the file locations in the code. Sit back and enjoy encrypting and decrypting with GnuPG. I should say once known, this is the easiest way to encrypt/decrypt from C# code, no strings attached.

If you need any other information, please do let me know in comments.

Cheers,

PMDY

Adding intelligence to Dataverse using Dataverse AI functions

Hi Folks,

While intelligence with the use of AI is being embedded into each and every part of the Microsoft ecosystem, it is good to know the features coming in the Power Platform space.

In this blog post, let’s see how we can use Dataverse AI Functions, their usage, advantages which can greatly ease summarizing, classifying, extracting, translating, assessing sentiment, or drafting a reply for common business scenarios.

To illustrate it better, I used a different AI Function for Canvas App, Model Driven App and Power Automate, hope you can follow the same for others as well.

What are Dataverse AI Functions?

Think of Dataverse AI Functions as prebuilt AI Functions which will add intelligence in your Apps and Flows without need to collect, build and train the models. They can be used in many places such as AI Builder, Power Automate, Power Apps, Low Code Plugins. Following are the AI Functions available…

  1. AIReply – Drafts a reply to the message you provide.
  2. AISentiment – Detects sentiment for the text you provide
  3. AISummarize – Summarizes the text you provide
  4. AIClassify – Classifies the text into one or more categories, you can use this from custom copilot
  5. AIExtract – Extracts specified entities like Names of people, phone numbers, places etc.
  6. AITranslate – Translate text from another language

Let’s see their usage in our favorite Canvas Apps first as illustration is easy and later in the post, I will mention how you can call the Dataverse AI Functions from Model Driven Apps, Power Automate so that you can get the real essence of it….

Utilizing ‘Dataverse AI Functions’ in a Canvas App

Create a new Canvas App and add ‘Environment’ Datasource as shown below.

All the ‘Dataverse AI functions’ can be accessed by ‘Environment‘ as shown below.

Let’s try the AIReply function in Canvas Apps

Add a textbox for storing the prompt or input string and a button control.

On the ‘OnSelect‘ event of the button, use the following formula to store the response in the AIResponse context variable, make sure you name the variables appropriately in your formula as per your naming defined in canvas apps.

UpdateContext({AIReplyResponse:Environment.AIReply({Text:AIInput.Text})})

Now create one more text variable to store the response and change the Default value to AIReplyResponse.PreparedResponse.

Try testing the app by providing inputs as below…

You should get a response from AIReply in the response field, you can try out other functions providing the necessary parameters required.

Utilizing ‘Dataverse AI Functions’ in a Power Automate

In Power Automate, all you can do to call Dataverse AI Functions is call the Unbound Action as below.

Passing the relevant input parameters is enough to get the output from these functions.

Let’s try AISentiment

Click on test, you should a response from Power Automate with the sentiment

Utilizing ‘Dataverse AI Functions’ in a Model Driven Apps

Do you want to utilize the similar capabilities of Dataverse AI Functions inside your custom code like in Plugins, Actions etc..

Let’s try AIClassify

var request = new OrganizationRequest("AIClassify")
{
["AllowMultipleCategories"] = false,
["Categories"] = titles,
["Text"] = classifyText
};
var result = service.Execute(request);

It was pretty much similar in AIBuilder as well…

Please do note that there are quotas to use these AI Functions at tenant level, else you might get similar error like below, while I didn’t get any information regarding this from Microsoft, so I am unsure about this as of writing this post, I will keep this updated if I get to know.

Using Dataverse AI functions needs a bit of Prompt Engineering knowledge, you were looking to learn more about Prompt engineering, then check it out here.

References:

https://learn.microsoft.com/en-us/power-platform/power-fx/reference/function-ai

Cheers,

PMDY

Showing multiselect option set from Model Driven Apps in Power BI

Hi Folks,

Well, this post will show you how you can work with multi option sets from Dynamics 365 in Power BI. First of all, you need some basic understanding of Power BI Desktop to follow. However, I made it clear for people with little background to follow and relate to. I scanned through the internet, but I couldn’t find a similar post, hence I am blogging this if it might help someone. I have faced this issue and here is the solution, you don’t need to use XrmToolBox nor Postman nor complex Power Query as many out in internet would suggest.

So, follow with me along, if you were trying show the values in Multi OptionSet from Model Driven Apps in Power BI as below, then this post is absolutely for you.

Practically if we retrieve the value of Multi OptionSet field as shown in the above image. You get something like below in comma separated values.

Now based on use case and the requirement, we need to transform our data, i.e. Split the values into rows or columns using a delimiter, in this case, we use comma as delimiter. Here I am splitting into multiple rows as I need to show the contacts for different option values selected in the record.

Select on the respective field and choose Split Column option available in the ribbon.

Next, you will be presented with Split Column Delimiter Dialog box, you may select the options as below and click on Ok.

Next in the Split Column by Delimiter, choose as below.

Once clicked on Ok, now the Multi OptionSet was changed to Single OptionSet and showing the values in different rows.

We can use Dataverse REST API to get the OptionSet values as below in Power BI, click on Get Data –> Web, enter the below in the URL to get the MultiSelect OptionSet Values –> Load. You can refer here some reference.

https://ecellorshost.crm5.dynamics.com/api/data/v9.2/stringmaps?$filter=attributename%20eq%20%27powerbi_multioptionset%27

Once data is loaded, it should look as below..

So, now click on Close and Apply the transformation to be saved in the model, later create the data model relationships by going to the model view as below between the multiselect OptionSet field in the contact table and string map table.

Once the relationship is established, we can proceed with plotting the visuals in visuals of your choice. For simplicity, used.

Hope this helps someone looking out for such requirement which at least could save couple of seconds.

Cheers,

PMDY

Dataverse – Git Integration – Preview – Quick Review

Hi Folks,

This post is about Dataverse and Git Integration which is the most sought after feature in the todays automation Era. This is a preview feature, you would need to create a new environment with Early Access enabled to test this feature or you can use an existing US Preview environment for testing this out.

While every MDA(Model Driven Application) and it’s components can be safely and moved across the environments using Solutions with the help of Azure DevOps Pipelines. However when coming to integrating Power Platform Solutions to Azure DevOps, we had to manually export the solution and download them each and every time when we would like to commit the Solution Artifacts to Azure DevOps Repo.

With this new Preview feature we can directly integrate the Power Platform Solutions to Azure DevOps.

Let’s see this action…wait a moment, there were some prerequisites to be considered…

  1. Environment should be a Managed Environment to start using this and you need to be an Admin for the environment
  2. Azure DevOps subscription and license should be available to set this up, also permission to read source files and commits(should be a member of contributor group in Azure DevOps) from a Repo
  3. Your email address used for Azure DevOps and Power Platform Solutions should be the same

Setup:

Connecting Dataverse with Azure DevOps is easy but requires a bit of understanding of the Binding options available.

Well, there were two types of Binding options

  1. Environment Binding – Single root folder binds to all the unmanaged solutions in the environment
  2. Solution Binding – Different solutions uses a different root folder in Azure DevOps for binding

Note: Once the binding is setup, there isn’t away to change, so set this up carefully, else you may need to delete the folder and create a new one in Azure DevOps.

Let’s see one by one…for demoing purpose, I have created two projects in Azure DevOps Instance

  1. Solution Binding: When we use this, all the components will be available as pending changes
  2. Environment Binding: When we use this, all the unmanaged solution components will be mapped to one Azure DevOps root folder. Let’s set this up.

We are currently able to use only Solution binding, as Environment Binding doesn’t show up any changes to be committed, but there is a catch here.

We can set up for Environment binding and verify if the Solution components are getting marked as pending changes or not. Do note that Setting up the Binding is a one time activity for environment, once setup, it can’t be changed from one type to another.

Open https://make.powerapps.com and navigate to solutions and click on ellipses as below

Once clicked on Connect to Git

Since we were currently using Environment binding, let’s select the Connection Type as Environment

Then click on Connect, once connected, you should a alert message in power apps maker portal at the top.

Now create a new solution as below named ecellors Solution

Verify the integration by clicking on Git Integration as below

It should show as below

Now let’s add few components to the solution we created

Once added, let’s publish the unmanaged solution and verify it..

Do look closely, you should see a Source Control icon highlighted in yellow color for illustration.

Also, you should see a commit option available at the top

You should now be able to commit the solution components as if you are committing the code changes.

It also specifies the branch to which we were commiting…

While it takes few minutes unlike pushing the code to Azure DevOps to push the changes, however this would depend based on the number of solution components you were pushing..once it is done, it will show a commit message like below…

Now let’s verify our Azure DevOps Repo..for this you can go back to the main solutions page, click on Git Connection at the top..

After clicking on Git Connection, click on the link to Microsoft Azure DevOps as below

Then you should be navigated to Azure DevOps folder as below where all the solution files will be tracked component wise.

Now we will move back to Power Apps maker portal and make some changes to any of the components inside the solution…

Let’s say, I just edited the flow name and created a new connection reference, saved and published the customizations.

If you did some changes at the Azure DevOps repo level, you can come back and click on Check for updates, if there were any conflicts between changes done in Azure DevOps and component in solution, it will be shown as conflict.

We now have 3 component changes and all were listed here…you can click on Commit.

As soon as the changes are committed, you should see a message saying Commit Successful and 0 Changes, 0 Updates, 0 Conflicts.

Now you successfully integrated Dataverse Solution components with Azure DevOps without any manual intervention required while deploying solutions using Azure DevOps Pipelines.

Hope you learned something new today…while feature is still in Preview and only available for early release, while couple of issues still need to fixed by Microsoft.

I have tested this feature by creating an environment in US Preview region and this feature will be a good value to projects using Automation and this solution repository can be further deployed to other environments using Azure DevOps Pipelines.

This will be rolled out soon next year, hope you learned something new today…

Cheers,

PMDY

Microsoft Power Platform Center of Excellence (CoE) Starter Kit – Basics – Learn COE #01

Hi Folks,

This is an introductory post, but it’s worth going through where I will be sharing basics about using Centre of Excellence(COE) in Power Platform. Let’s get started.

So, what’s Center of Excellence? COE plays a key role in deriving strategy and move forward in this fast-paced world to keep up with the innovation. Firstly, we may need to ask ourselves few questions…Do your organization have lot of flows, apps and copilots aka power virtual agents? Do you want to effective manage them? Then how you want to move forward…using COE Starter kit is a great choice. It is absolutely free to download, the starter kit is a collection of components and tools which will help to oversee and adopt Power Platform Solutions. The assets part of the CoE Starter Kit should be seen as a template from which you inherit your individual solution or can serve as inspiration for implementing your own apps and flows.

There were some prerequisites before you can install your COE Starter Kit. Many of the medium to large scale enterprise Power Platform implementations should be possessing in their tenant.

  1. Microsoft Power Platform Service Admin, global tenant admin, or Dynamics 365 service admin role.
  2. Dataverse is the foundation for the kit.
  3. Power Apps Per User license (non-trial) and Microsoft 365 license.
  4. Power Automate Per User license, or Per Flow licenses (non-trial).
  5. The identity must have access to an Office 365 mailbox that has the REST API enabled meeting the requirements of Outlook connector.
  6. Make sure you enable the Power Apps Code Components in Power Platform Admin Center
  7. If you want to track unique users and app launches, you need to have Azure App Registration having access to Microsoft 365 audit log.
  8. If you would like to share the reports in Power BI, minimally you require a Power BI pro license.
  9. Setting up communication groups to talk between Admins, Makers and Users.
  10. Create 2 environments, 1 for test and 1 for production use of Starter Kit
  11. Install Creator Kit in your environment by downloading the components from here

The following connectors should be allowed to effectively use data loss prevention policies(DLP)

Once you were done checking the requirements, you can download from the starter kit here.

You can optionally install from App Source here or using Power Platform CLI here.

The kit provides some automation and tooling to help teams build monitoring and automation necessary to support a CoE.

While we saw what advantages are of having COE in your organization and other prerequisites. In the upcoming blog post, we will see how you can install COE starter kit in your Power Platform tenant and set it up to effectively plan your organization resources for highest advantage.

Cheers,

PMDY