Subscribe to continue reading
Subscribe to get access to the rest of this post and other subscriber-only content.
Exploring Power Platform and Beyond: Features, Experiences, Challenges, Solutions all in one place
Subscribe to get access to the rest of this post and other subscriber-only content.
Hi Folks,
In this blog post, let’s see how we can create a custom connector without leaving our own Visual Studio for building a custom connector. Ideally for building any custom connector, we need to create them in https://make.powerapps.com or https://make.powerautomate.com. Last month Microsoft Announced that Power Platform is now a connected service in Visual Studio 2022. In this blog, we will utilize its capability…
Before diving deeper, let’s see what are the prerequisites..
Let’s get started..
Step 1:
Create ASP.NET Web API Project in Visual Studio
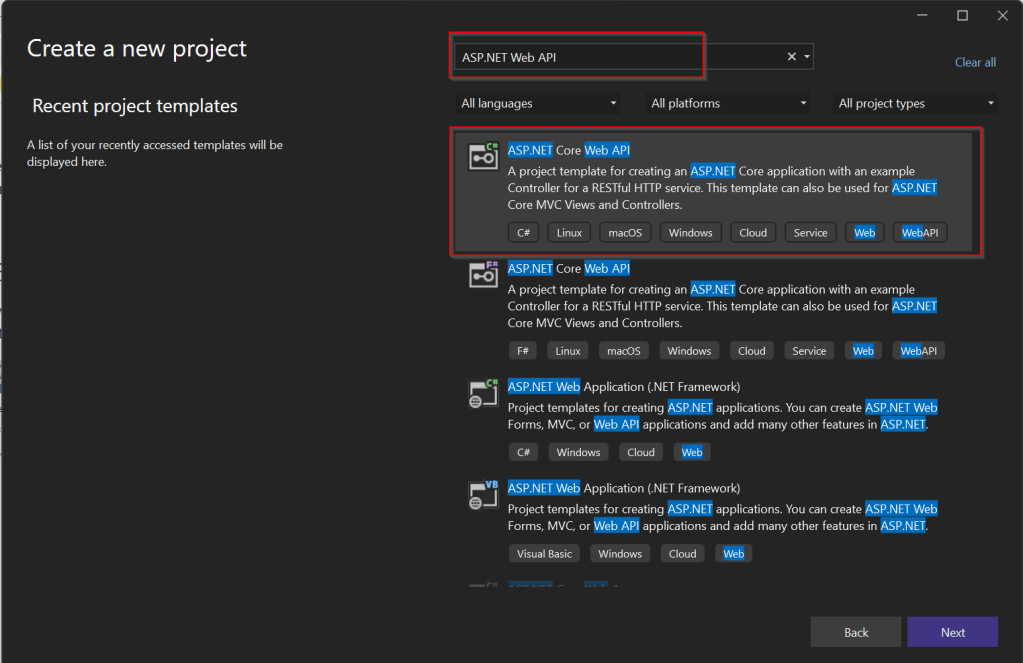
Step 2:Choose your option as below and click on Next..
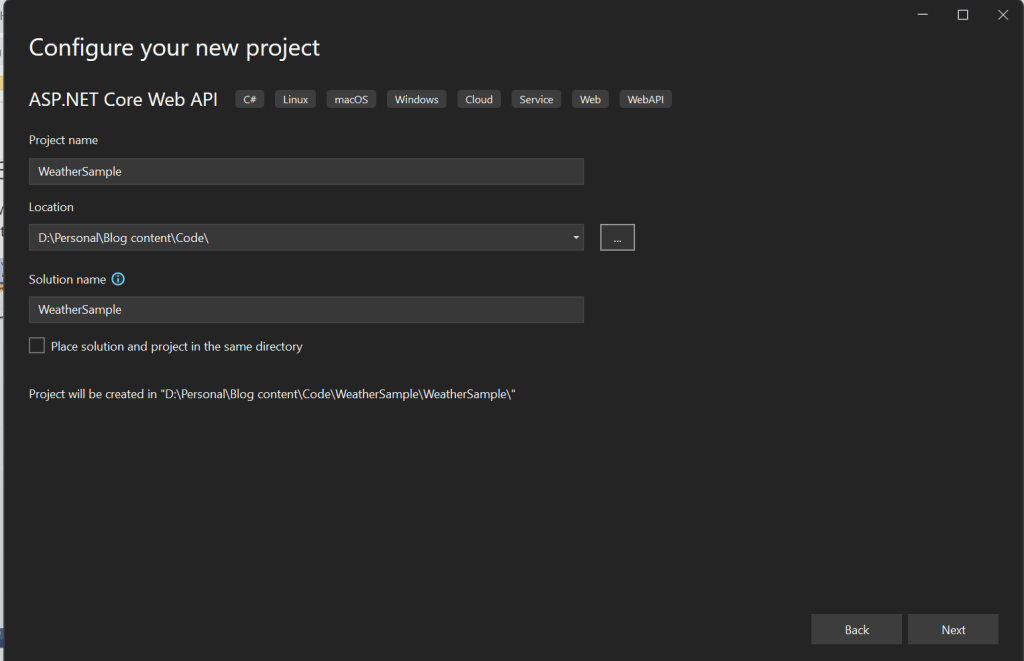
Step 3:
Choose your next steps as below and click on Next to proceed, make sure to choose authentication type as None

Step 4:
Create a ASP.NET Core Web API Project
Step 5:
By adding Power Platform as a service dependency, you can update an existing custom connector, or create a new one from your API.
If you want to expose your local running API to a public endpoint, I prefer using Dev Tunnels feature of Visual Studio…
That’s it, you have started running your API.
Step 6:
Now let’s create a Mobile App with Power Apps…with the same login you have used for the Visual Studio to create a custom connector..

Step 7:
First check if Custom Connector has been created in your tenant and authenticate the connection….navigate to https://make.powerapps.com and click on Discover at the left of the page….and then click on Custom Connectors, you should see a connector which we created from Visual Studio….nice isn’t it…

Step 8:
All you need to create a connection by clicking on the + sign available..
Once connected, now try creating a mobile Canvas App..
In the Canvas App, try adding data…and search for Weather Sample which you created, you should see something like below…

Step 9:
Once the web API is running in your development environment, you can debug in real time and even Hot Reload your code.

References:
https://learn.microsoft.com/en-us/aspnet/core/test/dev-tunnels?view=aspnetcore-7.0#create-a-tunnel
Thank you for reading…
Cheers,
PMDY
Prerequisite: Intall Dataverse Accelerator from AppSource from Microsoft Power CAT Team. Follow along once you have installed…see Dataverse Accelerator Installation Post if you want to know how..
Firstly, open the environment from https://make.powerapps.com where you would like to test this out, install the Dataverse Accelerator Solution as described above.

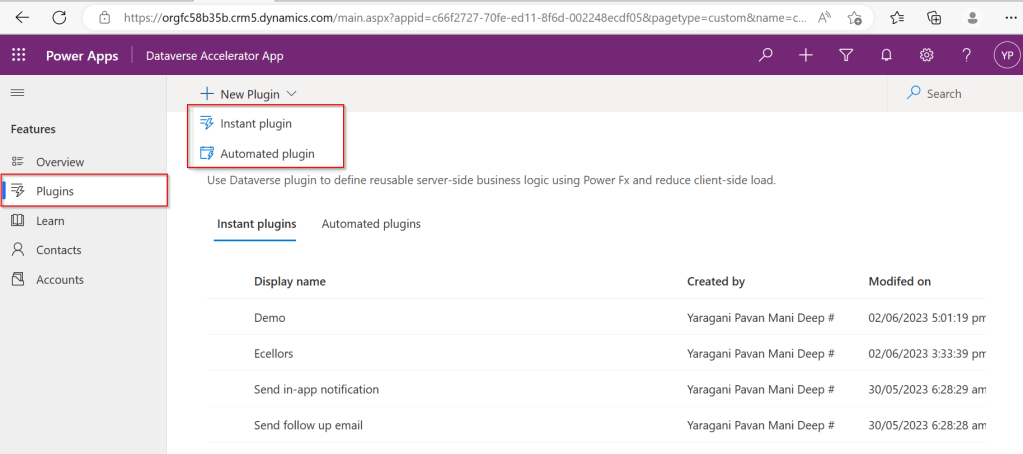
You should see there is an option to create Plugin from UI itself, no need to open Visual Studio and write your .Net Class library and register using Plugin Registration tool.
Please note that this is still an Experimental Feature and lot of improvements yet to be made..below is my quick test on basic CRUD Operation using this Plugin..
There were two types of Low Code Plugins
Let’s see how they work by creating an Instant Plugin…
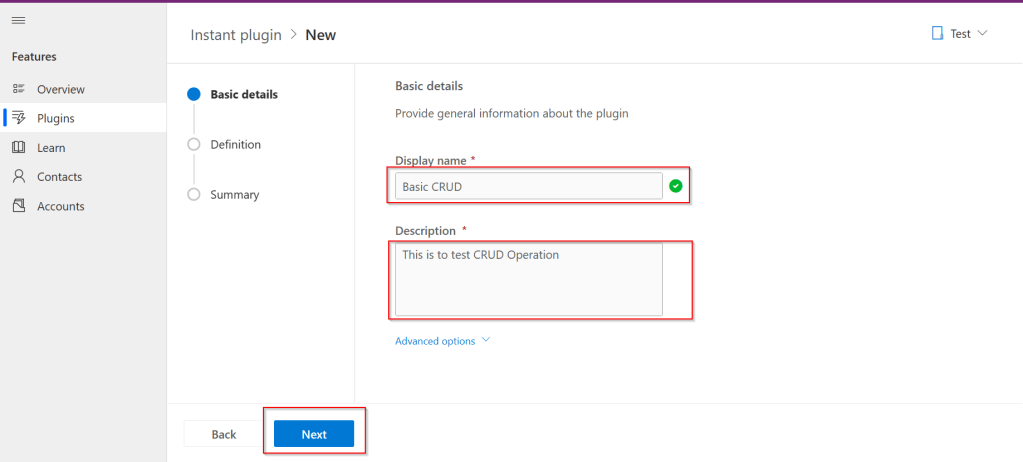
Step 1: Click on New Plugin Button available
Step 2: Key in the display name and description, both are mandatory to be entered…we don’t have a way to customize here as of now…
Step 3:Then Click on Next and enter the Parameters in the Definition area…I just mentioned In and Out parameters for brevity, then added a simple expression to multiply the input variable supplied by 100…
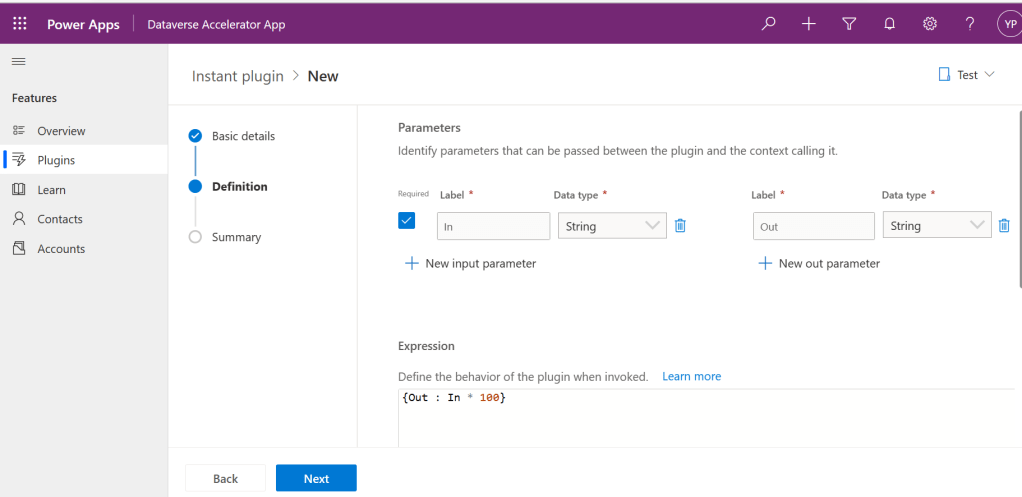
Make sure you won’t get any errors
Step 4: Then click on Next and click on Save.
Step 5:Once Saved, you will get a new button for testing…

Step 6:Clicking on Test will get you to the below screen to enter your input parameter…

Step 7:Clicking on Run which gives the output in Web API and highlighted is the response received with a success.

Note:
For some of the Automated Plugins, got a failure message with no way to troubleshoot what was the error was…I have raised this to Microsoft, but they mentioned that these features are work in Progress…
Hope we get all the complex functionality there in Dynamics 365 CE Plugins be available within Dataverse Low Code Plugins with the help of Power Fx too in future….the App development is going to be lot more easier…with Microsoft Power Platform… and citizen developers can pitch in…
Reference: Dataverse Low Code Plugins Repo in GIT Hub
Thank you for reading…
Cheers,
PMDY
Subscribe to get access to the rest of this post and other subscriber-only content.
Subscribe to get access to the rest of this post and other subscriber-only content.
Hi Folks,
Yesterday I was working with Azure DevOps repository for my project. My local Develop branch is behind the Main branch by few commits, I want to get the latest commits into my local and include those from the Main branch also in to my Develop branch.
It is then I got to know whether to use GIT Merge Command or GIT Rebase Command. And here you go my findings on the same….
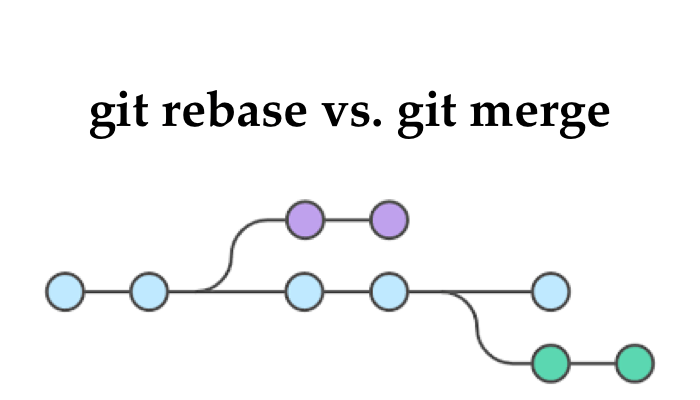
I got to know the details, official Git manual states that rebase “reapplies commits on top of another base branch”, whereas merge “joins two or more development histories together”. In other words, the key difference between merge and rebase is that while merge preserves history as it happened, rebase rewrites it. Let’s start with an illustration…for better understanding…followed by the differences…
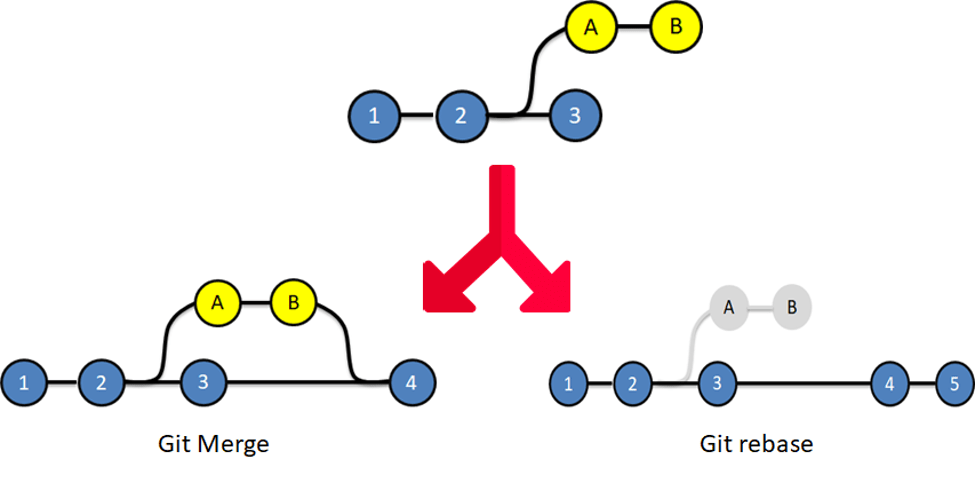
| Merge | Rebase |
| Git merge is a command that allows you to merge branches from Git. | Git rebase is a command that allows developers to integrate changes from one branch to another. |
| In Git Merge logs will be showing the complete history of the merging of commits. | Logs are linear in Git rebase as the commits are rebased |
| All the commits on the feature branch will be combined as a single commit in the master branch. | All the commits will be rebased and the same number of commits will be added to the master branch. |
| Git Merge is used when the target branch is shared branch | Git Rebase should be used when the target branch is private branch |
Actually talking both do mean the same purpose and have their own uses, but at the end of the day it is completely up to your ALM strategy/methodology. I preferred to use Merge instead of Rebase just that my branch is shared branch and for simplicity.
Hope this helps…
Cheers,
PMDY
Hi Folks,
While you may have noticed this or not, but it’s real. Now Dynamics 365 CE existing table types have a new companion called Elastic, it is yet to be announced.
However let’s take a quick look of the table types showing up when you were trying to create a new one in Dataverse.
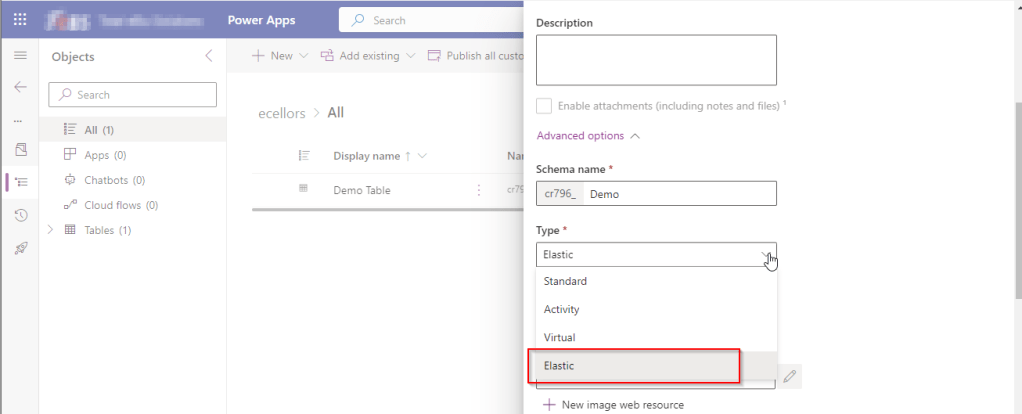
While everyone is aware about Standard, Activity, Virtual types in Model Driven Apps. Elastic tables are new tables which came in to Dataverse and probably it will be announced in the upcoming Microsoft Build 2023.
From my view, Elastic tables were
1. Built similar to the concept of Elastic Queries in Azure which is usually meant for the purposes of Data archiving needs.
2. You can scale out queries to large data tiers and visualize the results in business intelligence (BI) reports.
3. Elastic Query provides a complete T-SQL Database Querying capability on Azure SQL, possibly Dataverse.
Hope we get all the capabilities released with Elastic Queries of Azure SQL be released in Dataverse as well.
References:
Data Types in Model Driven Apps
Cheers,
PMDY
Hi Folks,
Do you know you can change the Data type of an Primary column between Single Line of Text and Autonumber even after creation of your entity specifying a defined Primary Name Column. There is a catch….
So let’s see…
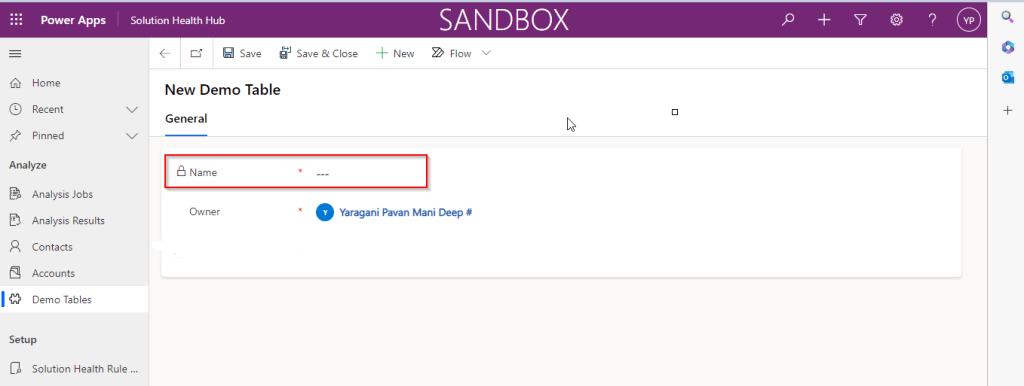
I first created a brand new Table called Demo Table and kept the Primary Column as Single Line of text. Earlier once the table is created, you will not be able to change the Primary name column if you wish to, the only way was to delete the table and re-create it with the correct type. But now you can change the type of the column at least to a unique autonumbering.

I want the Primary Name column to be unique, but when I look at the data in my table captured, I see many duplicates.

So let’s change the data type of the primary column data type to Autonumber.
The primary field look as below initially…
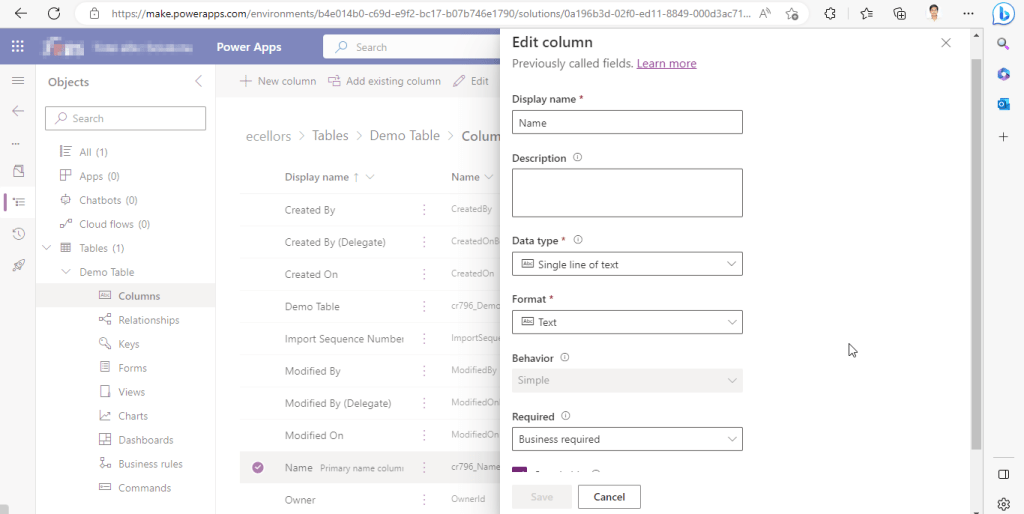
Select the Data Type available…
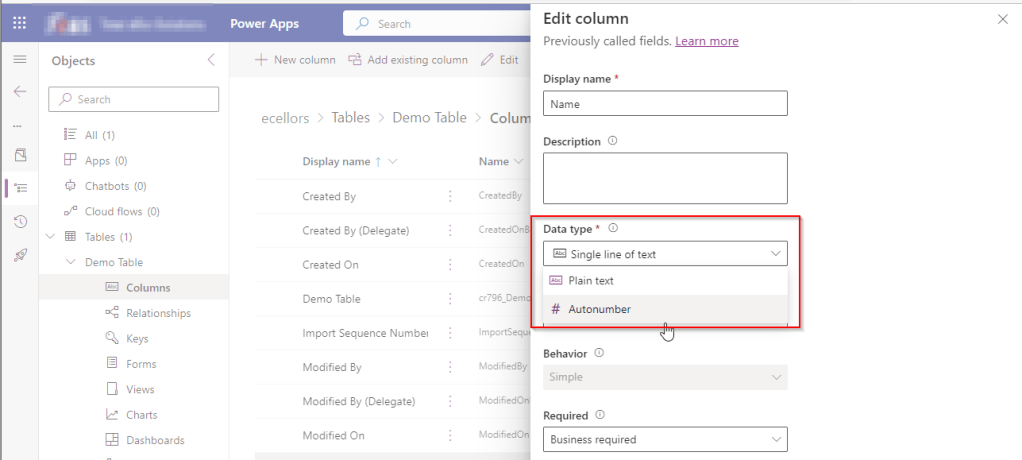
Now Select the Autonumber from the drop down available…you can optionally specify any custom prefix which you want for your Autonumber…and click Save and publish the customizations.

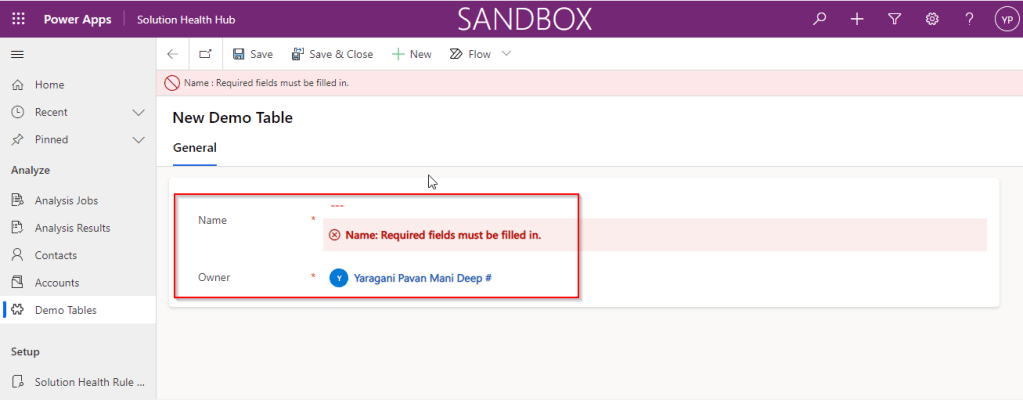
Now go back to your model driven app and then try creating a new record for the respective entity.
Since it was a primary field column, it is by default made mandatory…what’s up…the Autonumber column data type change is not reflecting….this is the same even if you check and publish the solution multiple times. Neither you can’t specify the field value because you already choose this to be an Autonumber and system should create it by itself.
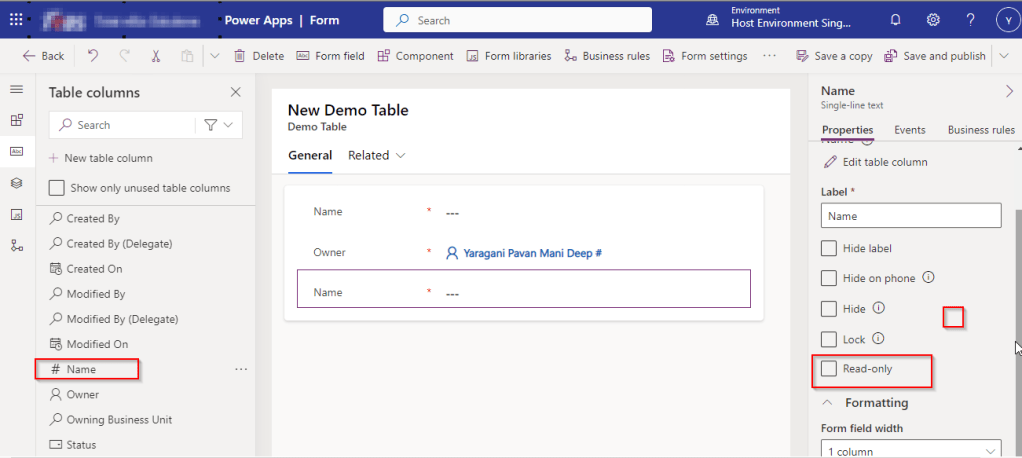
If you were scratching your head, then this simple tip will help…
Just make the field read-only from the form where this field is being referred, so you don’t need to really enter value for it…then publish the customizations.
Once you have done…
Now try to save the record..

There you go, you can see an Autonumber being populated in the primary field…
Cheers,
PMDY
Hi Folks,
As a Power Platform Admin/Consultant…did you often worry about your Power Platform Request Limits and usage left…? Do you receive warning messages from Microsoft regarding the usage of your database exceeded..? Want to see what are Custom Plugin Errors encountered while using your Model Driven App targeting Dataverse….then want to consolidate them and forward to your team to look into the issues without much efforts….then you were in the right place…
Just login with your credentials to admin page https://admin.powerplatform.microsoft.com/.
Expand Resources to the left…to find the Capacity menu

If you just want to know only the data usage, then you can ahead and click on Download as shown above to get one.
Want to get in depth analysis…then click on Details as highlighted in the same snap above.
This page shows your Database usage/File usage and respective categorizations by table as below..
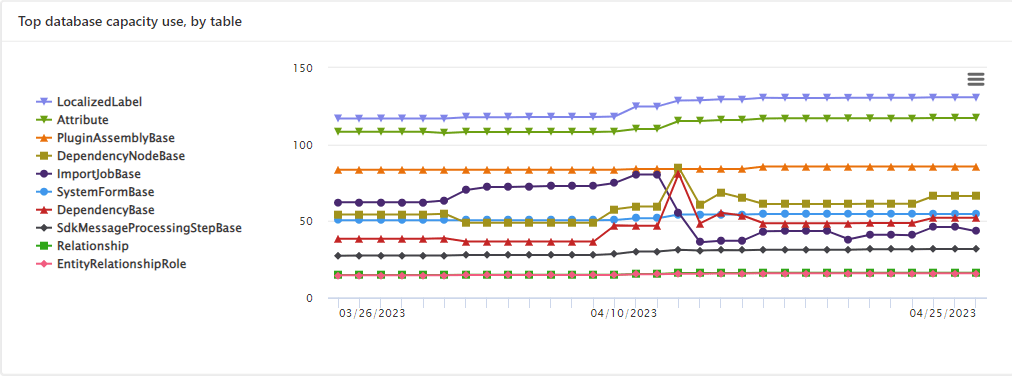
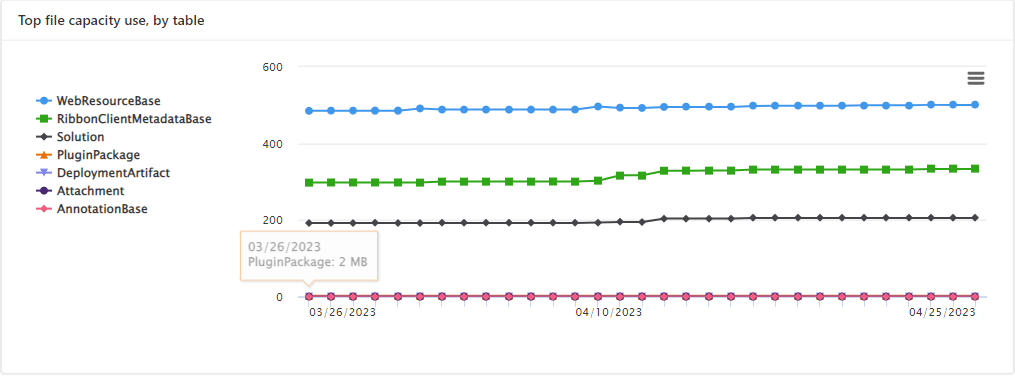

These are reports which I was able to extract from my trial environment, however all the reports were not available currently in my region. Yes, this is expected as this feature is still in preview and not recommended for Production Projects as of now. Definitely in the future…
Note:
Hope you found this post helpful…
Cheers,
PMDY
Hi Folks,
In this blog post, I will talk about implementing a custom page for your implementations.
Here in our use case, customer want to see a pop up dialog box where they can reject the cases from a button and when reject is clicked, there should be a dialog box to capture the reject reason and comments and update them back to the record. So for this we had to implement a custom page and called from a Ribbon button. If you just want to show an alert, you can very easily implement using JavaScript with the help of OOB Alert Dialog…
Xrm.Navigation.openAlertDialog(alertStrings,alertOptions).then(closeCallback,errorCallback);
But in case as user want to update entity details like optionset field, directly from the pop up, you should consider using the approach as we did using a custom page.

.
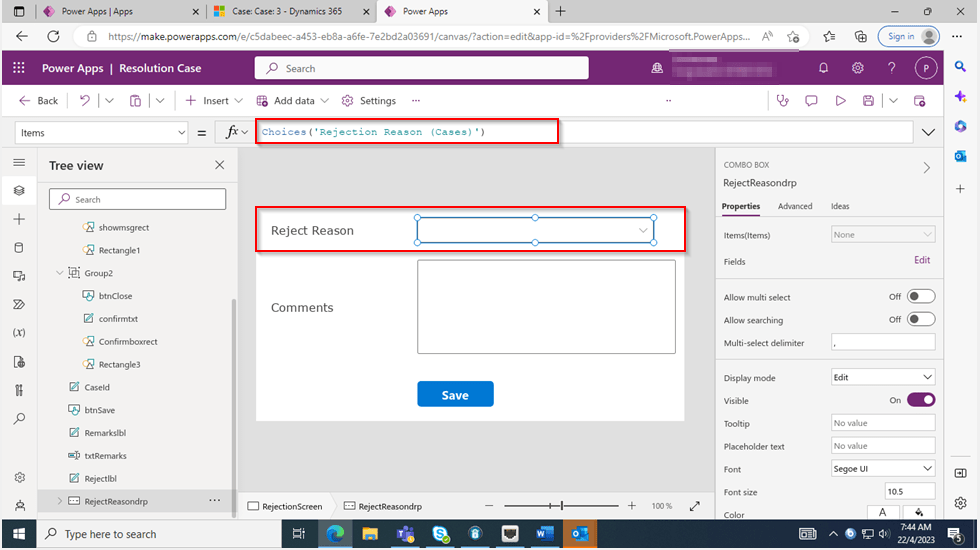
All we have used is JavaScript, Ribbon Workbench and Custom Page…First is to design the custom page in https://make.powerapps.com/

The optionset for Reject Reason is bound to the Reject Reason combo box using the below property.
On the App start, we will set the parameter with what we have supplied from the ribbon on-click function.

On the OnSelect property of the Save button, we can use the below function

Function:
Here’s the js code for the button OnClick Event…
Here the ribbon workbench customization added…

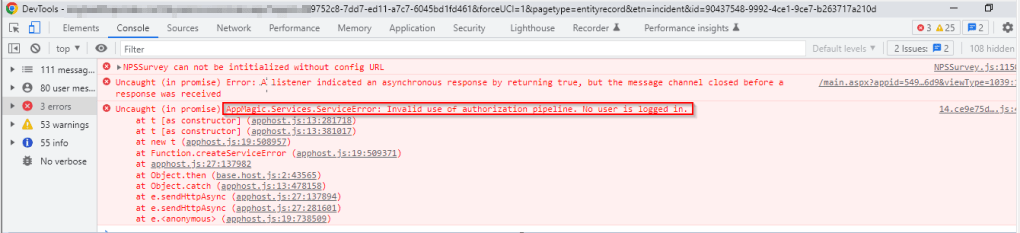
Finally publish the customizations and add the custom page to the model driven app…don’t forget to add this to your app as this mandatory to get the authorization to your page as below, else you see below error in developer tools of your browser as below…and no custom page opens up…
That’s it…when a Reject is clicked, you should a see a page as below..
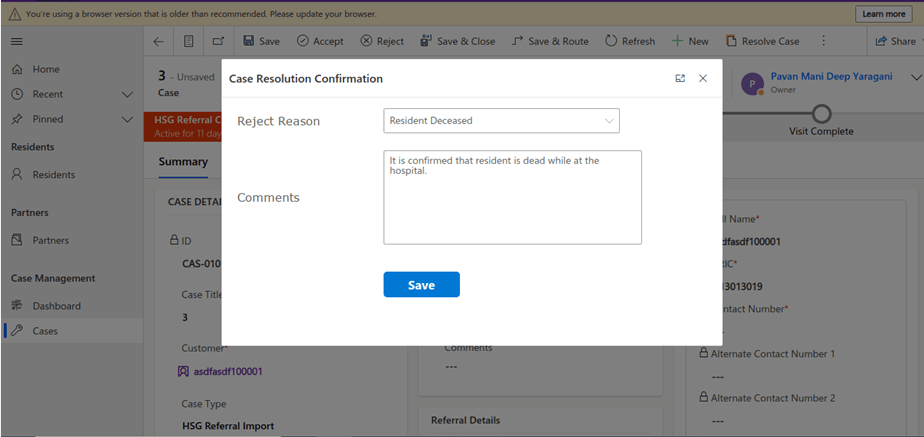
Upon entering the details as above, you will be shown a confirmation screen as below..

Once you click on Close, the selected details will be updated back in the record.
Hope this helps someone implementing custom page for a similar requirement….
Cheers,
PMDY