Are you a Power Platform or Dynamics 365 CE Developer, you would definitely need to work on Plugin Registration tool at any given point of time and having a local application for Plugin Registration tool greatly helps…in this post, I will show a little different way to install Plugin registration tool and that too very easily.
Well, this approach is especially useful to me when I got a new laptop and need to work on Plugin Registration Tool where the Plugins already build for the implementation.
First 3 ways might have known to everyone through which you can download Plugin registration tool…do you know there is fourth approach as well…
Because there were limitations to use these approaches at least in my experience, I found the fourth one very useful.
XrmToolBox – Not quite convenient to profile and debug your plugins
https://xrm.tools/SDK – Dlls in the downloaded folder will be blocked and would need to manually unblock the DLL’s for the Tool to work properly
CLI – People rarely use this.
Just do note that the approach is very easy and works only if you have a Plugin Project already. Please follow the steps below
Just open the Plugin project.
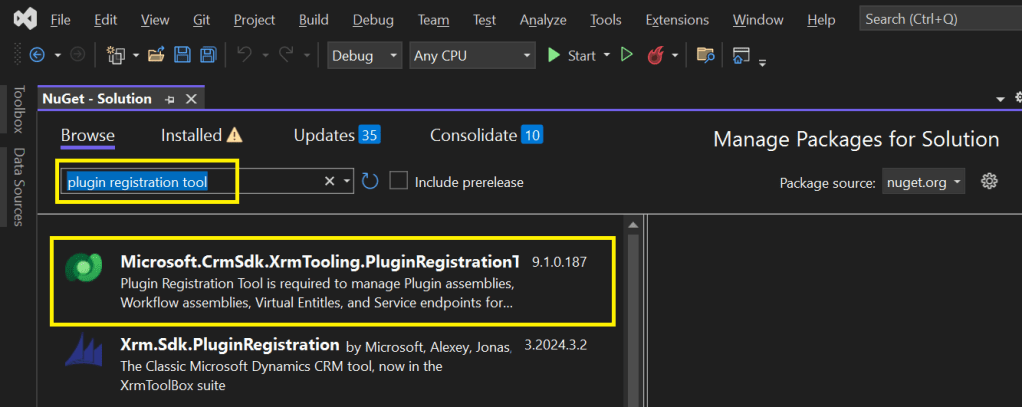
Right click on the solution and choose manage Nuget Packages for the solution
Search for Plugin Registration tool as below
4. Choose the Plugin project and click install, confirm the prompt and agree the license agreement shown
5. Once installed, next go to the Project folder in the local machine.
6. Navigate to Packages folder, you should see a folder for Plugin Registration tool below
7. There you go, you can open the Plugin Registration Application under tools folder. You can undo the changes for the Assembly it is linked to Source control.
That’s it, how easy it was? Hope this would help someone.
After a while, I am back with another interesting way to solve this type of problem in Power BI. It took increasingly more amount of time to figure out best approach, this post is to help suggest a way of solving differently. This post is a bit lengthy but I will try to explain it in the best way I can.
Here is the problem, I have date fields from 2 fact tables, I have to filter them using a single date slicer which is connected to a calendar table and show the data when any of dates in a particular row falls in the date slicer range. I initially thought this was an easy one and could be solved by creating a relationship between the two fact tables with calendar table, then slice and dice the data as I was able to filter the data with one fact table when connected to calendar table.
I was unable to do that because there were multiple date fields in one fact table and need to consider dates from two tables. I tried to get the value from the slicer using Calculated field since I have do row by row checking. Later understood that, date slicer values can be obtained using a calculated field but those will not be changing when the dates in date slicer is getting changed, this is because the Calculated fields using row context and will only be updated when data is loaded or user explicitly does the refresh. Instead we have to use measure which is calculated by filter context.
The interesting point here is that, if a measure is added to the visual, it returns same value for each row, so a measure shouldn’t be added to a visual as it calculates values on a table level and not at row level, it is ideal if you want to perform any aggregations.
I tried this approach using the great blog post from legends of Power BI(Marco Russo,Alberto Ferrari), but this looked increasingly complex to my scenario and don’t really need to use this, if you still wish to check this out, below is the link to that.
So, then I tried to calculate the Maximum and Minimum for each row in my fact table using MAXX; MINX functions
MaxxDate =

VAR Date1 = FactTable[Custom Date1]
VAR Date2 = FactTable[Custom Date2]

RETURN
MAXX(
    {
        Date1,
        Date2

    },
    [Value]
)
MinXDate =

VAR Date1 = FactTable[Custom Date1]
VAR Date2 = FactTable[Custom Date2]

RETURN
MAXX(
    {
        Date1,
        Date2

    },
    [Value]
)
After merging the two tables into a single one, then create two slicers connected to Maximum Date and Minimum Date for each row. I thought my problem is solved, but it isn’t, since I was only able to filter the dates which have a maximum or minimum value selected in the date slicer, any date value within the date range is being missed.
In this post, I will be talking about the features of Dataverse Accelerator in brief. Actually, the Microsoft Dataverse accelerator is an application that provides access to select preview features and tooling related to Dataverse development, it is based on Microsoft Power Pages. This is totally different from Dataverse Industry Accelerator.
Dataverse accelerator app is automatically available in all new Microsoft Dataverse environments. If your environment doesn’t already have it, you can install the Dataverse accelerator by going to Power Platform Admin Center –> Environments –> Dynamics 365 Apps –> Install App –> Choose Dataverse Accelerator
You can also refer to my previous blog post on installing it here if you prefer
Once installed, you should see something like below under the Apps
On selection of the Dataverse Accelerator App, you should see something like below, do note that you must have App-level access to the Dataverse accelerator model driven app, such as system customizer or direct access from a security role.
Now let’s quickly see what are features available with Dataverse Accelerator
Reusable, real-time workflows that execute a specific set of commands within Dataverse. Low-code plug-ins run server-side and are triggered by personalized event handlers, defined in Power Fx.
A modern interface to surface the existing plug-in trace log table in Dataverse environments, designed for developing and debugging Dataverse plug-ins and custom APIs. Do you remember viewing Plugin Trace logs from customizations, now you don’t need system administrator role to view trace logs, giving access to this app will do, rest everything remains the same.
A preauthenticated software testing tool which helps to quickly test and play with Dataverse API’s.
I wrote a blog post earlier on using Low Code Plugins, you may check it out here, while using Plugin Monitor is pretty straight forward.
You can find my blog post on using Postman to test Dataverse API’s here.
Now let’s see how can use the API Playground, basically you will be able to test the below from API Playground similar to Postman. All you need to open the API Playground from Dataverse accelerator. You will be preauthenticated while using API Playground.
Instant plug-ins are classified as any user-defined workflows registered as a custom API in the environment with a related Power Fx Expressions.
OData request
Allows more granular control over the request inputs to send OData requests.
Custom API, Instant Plugin – You select the relevant request in the drop down available in API Playground and provide the necessary input parameters if required for your request
OData request – Select OData as your request and provide the plural name of the entity and hit send
After a request is sent, the response is displayed in the lower half of your screen which would be something like below.
I will update this post as these features get released in my region(APAC), because at the time of writing this blog post, this API Playground feature is being rolled out globally and was still in preview.
The Dataverse accelerator isn’t available in GCC or GCC High environments.
Hope learned something about Dataverse Accelerator.
This sounds good for those who are Pro Dev and also those working on Fusion teams (Pro + Low Code), as well. Just note, all these features are in preview or experimental features and are available in US Preview Region now as they were just released in the Microsoft Build 2024 last week. Public preview of these features is expected to be released in June 2024, so you can then try out in your region as well. If you want to check these out now, spin up a trial in US Preview region.
These are the top new features
View the Code behind the Canvas Apps
Use Copilot to generate comments and expressions for your Canvas Apps
Integrate Canvas Apps with GitHub
Feature #1:View the Code behind the Canvas Apps
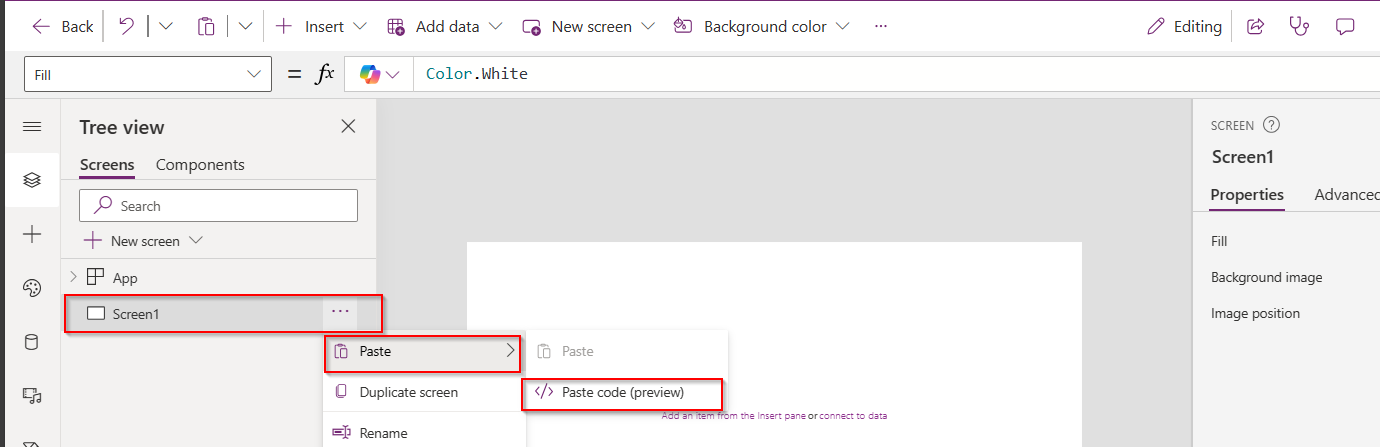
Now you can view the code behind your Canvas Apps, besides the screen where the components reside, click on the ellipses as below
You should be able to see the YAML source code for your Canvas App, the code is currently read only, you can click on Copy code option in the above screen at the bottom of page.
Make the necessary changes to the YAML code, create a new blank screen and you can then copy the YAML code to recreate the previous screen for which you copied the YAML code into a new screen if you wish you.
Here I will copy the code for the container inside, then I will create a new Blank screen
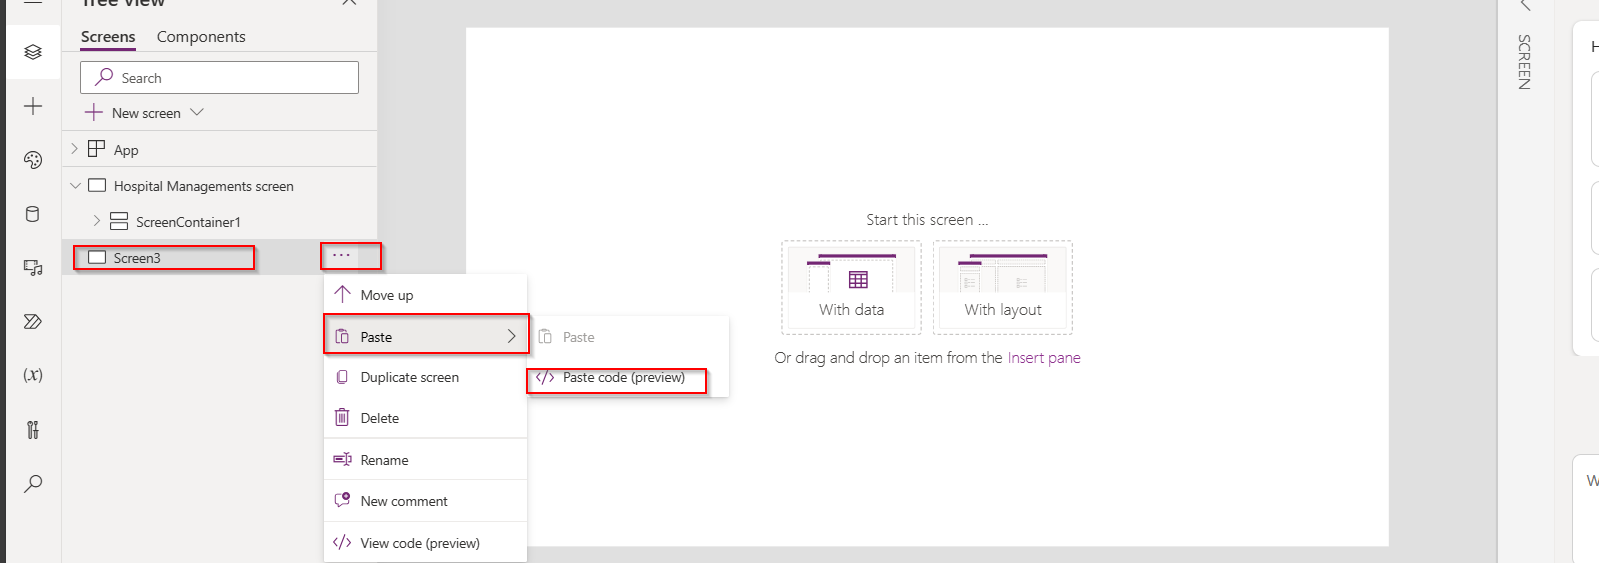
Once blank screen is added, expand it so that it occupies the entire size of the App, then click on Paste as below
Give it a minute, your new screen is now ready with container inside as below e.g here it was Screen3, just rename this accordingly.
How easy it was…. make sure you copy it to relevant item, meaning if you copied the code of container, you could only copy it to another container and not a screen.
Feature #2: Use Copilot to generate comments and expressions for your Canvas Apps
Do you want to generate comments for the expressions you wrote. Or have you forgot the logic which you have written for Canvas Apps long time back, don’t worry, use this approach.
Let’s say, I am choosing OnSelect Property, I have the below formula
Let’s ask Copilot what this mean, click on the Copilot icon available as below
Choose to explain the formula
So now you click on Copy option available and paste it above your command, this serves as a comment for your expression, you can try for any complex expression you wrote in your App. This improves the readability of your app and also makers can use existing knowledge to quickly get up to speed, minimize errors, and build—fast next time you were working on the same App
Now you can generate Power Fx using Copilot, you can start typing in natural language what you need in comments and as soon you stop typing, it shows as generating as below…you could use either // and /* */, comments can remain in the formula bar as documentation, just like with traditional code.
It generates the Power Fx command for your input as below and then you need to click on Tab key on your keyboard, it will show something like below
And finally, you can see the output as below.
You can apply these two tips for complex formulas as well.
Feature 3:Integrate Canvas Apps with GitHub
Did you ever notice that if the canvas app was opened by one user, when another user tries to open the same Canvas app, you would see a warning message and you need to explicitly click on override to take it forward, meaning at any point of time, only one person could be able to work on the Canvas App.
Now we can use first class Devops with the GitHub Integration feature enabled, many people can work on the same canvas app at the same time and also commit the code for Canvas Apps to Git, let’s see this.
Prerequisites:
You need to have a GitHub Repo created, creating branches is optional, we can use main branch otherwise.
Enable the experimental feature as below
Then you should see
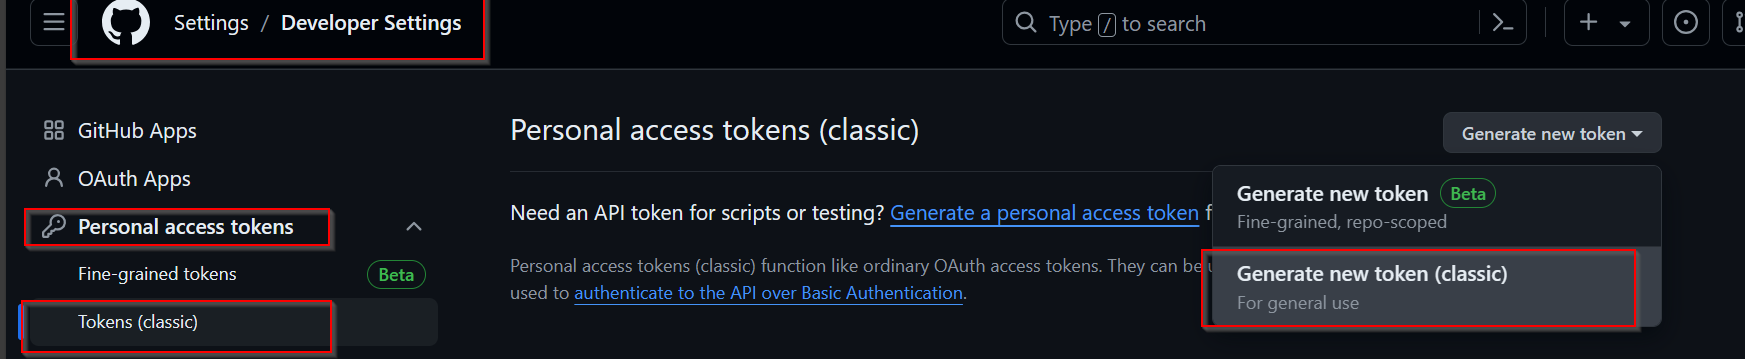
Next thing is you need to configure Git version control as below, you can either use GitHub or Azure DevOps for this, I want to create a new Directory for storing my canvas app like GitHub Test which is not yet in my GitHub Account.
You need to your GitHub Account settings to create a new token as below.
For the personal access token, give repo level scope and click generate token.
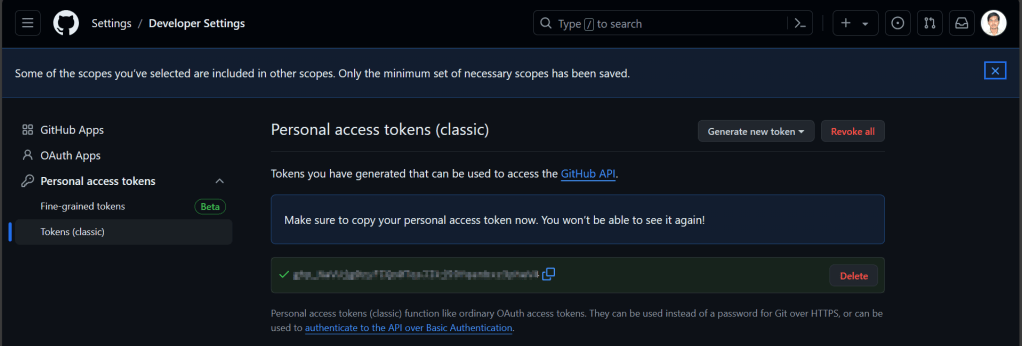
Copy the personal access token in the connect to a Git Repository window, once authenticated, you should see a message like below.
Click Yes, you should see something like below
Within a minute, you should the below screen w
So, you should the code files being created in your GitHub Account as below
Now, your team can make the changes in the GitHub, since GitHub allows multiple people to work on it, latest commit will be reflected whenever you try to open the Canvas App from the maker portal. This helps developers build and deploy to source control without leaving the maker portal. Whenever you try to open this app, it will ask your Git Account credentials.
Do note that these features are currently available in US Preview region as they are just released last week in Build and would be released to other regions in near future, possibly in June 2024.
Hope you learned something new coming up next month or sooner…
Have you or your user ever mistakenly deleted records in Model Driven Apps..? Do you remember we can recover the deleted records from recycle bin in your PC, now similarly we can also do this in Dataverse also.
In this blog post, I will discuss about how you can retrieve a deleted record in Dataverse.
To use this, just enable this feature from Power Platform Admin Center, you can optionally set the recovery interval if you wish to.
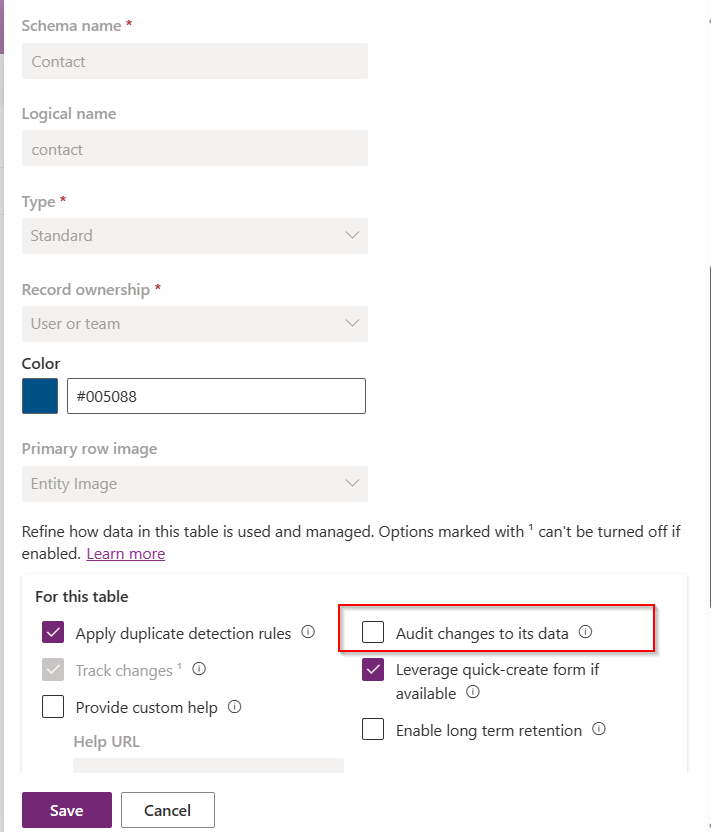
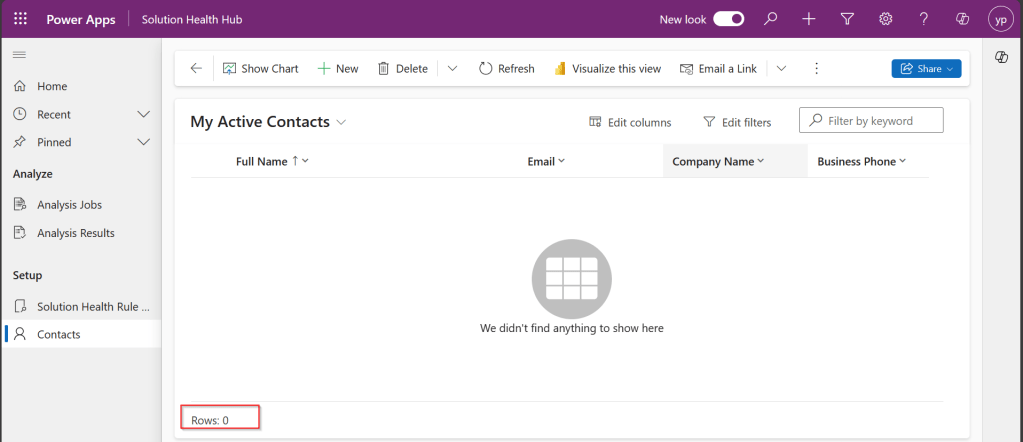
For this, we take Contact table as example, now let’s check the audit setting of the contact table..well, it’s turned off.
Even the auditing is not enabled for the contact entity, with this Recycle Bin Preview feature, we should be able to recover the records, let’s see this in action.
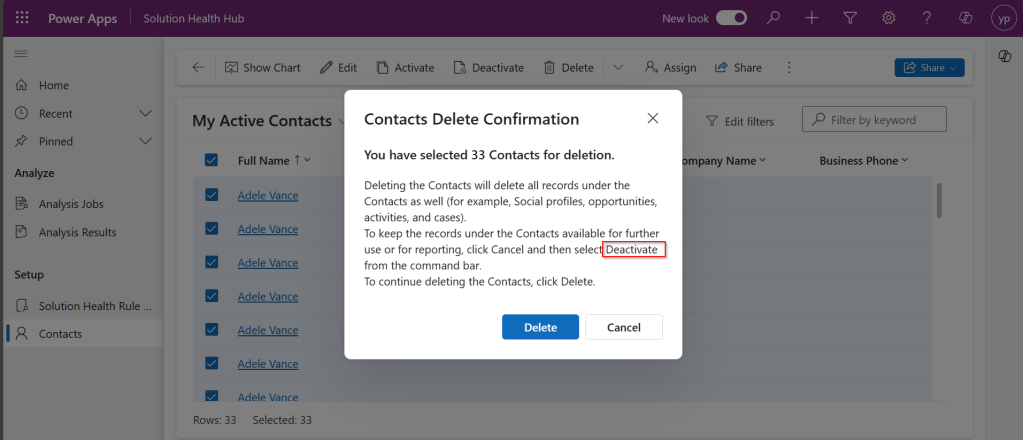
Now try deleting the contact records, I have 33 contact records in my environment, let me delete all of them.
It suggests you deactivate rather than delete, still let’s delete them.
All the records are now deleted.
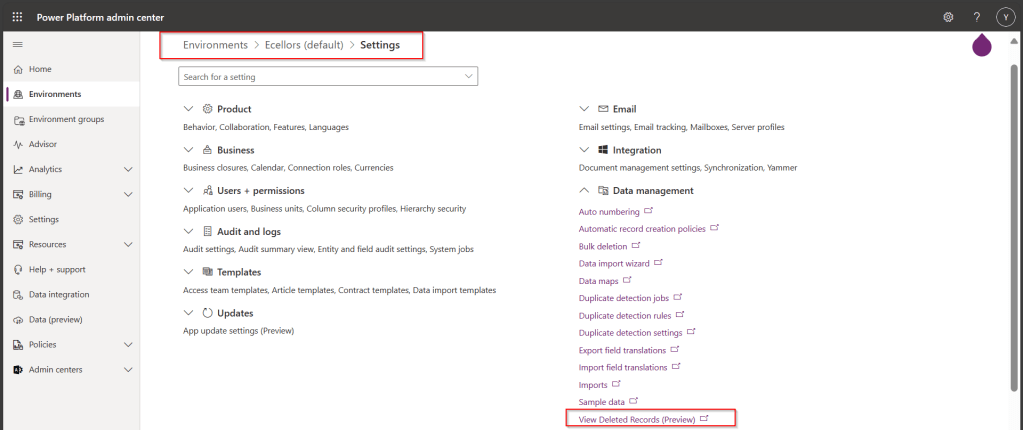
Now, let’s see how to recover them back…. just go to Power Platform Admin Center –> Environments –> Settings –> Data Management
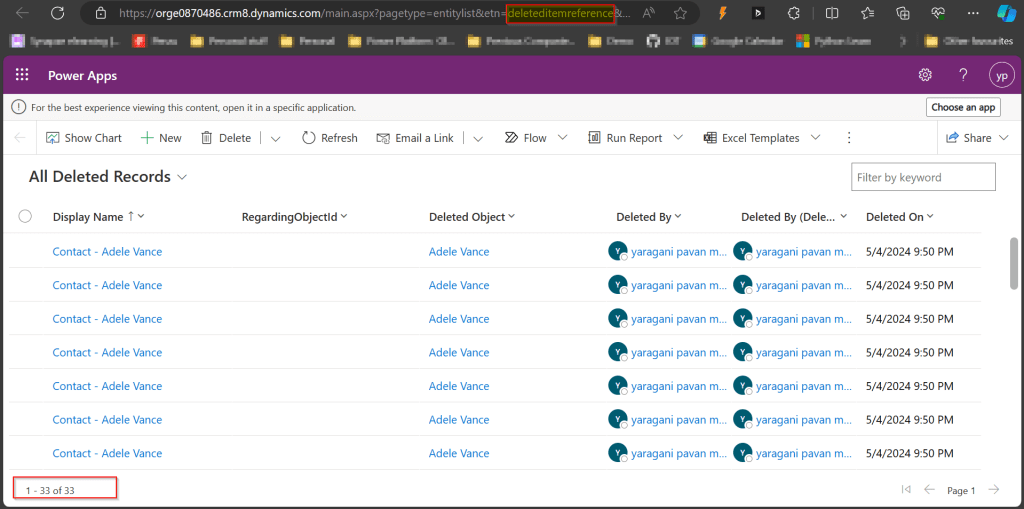
As you click on View Deleted Records, you will be navigated to a view from a new table called DeletedItemReference which stores the deleted records just like recycle bin.
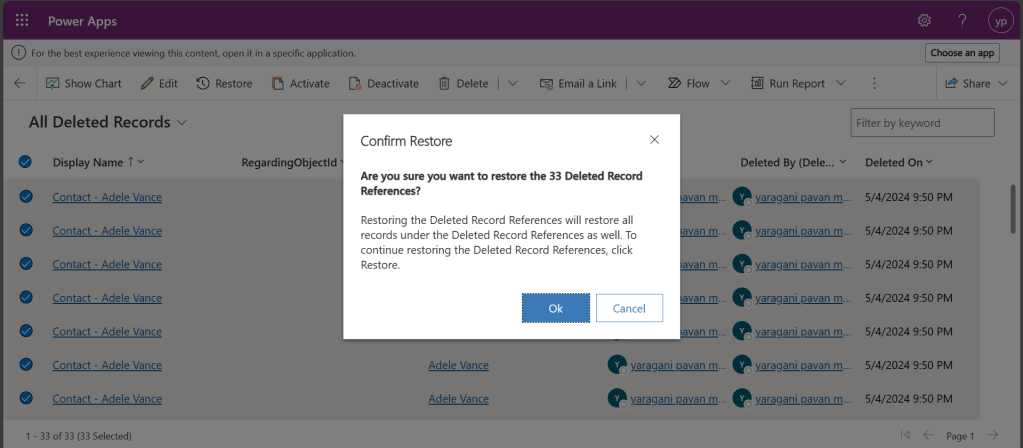
Just select the records, you should see a restore button available on the command bar, here I choose All Deleted Records.
Once you click on restore, you will be shown a confirmation dialog, click on Ok.
You should see the records back in the respective table i.e. Contact here.
In this post, we saw recovering records which were deleted manually…the same thing works for records deleted using Bulk Delete jobs or whatever way you try to delete.
Note:
This is a preview feature and not recommended to use in Production environments right away.
You will not be able to recover the deleted records when you have custom business logic applied to delete the records from deleteditemreference table also, moreover this still a preview feature and not recommended for Production use.
You will be able to recover records which were deleted by the Cascading behavior, like record Child records alone when Parent is still deleted.
You can only recover up to the time frame you have set above and maximum up to 30 days from date of deletion.
Hope you learned something new…that’s it for today…
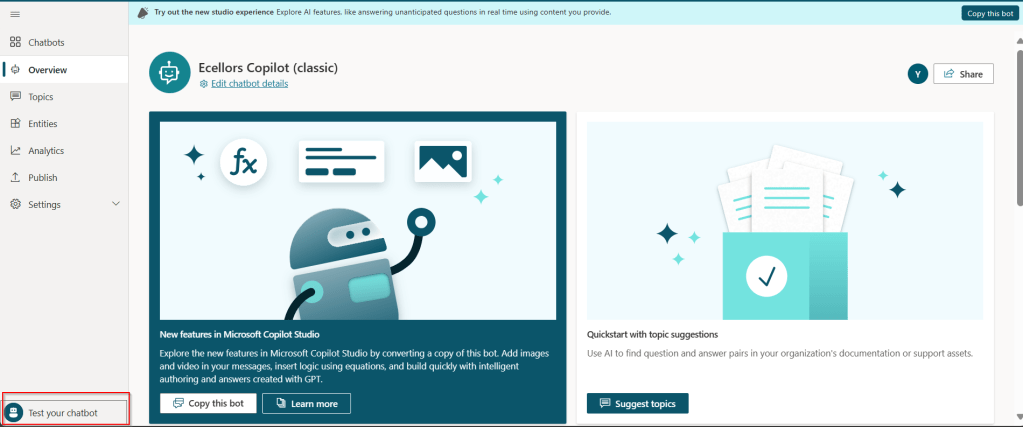
Thanks for visiting my blog, this post is a continuation of my previous blog post on creating a Copilot, if you haven’t gone through that, I would strongly recommend checking my introductory post on this topic, you can find it here.
Well, so in this blog post, we will see how you can test and publish your bot so your bot development would be complete.
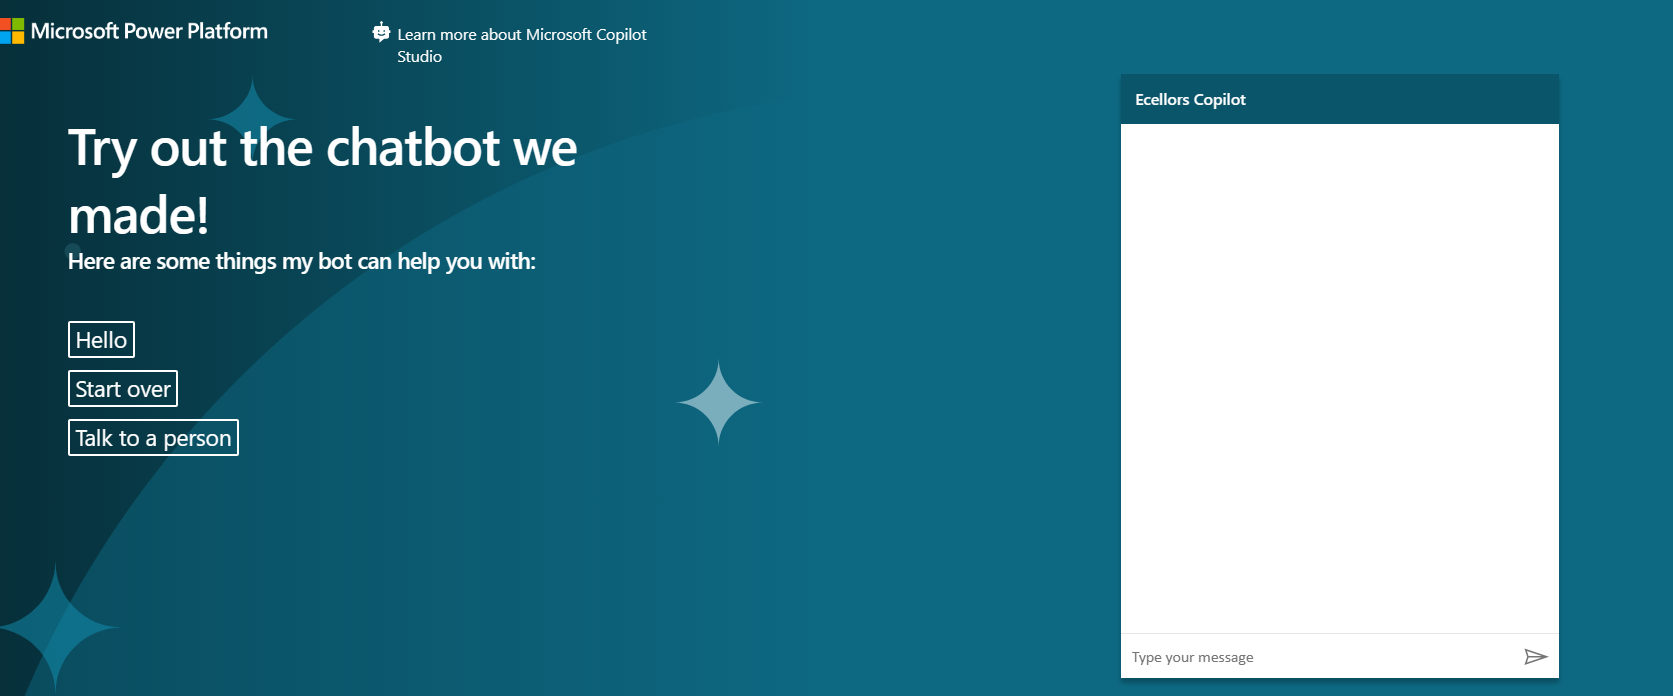
Your bot can be tested, and messages will be displayed on the chat screen.
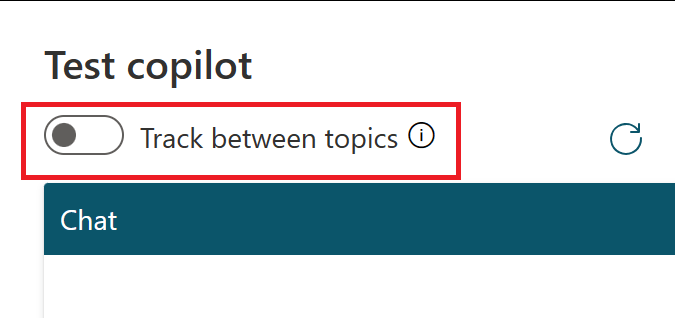
Step 1:Test your Copilot:
The bot calls the topics based on the trigger phrases you have entered as below.
You can return to the authoring canvas for the topic at any time to revise its conversation path. The Test chat pane will automatically refresh itself when you save changes to a topic.
As you fine-tune your bot, it can be useful to enable tracking between topics so you can follow through the conversation path step by step.
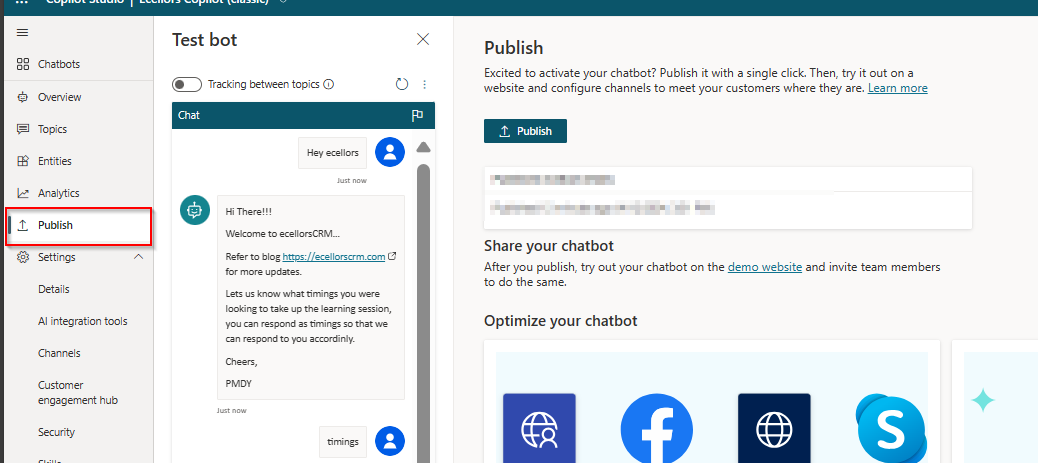
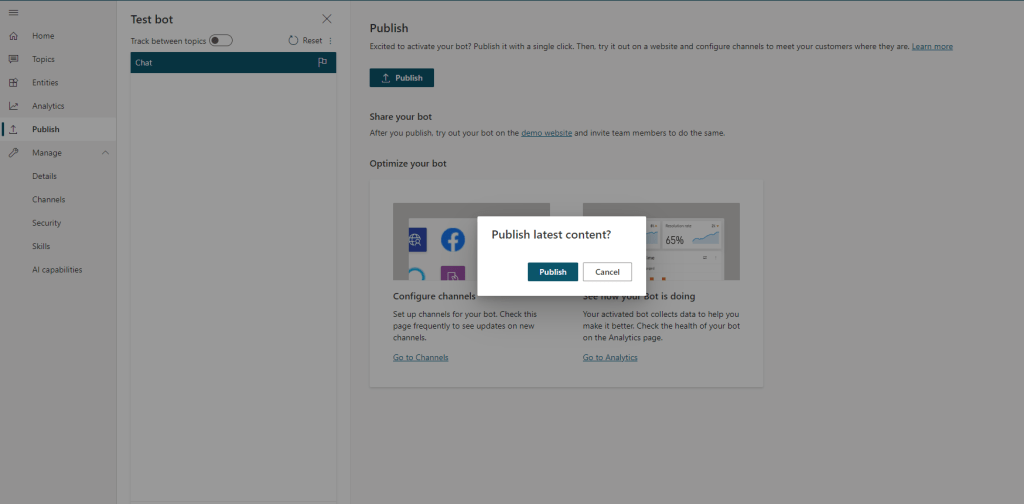
Step 2:Publish your bot
Once you confirm that everything is good and then you can publish your Copilot.
Publishing you bot helps to engage with your customers on multiple platforms or channels.
Each time an update is made, you would need to publish the bot in the Copilot Studio and this will publish the changes to all your respective configured channels. If you haven’t configured any channels, you may proceed to next step to get to know this.
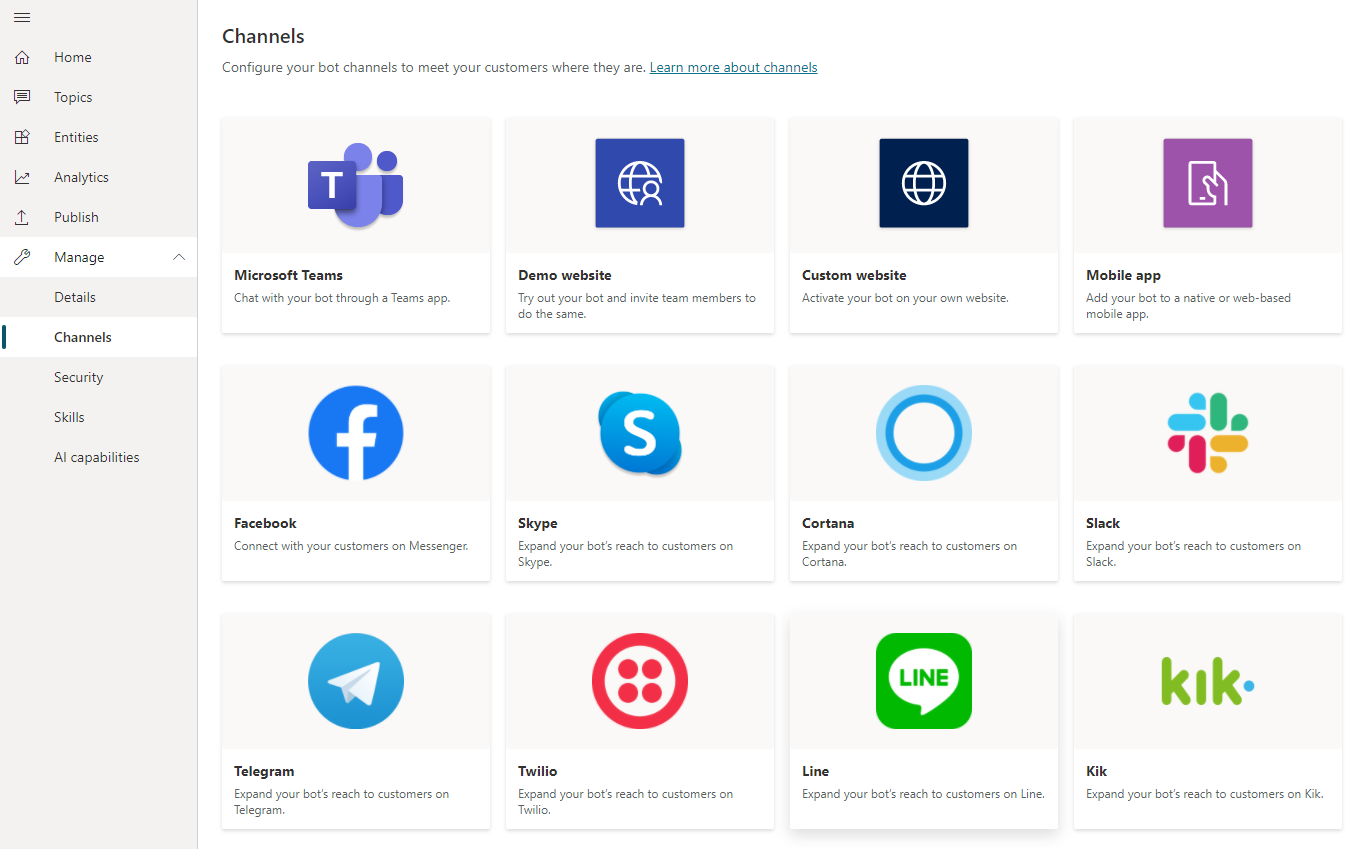
Step 3:Configure Channels
You can see what channels we currently support by selecting Manage and going to the Channels tab in the side navigation pane and each channel may require different setup and configuration.
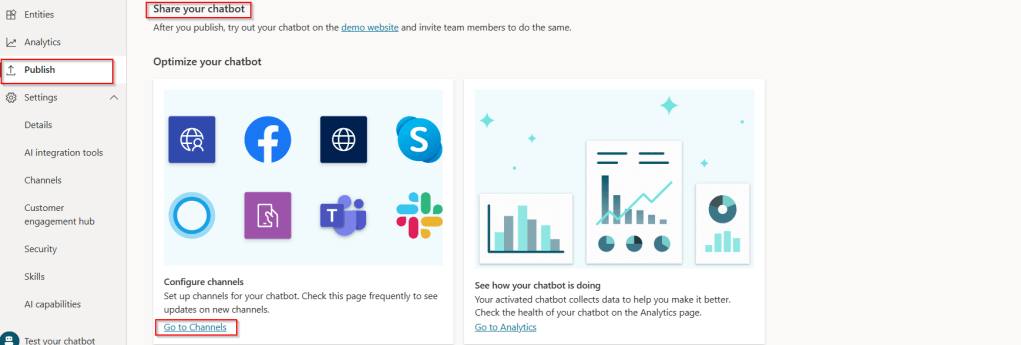
Step 4:Finally let’s see how the Copilot looks like when you embed...
a. Navigate to channels as highlighted from publish tab:
b. Verify if the channels are enabled:
If not enabled, make sure you set the authentication for your Copilot properly for the respective channel to embed your bot. For simplicity, I have chosen No authentication.
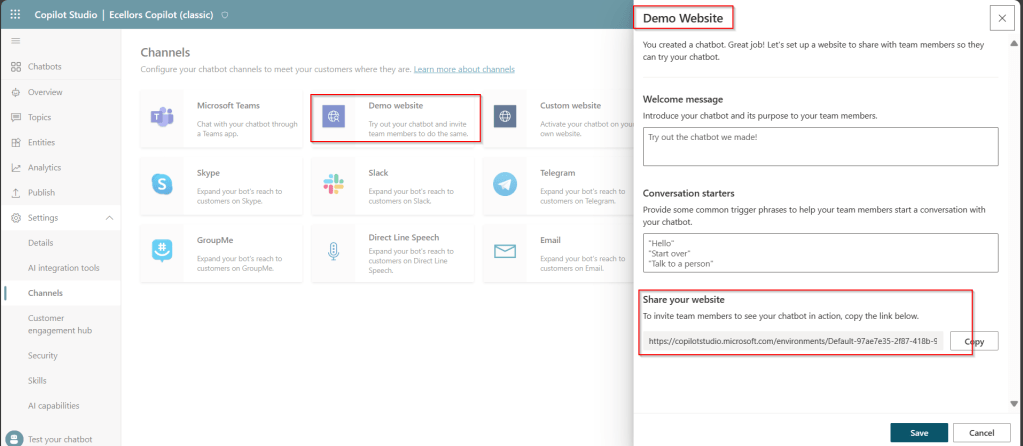
c. Find the embed code:
As shown above, you can find the embed code under Share your website.
d. Copy the embed code in browser:
You can test out your Copilot in your browser by pasting your embed code and it should look something like below.
Step 5: Bot analytics
a. Do note that there might be one hour of delay between when the conversations occur and when the statistics for those conversations appear in the analytics views
b. All the channels’ analytics will be logged here.
c. You can find the Summary on how your bot is performing, understand how your topics defined are performing and come up with CSAT Scores out of this.
Now that we have learnt how to build a simple Copilot, in the next blog post, I will cover about the Variable Management and Topic Management in Copilots which would help to design your desired topic conversation path for your Chatbot.
In the next few blog posts in this series, I will be talking all about Microsoft Copilot aka Power Virtual Agent from beginner to advanced topics, you might see longer posts but you don’t require any prerequisite knowledge on Copilot to follow.
So, lets’ get started and learn with me in this blog series, let’s dive into the capabilities of Generative AI using #copilot.
Actually, Copilots empowers teams to quickly and easily create powerful bots using a guided, no-code graphical experience.
In this blog post, we will see how you can create a simple Chatbot. Excited? so let’s get started.
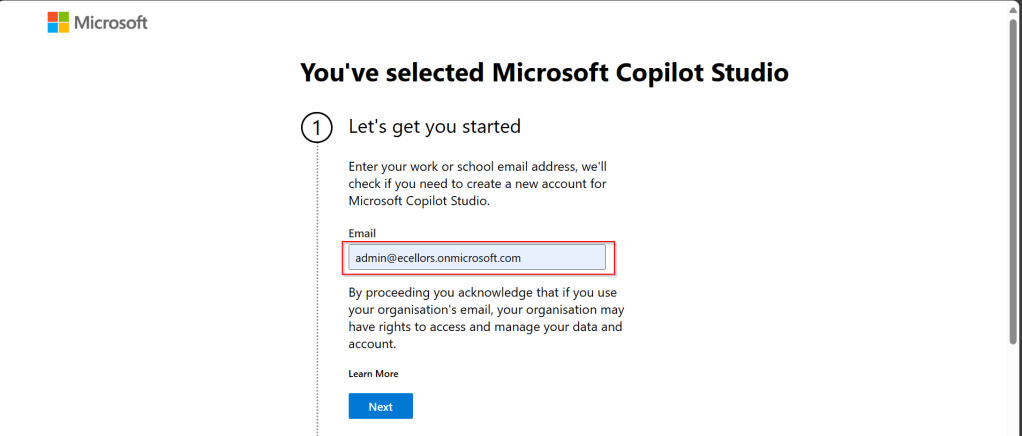
Step 3: Enter your email address and click on Next.
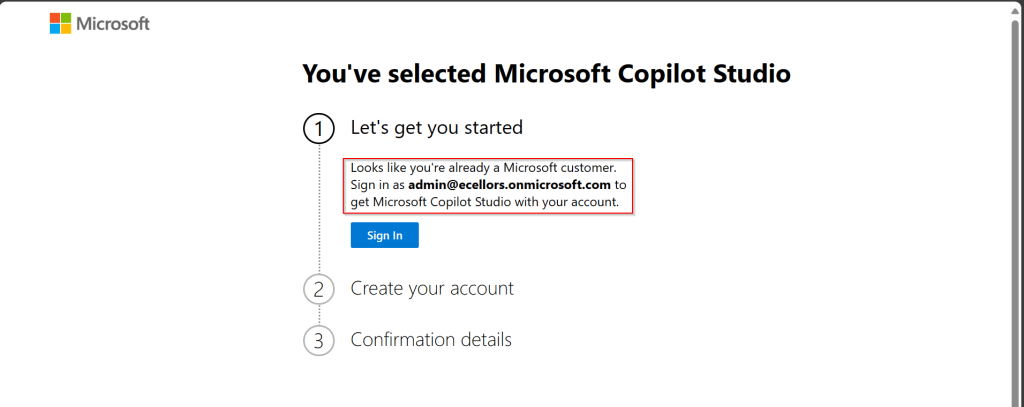
Step 4: In case you have an existing Microsoft 365 Subscription, you will be shown something below.
Step 5: Click on SignIn, I have already had an account in Copilot Studio, in case you don’t have, one will be created.
Step 6:
a. Once you click on Get Started, Copilot Studio opens in a new tab and you will be asked to login once, enter your Signin details.
b. In case you previously logged created a Copilot Studio trial, you can continue using it, else extend it to 30 days if requested. Click on Done at the bottom.
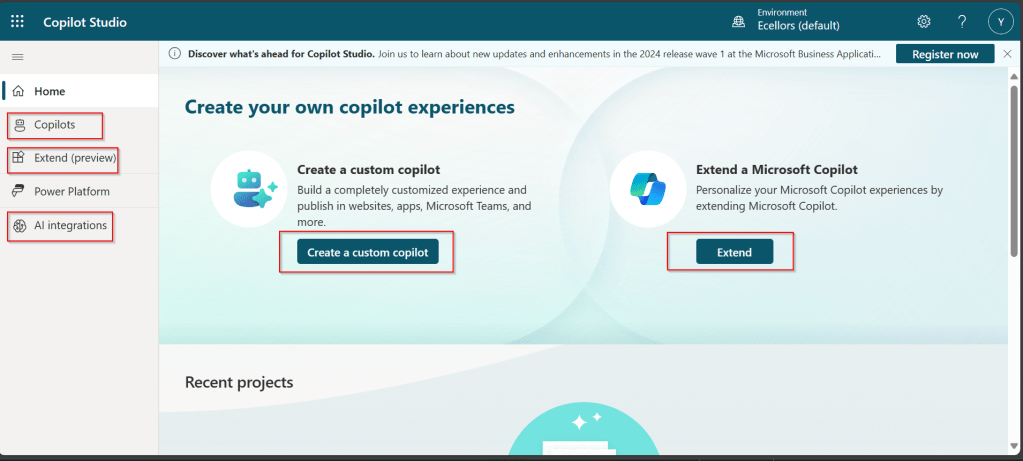
Step 7: Below is the home page of Copilot Studio.
I will be talking about each of the highlighted topics in great detail in the upcoming posts.
Note: Copilots are supported only in certain locations listed in the supported data locations, with data stored in respective data centers. If your company is located outside of the supported data locations, you need to create a custom environment with Region set to a supported data location before you can create your chatbot.
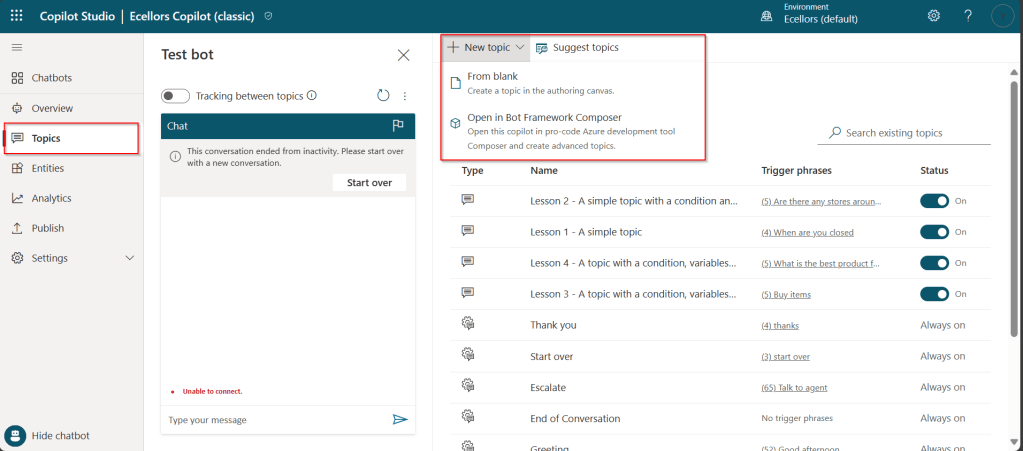
Step 8:In this step, we will create a Copilot, so click on New Copilot
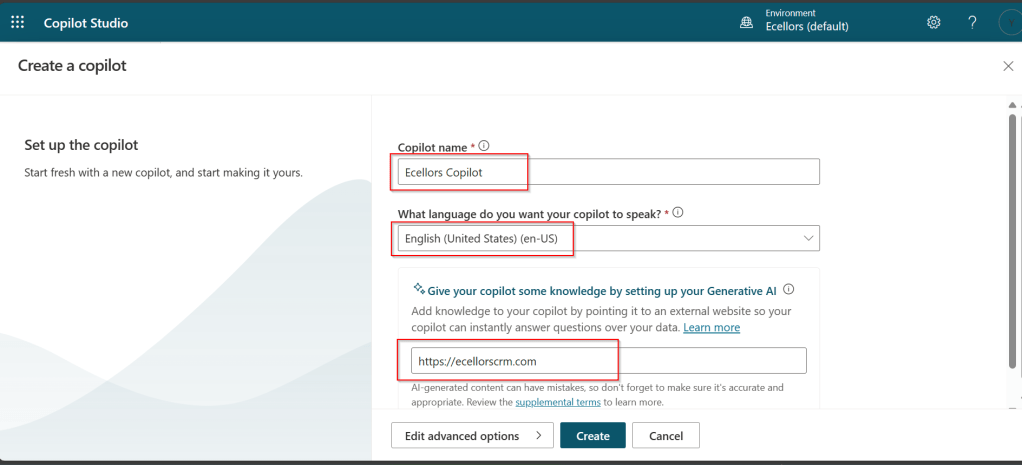
Step 9: I have provided a name; chosen a language and we can provide an existing website to utilize the Generative AI Capabilities built in Copilot Studio.
So, here I have provided my blog address. By using this, Copilot can generate suggested topics which you have option to add to your existing topics.
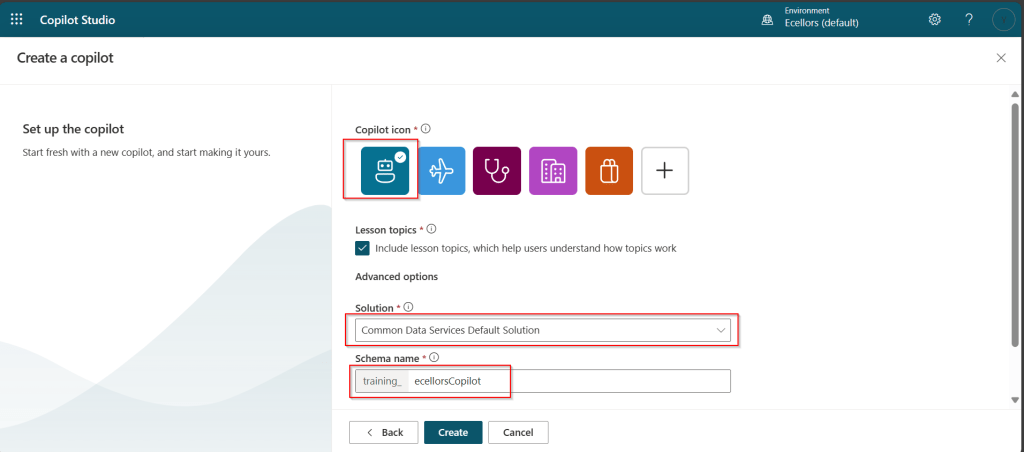
Step 10:
a. Click on advanced options; you will be able to choose an icon for the Copilot
b. You can optionally include Lesson Topics
c. Choose an existing solution you wish to add this Copilot to
d. Choose appropriate Schema name.
e. You can optionally enable voice capabilities by choosing the language in which your copilot wants to speak to.
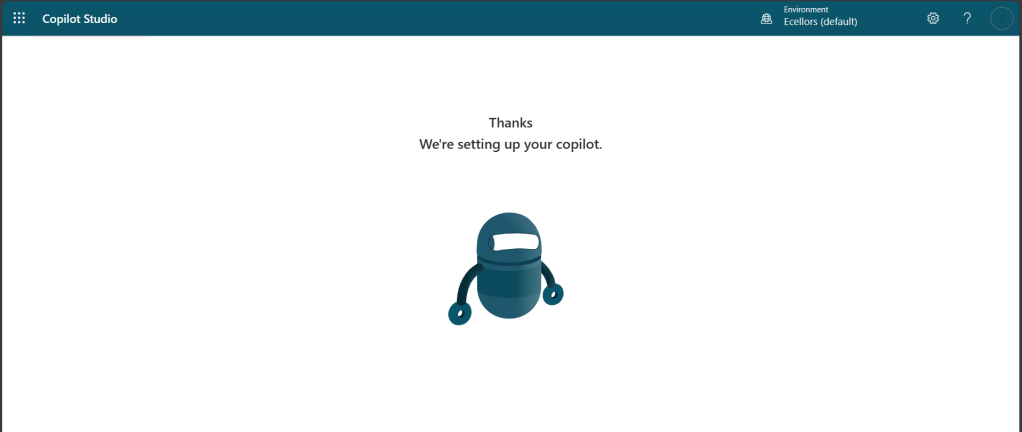
Step 11: You will be shown the below screen and within a few seconds, your Copilot will be ready.
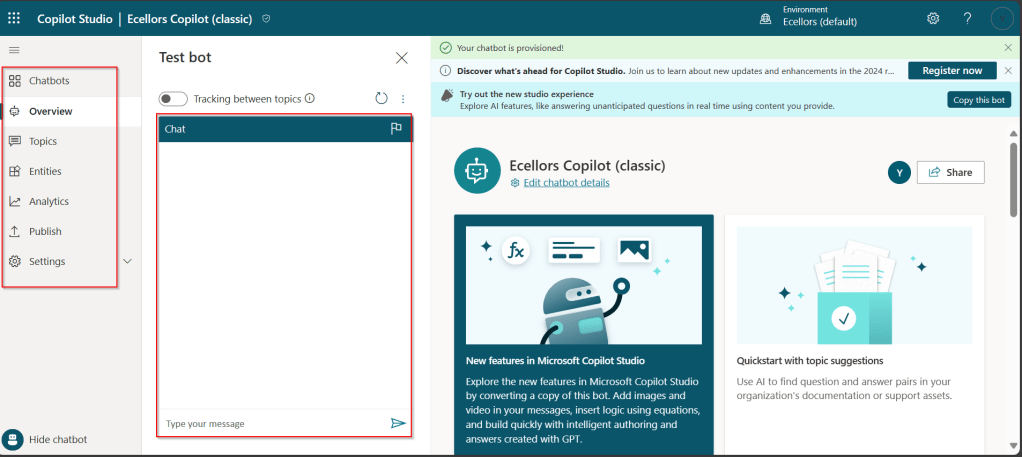
Step 12: This is the main page of your Copilot; you will also be able to add additional Copilots or delete the Copilot.
Step 13: Now, let’s understand Topics what one of the building blocks of Copilot which are nothing but predefined categories or subjects which can help to classify and organize the KB/Support articles.
The topics shown on the right are prebuilt topics for the Copilot you have just created. Here you may wish to create new topics as necessary.
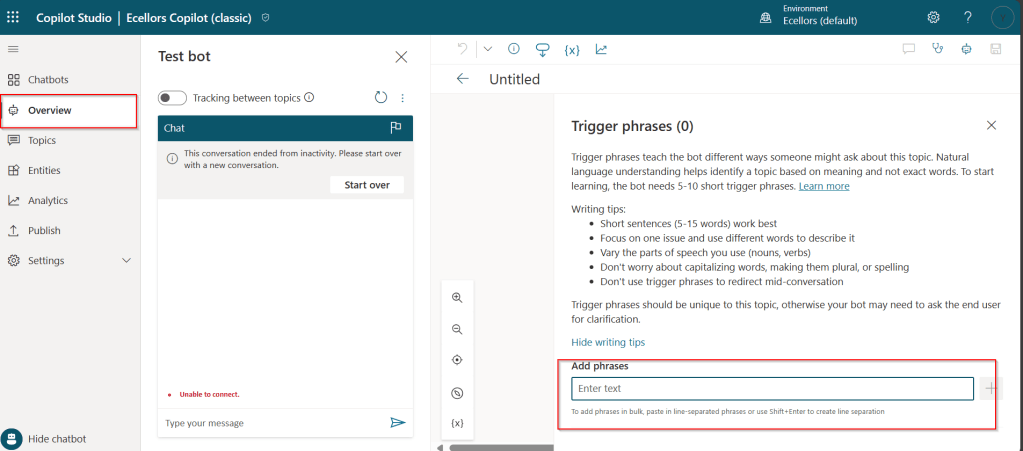
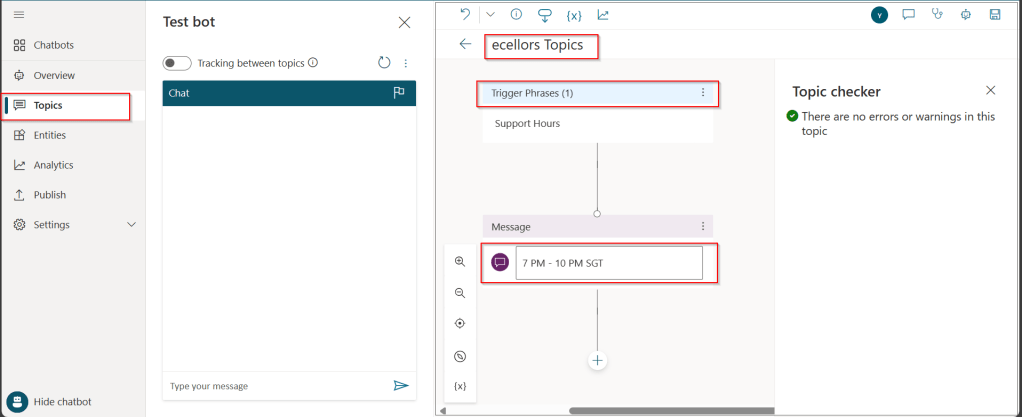
Step 14: Trigger phrases are those which customer enters in the chat window to start the conversation which then calls the relevant topics. There can be multiple trigger phrases for a single topic.
You may click to create a topic which then asks you to provide the trigger phrases, when you click to add a topic, the Trigger phrases node and a blank Message node are inserted for you.
Copilot opens the topic in the authoring canvas and displays the topic’s trigger phrases. You can add up to 1000 topics in a Copilot.
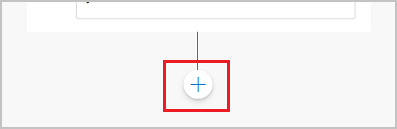
Step 15: You can add additional nodes by selecting the Plus (+) icon on the line or branch between or after a node.
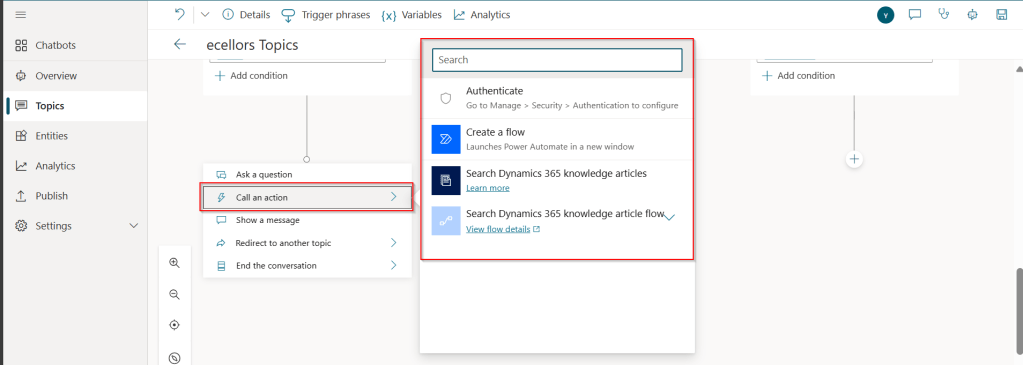
Step 16: When you were adding a new node, you can choose from the below options available.
You can either use any of the available options as above..
a. Ask a question
If you want to ask a question and get response from end user, you may do so by adding a node, click on Ask a question.
For example, I choose Multiple choice options.
Based on what you enter in the Identify field, you can enter what options user may have. You can nodes further to create branching logic
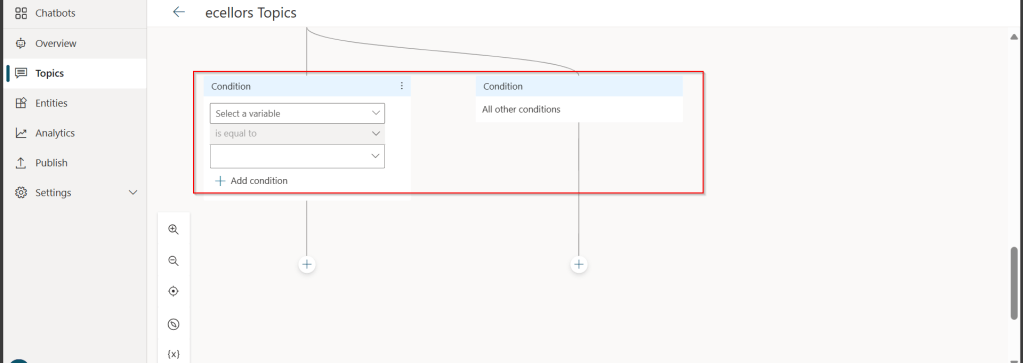
b. Add a condition
You can add a condition in the canvas as below to take your Copilot branch out conditionally.
c.Call an action: The options shown below are self explanatory. You can branch out with the possible options.
d. Show a message
You may choose to show a message to the user by entering your message in the text box available.
d. Goto another topic
f. End the conversation:
Finally, you can end the conversation by choosing to end the conversation with the available options or you can transfer to an agent to take the user queries further.
Step 17:
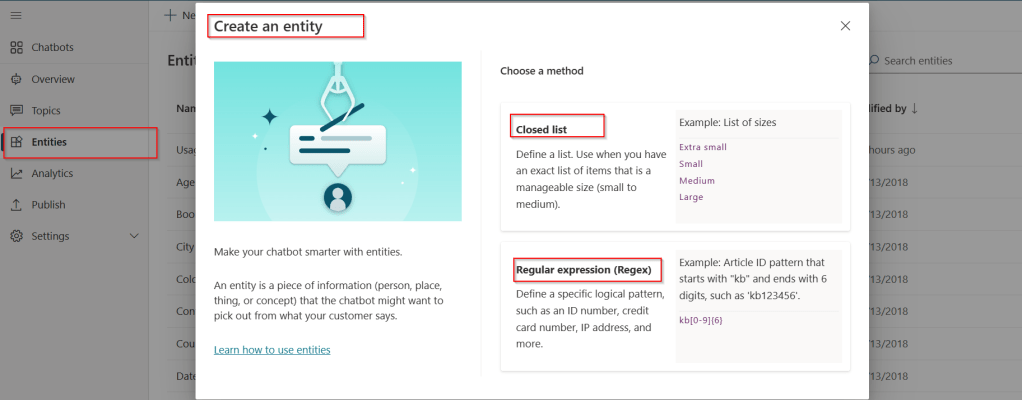
Copilot conversations are all about natural language understanding. Entity is the fundamental aspect which can be recognized from user’s input.
It can be simply can be thought real world subject like Person name, Phone number, Postal Code etc. We have system as well as custom entities while building.
You can also build custom entities you can choose from the options available.
Now that you have seen what are the building blocks of Copilot, in the upcoming blog posts let’s see on how to test and publish your copilots.
Well, this could be a very interesting post as we talk about optimizing the Dataverse performance using bulk operation messages and too using Dataverse plugin customizations but wait, this post is not complete because of an issue which I will talk later in the blog. First let’s dig into this feature by actually trying out. Generally, every business wants improved performance for any logic tagged out to out of box messages and so developers try to optimize their code in various ways when using Dataverse messages.
Firstly, before diving deeper into this article, let’s first understand the differences between Standard and Elastic tables, if you want to know a bit of introduction to elastic tables which were newly introduced last year, you can refer to my previous post on elastic tables here.
The type of table you choose to store your data has the greatest impact on how much throughput you can expect with bulk operations. You can choose out of two types of tables in Dataverse, below are some key differences you can refer to:
Standard Tables
Elastic Tables
Data Structure
Defined Schema
Flexible Schema
Stores data in Azure SQL
Stores data in Azure Cosmos DB
Data Integrity
Ensured
Less Strict
Relationship model
Supported
Limited
Performance
Predictable
Variable, preferred for unpredictable and spiky workloads
Agility
Limited
High
Personalization
Limited
Extensive
Standard and Elastic Table Differences
Plugins:
With Bulk Operation messages, the APIs being introduced are Create Multiple, UpdateMultiple,DeleteMultiple (only for Elastic tables), Upsert Request(preview). As of now you’re not required to migrate your plug-ins to use CreateMultiple and Update Multiple instead of Create and Update messages. Your logic for Create and Update continues to be applied when applications use CreateMultiple or UpdateMultiple.
This is mainly done to prevent two separate business logics for short running and long duration activities. So, it means Microsoft have merged the message processing pipelines for these messages (Create, Create Multiple; Update, Update Multiple) that means Create, Update messages continue to trigger for your existing implemented scenarios, when you update to use Create Multiple, Update Multiple still the Create, Update will behave.
Few points for consideration:
While I have tested and still could see IPluginExecutionContext only provides the information and still I have noted Microsoft Documentation suggests using IPluginExecutionContext4 for Bulk Messages in Plugins where it is being shown as null yet.
While you were working with Create, Update, Delete, you could have used Target property to get the input parameters collection, while working with Bulk Operation messages, you need to use Targets instead of Target.
Instead of checking whether the target is Entity you need to use Entity Collection, we need to loop through and perform our desired business logic
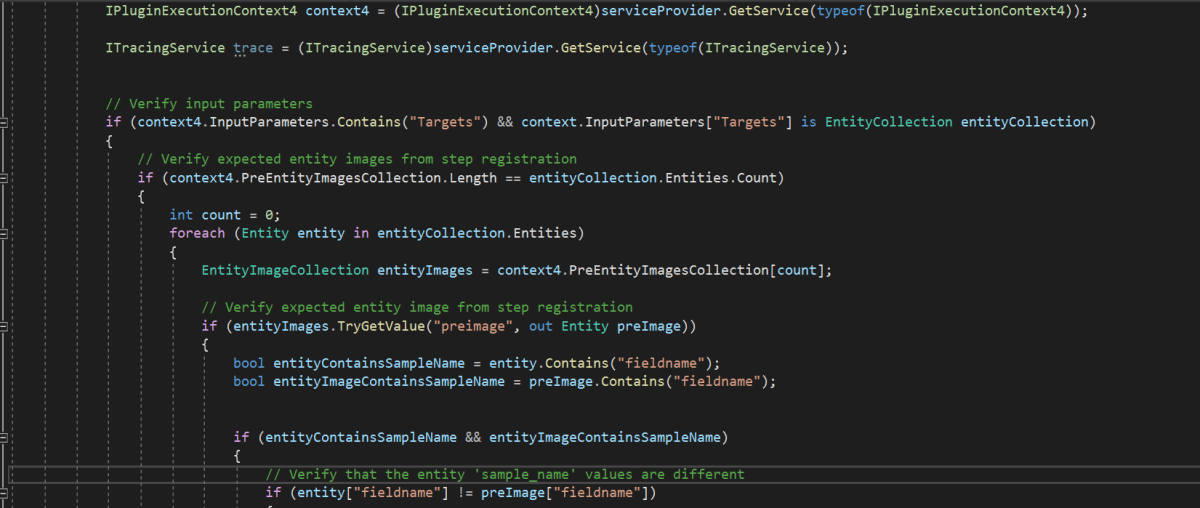
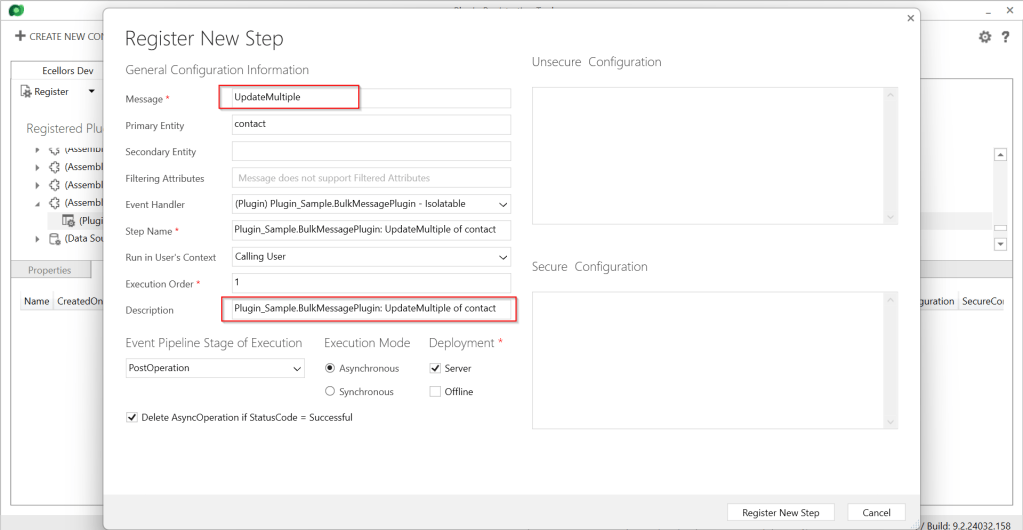
Coming to Images in plugin, these will be retrieved only when you have used IPluginExecutionContext4.
Below is the image from Plugin Registration Tool to refer(e.g. I have taken UpdateMultiple as reference, you can utilize any of the bulk operation messages)
Sample:
Below is the sample, how your Bulk operation message plugin can look like…you don’t need to use all the contexts, I have used to just check that out.
I have posted this question to Microsoft regarding the same to know more details on this why the IPluginExecutionContext4 is null , while still I am not sure if this is not deployed to my region, my environment is in India.
Recommendations for Plugins:
Don’t try to introduce CreateMultiple, UpdateMultiple, UpsertMultiple in a separate step as it would trigger the logic to be fired twice one for Create operation and another for CreateMultiple.
Don’t use batch request types such as ExecuteMultipleRequest, ExecuteTransactionRequest, CreateMultipleRequest, UpdateMultipleRequest, UpsertMultipleRequest in Plugins as user experiences are degraded and timeout errors can occur.
Instead use Bulk operation messages like CreateMultipleRequest, UpdateMultipleRequest, UpsertMultipleRequest
No need to use ExecuteTransactionRequest in Synchronous Plugins as already they will be executed in the transaction.
Hope this guidance will help someone trying to customize their Power Platform solutions using Plugins.
I will write another blog post on using Bulk operation messages for Client Applications…
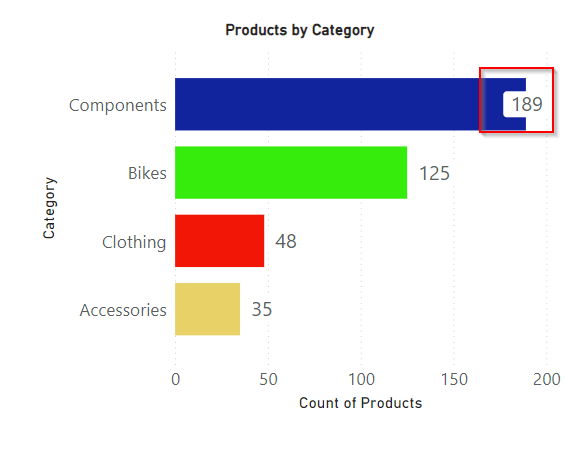
This post is a tip which I have implemented in my one of my projects which can help to improve your Power BI Reports accessibility.
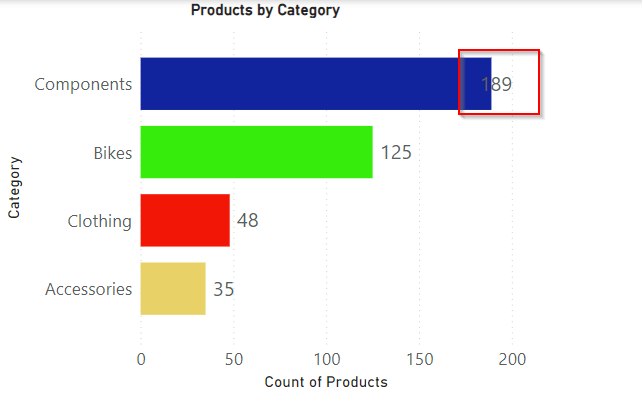
Enabling data labels is a great way to show the numbers in the visual
But what if they keep overlapping even though you ensured optimal size and Data labels to be displayed at the Outside end like below. It decreases the report accessibility.
There were two options for you…
Changing the colors in the theme color
You can change the themes by going to View option if you would like to install the ones available with Power BI, else if you want to install custom themes, you can download them from https://powerbi.tips/ and install.
After changing the theme color, the data label is clear and readable and thereby increasing accessibility.
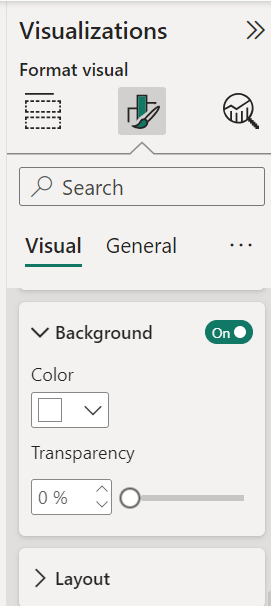
2. Enable background color and set the transparency
This is the other option where you can enable the background for the data labels and set the transparency based on your requirement, it is good to set that to a low number as below.
There it is, now your report looks a lot better for users to read the data labels
Hope this helps someone trying to improve the readability and accessibility of the Power BI Report using the tooltips..
Geo Migration is a great feature/flexibility offered by Microsoft for customers who wish to move to a region which is in closest proximity to their operations even though initially their Power Platform environment region based out of a different one when they signed up. I checked out online but couldn’t find a good reference blog article yet online, hence this post.
I will make this post detailed but a comprehensive one for anyone to understand the migration. Customers can also opt for Multi Geo for those who have a need to store data in multiple geographies to satisfy their data residency requirements. If you don’t know where your Power Platform environment resides, you can check from Power Platform Admin Center.
If you were not aware yet, Microsoft Azure is the only cloud provider which offers services in more regions when compared to AWS (Amazon Web Services) and GCP (Google Cloud Platform). The Geo Migration feature seamlessly allows customers to move their environments in a single tenant from one region to another. e.g. for Singapore, it is as below.
Important:
Geo Migration is not generally available, so please exercise with caution.
You may reach out to your TAM(Microsoft Technical Account Manager) quoting your request
There were several limitations, see below references for more details.
Mandatory Pre-Migration Check list:
Any Power Apps, Power Automate Flows should be manually exported prior to the migration. Custom Connectors aren’t supported as of now, they must manually reconfigure or created in the new environment. You can export them individually or export them in group.
Canvas Apps, Custom Pages, Code Components like PCF and libraries should be deleted from the environment before your migration activity starts. Else they might be in corrupted state after migration activity.
If any of your Apps are not solution aware because of any reason like App calls a Power Automate when a button is called etc., you may need to explicitly export it out and take the backup.
Post Migration Check list:
After the migration, import all the packages which you have taken backup during pre migration. For those which were not solution aware, import them manually.
If you have Power Portals or Power Virtual Agents, those should be exported explicitly.
Make sure you test all functionalities in order not to impact end users.
Notes:
You don’t need to build Apps and Flows from scratch. Dynamics 365 marketing App is not supported yet. There could be some configuration changes post migration.
While I try to put the information to the best available as per sources from Microsoft, this may change over time and variation could be different as each customer will have different workloads and dependencies with other services, so please read the references carefully before proceeding. Contact Microsoft Support or TAM as necessary.
Hope this helps to get a sneak peek into the migration process.