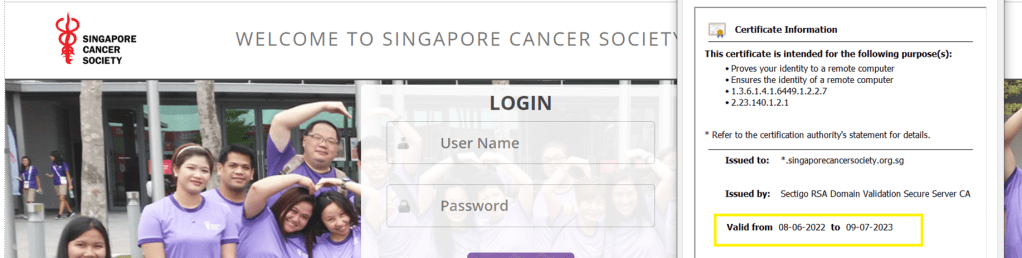
Now-a-days Power Platform pages/portals are being adopted by the clients using Dynamics. But there could be clients who still have their ASP.net MVC Portals running on Azure and just that they don’t want to move because of budget constraints. There will be times when you need to update the SSL certifcate to make the websites more secure out in the internet.
So here in this case, we’ll walk through the steps for updating your portal certificate. Please note that you need to create certificate request and request for the certificate from a certificate authority.
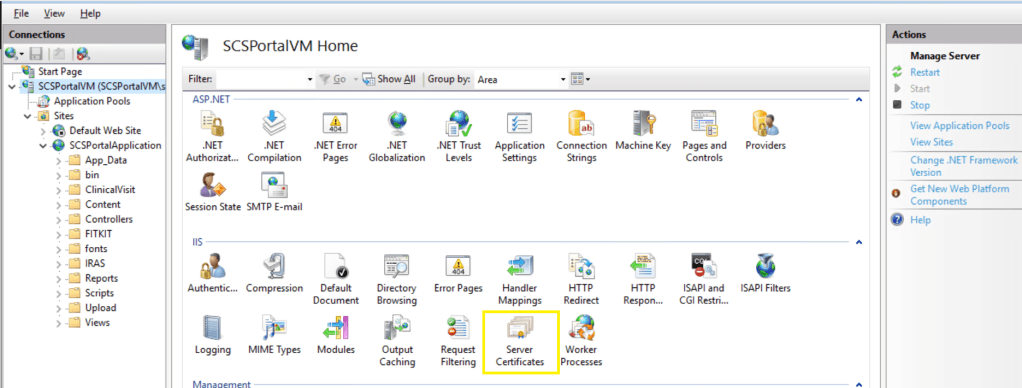
For updating certificate, you need use IIS….go to Server Certificates as highlighted below
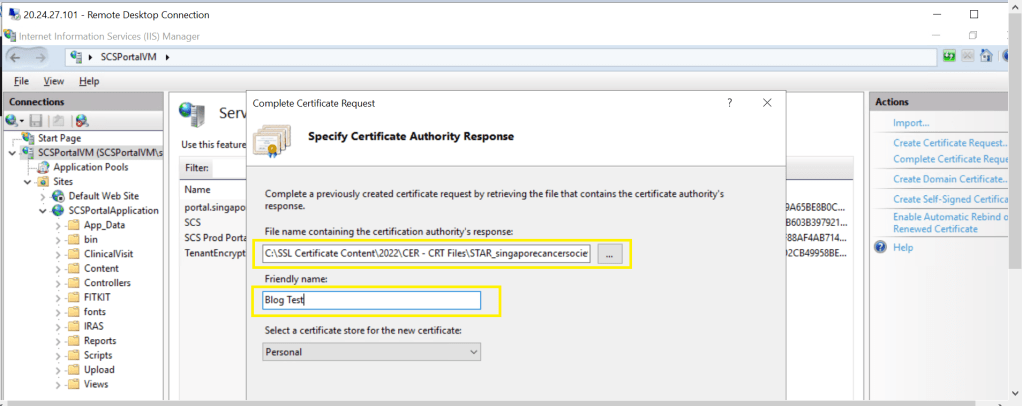
Click on Complete Certificate Request at the right…as below
For File name below, click on Elipses and locate the file(.cer) of your SSL certificate provided by certificate issuing authority and click Ok.
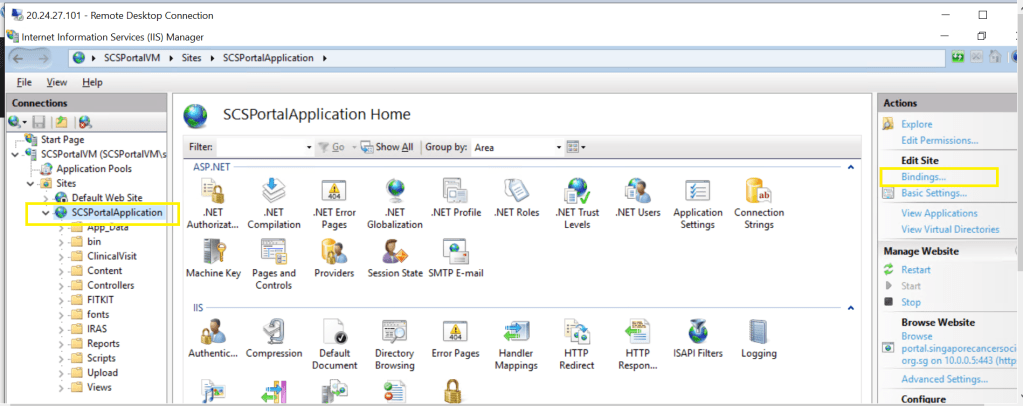
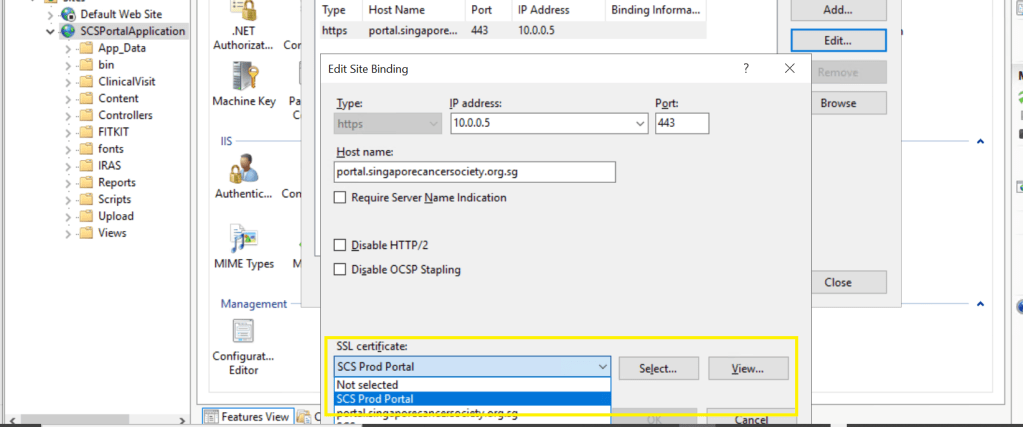
Next step is to update the website bindings to take the latest certificate just updated. Click on your website as below..you should see bindings at the right as highlighted.
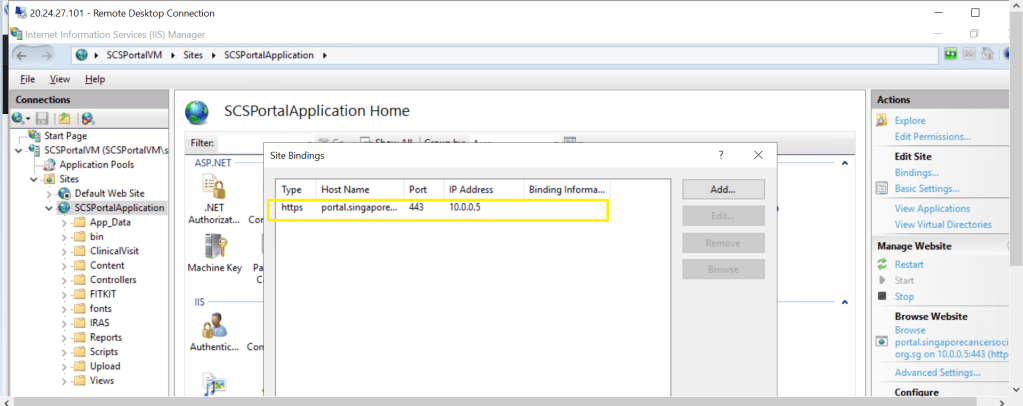
Locate the bindings as below
Click on the binding and click Edit..and select your latest SSL Certificate..
Click Ok and there you go, your certificate is updated.
Thank you for reading, please let me in comments if you have any queries….
Typescript is a strongly typed and built on Javascript. So now you could catch your errors little earlier…TypeScript code converts to JavaScript, which runs anywhere JavaScript runs: In a browser, in your apps etc.
TypeScript offers all of JavaScript’s features, and an additional layer on top of these: TypeScript’s type system. For example, JavaScript provides language primitives like string and number, but it doesn’t check that you’ve consistently assigned these. TypeScript does. This means that your existing working JavaScript code is also TypeScript code. TypeScript is an Object oriented programming language and inherits all the features of OO’Programming.
Microsoft recommends using TypeScript instead of JavaScript in all your Dynamics new implementations and slowly as this gives much flexibity to a developer. So why not learn this and boost your productivity…
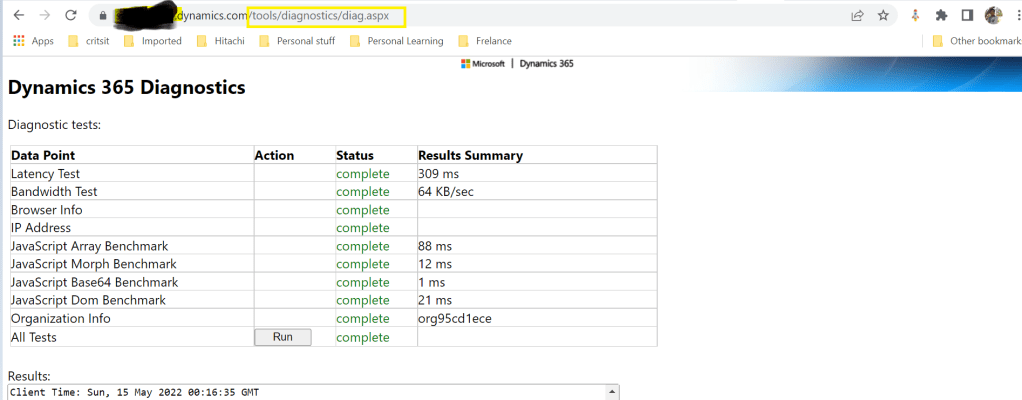
Recently I was asked by one customer on how they can assess or check the performance of Dynamics CE as they were having some network outages and issues. I remembered that I used a tool earlier for checking my Dynamics CRM On premise engagement. So after checking for online version as well, got to know that we can use in the same way to find the performance for the online CE instance as well. You can follow as below…
To run the Diagnostics tool, you have to follow these steps.
On the user’s computer or device, start a web browser, and sign in to an organization.
The report displays a table with test and benchmark information. Of particular importance is the Latency Test row value. This value is an average of twenty individual test runs. Generally, the lower the number, the better the performance of the client.
In this way you can track your Dynamics CE performance at a given point of time to assess your network latency and bandwidth behaviors.
To start with Service Bus is fully managed messaging service which is used to connect any applications, devices, and services running in the cloud to any other applications or services. In this we can have queues which helps in the one directional communication and topics which provides two directional communication with the help of publish subscribe model.
Service bus can serve the following purposes
Used for messaging
For Decoupling producer and consumer of the message
Load balancing
For 1:N(publish and subscribe model) using Topics
Queues and Topics follow FIFO mechanism.
That said, lets see in action…
Create an Azure service bus namespace in Azure like below…
Following this, once you have created a namespace which is actually a container for all messaging components (queues and topics).
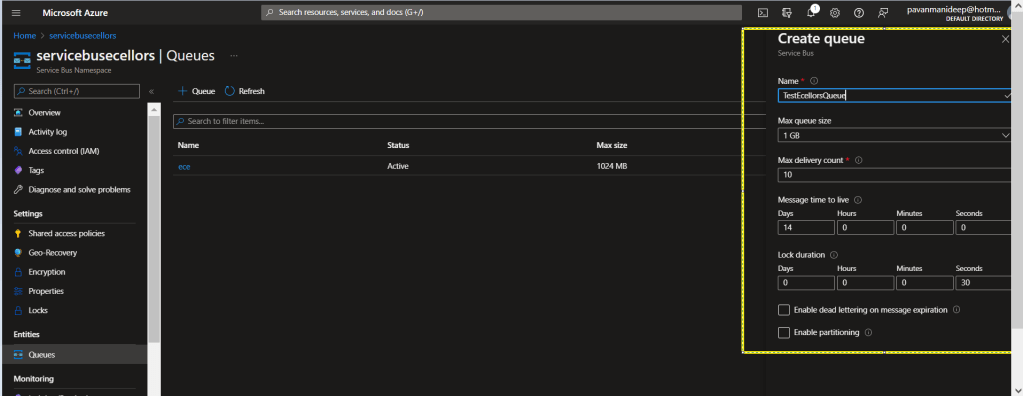
Next step is to create a queue or topic, in this case I am creating a queue….creating topic will be similar.
Fill up the details as required for the queue setup in the highlighted section…
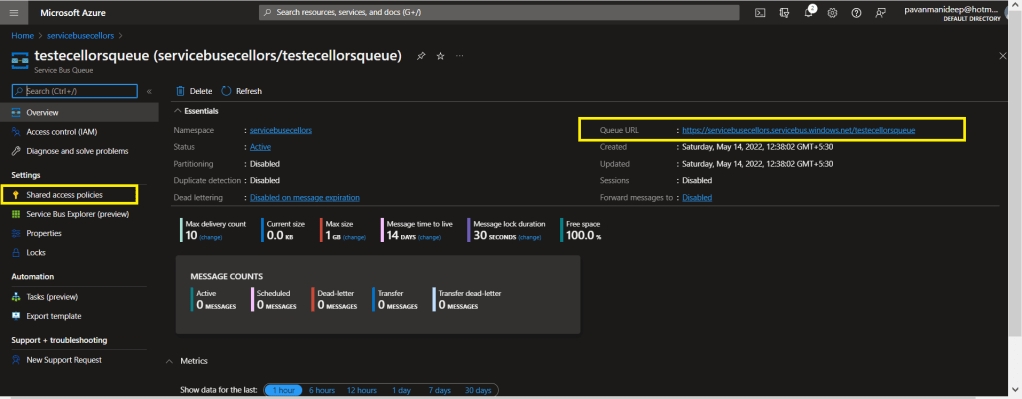
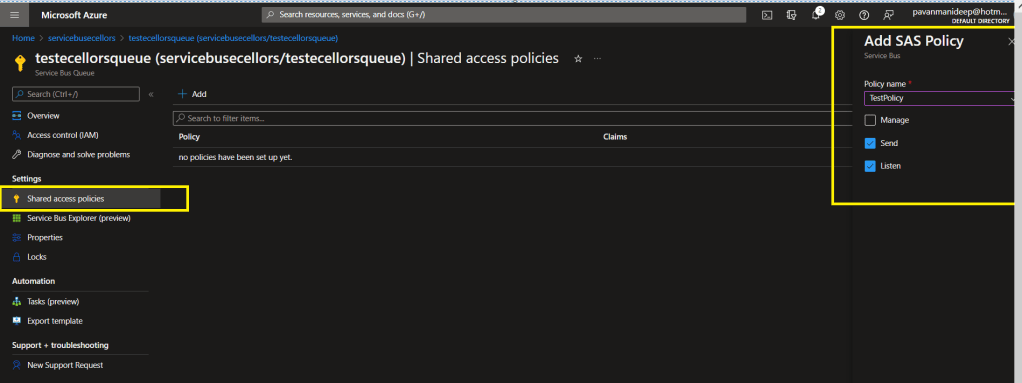
After creating a queue or topic, you need to create an access policy for the same as below
Do note the queue URL as highlighted above….access control in service bus is achieved through Shared Access policies.
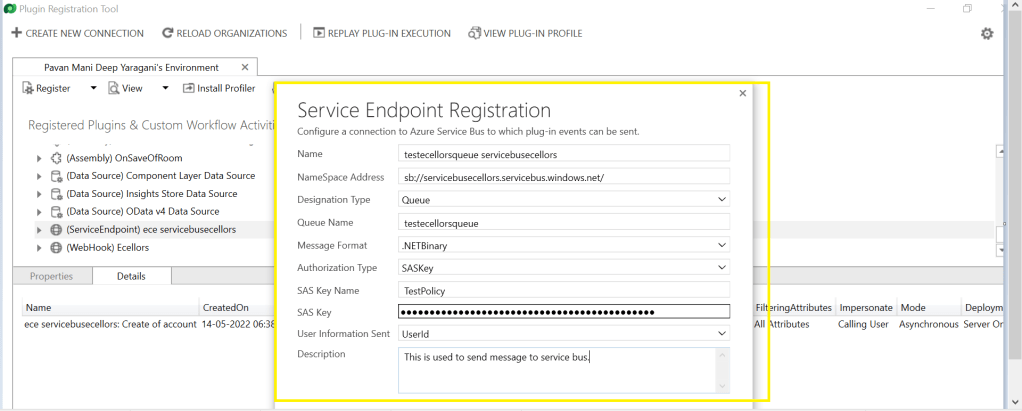
Once you have Primary connection string created, you need to go back to your Plugin registration tool and register a service end point for triggering your service bus message and provide the connection string in the below areas highlighted and click on next.
Next below appears for your review..
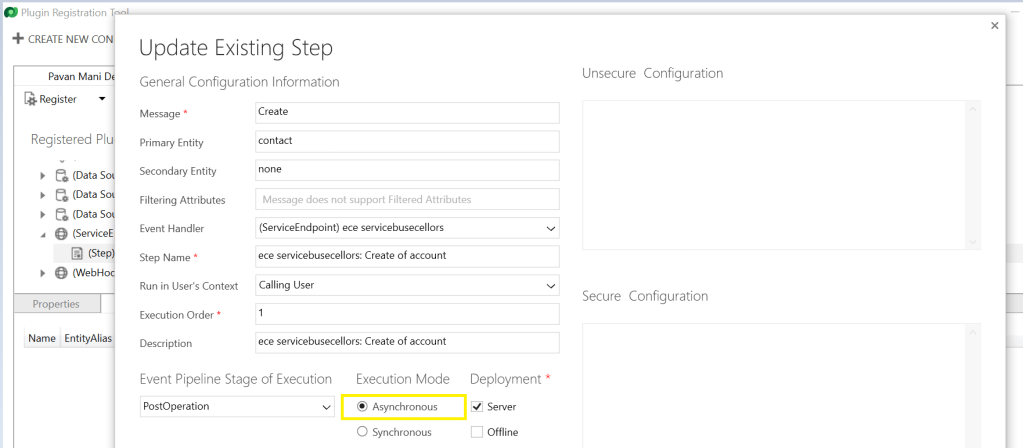
You can provide SAS Key or SAS Token for authentication in order to retrieve the messages from service bus and click on save. Now your end point is configured, now you can go ahead and create a step which will trigger the message to service bus from Dynamics, do note that you can only register an asynchronous operation inorder to communicate with your service bus.
You can perform the necessary operation and you can find the message being created in the service bus. If it didn’t show up immediately, please refresh and try after a few mins.
In order to consume these messages, you can use a console application for the sake of retrieval. Once the message is retrieved, it will be deleted from the queue by default.
Incase you want to use those messages for your troubleshooting purposes, you can peek command, the Peek operation on a queue or a subscription returns at most the requested number of messages. The following table shows the types of messages that are returned by the Peek operation.
Type of messages
Included?
Active messages
Yes
Dead-lettered messages
No
Locked messages
Yes
Expired messages
May be (before they are dead-lettered)
Scheduled messages
Yes for queues. No for subscriptions
I hope this provides right insights for integrating service bus with Azure and service bus is widely used when both systems were not in sync and available at the same time.
In this blog post, we will talk about the integration of Dynamics CE first party apps(Model driven) with Azure.
You can integrate with Function Apps from Dynamics using two ways…
Authenticate your Dynamics CE app within your Function app code
Register a web hook to trigger a call to Azure functions using a trigger
We’ll see both the scenarios…
Authenticate your Dynamics CE app within your Function app code
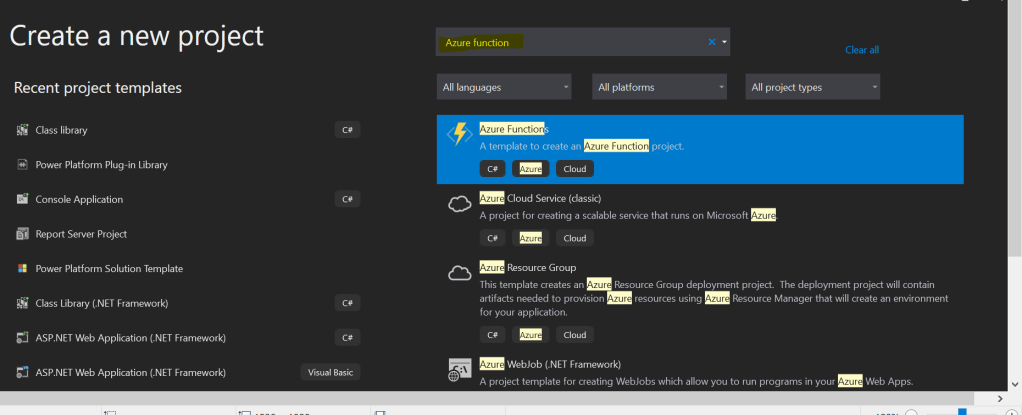
Open your favorite IDE and create azure function..in this case I’ll be using Visual studio.
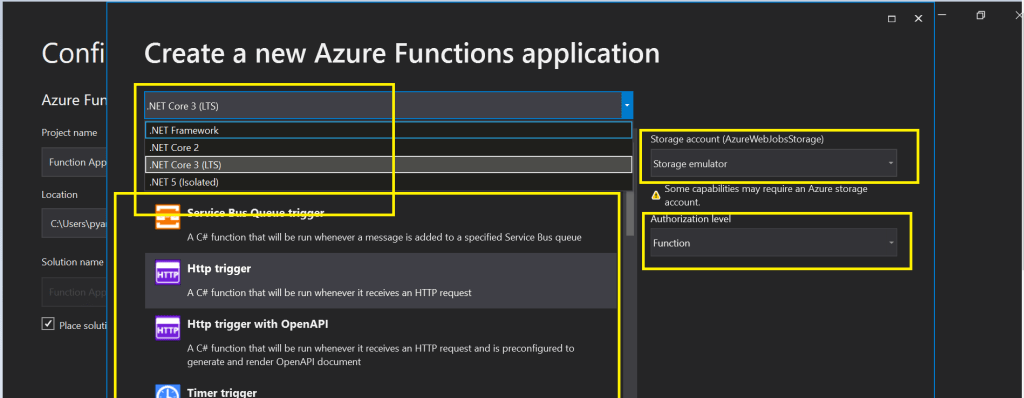
Create a new Azure Function Project(Make sure you install the Azure functions project template using extensions).
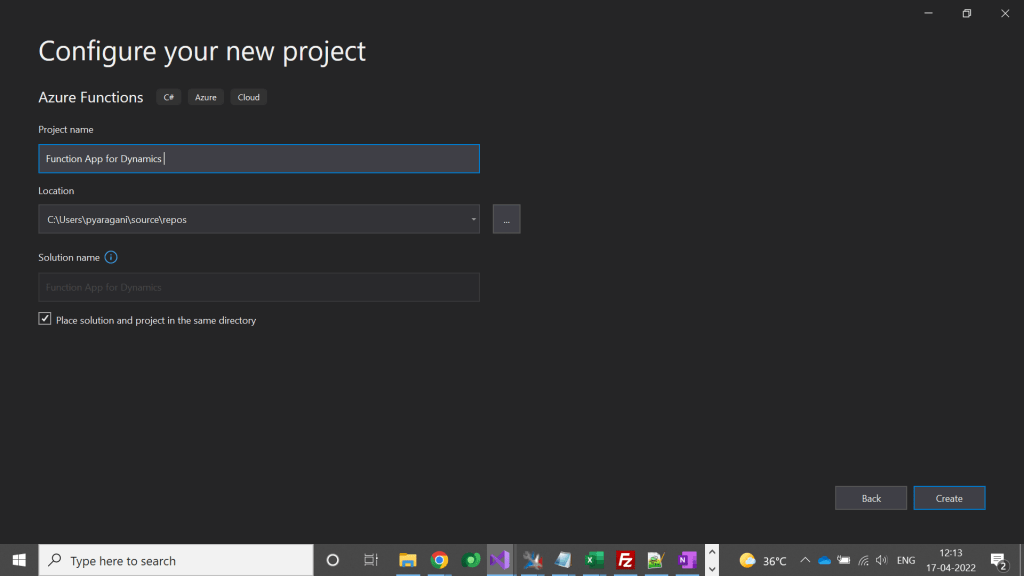
Click on Next option at the bottom, in the next step specify your Function App name as below.
Don’t change other values and click on Create at the bottom of the page.
So in the next step, please make a note of the important things which were highlighted below..
Make sure you select the Target framework as .Net Framework.
You can select any trigger, but for simplicity I am selecting HTTP Trigger here.
In case you need to debug your Azure function and run it locally, then you need to be sure that you install Azurite Storage Emulator in your machine using this link, otherwise you can select None for the storage account option, if in that case make sure that your Azure function don’t need any storage.
Don’t change other values and click on Create at the bottom of the page.
This will take couple of mins to create the necessary scaffolding required for the Azure function.
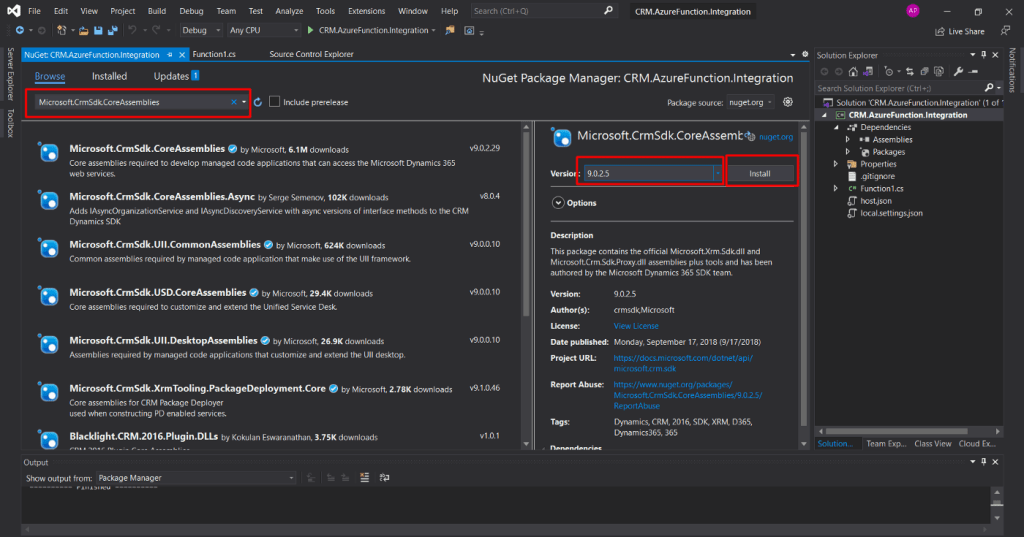
Now you need to authenticate to your Dynamics Instance, so firstly right click on your project and select Manage Nuget Packages. Then you need to browse for Microsoft.Crm.Sdk.CoreAssemblies and install.
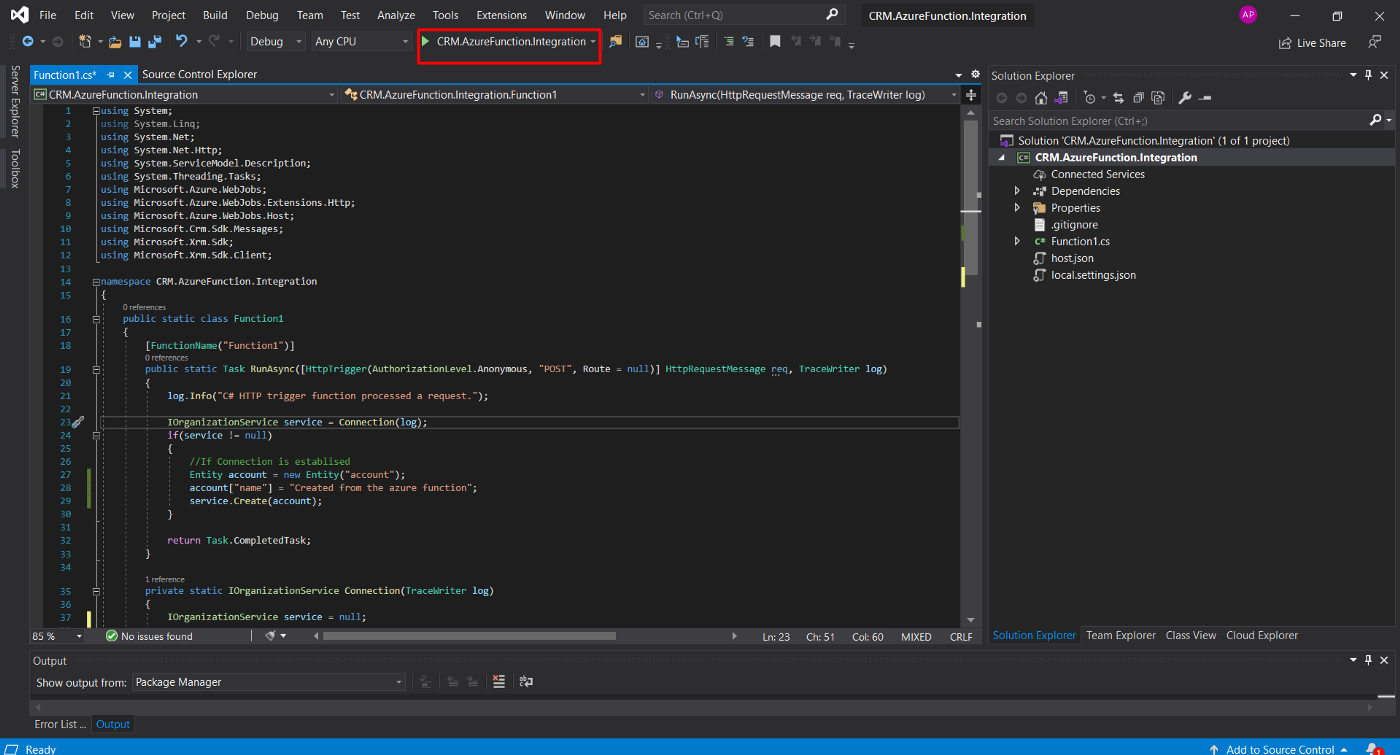
Then you will be able to authenticate your Azure function with Dynamics CE…once you were authenticated you can create a hard coded entity record in Dynamics whenever your function app runs.
The entire code…is hosted in GitHub for reference.
In this way you can an integration between Azure function and Dynamics 365
We will require the API testing tool, here I am using Postman and the following is the link to download “Postman”. https://www.postman.com/downloads/
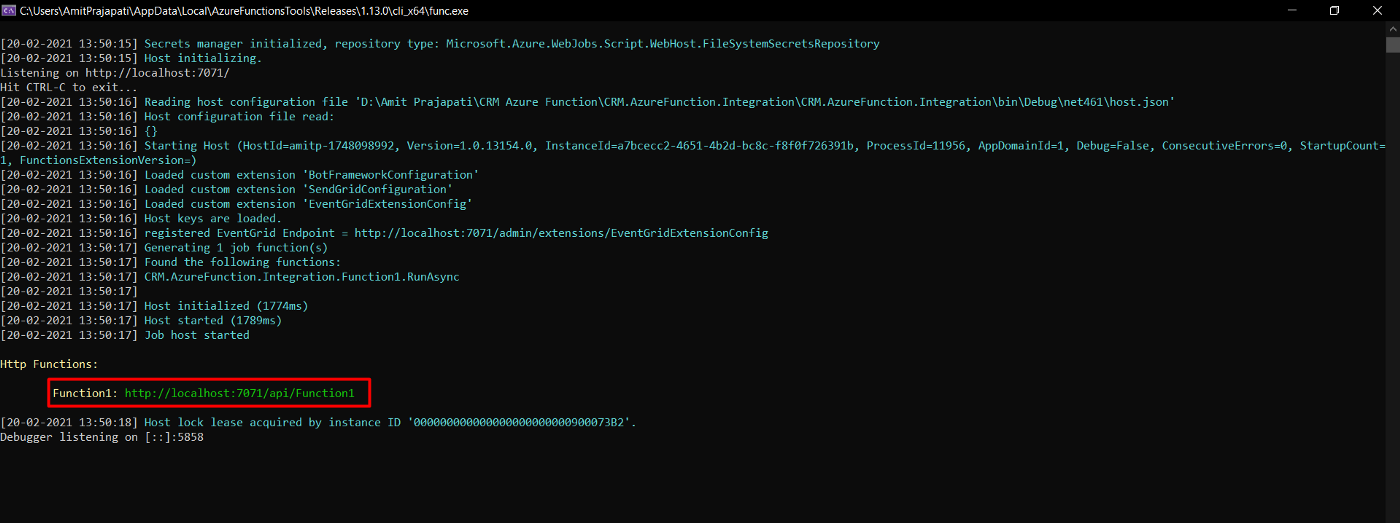
To test the application, click on the Start button on top of Navbar as mentioned below in the screenshot [Button will have Project Name]. It will take a few minutes to Load the Azure Emulator
Run the Function App on the Local machine for testing.
Following is the screen you will be able to see and copy the URL highlighted in the red below and paste that URL in Postman.
Azure Function Tool
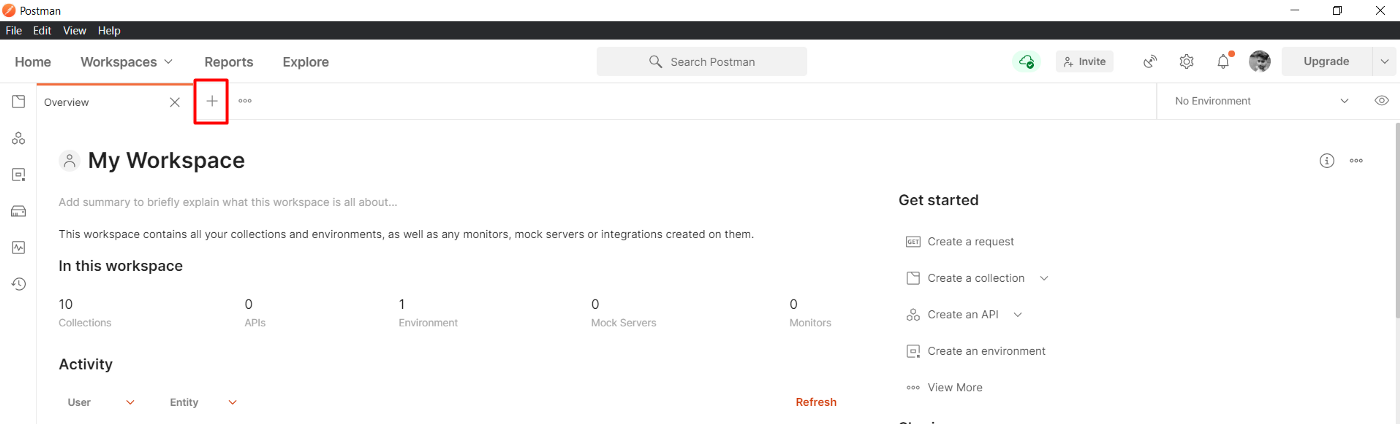
Open the Postman and click on the create a new tab
Postman Dashboard
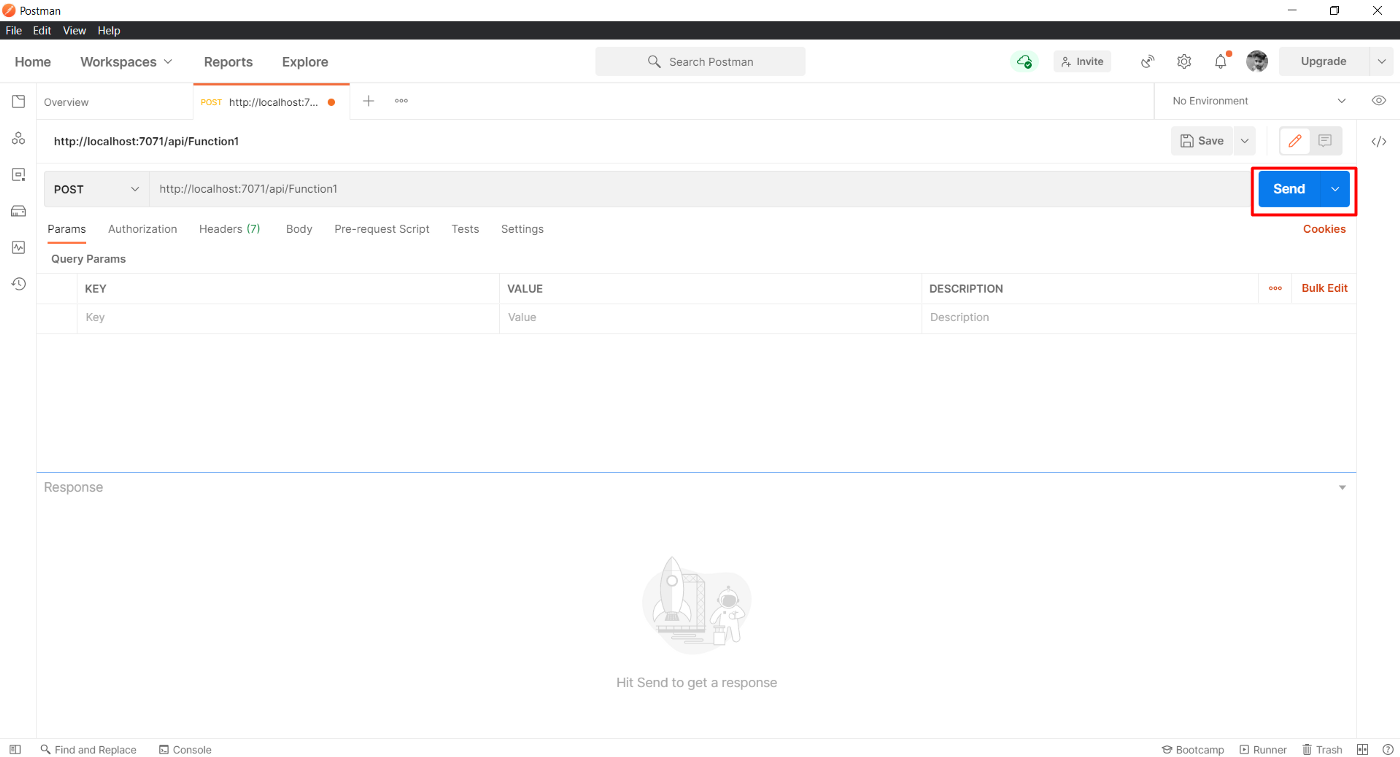
Select request as POST and paste the URL:
After pasting the URL, click on Send
You will get the following response on the Azure Function Tool and Postman
The result after Sending Post Request to Azure Function
If there any error or issue with the Azure Function code, the request will be failed and will be displayed on both Azure Function Tool and Postman [Status will be “4**” or “5**” ]
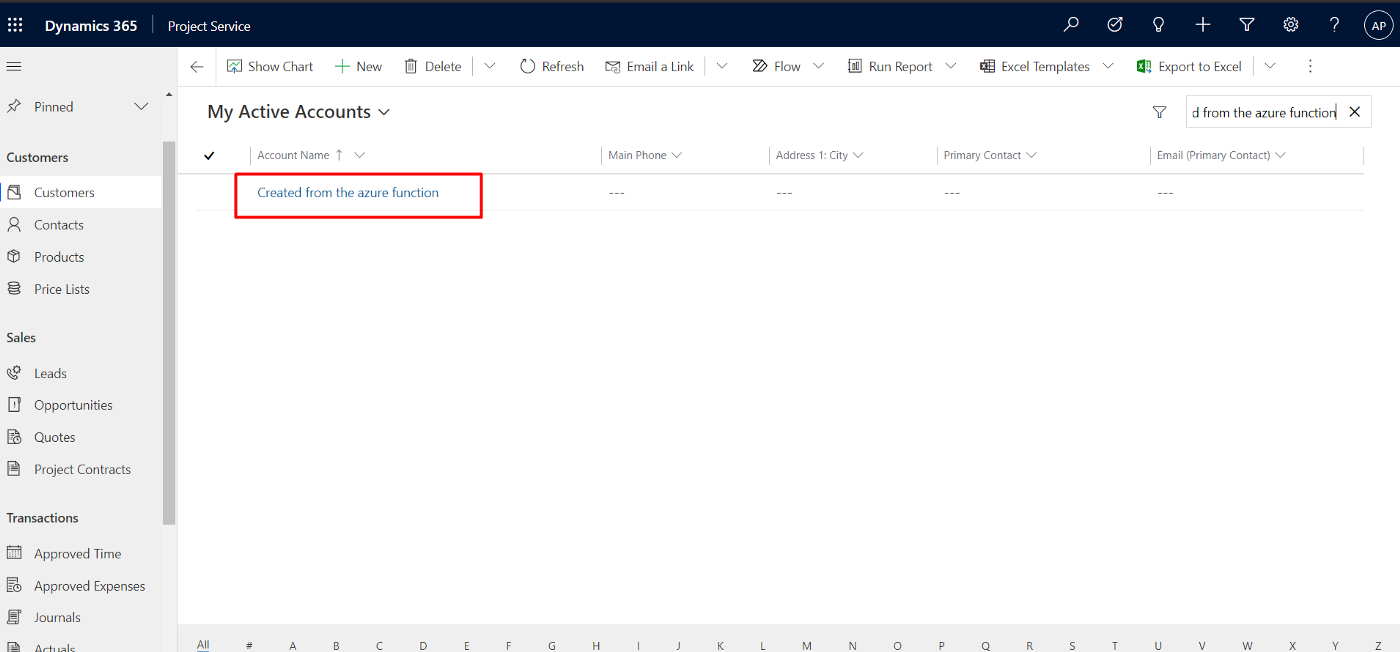
Now, we will take look at Dynamics 365 CRM environment and check whether the account is created or not.
Result
Created customer from Azure Function.
2. Register a web hook to trigger a call to Azure functions using a trigger
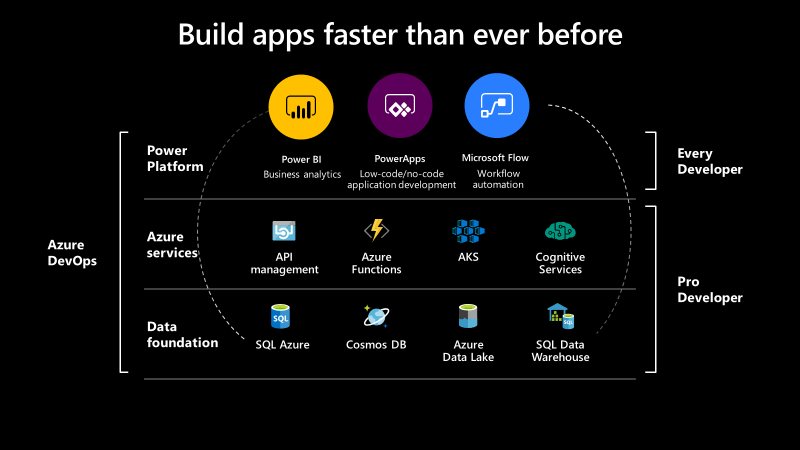
Hope every one should be very much interested in learning the base line for Power Platform which is Azure.
So this blog serves as the introduction in this #PowerfulAloneBetterTogether series.
Basically while designing your solution for your CE Apps, in order to improve the performance you need to make sure that you perform a minimal set of operations in CE and if in cases where you exceed the timeout limit in Dynamics CE and this is where the remote execution context should be passed to Azure Integration and move all your heavy operations outside your Dynamics CE preferably a line of business application.
So this is where we can think of the following possibilities for our integration…please click on respective link to navigate respectively…
I would be detailing about each of this integration with a separate blog post…how each one provides a bunch of alternatives to overcome our current limitations.
Hope this blog series would be of great help and will serve as a reference and your go to guide for your Power Platform and Azure Integrations.
Now a days ALM Dev ops is latest trend which every consultant should be aware of. There were tons of videos on Dev ops and creating a build or release pipelines but nevertheless they were sufficient as they were for too long period’s of time which spans roughly around 1-1.5 hrs.
So I was searching for some good blog or articles for the same which can save my time, this PDF guide from Microsoft is sound enough to get all you need with your ALM implementation for Power Platform.
If you are a Dynamics CE Consultant, you should have heard of orphan records. Do you know Orphan flows do exist in Power Automate in a similar way….
A flow is considered to be an Orphaned flow when it don’t have a valid owner anymore. This can possibly happen when the creator or owner of the flow has left the organization and there is no co-owner or the owner for the flow. If the flow uses connections that require authentication, then it may start failing because the user identity is not valid anymore.
Admins can maintain continuity on the business process automated by the flow by adding one or more co-owners to it. Co-owners basically have full control over the flow just like the original owner, and can fix authentication for connections if any and enable the flow if it has been disabled.
Please note that only privileged users can view flows that do not have any valid owners. On the environment page from Flow Admin Center (https://admin.flow.microsoft.com/environments), go to “Resources” tab and then open the “Flow” list. Orphaned flows display “None” as their owner. Click “Load more” to load the next set of flows so as to ensure you have looked through all flows that might be orphaned.
How will you solve this problem?
Manually you can add the flow a owner which will resolve the issue when the number of flows are in reasonably small in number. But if the number of Orphaned flows are in large number, you should look for next approach presented.
Code way…using Power Automate cmdlets: Make sure you follow the instructions for setting this up.
It is often intimidating and overwhelming when you see your code is not working in Production and you were not sure if some one from your team has modified that which haven’t been checked in to source control.
If you find yourself in a such a tragic condition, this post is for you and it just gives some tools for you…
Load your assemblies into the tools and you should be able to view your code inside your class just from Dll. From my personal preference, I suggest you to download the JustDecompile which is much more flexible.
In this tutorial, you will learn about JavaScript arrow function with the help of examples.
Arrow function is one of the features introduced in the ES6 version of JavaScript. It allows you to create functions in a cleaner way compared to regular functions. For example,
This function
// function expression
let x = function(x, y) {
   return x * y;
}
can be written as
// using arrow functions
let x = (x, y) => x * y;
using an arrow function.
Arrow Function Syntax
The syntax of the arrow function is:
let myFunction = (arg1, arg2, ...argN) => {
    statement(s)
}
Here,
myFunction is the name of the function
arg1, arg2, ...argN are the function arguments
statement(s) is the function body
If the body has single statement or expression, you can write arrow function as:
let myFunction = (arg1, arg2, ...argN) => expression
Example 1: Arrow Function with No Argument
If a function doesn’t take any argument, then you should use empty parentheses. For example,
let greet = () => console.log('Hello');
greet(); // Hello
Example 2: Arrow Function with One Argument
If a function has only one argument, you can omit the parentheses. For example,
let greet = x => console.log(x);
greet('Hello'); // Hello
Example 3: Arrow Function as an Expression
You can also dynamically create a function and use it as an expression. For example,
let age = 5;

let welcome = (age < 18) ?
  () => console.log('Baby') :
  () => console.log('Adult');

welcome(); // Baby
Example 4: Multiline Arrow Functions
If a function body has multiple statements, you need to put them inside curly brackets {}. For example,
let sum = (a, b) => {
    let result = a + b;
    return result;
}

let result1 = sum(5,7);
console.log(result1); // 12
this with Arrow Function
Inside a regular function, this keyword refers to the function where it is called.
However, this is not associated with arrow functions. Arrow function does not have its own this. So whenever you call this, it refers to its parent scope. For example,
Inside a regular function
function Person() {
    this.name = 'Jack',
    this.age = 25,
    this.sayName = function () {

        // this is accessible
        console.log(this.age);

        function innerFunc() {

            // this refers to the global object
            console.log(this.age);
            console.log(this);
        }

        innerFunc();

    }
}

let x = new Person();
x.sayName();
Output
25
undefined
Window {}
Hope this helps in improvising your JavaScript code for your Power Platform Implementations