Dataverse Low Code Plugins – Insight

Prerequisite: Intall Dataverse Accelerator from AppSource from Microsoft Power CAT Team. Follow along once you have installed…see Dataverse Accelerator Installation Post if you want to know how..

Firstly, open the environment from https://make.powerapps.com where you would like to test this out, install the Dataverse Accelerator Solution as described above.

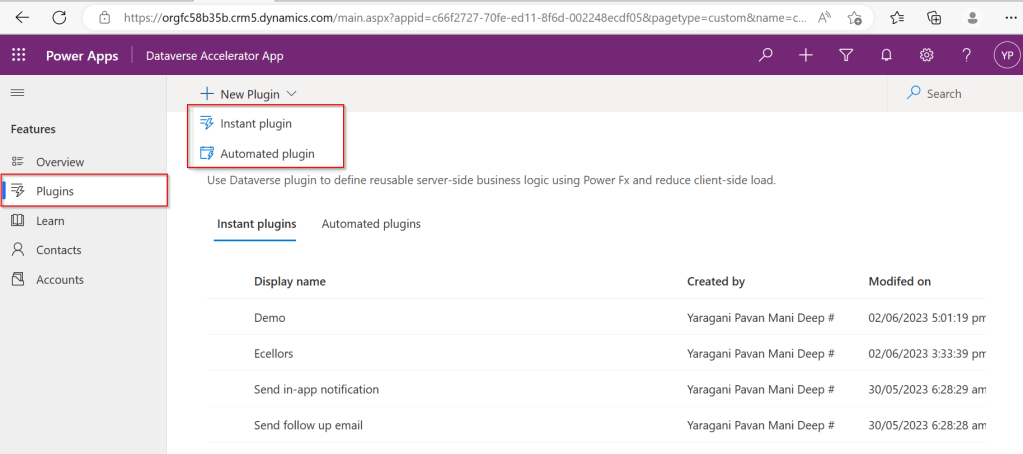
You should see there is an option to create Plugin from UI itself, no need to open Visual Studio and write your .Net Class library and register using Plugin Registration tool.

Please note that this is still an Experimental Feature and lot of improvements yet to be made..below is my quick test on basic CRUD Operation using this Plugin..

There were two types of Low Code Plugins

  1. Instant Plugins
  2. Automated Plugins

Let’s see how they work by creating an Instant Plugin

Step 1: Click on New Plugin Button available

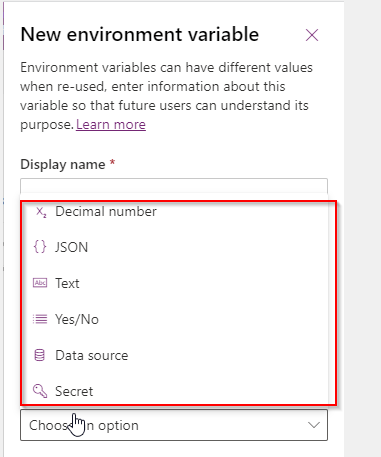
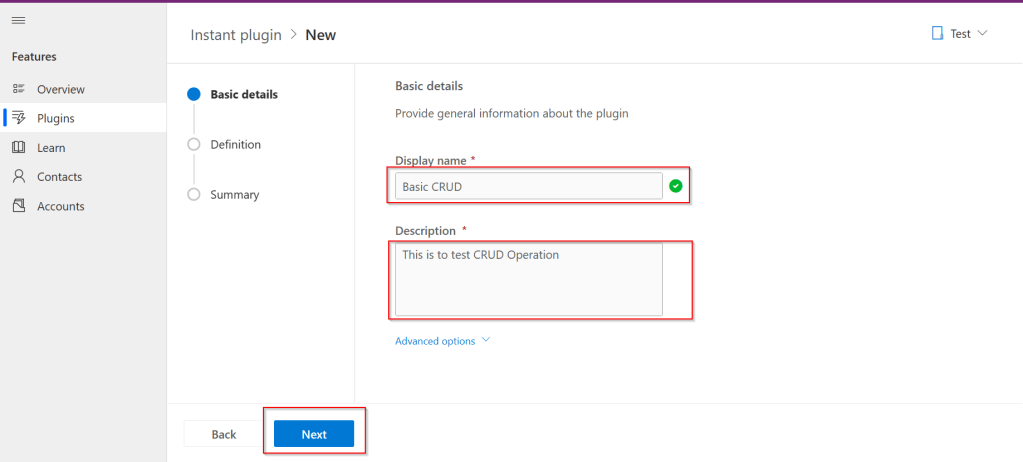
Step 2: Key in the display name and description, both are mandatory to be entered…we don’t have a way to customize here as of now…

Step 3:Then Click on Next and enter the Parameters in the Definition area…I just mentioned In and Out parameters for brevity, then added a simple expression to multiply the input variable supplied by 100…

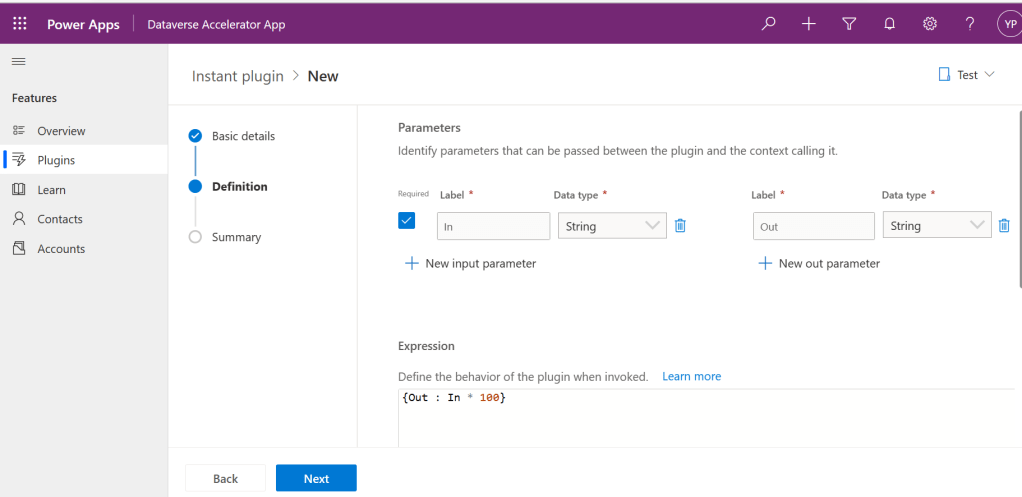
Make sure you won’t get any errors

Step 4: Then click on Next and click on Save.

Step 5:Once Saved, you will get a new button for testing…

Step 6:Clicking on Test will get you to the below screen to enter your input parameter…

Step 7:Clicking on Run which gives the output in Web API and highlighted is the response received with a success.

Note:

For some of the Automated Plugins, got a failure message with no way to troubleshoot what was the error was…I have raised this to Microsoft, but they mentioned that these features are work in Progress…

Hope we get all the complex functionality there in Dynamics 365 CE Plugins be available within Dataverse Low Code Plugins with the help of Power Fx too in future….the App development is going to be lot more easier…with Microsoft Power Platform… and citizen developers can pitch in…

Reference: Dataverse Low Code Plugins Repo in GIT Hub

Thank you for reading…

Cheers,

PMDY

Install Dataverse Accelerator App from AppSource

Subscribe to continue reading

Subscribe to get access to the rest of this post and other subscriber-only content.

Getting started with creating a flow using Copilot in Power Automate

Subscribe to continue reading

Subscribe to get access to the rest of this post and other subscriber-only content.

Environment variables in Power Platform makes your life easier – Quick recap…

Often there is a need to use some kind of configuration for your customizations to work across environments in Power Platform or for storing the 3rd party URLs like SharePoint, other API services etc…previously there were ways where you can store your config but now with this helps in efficient way of interacting with your configuration across environments.

One environment variable can be used across many different solution components – whether they’re the same type of component or different ex. Power Apps and Flow can use the same variable in the environment. Environment variables store the parameter keys and values, which then serve as input to various other application objects.

Additionally, if you need to retire a data source in production environments, you can simply update the environment variable values with information for the new data source. The apps and flows don’t require modification and will start using the new data source.

The environment variables can be unpacked and stored in source control. You may also store different environment variables values files for the separate configuration needed in different environments. Solution Packager can then accept the file corresponding to the environment the solution will be imported to. Thanks @Rezza Dorani for the video…

The following environment variables are available as on today…

Use cases:

  1. Access Environment variables in Plugins
  2. Get & Set Environment variables using Javascript

Few Advantages:

  1. Environment variables are supported in custom connectors.
  2. Provide new parameter values while importing solutions to other environments. 
  3. Supported by Solution Packager and DevOps tools enable continuous integration and continuous delivery (CI/CD).
  4. Its very easy to maintain datasources in Environment variables.
  5. Its ideal for passing any parameters to bound or unbound actions from Power Automate.

Neverthless there were few limitions:

  1. When environment variable values are changed directly within an environment instead of through an ALM operation like solution import, flows will continue using the previous value until the flow is either saved or turned off and turned on again.
  2. If the environment value is changed, it may take up to an hour to fully publish updated environment variables.
  3. If you made the same mistake as I did and imported a Managed Solution without a Current Value, added a Current Value for the first time and cannot edit the new Current Value anymore.
  4. It looks like a potential risk.

Hope this post helped in some way…please let me know if you have any questions….

Cheers,

PMDY

ALM is new buzz word for Power Platform Projects…a quick workshop guide….#Microsoft

Hi Folks,

Now a days ALM Dev ops is latest trend which every consultant should be aware of. There were tons of videos on Dev ops and creating a build or release pipelines but nevertheless they were sufficient as they were for too long period’s of time which spans roughly around 1-1.5 hrs.

So I was searching for some good blog or articles for the same which can save my time, this PDF guide from Microsoft is sound enough to get all you need with your ALM implementation for Power Platform.

Reference: GITHub Page

You can also practice with the amazing Dev Ops Labs available from Microsoft below…

Azure DevOps Labs

If you were more comfortable watching the videos…refer the below videos…follow along…

ALM for Power Platform from D365 Champs

ALM from Dharani

There you go….happy CRM’ing….

Cheers,

PMDY

Decompile your .Net Assemblies

Hi Folks,

It is often intimidating and overwhelming when you see your code is not working in Production and you were not sure if some one from your team has modified that which haven’t been checked in to source control.

If you find yourself in a such a tragic condition, this post is for you and it just gives some tools for you…

  1. JustDecompile from Telerik
  2. dotPeeks from JetBrains
  3. Net Reflector from Red Gate

Load your assemblies into the tools and you should be able to view your code inside your class just from Dll. From my personal preference, I suggest you to download the JustDecompile which is much more flexible.

Cheers,

PMDY

JavaScript Arrow Functions

In this tutorial, you will learn about JavaScript arrow function with the help of examples.

Arrow function is one of the features introduced in the ES6 version of JavaScript. It allows you to create functions in a cleaner way compared to regular functions. For example,

This function

// function expression
let x = function(x, y) {
   return x * y;
}

can be written as

// using arrow functions
let x = (x, y) => x * y;

using an arrow function.


Arrow Function Syntax

The syntax of the arrow function is:

let myFunction = (arg1, arg2, ...argN) => {
    statement(s)
}

Here,

  • myFunction is the name of the function
  • arg1, arg2, ...argN are the function arguments
  • statement(s) is the function body

If the body has single statement or expression, you can write arrow function as:

let myFunction = (arg1, arg2, ...argN) => expression

Example 1: Arrow Function with No Argument

If a function doesn’t take any argument, then you should use empty parentheses. For example,

let greet = () => console.log('Hello');
greet(); // Hello

Example 2: Arrow Function with One Argument

If a function has only one argument, you can omit the parentheses. For example,

let greet = x => console.log(x);
greet('Hello'); // Hello 

Example 3: Arrow Function as an Expression

You can also dynamically create a function and use it as an expression. For example,

let age = 5;

let welcome = (age < 18) ?
  () => console.log('Baby') :
  () => console.log('Adult');

welcome(); // Baby

Example 4: Multiline Arrow Functions

If a function body has multiple statements, you need to put them inside curly brackets {}. For example,

let sum = (a, b) => {
    let result = a + b;
    return result;
}

let result1 = sum(5,7);
console.log(result1); // 12

this with Arrow Function

Inside a regular function, this keyword refers to the function where it is called.

However, this is not associated with arrow functions. Arrow function does not have its own this. So whenever you call this, it refers to its parent scope. For example,

Inside a regular function

function Person() {
    this.name = 'Jack',
    this.age = 25,
    this.sayName = function () {

        // this is accessible
        console.log(this.age);

        function innerFunc() {

            // this refers to the global object
            console.log(this.age);
            console.log(this);
        }

        innerFunc();

    }
}

let x = new Person();
x.sayName();

Output

25
undefined
Window {}

Hope this helps in improvising your JavaScript code for your Power Platform Implementations

Happy CRM’ing.

Cheers,

PMDY

Download CRM 365 V9.X Tools using PowerShell

Arun Potti's avatarArun Potti's Power Platform blog

Follow the below steps to download the Tools,

Step 1: Create a folder in D Drive and name it as “Dynamics_365_Development_Tools

Step 2: Click on Windows, search for Windows PowerShell and open it.

Windows PowershellStep 3: Type the below command to change the directory.

cd D:Dynamics_365_Development_Tools

and press Enter.

Windows Powershell Command to Change DirectoryStep 4: Copy & Paste the below PowerShell script in PowerShell Window to download tools from Nuget.

$sourceNugetExe = "https://dist.nuget.org/win-x86-commandline/latest/nuget.exe" $targetNugetExe = ".nuget.exe" Remove-Item .Tools -Force -Recurse -ErrorAction Ignore Invoke-WebRequest $sourceNugetExe -OutFile $targetNugetExe Set-Alias nuget $targetNugetExe -Scope Global -Verbose ## ##Download Plugin Registration Tool ## ./nuget install Microsoft.CrmSdk.XrmTooling.PluginRegistrationTool -O .Tools md .ToolsPluginRegistration $prtFolder = Get-ChildItem ./Tools | Where-Object {$_.Name -match 'Microsoft.CrmSdk.XrmTooling.PluginRegistrationTool.'} move .Tools$prtFoldertools*.* .ToolsPluginRegistration Remove-Item .Tools$prtFolder -Force -Recurse ## ##Download CoreTools ## ./nuget install Microsoft.CrmSdk.CoreTools -O .Tools md .ToolsCoreTools $coreToolsFolder = Get-ChildItem ./Tools | Where-Object {$_.Name -match 'Microsoft.CrmSdk.CoreTools.'} move .Tools$coreToolsFoldercontentbincoretools*.* .ToolsCoreTools Remove-Item .Tools$coreToolsFolder -Force -Recurse ## ##Download Configuration Migration ##…

View original post 92 more words

Power platform Plugin design mistakes which often make you mad…!!!

Hello friends,

Below blog details about the common plugin design mistake which often make you spend hours together to troubleshoot….

  1. Make sure you properly verify the filtering attributes are missing
  2. Don’t unnecessarily include all the parameters in the Pre/Post image
  3. Don’t retrieve all the data in your fetch queries
  4. Make sure your operation doesn’t take long time when you were trying to perform any synchronous operation.
  5. Check if any other operation is blocking your action or pushing your action to go next.
  6. Try to use trace log if you were able to call the plugin
  7. In some cases, if you have any issue with the plugin registration tool to profile, alternatively you can put this method of logging to trace out the issue.
  8. Use depth property to prevent infinite loop execution.

Hope you found at least you are able to understand why your plugin doesn’t trigger now.

Thank you…that’s it for today….

Cheers,

PMDY

Call Azure Function from Dynamics 365 CRM using Webhooks

priyeshwagh777's avatarD365 Demystified

This is a vast topic to cover in a blog. But I wanted to write from a bird-eye’s view of how this will pan out in an implementation where you perform a certain operation in Dynamics 365 CRM and an Azure Function is called to perform further operations.

This post is written keeping in mind fair knowledge of Azure Functions, Storage accounts and subscriptions in mind.

I’ll try to keep the article short, so stay with me! 🙂

Create a Function App in Azure

  1. Let’s say you have created a Function App in Azure already and want to connect to Dynamics 365 CRM. Click on the big + New Function button in the screenshot below
    resourceOverview_LI
  2. Now, since I want to keep Visual Studio as my driver for coding and deployment, I’ll create a new Project in Visual Studio of type Azure Functions and click Next
    newProj
  3. On the next page, I’ll…

View original post 560 more words